So, forging helmet bowls from thick plate, similar to the bucket makers. I know this is a topic that a lot of you guys have spent a long time thinking about/messing around with so I'm hoping to get some advice. I have access to a 50lb power hammer, and I'm working on forging a sledge hammer that will be long enough to reach into a helm bowl. Hopefully one of my class mates will make a suitable striker.
There is a lot about the process that I want to straighten out in my mind before I actually start experiments in steel.
First of all, what kind of heat do you think would work best? It looks like the Italian bucket makers have a big gas forge for heating the entire starting blank. This might be possible, but depending on the size of the starting blank, I may not be able to fit it in the gas forge I'll have available. Another option I was thinking of was to build an 8" Eric Thing style forge cone, which I imagine might be suitable at least for heating the top of the vessel once it has some depth. I was thinking it may also work to heat the initial flat blank for drawing out the edges. This approach would just take more heats than the bucket makers, I guess.
It looks like the bucket makers thin the edges of each blank separately and then stack them together to start the dishing/squishing process. Do you think it would work to stack a few blanks before thinning the edges, or would the edge thinning process force them apart?
Also, what would be a good thickness and diameter to start with for a helmet blank? Any tips on where I could track down some good information on the thicknesses of different areas of different extant helms?
Finally, given that I'll have access to a 50lb power hammer and one, maybe two strikers, how many helm blanks do you think I could work at a time? I'm sure it would be best to start small and get a feel for the process, but it would be interesting to see what the hive mind thinks.
Since I'm at school for blacksmithing right now, it should be easier to work this project into the curriculum than it has been for normal armour projects. If it ever gets off the ground, I will be sure to post pictures.
Experimental helmet forging
Re: Experimental helmet forging
Okay, bit of progress on this. I cut out a starting blank of 1/4" plate at a diameter of 12" weighing 8 lbs.
I built a forge cone, but not a frame for it yet, so I just placed it on top of some fire bricks of a dirt floor. This works at my teachers shop, but not at the school shop where we have a concrete floor.

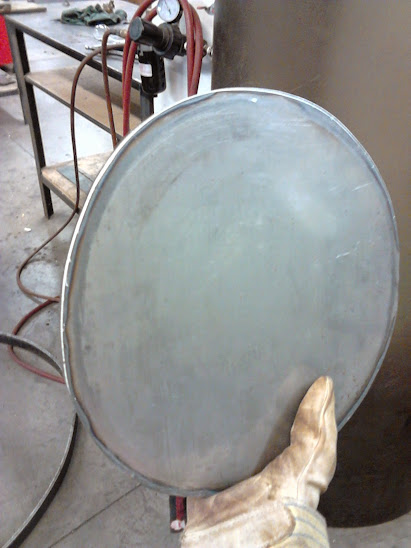
So we made it out to my teachers shop for a day and ran both of his power hammers pretty much all day (a class of 8 people). Got some work done on my helmet blank and my long sledge hammer. The helmet blank is now 14" in diameter, and the average edge thickness looks to be around 1/8". The sledge hammer started off as 1 3/4 round 4130, and it weighs about 7 ponds. After drawing out a neck, it's around 15". Still needs some work before I mount it to a handle, but I've got all the power-hammering done anyway.

Not totally sure how I'm going to proceed from here with the helmet. I'm thinking I might dish it into a swage block, then start working with a striker and the wider face of my sledge hammer. Probably from the outside in? Not sure. I may also need to forge another hammer for me to use one handed while working with a striker. I've got some time to think about this while I finish the sledge hammer and build a frame to go with that forge cone. This time around I'm planning on forging just this one blank by itself. If it goes alright, I might try stacking a few. I'm not sure how exactly I would go about stacking them though. There's a very wide forge at school. Maybe just heat them up in a stack with an extra wide one on the bottom, hammer them together in a dish, them roll the edge of the lowest one over the stack?
I imaging I would need a second striker if I was going to forge a stack.
Here's one of my class mates using the bigger hammer. Someday I need to own one of these. They're amazing.

I built a forge cone, but not a frame for it yet, so I just placed it on top of some fire bricks of a dirt floor. This works at my teachers shop, but not at the school shop where we have a concrete floor.
So we made it out to my teachers shop for a day and ran both of his power hammers pretty much all day (a class of 8 people). Got some work done on my helmet blank and my long sledge hammer. The helmet blank is now 14" in diameter, and the average edge thickness looks to be around 1/8". The sledge hammer started off as 1 3/4 round 4130, and it weighs about 7 ponds. After drawing out a neck, it's around 15". Still needs some work before I mount it to a handle, but I've got all the power-hammering done anyway.
Not totally sure how I'm going to proceed from here with the helmet. I'm thinking I might dish it into a swage block, then start working with a striker and the wider face of my sledge hammer. Probably from the outside in? Not sure. I may also need to forge another hammer for me to use one handed while working with a striker. I've got some time to think about this while I finish the sledge hammer and build a frame to go with that forge cone. This time around I'm planning on forging just this one blank by itself. If it goes alright, I might try stacking a few. I'm not sure how exactly I would go about stacking them though. There's a very wide forge at school. Maybe just heat them up in a stack with an extra wide one on the bottom, hammer them together in a dish, them roll the edge of the lowest one over the stack?
I imaging I would need a second striker if I was going to forge a stack.
Here's one of my class mates using the bigger hammer. Someday I need to own one of these. They're amazing.
-
Tom B.
- Archive Member
- Posts: 4532
- Joined: Mon Oct 17, 2005 4:15 am
- Location: Nicholasville, KY
- Contact:
Re: Experimental helmet forging
Goll's thesis has more thickness data than I have seen anywhere else.
Look in the spreadsheets, I don't have access to my computer until Monday or I would point you to the exact file to look at.
thread with Thesis download link
Look in the spreadsheets, I don't have access to my computer until Monday or I would point you to the exact file to look at.
thread with Thesis download link
Re: Experimental helmet forging
Thanks for the link Tom. That is a seriously hefty document. In briefly skimming through the files, I found the bucket making video in there. Incredible! Much more complete than what I've seen on youtube. That will be most helpful.
I wonder what the liquid they put on the plates before stacking them is. Probably some kind of ceramic coating? I wonder how essential that is...
I wonder what the liquid they put on the plates before stacking them is. Probably some kind of ceramic coating? I wonder how essential that is...
-
Tom B.
- Archive Member
- Posts: 4532
- Joined: Mon Oct 17, 2005 4:15 am
- Location: Nicholasville, KY
- Contact:
Re: Experimental helmet forging
I think they refer to the slurry as "mud" not sure exactly what it is.
It is essential to keep the pieces from sticking together.
It is essential to keep the pieces from sticking together.
Re: Experimental helmet forging
Tableau,
I would recommend breaking the project up into two parts. The fist would be making a single helmet through the "squashing" technique. The second would be doing the same to a stack of blanks.
Realistically, one could spend a lot of time just figuring out how to "squash up" a helmet. There is much to be learned, reinvented, and figured out about this process. If I were a young man again, that's what I would be doing right now.
The mass production thing is very seductive, but it introduces a whole group of new problems in addition to the essential ones.
Mac
Robert MacPherson
The craftsmen of old had their secrets, and those secrets died with them. We are not the better for that, and neither are they.
http://www.lightlink.com/armory/
http://www.billyandcharlie.com
https://www.facebook.com/BillyAndCharlie
The craftsmen of old had their secrets, and those secrets died with them. We are not the better for that, and neither are they.
http://www.lightlink.com/armory/
http://www.billyandcharlie.com
https://www.facebook.com/BillyAndCharlie
Re: Experimental helmet forging
Mac, you're right, of course. I do plan on doing this one on its own. My brain keeps trying to tell me that doing a few blanks at once might be easier though. I'm probably just overlooking the many other complications that would involve. It's a very exciting idea though.
I remember you mentioned you had sketches of the various stages of your squishing experiments buried somewhere. Any idea where those might be?
I remember you mentioned you had sketches of the various stages of your squishing experiments buried somewhere. Any idea where those might be?
Re: Experimental helmet forging
They are in a notebook...somewhere. I'll keep an eye out and post 'em when I find 'em.
Mac
Mac
Robert MacPherson
The craftsmen of old had their secrets, and those secrets died with them. We are not the better for that, and neither are they.
http://www.lightlink.com/armory/
http://www.billyandcharlie.com
https://www.facebook.com/BillyAndCharlie
The craftsmen of old had their secrets, and those secrets died with them. We are not the better for that, and neither are they.
http://www.lightlink.com/armory/
http://www.billyandcharlie.com
https://www.facebook.com/BillyAndCharlie
-
Thomas Powers
- Archive Member
- Posts: 13112
- Joined: Fri Aug 11, 2000 1:01 am
- Location: Socorro, New Mexico
Re: Experimental helmet forging
Remember that the lower temperature limit for forge welding is probably absolut zero---you get things solid phase welding in space after all. Also the hotter you work the steel the easier it works and the closer you are to accidentally making a weld. When I was forging a piece of 2.5" sq stock one in another smiths gas forge near 7000' altitude another person moved their 3/4" rod in the forge and slid it next to mine and that forge welded! we had to take them both out and hammer them apart with a sledge...No flux on either piece!
Re: Experimental helmet forging
Okay, so I'll definitely need to figure out some kind of slurry before trying a stack. I guess it must be made of some kind of ceramic? Probably just something that won't melt at forging temperatures, I would think. Sand is probably too course. Maybe just some clay/water mixture?
-
Tom B.
- Archive Member
- Posts: 4532
- Joined: Mon Oct 17, 2005 4:15 am
- Location: Nicholasville, KY
- Contact:
Re: Experimental helmet forging
I know that Rob Mazza (Zanetto here on the archive) did an experiment raising a pair of helms in a stack. I don't remember what he used to keep them from sticking but I do remember it worked out well for him.
Re: Experimental helmet forging
Watered down clay or simply mud, dirt should work, but as Mac said, before stacking try to make it work with one blank.
Re: Experimental helmet forging
When I raised the stack of (2) helmets, I painted watered down drywall compound (gypsum) between the plates. I would stay away from sand as that is sometimes used as a flux in forge welding.
My helmets did not weld together probably because I wasn't getting them super hot and because I shaped them by raising rather than directly hitting the inside of the blank on an anvil.
The helmets were difficult to separate but that was because I worked then to an almost finished state before trying to separate them.
Here is a photo sequence of my process:
http://s186.photobucket.com/user/zanett ... %20Project
Cheers,
Rob
Re: Experimental helmet forging
Nice hat(s) Rob! I am not at all surprised to hear you had trouble getting them apart.
Mac
Mac
Robert MacPherson
The craftsmen of old had their secrets, and those secrets died with them. We are not the better for that, and neither are they.
http://www.lightlink.com/armory/
http://www.billyandcharlie.com
https://www.facebook.com/BillyAndCharlie
The craftsmen of old had their secrets, and those secrets died with them. We are not the better for that, and neither are they.
http://www.lightlink.com/armory/
http://www.billyandcharlie.com
https://www.facebook.com/BillyAndCharlie
-
Thomas Powers
- Archive Member
- Posts: 13112
- Joined: Fri Aug 11, 2000 1:01 am
- Location: Socorro, New Mexico
Re: Experimental helmet forging
I like including an easy to hold handle in the piece!
As for a coating, if you want to get fancy, clay slip from a ceramics supply store would probably work---probably need to be diluted more as well.
Definitely not quartz sand as it will melt and stick at forging temps! (as well as splash when the item is struck hot.)
As for a coating, if you want to get fancy, clay slip from a ceramics supply store would probably work---probably need to be diluted more as well.
Definitely not quartz sand as it will melt and stick at forging temps! (as well as splash when the item is struck hot.)
Re: Experimental helmet forging
Clay slip. Sounds like a good idea. I should ask the ceramics department about that.
Nice work rob! Raising two hats at once. Interesting idea.
Nice work rob! Raising two hats at once. Interesting idea.
Re: Experimental helmet forging
I got the idea from Fuller's book on coppersmithing where he talks about raising copper hemispheres for ball floats by stacking and raising both halves at once. Two sheets of 16 gauge steel equals 1/8", which is pretty unwieldy in an 18" diameter blank of steel until you get some volume to it.
What I really want to do is what you are attempting, that is forge helmet skulls from thick plate. Then try the stacking of the blanks. I think Patrick Thaden made some sallets this was a number of years ago.
Cheers,
Rob
What I really want to do is what you are attempting, that is forge helmet skulls from thick plate. Then try the stacking of the blanks. I think Patrick Thaden made some sallets this was a number of years ago.
Cheers,
Rob
-
wcallen
- Archive Member
- Posts: 4777
- Joined: Mon Oct 29, 2001 2:01 am
- Location: North Carolina, USA
- Contact:
Re: Experimental helmet forging
Yes, Patrick... along with someone... made a stack of bowls for some simple c1500 bowls for the cheap salades with a separate tail and brow plate.
Later he worked with someone else to play with some little breastplates in the same way. They were using a big striker hammer, not a power hammer. Both experiments seem to have worked. He wasn't working all that thick material, but I don't remember how thick it was.
Wade
Later he worked with someone else to play with some little breastplates in the same way. They were using a big striker hammer, not a power hammer. Both experiments seem to have worked. He wasn't working all that thick material, but I don't remember how thick it was.
Wade
-
Tom B.
- Archive Member
- Posts: 4532
- Joined: Mon Oct 17, 2005 4:15 am
- Location: Nicholasville, KY
- Contact:
Re: Experimental helmet forging
Patrick and Ralph Snell did make a couple of test pieces if I remember correctly.
Edit: Found the thread (also the same thread with Mac's pewter disk pics)
Dishing steel... on a flat anvil?
Edit: Found the thread (also the same thread with Mac's pewter disk pics)
Dishing steel... on a flat anvil?
-
Tom B.
- Archive Member
- Posts: 4532
- Joined: Mon Oct 17, 2005 4:15 am
- Location: Nicholasville, KY
- Contact:
Re: Experimental helmet forging
There also is this thread:
Austrian Coppersmiths - Water powered hammer
It has links to many relevant videos on working with stacked blanks.
Austrian Coppersmiths - Water powered hammer
It has links to many relevant videos on working with stacked blanks.
Re: Experimental helmet forging
Yes! Thanks Tom. I was looking for that thread a while back, but I didn't really remember enough to track it down. Very interesting stuff.
Re: Experimental helmet forging
I found the notebook in question and made pics of the relevant pages and put them in this album. https://picasaweb.google.com/1074249789 ... directlink I am sorry the notes are so cryptic and my writing is so bad. Measurements are in thousandths of an inch.Tableau wrote:Mac [snip]
I remember you mentioned you had sketches of the various stages of your squishing experiments buried somewhere. Any idea where those might be?
I should put some pics of the miniature helmets that the notes refer to in that album as well.....perhaps later today or in the next day or so.
Mac
Robert MacPherson
The craftsmen of old had their secrets, and those secrets died with them. We are not the better for that, and neither are they.
http://www.lightlink.com/armory/
http://www.billyandcharlie.com
https://www.facebook.com/BillyAndCharlie
The craftsmen of old had their secrets, and those secrets died with them. We are not the better for that, and neither are they.
http://www.lightlink.com/armory/
http://www.billyandcharlie.com
https://www.facebook.com/BillyAndCharlie
-
Tom B.
- Archive Member
- Posts: 4532
- Joined: Mon Oct 17, 2005 4:15 am
- Location: Nicholasville, KY
- Contact:
Re: Experimental helmet forging
You attached some in this thread back before you figured out PicasaMac wrote:
I should put some pics of the miniature helmets that the notes refer to in that album as well.....perhaps later today or in the next day or so.
Mac
viewtopic.php?f=1&t=78036
Re: Experimental helmet forging
Quite so, Tom. Thanks!
I have copied those pics into the album with the notebook pages. https://picasaweb.google.com/1074249789 ... directlink
Mac
I have copied those pics into the album with the notebook pages. https://picasaweb.google.com/1074249789 ... directlink
Mac
Robert MacPherson
The craftsmen of old had their secrets, and those secrets died with them. We are not the better for that, and neither are they.
http://www.lightlink.com/armory/
http://www.billyandcharlie.com
https://www.facebook.com/BillyAndCharlie
The craftsmen of old had their secrets, and those secrets died with them. We are not the better for that, and neither are they.
http://www.lightlink.com/armory/
http://www.billyandcharlie.com
https://www.facebook.com/BillyAndCharlie
-
Patrick Thaden
- Archive Member
- Posts: 644
- Joined: Thu May 24, 2001 1:01 am
- Location: Denton TX, USA
- Contact:
Re: Experimental helmet forging
Here are some pics from Ralph and I playing with stacked raising. I'll add some additional pics in the following posts as it says I can only attach 3 at a time. I'll add some of my thoughts to the process as well.
- hat01.jpg (47 KiB) Viewed 73375 times
- hat02.jpg (49.66 KiB) Viewed 73375 times
- hat03.jpg (38.95 KiB) Viewed 73375 times
-
Patrick Thaden
- Archive Member
- Posts: 644
- Joined: Thu May 24, 2001 1:01 am
- Location: Denton TX, USA
- Contact:
Re: Experimental helmet forging
- hat04.jpg (51.55 KiB) Viewed 73375 times
- hat05.jpg (54.23 KiB) Viewed 73375 times
- hat06.jpg (35.08 KiB) Viewed 73375 times
Re: Experimental helmet forging
Sweet! Thanks patrick. That looks awesome. A few questions though: did you guys use some kind of ceramic coating as a release between layers? How big is that sledge hammer? It looks huge!
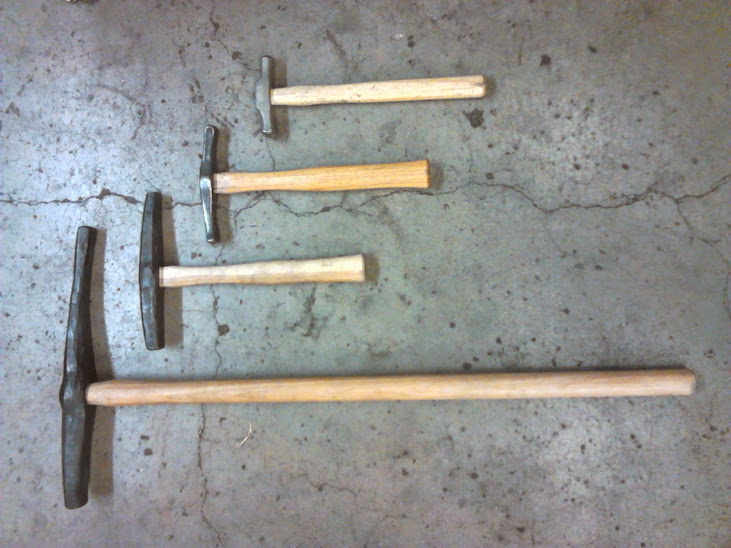
Today I finished two hammers that I plan to use for this. My first hammer (from the bottom) I posted earlier. It's a 7 pound sledge. I wish it's proportions were closer to it's little brother's, but it should still work fine. My second hammer is the one handed squishing hammer to be used by the guy with the tongs. It's 3 pounds, not including the handle, which makes it a bit heavier than my standard cross-pein. I forged it by myself out of 1 3/16 round. That was a bad idea. I should have gotten help from a striker.
The third one is the raising hammer I made earlier, for a sense of scale. It weighs a hair under 2 pounds, including its handle. The fourth hammer is not one I made. It's a raising hammer I bought off the hammer source. It weighs about the same as my raising hammer.
Next step is to wait for my student loans to come in so I can buy the steel to build a stand for my forge burner. Should happen mid next week.
Last edited by Tableau on Fri Oct 31, 2014 9:52 pm, edited 1 time in total.
-
Patrick Thaden
- Archive Member
- Posts: 644
- Joined: Thu May 24, 2001 1:01 am
- Location: Denton TX, USA
- Contact:
Re: Experimental helmet forging
- hat07.jpg (52.72 KiB) Viewed 73369 times
- hat08.jpg (51.74 KiB) Viewed 73369 times
-
Patrick Thaden
- Archive Member
- Posts: 644
- Joined: Thu May 24, 2001 1:01 am
- Location: Denton TX, USA
- Contact:
Re: Experimental helmet forging
I've got two long faced hammers both around 8-9 lbs. Both made for this experiment. One thing if doing the stack method, you will need to use a furnace, not a forge, you really need to get the whole stack hot. We found this out trying a larger full scale stack of discs that were never finished due to not having a furnace large enough....I've got a good furnace to do that now though....may have to find someone wanting to play again....
Re: Experimental helmet forging
Wow, that looks like it works really well. What thickness is your starting material?
I would definitely like to see the stacked breast plates. I've been wondering if that would be possible. Also, do you have pictures/details on your furnace?
I would definitely like to see the stacked breast plates. I've been wondering if that would be possible. Also, do you have pictures/details on your furnace?
Last edited by Tableau on Sat Nov 01, 2014 8:39 pm, edited 1 time in total.
Re: Experimental helmet forging
Oddly, people have been lamenting "cookie cutter" portrayals for years, where everyone copies the same thing.
ferrum ferro acuitur et homo exacuit faciem amici sui
-
wcallen
- Archive Member
- Posts: 4777
- Joined: Mon Oct 29, 2001 2:01 am
- Location: North Carolina, USA
- Contact:
Re: Experimental helmet forging
Again, oddly... the helmets that they produced from Patrick's stack were not cookie-cutter results. They used this as a way to produce the raw volume needed to get steel to cover the head.Ernst wrote:Oddly, people have been lamenting "cookie cutter" portrayals for years, where everyone copies the same thing.
Wade
Re: Experimental helmet forging
Patrick,
How thick were the pieces you put into the stack? Did you thin the edges in any way? Looks like it was a lot of fun. Been wanting to try this for quite some time.
Thanks,
Rob
How thick were the pieces you put into the stack? Did you thin the edges in any way? Looks like it was a lot of fun. Been wanting to try this for quite some time.
Thanks,
Rob
-
Patrick Thaden
- Archive Member
- Posts: 644
- Joined: Thu May 24, 2001 1:01 am
- Location: Denton TX, USA
- Contact:
Re: Experimental helmet forging
For the small hats we did we used some 1/8" thick plate, we did thin the edges down to about 16gauge. When we were done we cut one in half and found it to be really quite uniform from the center out to the edges thickness wise. If I recall it was about 107 deg F outside that day, it was actually cooler in the sun than in the shop. But it was fun. One early experiment I did was with a 4" X 4" X1" thick steel block, it moved great under the hammer till I got the diameter out to around 8" as the thickness was reduced I found I was spending probably more time heating than hammering and loosing a lot of material to scale. With the bucket stack the heat holds for a long time, we found we were wearing out our arms quicker than we were loosing heat in the stack. We also found when we seperated the stack we lost NO material to scale on the inner plates, they were actually cleaner coming out than the rusty nasty scaled metal we put in. There wasn't even heat discoloration other than around the very edge of the plates. We ran them temp wise about as hot as we could get them, not quite up to a white heat, but we wanted the metal to really move, and that it did. We were also quite sloppy with the hammer technique with many random blows happening, the blanks were quite lumpy looking but it really didn't seem to matter. I really don't believe this technique of stacked raising like this was being used much before the late 15th century though. I'm thinking the black sallets may have been some of the first to utilize this technique. Prior to this though I think it likely they were being done from single plates similar to what Mac was playing with in the tin disc experiments.
-
Patrick Thaden
- Archive Member
- Posts: 644
- Joined: Thu May 24, 2001 1:01 am
- Location: Denton TX, USA
- Contact:
Re: Experimental helmet forging
I'm not sure you would even need to start with plates that were anywhere uniform in thickness. This process seems to help even things out. Also if you know the weight of the starting piece you could pretty well figure that will be the final weight on your bowl, so no need to guage thickness on your blanks, just get a hunk of iron about the right weight and pound it to roughly correct start size. One thing I recall from when I was looking more into this was the shift in weight from a more typical sallet to the weights on black sallets, also when comparing the interior shots of the more typical sallets to those of a black sallet you can see they have very different types of marks.
Edited to add...
I think our experiment took us around 5 hours for the 5 blanks and another 5 hours to finish two of them out. This was our first real experiment with it and we also had numerous issues including figuring out the best way to heat them, again a furnace seems to be a must. I think if one had a bit of practice and 2 competent hammer men one could knock out 20 helmet sized blanks in a day