Mac's blog

This forum is designed to help us spread the knowledge of armouring.
Mac
Archive Member
Posts: 9953
Joined: Thu Jan 04, 2001 2:01 am
Location: Jeffersonville, PA

Re: Mac's blog

Post by Mac »

I've gone back and darkened the notes. I really don't like to use pen on templates but that seems to be the only way here.

This is an overall shot of all the templates. I don't seem to have really gotten the camera centered and square. In addition, there is a bit of "barrel" distortion. This will not be a problem for the guy who use analog conversion, and I trust it will present delightful challenges to the guys who want a digital solution.

Image

What follows is individual pics of each template. These are taken with the camera under a tripod, and nothing about the set up changes.

Image

Image

Image

Image

Image

I fixed the omission mentioned in the original post and re-shot the whole lot to be sure that everything was the same about the individual template pics.

Mac
Robert MacPherson

The craftsmen of old had their secrets, and those secrets died with them. We are not the better for that, and neither are they.

http://www.lightlink.com/armory/
http://www.billyandcharlie.com
https://www.facebook.com/BillyAndCharlie
User avatar
Keegan Ingrassia
Archive Member
Posts: 6423
Joined: Thu Jul 16, 2009 4:07 pm
Location: College Station, Texas (Shadowlands)

Re: Mac's blog

Post by Keegan Ingrassia »

Thanks for sharing, Mac! The notes you've included on them are as useful as the profiles themselves.
"There is a tremendous amount of information in a picture, but getting at it is not a purely passive process. You have to work at it, but the more you work at it the easier it becomes." - Mac
Mac
Archive Member
Posts: 9953
Joined: Thu Jan 04, 2001 2:01 am
Location: Jeffersonville, PA

Re: Mac's blog

Post by Mac »

I'm finally returning to the Gothic gauntlet project.

After a certain amount of faffing about to try to remember what I was doing, I produced a test piece for one of the brass fleur de lis plates. This is just a "path finder", but I think I know where I'm going now.

Image

Using two different "stepping off punches", I laid out the locations for punching out the holes. The punch marks are set on lines scribed on the surfaces of the plates. The row of punch marks along the edge are also on a line, but they were spaced by eye.

ImageImage

The first holes are 3/32". I bought a new punch set for these in hopes that fresh tooling would minimize the distortion of the plates.

Image

The holes nearer the edge were punched with 5/32". These will be the spaces between the points of the fleurs.

Image

A countersink in the drill press chamfers off the holes. This will give me a jump on some of the file work.

I used a sanding disc to open up the big holes at the edge. In addition to saving some file work, this will make the pieces less likely to stab and cut my while I am working on them later.

Image

Image
These centerpunch marks were just eyeballed. I hope that does not get me in too much trouble. They come out with a 1/16" punch.

ImageImage

At this point, I was afraid I would get too far ahead of myself, so I roughed out the pieces for the lower cuff plate....

Image

... and brought them to the same state as the others.

Image

The material within the three punches was removed with this dinky chisel.

Image

That's all for tonight. My back and shoulders hurt.

Mac
Robert MacPherson

The craftsmen of old had their secrets, and those secrets died with them. We are not the better for that, and neither are they.

http://www.lightlink.com/armory/
http://www.billyandcharlie.com
https://www.facebook.com/BillyAndCharlie
Indianer
Archive Member
Posts: 598
Joined: Fri Nov 06, 2015 8:07 am
Location: Northern Germany

Re: Mac's blog

Post by Indianer »

Mac wrote: Sat Oct 06, 2018 12:38 pm
Aussie Yeoman wrote:Spitballing alert:

I'd love to see a heatmap of hammer strikes on some plates. Especially in this case the metacarpal and the cuff. The cuff appears to have a very small amount of dorsal concave curvature, but each end, especially the back, far more so. I know this is just a particular anticlastic curve, and I can do anticlastic, but my party informed effort is far more effort is far higher than your expertly informed effort, I'm sure. Sometimes I think it'd be helpful to see a roadmap of where the path of hammer strikes goes.

This could be an exercise not worth the effort though.
I could take a closer pics of the various elements by themselves if you would like.
....
The cuff is certainly the most complex thing here. After some general shaping over the anvil horn, I used a rawhide mallet and a concave bickhorn to put in some of the "waist". The bulk of the work has been flaring the area from the center to the point with a crosspeen. and then using whatever hammer from whatever side to get the work to be smooth and continuous. The crest line is built up with some crosspeen blows to either side, adn then knocked back from the outside over a stake. This is all rough for now, and will need a lot more attention before the fluting happens.

Mac
I have been revisiting the gauntlet posts this morning. The wrapper was made pretty much the same way you shaped the cuff, right?

So to be clear: where the cuff flares out into the point you stretched the metal by hitting with the long axis of the cross-peen parallel to the center crease?

|||!||| | hammer marks ! Crease

Much obliged!!
Indi
Mac
Archive Member
Posts: 9953
Joined: Thu Jan 04, 2001 2:01 am
Location: Jeffersonville, PA

Re: Mac's blog

Post by Mac »

Indianer wrote: Thu Nov 04, 2021 2:07 am

I have been revisiting the gauntlet posts this morning. The wrapper was made pretty much the same way you shaped the cuff, right?
What are you calling the "wrapper"? :?
Indianer wrote: Thu Nov 04, 2021 2:07 am
So to be clear: where the cuff flares out into the point you stretched the metal by hitting with the long axis of the cross-peen parallel to the center crease?

|||!||| | hammer marks ! Crease

Yes. That's more or less right.

Mac
Robert MacPherson

The craftsmen of old had their secrets, and those secrets died with them. We are not the better for that, and neither are they.

http://www.lightlink.com/armory/
http://www.billyandcharlie.com
https://www.facebook.com/BillyAndCharlie
Indianer
Archive Member
Posts: 598
Joined: Fri Nov 06, 2015 8:07 am
Location: Northern Germany

Re: Mac's blog

Post by Indianer »

Mac wrote: Thu Nov 04, 2021 10:16 am
Indianer wrote: Thu Nov 04, 2021 2:07 am

I have been revisiting the gauntlet posts this morning. The wrapper was made pretty much the same way you shaped the cuff, right?
What are you calling the "wrapper"? :?

Mac
What you called the "lower cuff plate". Also heard it being called the "Door". Don't like that one.
Mac
Archive Member
Posts: 9953
Joined: Thu Jan 04, 2001 2:01 am
Location: Jeffersonville, PA

Re: Mac's blog

Post by Mac »

The distortion from yesterday's punching was pretty much what I expected. Not only had the fleur-de-lis plates flattened, but the edges which saw the most punching stretched a bit. The result was that even when I restored the curve, the "plan" was no longer correct.

Image

To restore the "plan" I needed to stretch the other edge. I laid the plates on the slightly curved surface of a rail, and struck a series of even blows along the length of the edge with a straight peen hammer.

ImageImage

It worked OK, and the edges match up again.

Image

The next step was to turn the holes into "beans". This mostly involved a "mouse tail" file and a small half round. These were among the files I bought at the last "Cabin Fever Expo", just before the Pandemic.

Image

This is what they look like this evening.

Image

All six of them are at this stage now.

Image

Tomorrow I will start in on the fleurs.

Mac
Robert MacPherson

The craftsmen of old had their secrets, and those secrets died with them. We are not the better for that, and neither are they.

http://www.lightlink.com/armory/
http://www.billyandcharlie.com
https://www.facebook.com/BillyAndCharlie
User avatar
Armadillo
Archive Member
Posts: 652
Joined: Thu Aug 10, 2000 1:01 am
Location: Seattle, WA USA

Re: Mac's blog

Post by Armadillo »

It's a small detail in the whole process, but the idea to countersink the holes to reduce filework later is splendid.
-A.
Mac
Archive Member
Posts: 9953
Joined: Thu Jan 04, 2001 2:01 am
Location: Jeffersonville, PA

Re: Mac's blog

Post by Mac »

Indianer wrote: Thu Nov 04, 2021 1:49 pm
Mac wrote: Thu Nov 04, 2021 10:16 am
Indianer wrote: Thu Nov 04, 2021 2:07 am

I have been revisiting the gauntlet posts this morning. The wrapper was made pretty much the same way you shaped the cuff, right?
What are you calling the "wrapper"? :?

Mac
What you called the "lower cuff plate". Also heard it being called the "Door". Don't like that one.
Ah! I get it.

Yes. The process is fundamentally the same except that there is not central crest to build up. Also, the lower cuff plate is a lot smaller, which means that it is easier and faster to shape. The number of required hammer blows does not go up at the same rate as the increase in surface. It feels like it goes up with something like the square of the area.

Mac
Robert MacPherson

The craftsmen of old had their secrets, and those secrets died with them. We are not the better for that, and neither are they.

http://www.lightlink.com/armory/
http://www.billyandcharlie.com
https://www.facebook.com/BillyAndCharlie
Mac
Archive Member
Posts: 9953
Joined: Thu Jan 04, 2001 2:01 am
Location: Jeffersonville, PA

Re: Mac's blog

Post by Mac »

Armadillo wrote: Fri Nov 05, 2021 4:07 pm It's a small detail in the whole process, but the idea to countersink the holes to reduce filework later is splendid.
-A.
Thanks! It does not save a lot of file work, but it saves some, and it's easy to do.

Mac
Robert MacPherson

The craftsmen of old had their secrets, and those secrets died with them. We are not the better for that, and neither are they.

http://www.lightlink.com/armory/
http://www.billyandcharlie.com
https://www.facebook.com/BillyAndCharlie
Mac
Archive Member
Posts: 9953
Joined: Thu Jan 04, 2001 2:01 am
Location: Jeffersonville, PA

Re: Mac's blog

Post by Mac »

Today's activity started with using the Dremel and a cut off wheel to remove more material from the fleurs. For delicat work, I like to use the real Dremel 409 discs, rather than the cheaper knockoffs. The cheepys tend to have oversized holes and they don't center accurately.

Image

The Dremel is fundamentally a left handed tool. If you use it right handed, it throws dust in your face. Even though I'm using is left handed, and the dust is going away from me, I still wear a respirator.

This is the last thing a bit of brass sees....

Image

Here is what a plate looks like after that process.

Image

All six of them.

Image

After annealing all of the plates, I took them to the belt sander to remove the tool marks from yesterday's hammer correction.

Image

Center punch marks at the bases of the fleur stems....

Image

...mark the locations for the three sided punch.

Image

I think these are really supposed to be cut with a graver, but I have not figured out how to get the right effect that way. So.. I'm punching them. .

Image

It takes about an hour to get to here from the Dremel stage. I used the clamp to hold the work, and five different files to chamfer the edges.

Image

Tomorrow I'll do the other five. After that they will still be rather rough, and there will be more clean up.

Mac
Robert MacPherson

The craftsmen of old had their secrets, and those secrets died with them. We are not the better for that, and neither are they.

http://www.lightlink.com/armory/
http://www.billyandcharlie.com
https://www.facebook.com/BillyAndCharlie
User avatar
Scott Martin
Archive Member
Posts: 1074
Joined: Wed May 23, 2012 3:34 pm
Location: Calgary AB, Canada
Contact:

Re: Mac's blog

Post by Scott Martin »

Hey Mac, I'll try to post my process. I think that I save a bunch of time because I use a jewelers saw to cut the shapes where I need them instead of doing (a lot of) stock removal. I haven't been beveling the fleurs as much as you have, and find that the polish step pulls down a lot of the "corners" but I haven't taken a close look at the originals so your method may be more authentic. I *did* take to some of the filing, since it helps define the fleurs a bit better.

I'm curious why you are doing the edge roll *after* the fleurs. I have been shaping the pieces and edge rolling and then adding the fleurs, because if I muff the edge roll I waste a LOT of work. I *never* irretrievably screw up the fleurs, but I do occasionally mis-strike with the hammer on a roll to the extent that I can't clean it up, which is why I am going with this methodology.

As for your observation with the graver, I will propose a variation of Occam's Razor, which I paraphrase as Mac's Chisel: "When in doubt, do it the easiest possible way. If it works, that's probably what was done." I anticipate that the actual triangles were put in with a tool similar to what you are using, but skipping the center punch in the first place. Your (Dremel) graver is *approximating* the look of a real graver, many of which are basically a long triangular punch. The "triangles" you are making could easily be made (with very crisp edges) by using a shortened (or broken) graver and striking it like a center punch into those base areas.

Some good high level detail here:
https://www.ganoksin.com/article/engrav ... eparation/
And a good pic from that site showing graver profiles:
Image
B and C are the most commonly used in my experience (Knife Graver)
And an example of what these tools look like from the side:
Image

So a "fat" graver with a profile similar to "B" in the first picture struck as a center punch would give you the triangle you are looking for with crisp edges and a triangular pyramid shape as the "well". I don't know if that matches the profile of the originals, JAG may be able to shed some light on that since he has examined many of them in detail, or possibly Tom B (having photographed so many)

Scott
User avatar
Christian Wiedner
Archive Member
Posts: 263
Joined: Wed Mar 18, 2009 7:33 pm
Location: Germany
Contact:

Re: Mac's blog

Post by Christian Wiedner »

Scott Martin wrote: Sat Nov 06, 2021 11:55 am
I'm curious why you are doing the edge roll *after* the fleurs. I have been shaping the pieces and edge rolling and then adding the fleurs, because if I muff the edge roll I waste a LOT of work. I *never* irretrievably screw up the fleurs, but I do occasionally mis-strike with the hammer on a roll to the extent that I can't clean it up, which is why I am going with this methodology.

You are aware the roped edge is another layer?
Ilkka Salokannel
Archive Member
Posts: 265
Joined: Mon Nov 09, 2015 3:35 pm
Location: Burnaby BC

Re: Mac's blog

Post by Ilkka Salokannel »

Hi all:

I want to know how Scott is doing it all in one piece.

Stay safe, ya'all.
User avatar
Scott Martin
Archive Member
Posts: 1074
Joined: Wed May 23, 2012 3:34 pm
Location: Calgary AB, Canada
Contact:

Re: Mac's blog

Post by Scott Martin »

Hi Christian - Apparently I am *not* aware of this, since that would make attachment challenging.

I am among the (likely majority) of folks who is trying to build armour without access to the originals that I am most interested n, and while I had a visit planned, COVID has caused travel plans to be suspended. On the flip side I am happy to expose my Ignorance, since that is the only way to learn - and more importantly to avoid spreading disinformation!

It would be great if you (or someone else who knows better than I) could provide a description of the layers that are built up to make these cuff edges and any evidence / tooling arks that suggest how they were assembled. I am particularly interested in how the layers are attached to one another, and then to the steel of the gauntlet.

I shall endeavor to have some material up later today on my assembly technique: much is (deliberately) modern as I am trading authenticity for speed (and Mac has vastly better filework than I do).

Scott
User avatar
Chris Gilman
Archive Member
Posts: 2467
Joined: Fri Oct 18, 2002 1:01 am
Location: Sylmar CA.
Contact:

Re: Mac's blog

Post by Chris Gilman »

Scott,
I'd like to suggest you start a separate thread with your approach on this.
User avatar
Scott Martin
Archive Member
Posts: 1074
Joined: Wed May 23, 2012 3:34 pm
Location: Calgary AB, Canada
Contact:

Re: Mac's blog

Post by Scott Martin »

Chris - can do, but I will put in my edge work comparison (briefly) since that is germane to the current discussion. Mac and I both use a rule and spacing punch to get our holes in the right place, I use a jewelers saw to make my "hearts" the right shape, and I then use the saw to get the "points" for my fleur-de-lis, instead of ginding and filing. I'l go into depth on a separate thread (rather than hijacking this one) but here are a coupe of pictures (clicking should allow you to get a high res pic)

Image Image
First image shows the use of the spacing punch, punching holes and making (bad) hearts. The second photo shows the progression (and nicer hearts with better curves instead of straight bases) along with the "cuts" in for the tops of the fleur-de-lis followed by cutting out the excess material. Progress is from the bottom to the top in this picture, with the top (hand) plate being nearly finished. My current process gives more "volume" to the side "leaves" of the fleurs by using a different arc for the top and bottom, as well as cutting the top "point" as a point instead of the parallel lines and then filing down. You will need to click through on the second image to see the intermediate cutwork, the low-res blends it out but I don't want to start dominating this thread with my pics since this is a "side comment".

Final results are similar, I'll likely steal Mac's countersink since it gives better 3D shape with minimal work. Once I have the (flat) shape shown here I will spend a small amount of time filing to get a nicer edge profile (as Mac does) but I don't spend much time filing to shape.

Scott
Mac
Archive Member
Posts: 9953
Joined: Thu Jan 04, 2001 2:01 am
Location: Jeffersonville, PA

Re: Mac's blog

Post by Mac »

I've just got a quick and poorly documented update for today.

The fleur del lys are pretty much all shaped up except for the ones at the ends of the strips. I still need to decide how to handle those. I also need to have an idea about how I am going to polish the filed edges, especially the ones in the "beans". The part where I am leaning toward a solution involving the Dremel tool and polishing discs makes me wonder (again) if the real ones were done using something like a gem cutter's lathe.

Image

All six of the plates are bolted in place with 3/32" (2.4mm) bolts. I thought about waiting till I had the roping done and assembling everything at once, but that seemed like a goat fuck difficult and frustrating thing to attempt.

Image


I really hate working with such small fasteners. The nuts are hard to handle without dropping them all the time. When I go to put the roping on, I will need longer bolts... so I better order some up so I'll have them when I need them. Tomorrow, I'll start in on the roping.

Mac
Robert MacPherson

The craftsmen of old had their secrets, and those secrets died with them. We are not the better for that, and neither are they.

http://www.lightlink.com/armory/
http://www.billyandcharlie.com
https://www.facebook.com/BillyAndCharlie
Ilkka Salokannel
Archive Member
Posts: 265
Joined: Mon Nov 09, 2015 3:35 pm
Location: Burnaby BC

Re: Mac's blog

Post by Ilkka Salokannel »

Hi Mac:

This is awesome. You are awesome.

Thank you for taking the time to post how these delicate parts are done.

Ilkka
Tom B.
Archive Member
Posts: 4532
Joined: Mon Oct 17, 2005 4:15 am
Location: Nicholasville, KY
Contact:

Re: Mac's blog

Post by Tom B. »

Scott Martin wrote: Sun Nov 07, 2021 11:13 am Hi Christian - Apparently I am *not* aware of this
Scott,

Look through the images in Goll's thesis he has some good photos of A62 that show that the various latten borders are made in 2 layers.

You also can see here (KHM page for A58 gauntlets):
https://www.khm.at/objektdb/detail/547358/
Mac
Archive Member
Posts: 9953
Joined: Thu Jan 04, 2001 2:01 am
Location: Jeffersonville, PA

Re: Mac's blog

Post by Mac »

I've more or less finalized the procedure for the roping, and made up the first of the six pieces.

The stock is 1/4 x .064" (6mm x 1.6mm) brass. It's half-hard as it comes out of the package, so I begin by annealing.

Image

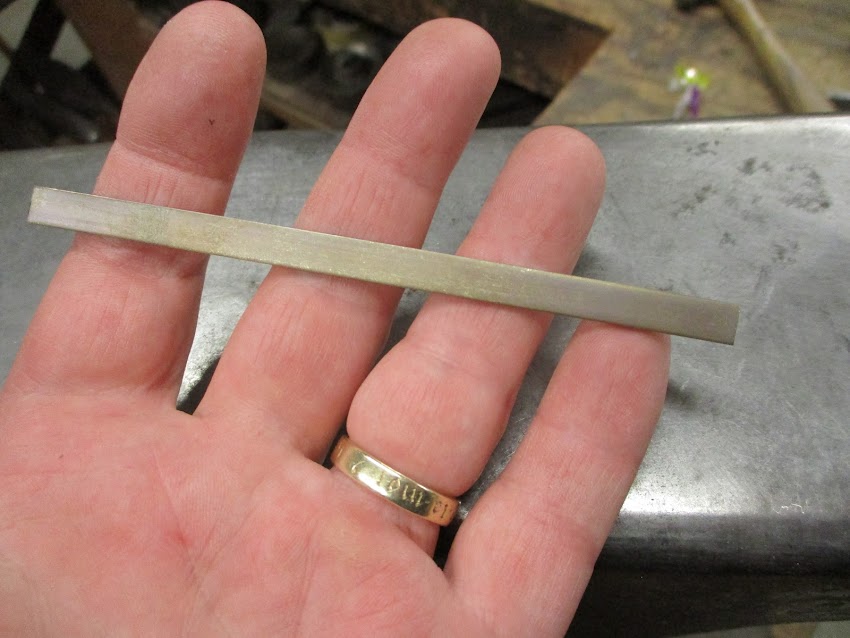
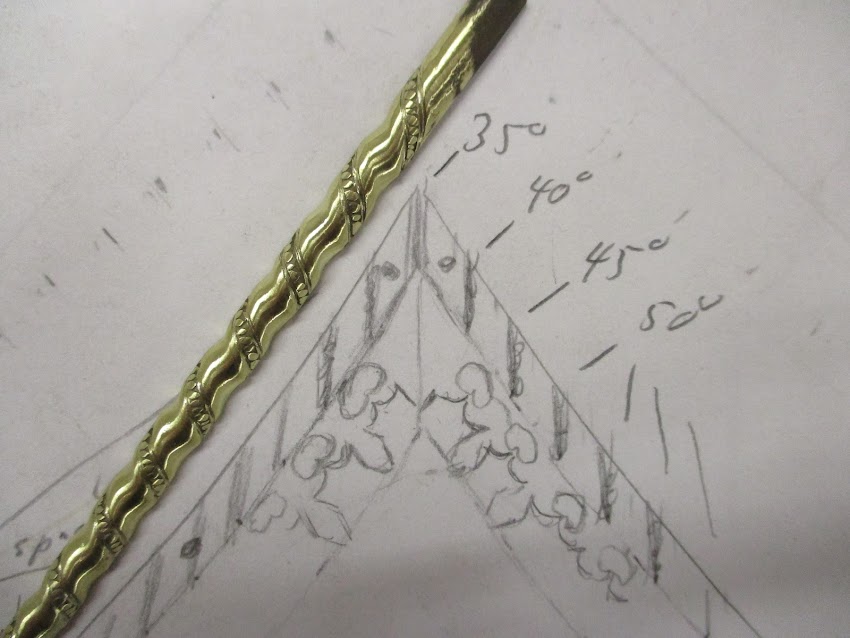
This leaves an oxide layer that takes pencil and scribes well. Here, I am laying out a 50° line every 5/16" (8.5mm).

Image

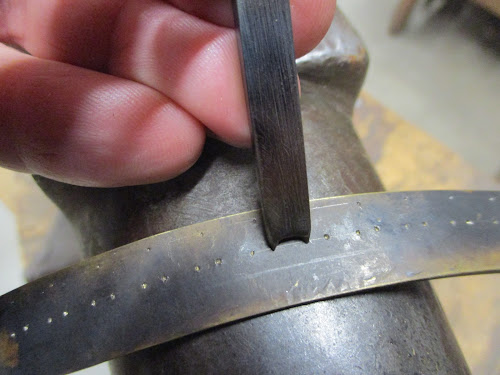
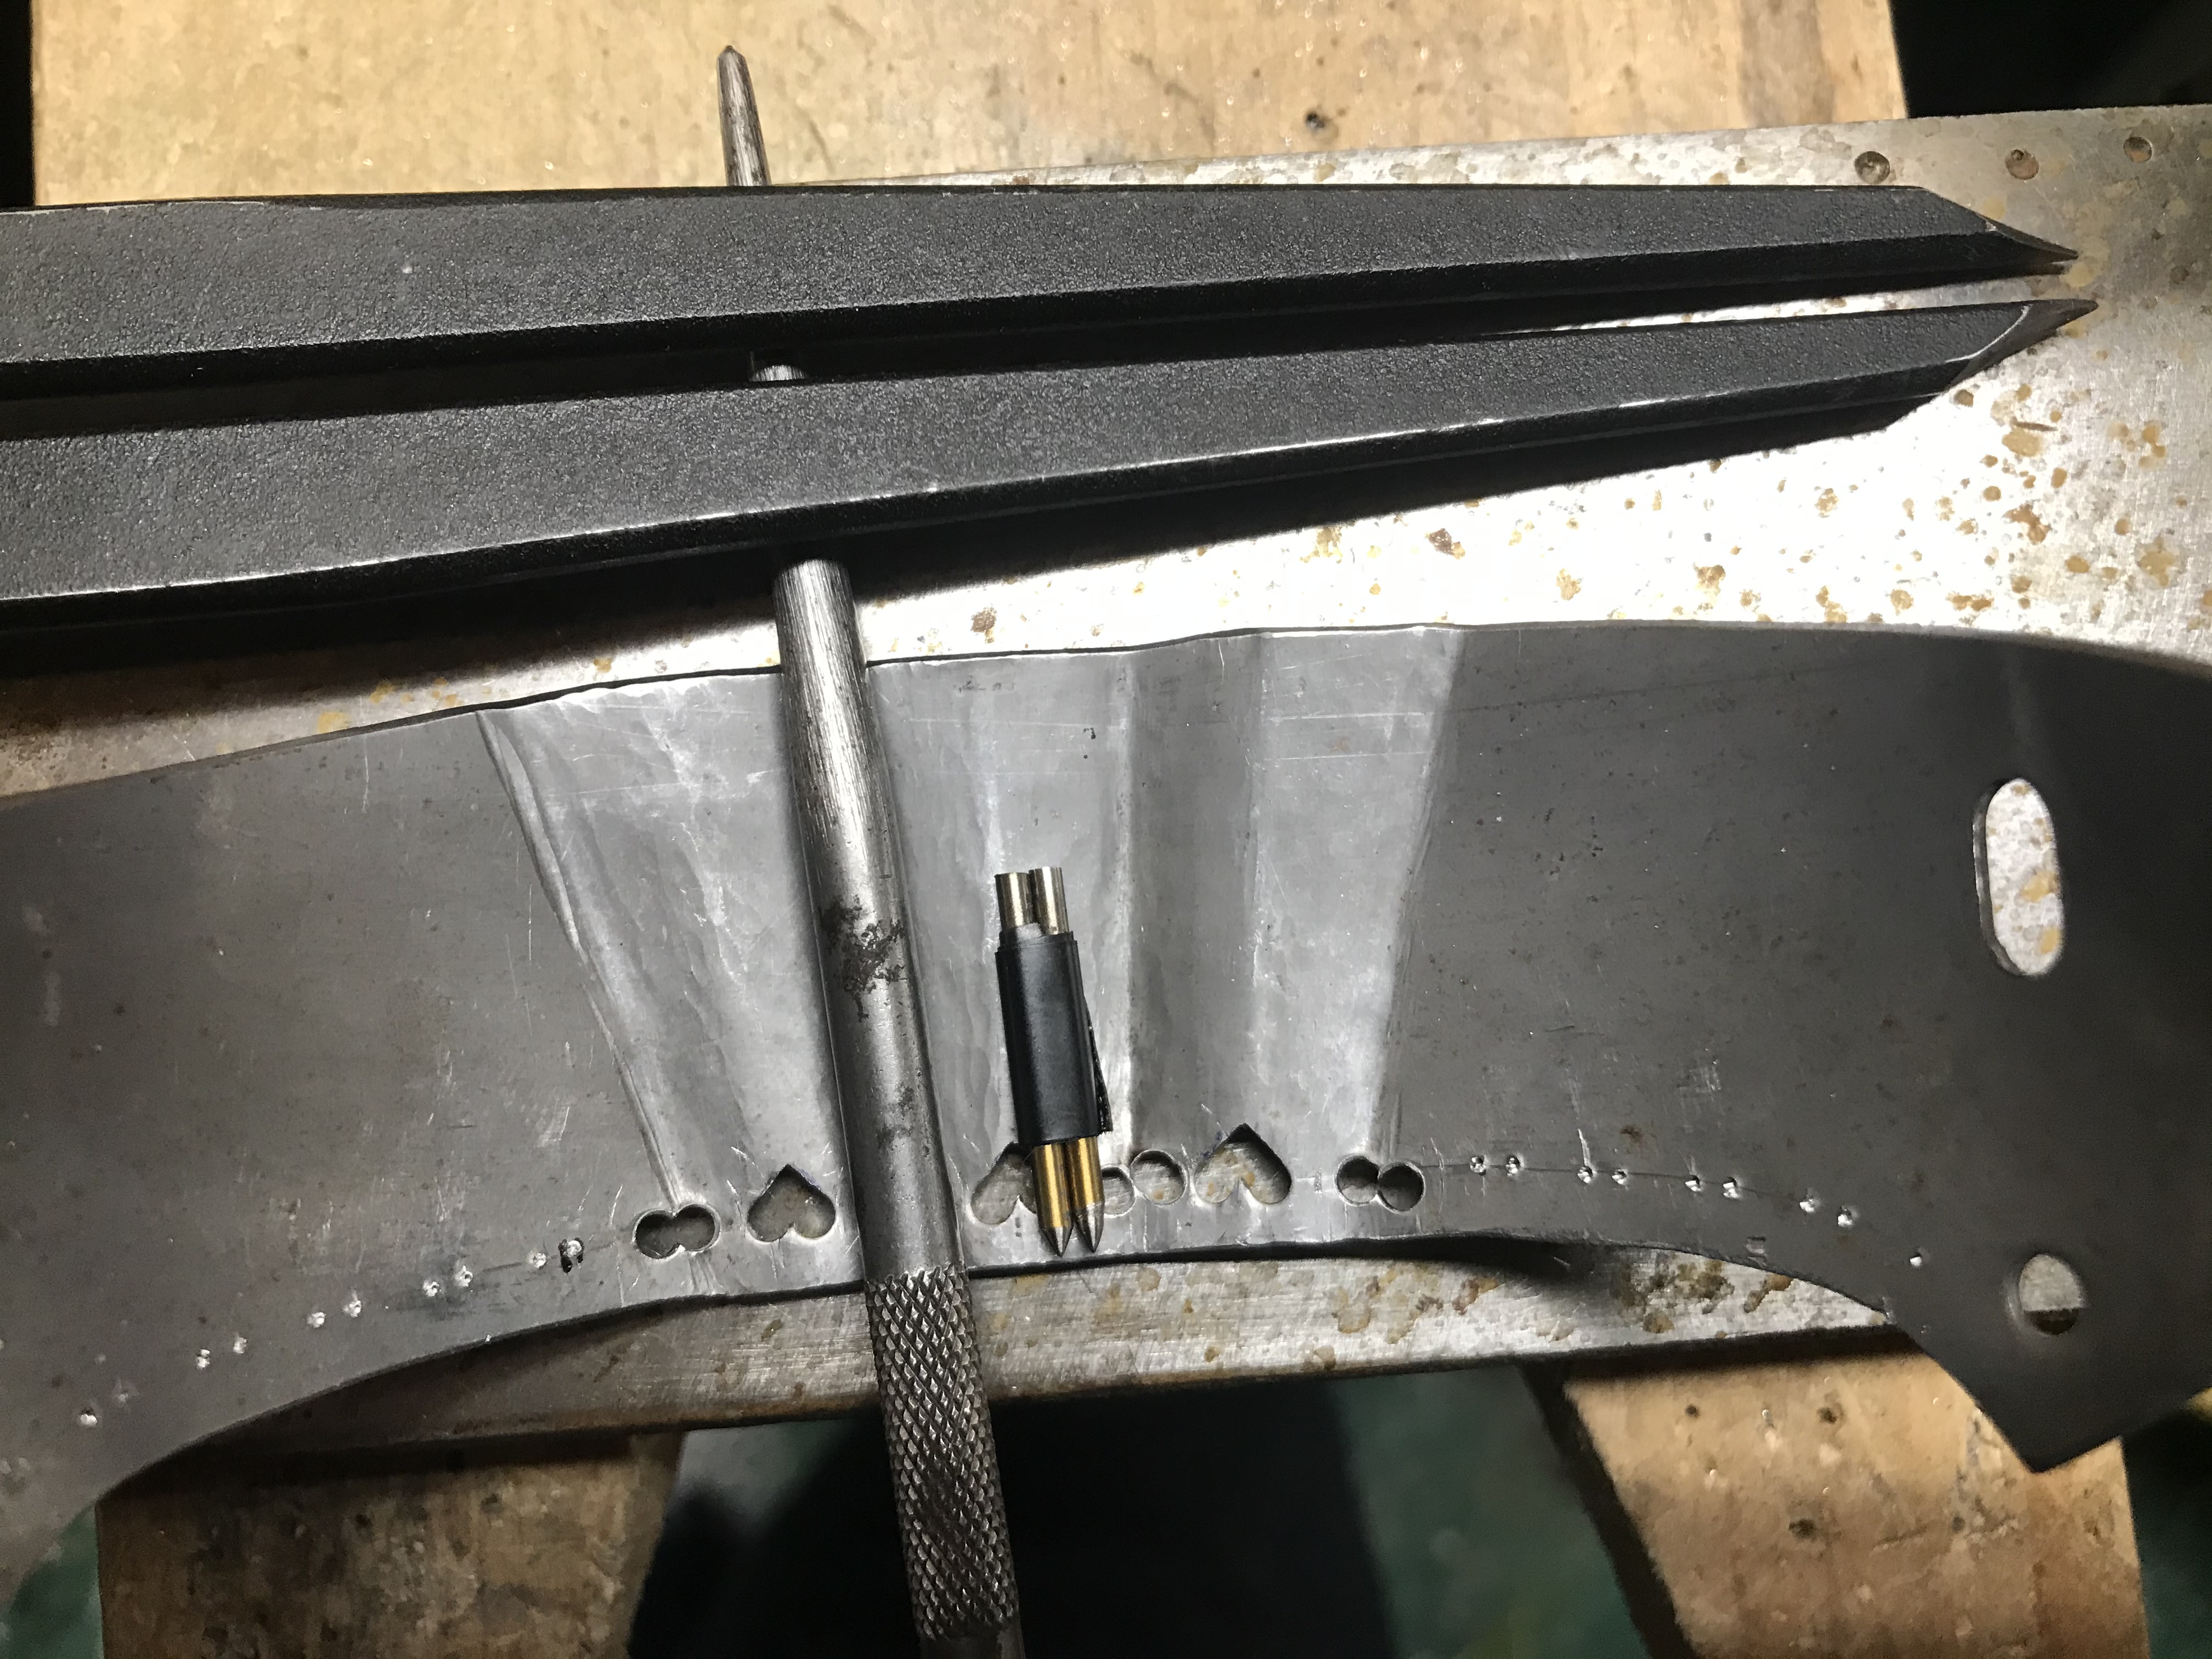
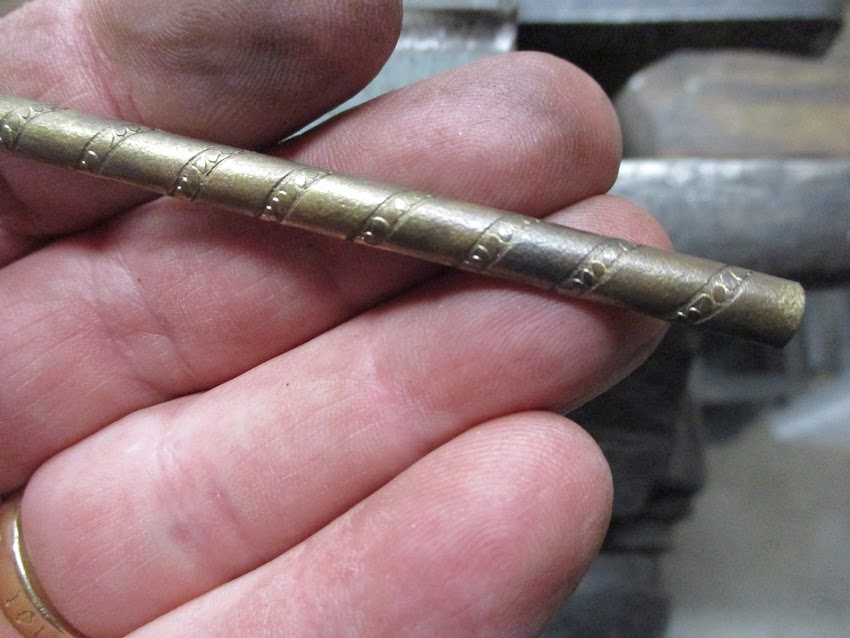
Using this punch, I chase in parallel lines.

Image

This punch makes the space between the dots which go between the lines.

Image

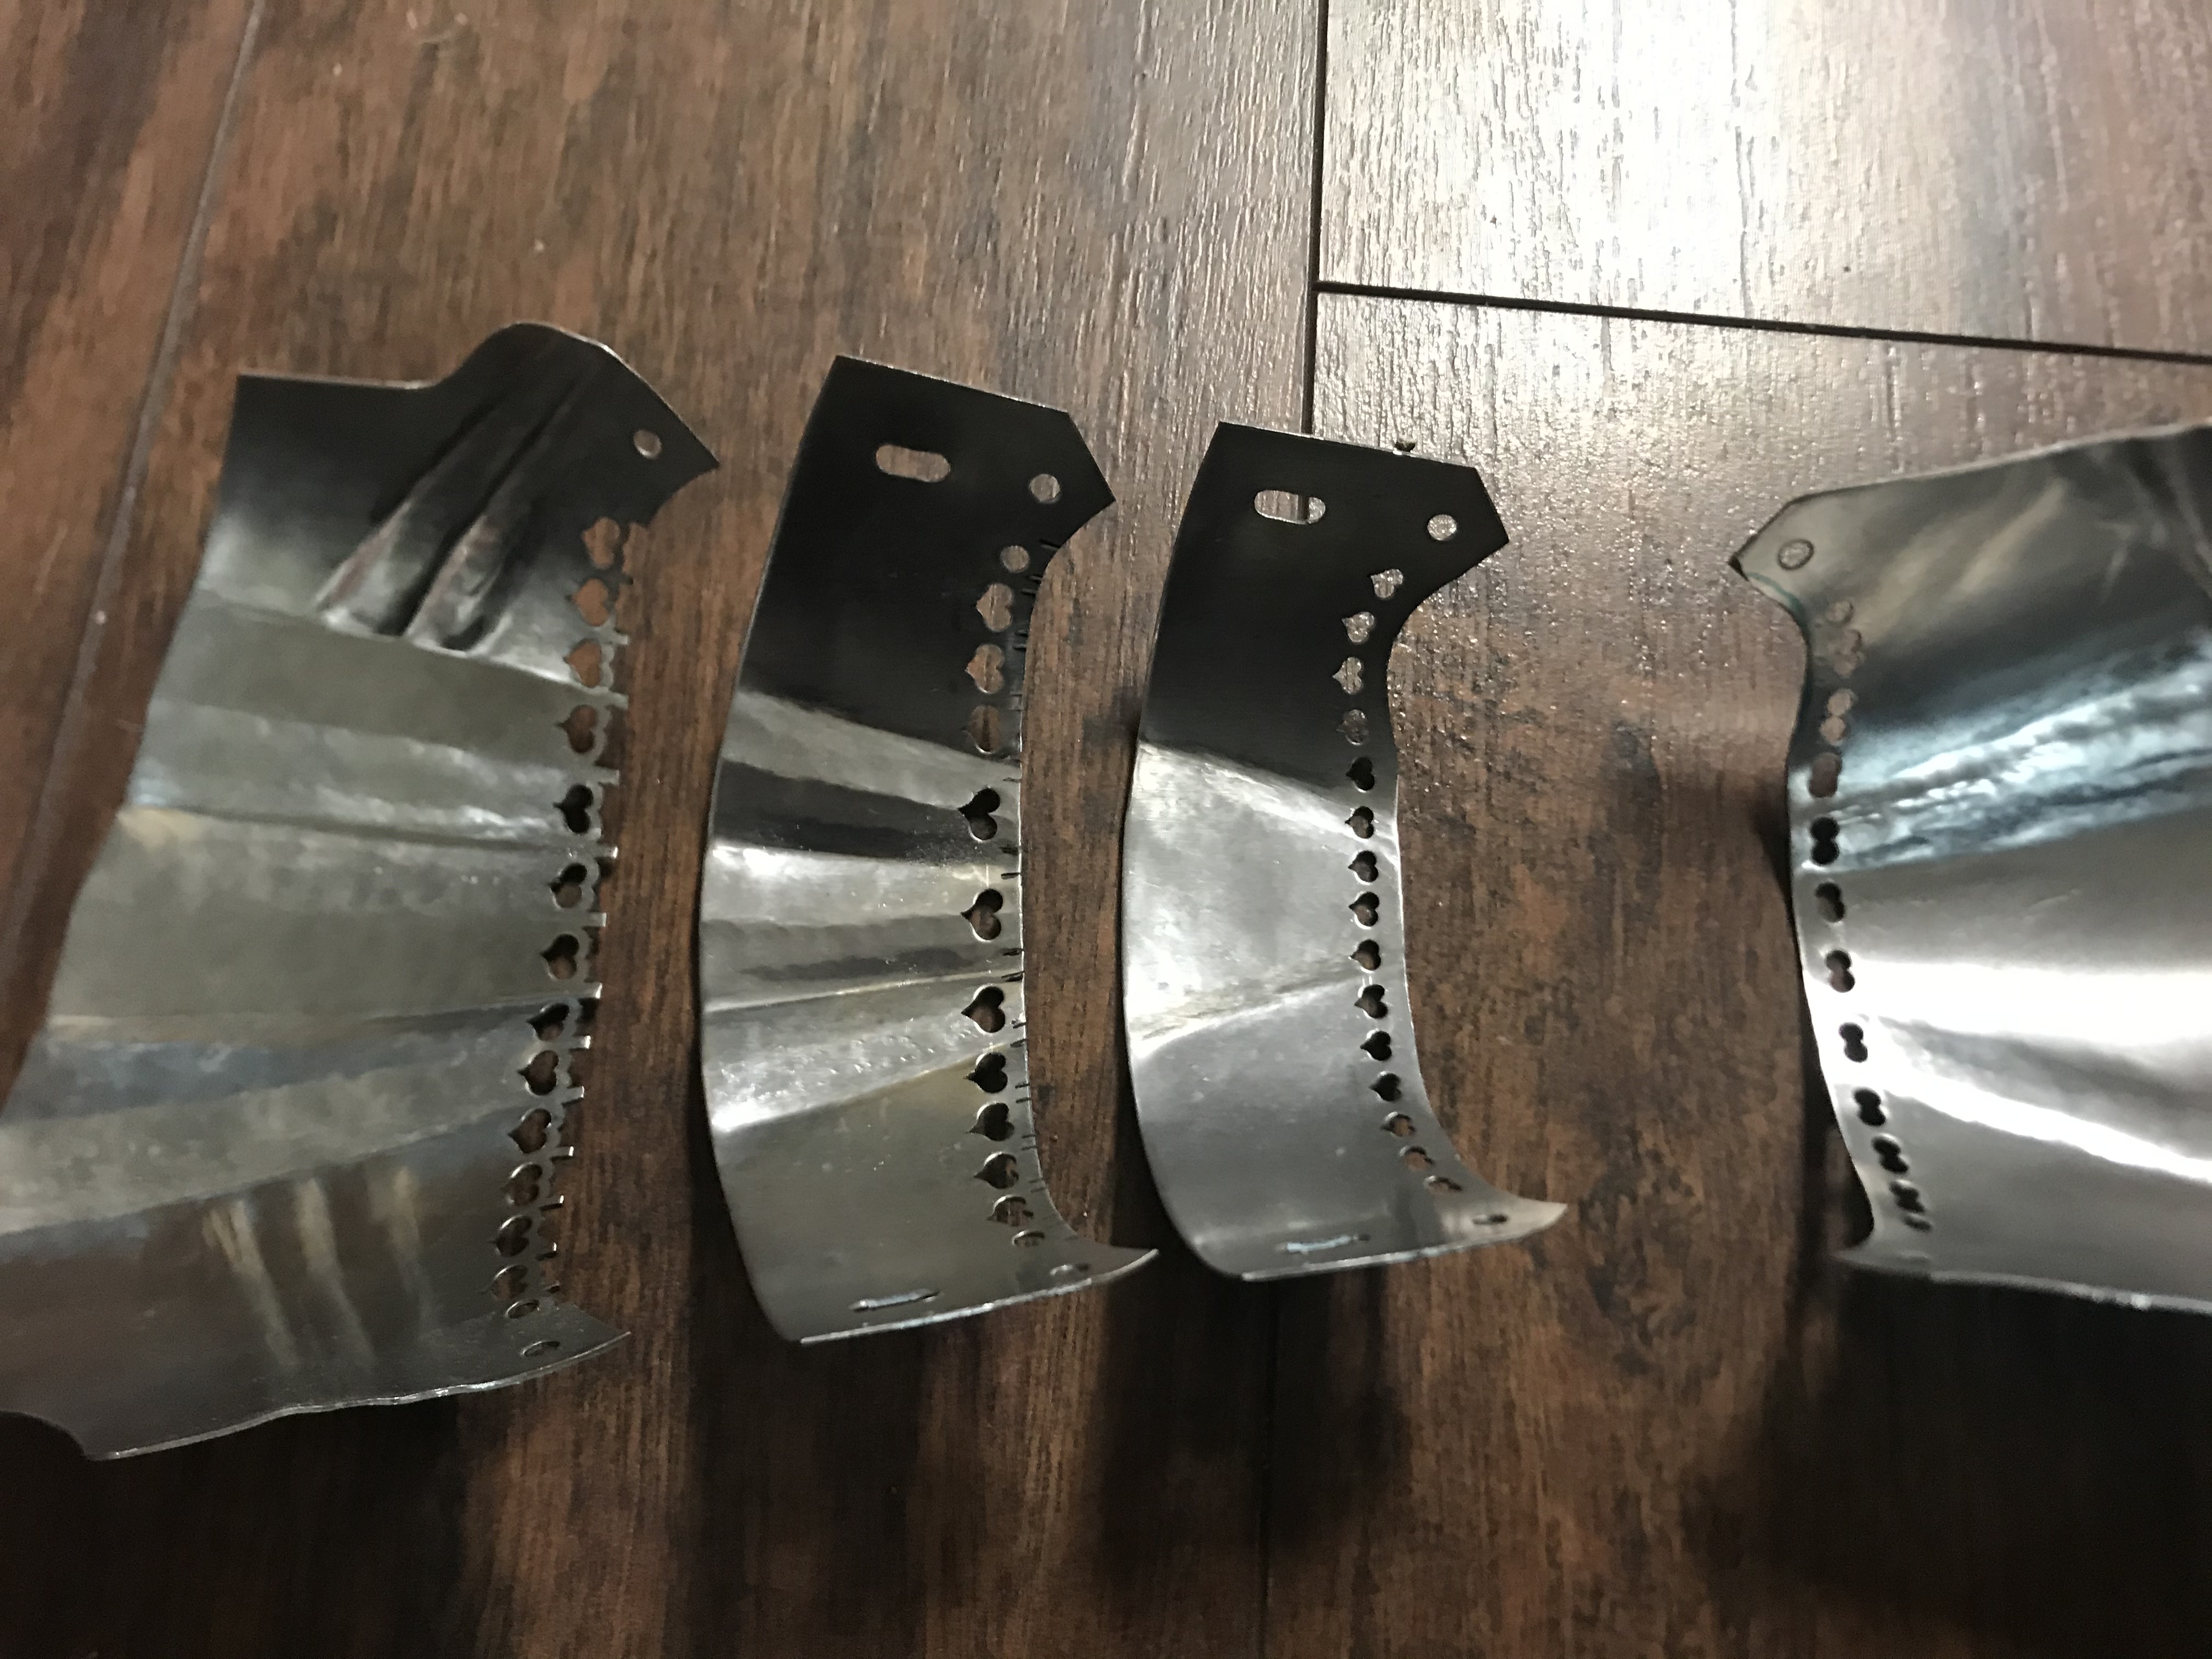
The resulting dots are not very pretty, but neither are the ones on the A58 gauntlets. All in all, I think this captures the spirit of them.

Image

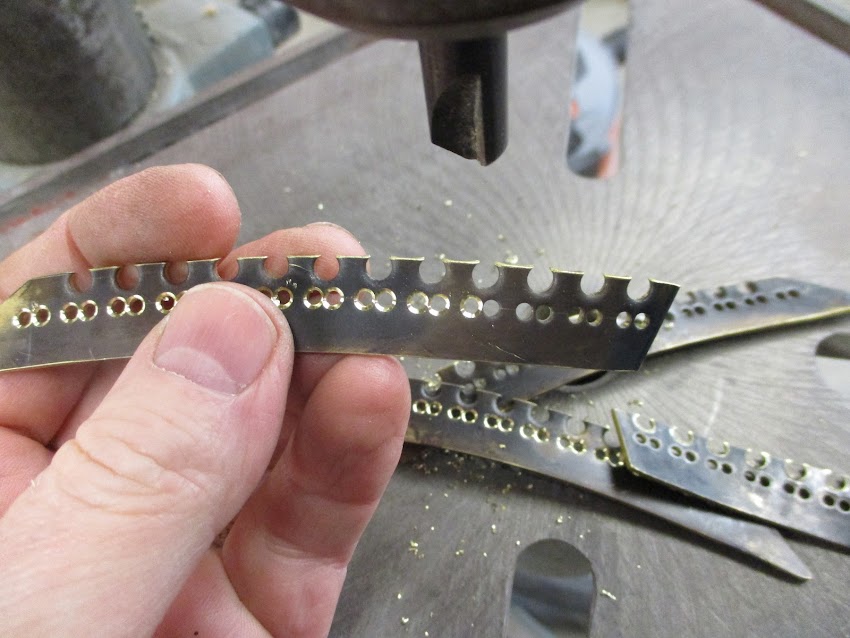
The strip gets formed up into a hollow with a crosspeen and then a punch.

ImageImage

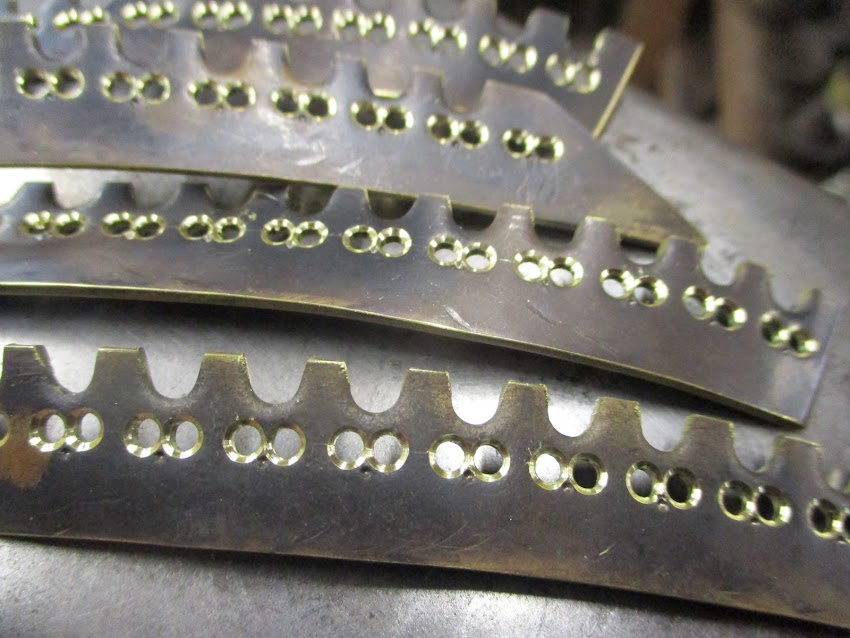
Remarkably enough, this procedure does not damage the dots or the lines. It does, however, curl the strip up a bit, and it needs to be straightened out to look like this.

Image

Here is an end view to show the shape.

Image

After another annealing, the edges are flattened on a disc sander followed by a file.

Image

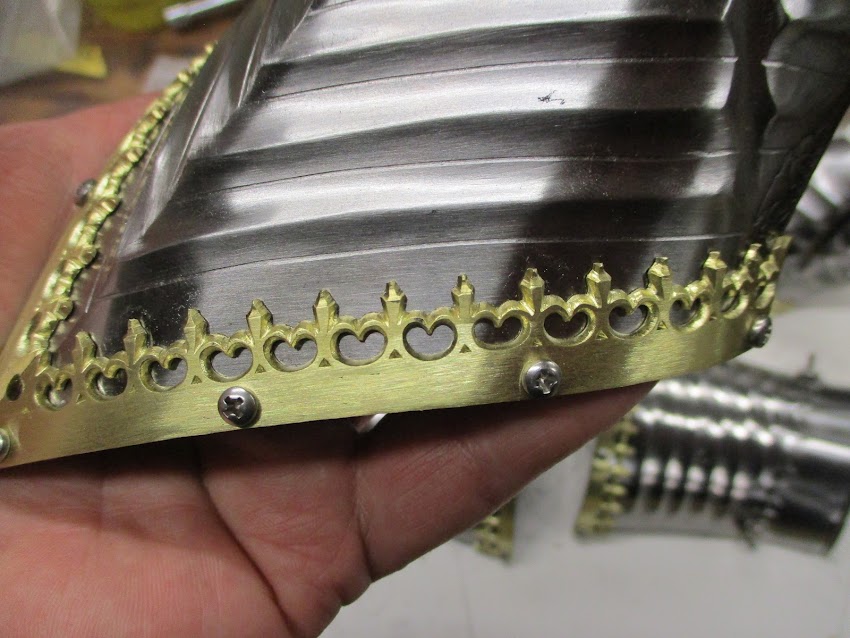
... to make the edges flat so the rope will sit nicely on the fleur plate.

Image

I start "hogging out" the rope using a grinder. This lets me set a line that a file will follow later.

Image

Most of the material is removed with a good sharp rat tail file.....

Image

...and smoothed out with a large (1/4" 6mm) chainsaw file.

Image

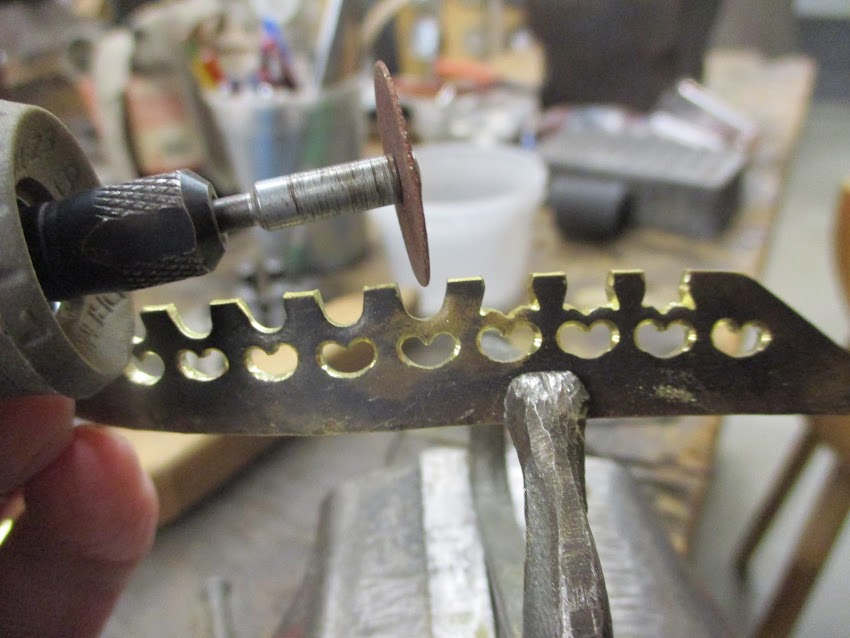
I used a fine/hard deburring wheel to smooth out the file marks and feather the profile out.

Image

This is what the more or less finished roping looks like. I will probably try to get the low spots a bit cleaner with a wire wheel, and polish up the rest with a buffing wheel.

Image

I've got the piece bent roughly to shape, but the final tweaking will have to wait till I have longer screws to hold the work in place. They are on order, and should show up in a few days.

Image

I will make up the other five pieces while I wait for my screws to arrive.

Mac
Robert MacPherson

The craftsmen of old had their secrets, and those secrets died with them. We are not the better for that, and neither are they.

http://www.lightlink.com/armory/
http://www.billyandcharlie.com
https://www.facebook.com/BillyAndCharlie
Indianer
Archive Member
Posts: 598
Joined: Fri Nov 06, 2015 8:07 am
Location: Northern Germany

Re: Mac's blog

Post by Indianer »

Mac, do you still have the patterns for the cuff top- and bottom half?

What I'd like to check is whether the tulip shape gets any consideration in the edge layout along the pattern; i.e. whether the metal blank is cut out with straight edges or rather meandering lines from wrist to elbow.

I also find it intriguing that for all the curvature in the finished piece they always seem to come out of the hammering with their long edges straight, as in they lie flat on a table. No cutting and all.

Then again...I sometimes feel like find the moon intriguing too.

Best, Indi
Mac
Archive Member
Posts: 9953
Joined: Thu Jan 04, 2001 2:01 am
Location: Jeffersonville, PA

Re: Mac's blog

Post by Mac »

Indianer wrote: Fri Nov 12, 2021 8:00 am Mac, do you still have the patterns for the cuff top- and bottom half?

What I'd like to check is whether the tulip shape gets any consideration in the edge layout along the pattern; i.e. whether the metal blank is cut out with straight edges or rather meandering lines from wrist to elbow.

I also find it intriguing that for all the curvature in the finished piece they always seem to come out of the hammering with their long edges straight, as in they lie flat on a table. No cutting and all.
I do have the templates. There was probably some grinding of the long edges of the main plates, but nothing worth noting on the templates.

Image
Indianer wrote: Fri Nov 12, 2021 8:00 am Then again...I sometimes feel like find the moon intriguing too.

Best, Indi
The Moon is a fascinating object. The whole idea of tidal locking is wondrous.

Mac
Robert MacPherson

The craftsmen of old had their secrets, and those secrets died with them. We are not the better for that, and neither are they.

http://www.lightlink.com/armory/
http://www.billyandcharlie.com
https://www.facebook.com/BillyAndCharlie
Indianer
Archive Member
Posts: 598
Joined: Fri Nov 06, 2015 8:07 am
Location: Northern Germany

Re: Mac's blog

Post by Indianer »

Thank you Mac!!
Mac
Archive Member
Posts: 9953
Joined: Thu Jan 04, 2001 2:01 am
Location: Jeffersonville, PA

Re: Mac's blog

Post by Mac »

Strangely enough, although my sketch is of right hand roping, all of my test pieces ( 8 of them, I think) have been left hand. Today, I made up a piece of right hand rope to go on the opposite cuff from the piece I made yesterday. I was pleased to find no hidden difficulties in the process.

Image

Mac
Robert MacPherson

The craftsmen of old had their secrets, and those secrets died with them. We are not the better for that, and neither are they.

http://www.lightlink.com/armory/
http://www.billyandcharlie.com
https://www.facebook.com/BillyAndCharlie
User avatar
Croquart
Archive Member
Posts: 79
Joined: Thu Jun 20, 2019 5:50 am
Location: Germany

Re: Mac's blog

Post by Croquart »

beautiful!
User avatar
Woodswork Armory
Archive Member
Posts: 159
Joined: Thu Jan 18, 2018 7:52 pm
Location: Buffalo, NY

Re: Mac's blog

Post by Woodswork Armory »

Gorgeous work as always Mac!
Mac
Archive Member
Posts: 9953
Joined: Thu Jan 04, 2001 2:01 am
Location: Jeffersonville, PA

Re: Mac's blog

Post by Mac »

Woodswork Armory wrote: Tue Nov 16, 2021 11:44 am Gorgeous work as always Mac!
Croquart wrote: Sat Nov 13, 2021 6:06 ambeautiful!
Thank you, guys!

Mac
Robert MacPherson

The craftsmen of old had their secrets, and those secrets died with them. We are not the better for that, and neither are they.

http://www.lightlink.com/armory/
http://www.billyandcharlie.com
https://www.facebook.com/BillyAndCharlie
Mac
Archive Member
Posts: 9953
Joined: Thu Jan 04, 2001 2:01 am
Location: Jeffersonville, PA

Re: Mac's blog

Post by Mac »

Today's mail included the longer screws that I need to get the roping shaped up and bolted in place.

Image

Tomorrow I'll see if I can get the other four pieces in place.

Mac
Robert MacPherson

The craftsmen of old had their secrets, and those secrets died with them. We are not the better for that, and neither are they.

http://www.lightlink.com/armory/
http://www.billyandcharlie.com
https://www.facebook.com/BillyAndCharlie
User avatar
Galileo
Archive Member
Posts: 5974
Joined: Thu Aug 10, 2000 1:01 am
Location: Casper, WY

Re: Mac's blog

Post by Galileo »

Mac, how often does the brass not work well after heat treating the steel? Is it still "close enough" or have you had to remake the brass work after treatment?
Dia Mathessos, Dynamis


Member#71
Mac
Archive Member
Posts: 9953
Joined: Thu Jan 04, 2001 2:01 am
Location: Jeffersonville, PA

Re: Mac's blog

Post by Mac »

Galileo wrote: Tue Nov 16, 2021 10:17 pm Mac, how often does the brass not work well after heat treating the steel? Is it still "close enough" or have you had to remake the brass work after treatment?
I'm fitting all the brass after the heat treatment and surface preparation. Now.. I suppose one could fit the brass before the heat treatment, but the grinding and finishing work might through off the hole locations on parts which are either highly curved or rough.

Mac
Robert MacPherson

The craftsmen of old had their secrets, and those secrets died with them. We are not the better for that, and neither are they.

http://www.lightlink.com/armory/
http://www.billyandcharlie.com
https://www.facebook.com/BillyAndCharlie
User avatar
Keegan Ingrassia
Archive Member
Posts: 6423
Joined: Thu Jul 16, 2009 4:07 pm
Location: College Station, Texas (Shadowlands)

Re: Mac's blog

Post by Keegan Ingrassia »

The fit-up on those pieces is beautiful! It's easy to see how they could be misconstrued as a single piece.
"There is a tremendous amount of information in a picture, but getting at it is not a purely passive process. You have to work at it, but the more you work at it the easier it becomes." - Mac
Mac
Archive Member
Posts: 9953
Joined: Thu Jan 04, 2001 2:01 am
Location: Jeffersonville, PA

Re: Mac's blog

Post by Mac »

Filing up the roping is not difficult work, but it requires "peace of mind". I also needed to take breaks so as not to injure myself. Each of these pieces is longer than needed to make them easier to bend.

Image

A subtle, but important detail is that the angles of the ropes change as they approach the cuff points.

Image

I started by bending them "the hard way", so they matched the curve of the template.

Image

From there, it's just a question of bending them around the cuff and drilling the locating holes from the inside. I started at the point, and worked to the edge.

Image

Getting the ropes to match nicely along the crest line was a bit fussy. The other one is not bad, but this is the better of the two.

Image

When all of the brass was bolted down, I took a minute to bolt the cuffs onto the rest of the gauntlets so I could take a broader view of the work. It's easy to get lost in the detail and worry that all the little mistakes will make the thing look bad. I think it's going to be OK.

Image

Now I need to figure out what happens next...

Mac
Robert MacPherson

The craftsmen of old had their secrets, and those secrets died with them. We are not the better for that, and neither are they.

http://www.lightlink.com/armory/
http://www.billyandcharlie.com
https://www.facebook.com/BillyAndCharlie
User avatar
Galileo
Archive Member
Posts: 5974
Joined: Thu Aug 10, 2000 1:01 am
Location: Casper, WY

Re: Mac's blog

Post by Galileo »

Donate them to me to...uh... display? :D

They're gorgeous.
Dia Mathessos, Dynamis


Member#71
Mac
Archive Member
Posts: 9953
Joined: Thu Jan 04, 2001 2:01 am
Location: Jeffersonville, PA

Re: Mac's blog

Post by Mac »

Galileo wrote: Wed Nov 17, 2021 7:06 pm Donate them to me to...uh... display? :D

They're gorgeous.
Thanks! Nice try!

Mac
Robert MacPherson

The craftsmen of old had their secrets, and those secrets died with them. We are not the better for that, and neither are they.

http://www.lightlink.com/armory/
http://www.billyandcharlie.com
https://www.facebook.com/BillyAndCharlie
Post Reply