I've just done a rivet count. There needs to be 106 brass capped 1/8" rivets. In addition to that, the brass trim will require 24 smaller (3/32") rivets. For the trim, I may well go with commercial brass button heads.
So... I guess I have my work cut out for me. Make up 120 brass capped 1/8" rivets and find a source for the 3/32" solid brass ones.
Mac
Mac's blog
Re: Mac's blog
Robert MacPherson
The craftsmen of old had their secrets, and those secrets died with them. We are not the better for that, and neither are they.
http://www.lightlink.com/armory/
http://www.billyandcharlie.com
https://www.facebook.com/BillyAndCharlie
The craftsmen of old had their secrets, and those secrets died with them. We are not the better for that, and neither are they.
http://www.lightlink.com/armory/
http://www.billyandcharlie.com
https://www.facebook.com/BillyAndCharlie
-
Gordon Thompson
- Archive Member
- Posts: 88
- Joined: Thu Jan 10, 2019 7:04 am
Re: Mac's blog
Thats a lot of rivets.
And thank you VERY much for documenting and sharing your work.
And thank you VERY much for documenting and sharing your work.
- "There's three of you, and only one of me. But that doesn't mean there are more of you. It's a mathematical paradox and an exception from the rule.
- What? What does that mean?
- That means *uck off. While you still can".
- What? What does that mean?
- That means *uck off. While you still can".
Re: Mac's blog
What’s the weight of all of those rivets?
Gaukler Medieval Wares
http://www.medievalwares.com
http://www.medievalwares.com
Re: Mac's blog
It is a lot, isn't it!? The number of rivets in an armor is always a bit of a surprise, even if you sort of expect it.Gordon Thompson wrote: ↑Thu Nov 18, 2021 1:12 pm Thats a lot of rivets.
And thank you VERY much for documenting and sharing your work.
Mac
Robert MacPherson
The craftsmen of old had their secrets, and those secrets died with them. We are not the better for that, and neither are they.
http://www.lightlink.com/armory/
http://www.billyandcharlie.com
https://www.facebook.com/BillyAndCharlie
The craftsmen of old had their secrets, and those secrets died with them. We are not the better for that, and neither are they.
http://www.lightlink.com/armory/
http://www.billyandcharlie.com
https://www.facebook.com/BillyAndCharlie
Re: Mac's blog
That's an interesting question, but a tough one to answer. I could weigh some brass capped rivets I have laying around but that would include full length shanks. I also have a bin of shanks that have been cut off of rivets from other projects. (I sometimes use the short ones to plug holes etc.) Perhaps I could sellect some typical looking off-cuts and get a weight for those to subtract from the lull length weight. I'd also need to add all the washers.
I'll work on that and get back later.
Mac
Robert MacPherson
The craftsmen of old had their secrets, and those secrets died with them. We are not the better for that, and neither are they.
http://www.lightlink.com/armory/
http://www.billyandcharlie.com
https://www.facebook.com/BillyAndCharlie
The craftsmen of old had their secrets, and those secrets died with them. We are not the better for that, and neither are they.
http://www.lightlink.com/armory/
http://www.billyandcharlie.com
https://www.facebook.com/BillyAndCharlie
Re: Mac's blog
Ok.. Here's the skinny on rivet weights.
I measured the weight of 30 brass capped rivets that were left over from other projects. That came to 40.63g, or 1.19g each.
The weight of 30 average looking off-cut shanks was 9.63g. So an average off-cut weighs about .321g each.
The weight of 30 washers is 7.33g. Each washer is then about .244 g.
If I subtract an average off-cut and add a washer to the weight of a brass-capped rivet I get 1.273g each. So, the 53 rivets required for each gauntlet will add 67.47g.
As an aside.... The weight of an average non-capped rivet (trimmed and washered) is 1.113g. , and at 53 per gauntlet, that would be 58.99g. Thus, the brass capping adds about 8.48 to each gauntlet.
Mac
Robert MacPherson
The craftsmen of old had their secrets, and those secrets died with them. We are not the better for that, and neither are they.
http://www.lightlink.com/armory/
http://www.billyandcharlie.com
https://www.facebook.com/BillyAndCharlie
The craftsmen of old had their secrets, and those secrets died with them. We are not the better for that, and neither are they.
http://www.lightlink.com/armory/
http://www.billyandcharlie.com
https://www.facebook.com/BillyAndCharlie
-
Scott Martin

- Archive Member
- Posts: 1074
- Joined: Wed May 23, 2012 3:34 pm
- Location: Calgary AB, Canada
- Contact:
Re: Mac's blog
Call Karen at RJ Leahy. They supplied my last few sets of 3/32" brass rivets. Nope, they aren't on the website, but they can usually get them in stock in under a week and shipped (to me in Canada) arriving within 2 weeks - likely faster to the US
And on the "trying to be useful" riff, they have also sourced some 1/16" rivets for me (dome heads AND truss-like heads), so if it's something that you want they can probably find it for you. Failing that, the "E" section of the Spae-Nuar catalogue has rivets:
https://spaenaur.com/catalog/E8/#zoom=z
A few pages earlier are the brass round heads down to 1/16" diameter.
Scott
Re: Mac's blog
I've ordered some from these guys here https://www.blacksmithbolt.com/store/p/ ... ivets.aspx
... and some others from an ebay vendor. https://www.ebay.com/itm/233817095948
Mac
... and some others from an ebay vendor. https://www.ebay.com/itm/233817095948
Mac
Robert MacPherson
The craftsmen of old had their secrets, and those secrets died with them. We are not the better for that, and neither are they.
http://www.lightlink.com/armory/
http://www.billyandcharlie.com
https://www.facebook.com/BillyAndCharlie
The craftsmen of old had their secrets, and those secrets died with them. We are not the better for that, and neither are they.
http://www.lightlink.com/armory/
http://www.billyandcharlie.com
https://www.facebook.com/BillyAndCharlie
Re: Mac's blog
I got to thinking last night and vowed to check on whether or not I had any viable plating solution left over from the St Florian project. I do, but it has begun to precipitate a bit. I checked whether or not it would still plate on a test piece, and it seems to still work.

So... I've begun plating, starting with the buckles.

I hope I can get everything done with what I have, but I suspect that I will be sending the good folks at Reo Grande another hundred bucks soon.
Mac
So... I've begun plating, starting with the buckles.
I hope I can get everything done with what I have, but I suspect that I will be sending the good folks at Reo Grande another hundred bucks soon.
Mac
Robert MacPherson
The craftsmen of old had their secrets, and those secrets died with them. We are not the better for that, and neither are they.
http://www.lightlink.com/armory/
http://www.billyandcharlie.com
https://www.facebook.com/BillyAndCharlie
The craftsmen of old had their secrets, and those secrets died with them. We are not the better for that, and neither are they.
http://www.lightlink.com/armory/
http://www.billyandcharlie.com
https://www.facebook.com/BillyAndCharlie
Re: Mac's blog
The following represents a couple of days of work on the brass-capped rivets. I need 53 of them per gauntlet.
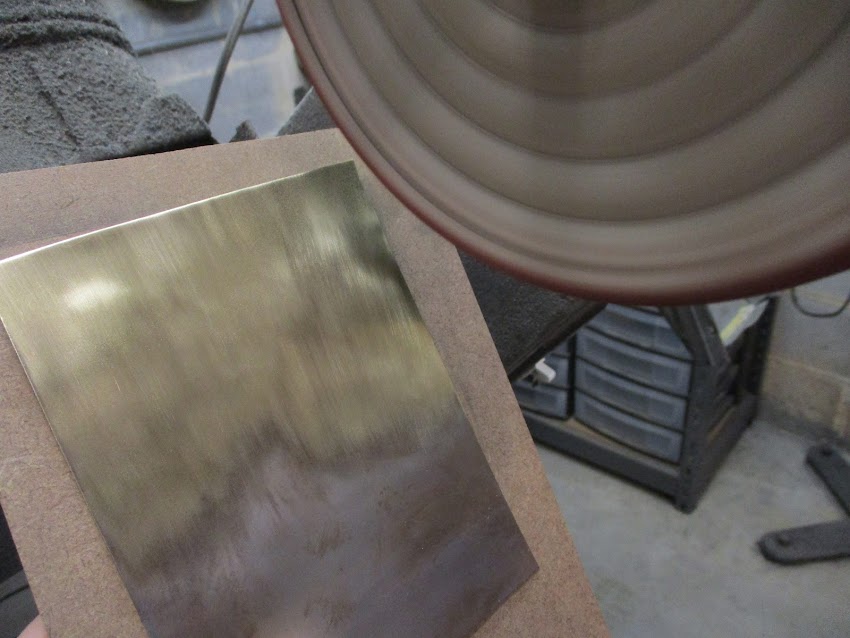
The caps will be made of 0.012" (.3mm) brass shim stock. The packaging of this brand sort of cracks me up.

The stock is 6" (150mm) wide, and I cut off a length that would produce about 100 caps. I already has about 50 blanks left over from the St. Florian project, so I should end up with nearly 150 caps. Here the piece is sitting there waiting for me to anneal it with the torch.

After annealing, I cleaned one the oxide off of one side using greaseless abrasive on a cotton buff. The clean side will be the surface the solder will adhere to. A piece of Masonite keeps the work flat.
Here, I'm ruling out 1/2" (13mm) divisions on the oxidized side of the sheet.

With a shears in the anvil, and a bucket to catch the squares.

This is the business end of the punch which will form the caps. The tin block shows a series of depressions. I try to keep three depressions in service at all times. The first one is to "break down" the stamping. The second refines the shape. The third one sharpens up the dome a bit. Each one serves its function for about 6 or 8 stampings. After that, I use second one for the break down etc.

This is the break down step. Next I'll use the depression on the right, then the shallow one above and left.

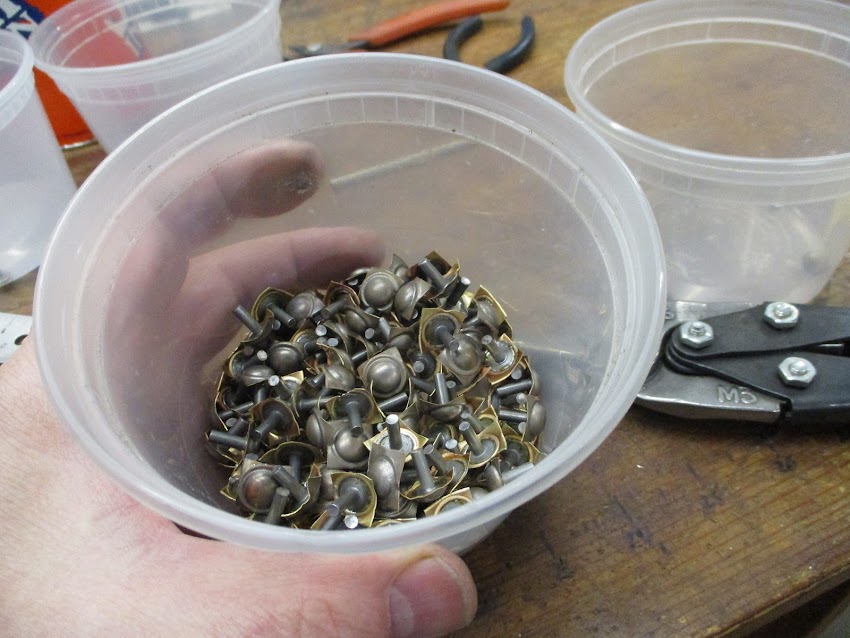
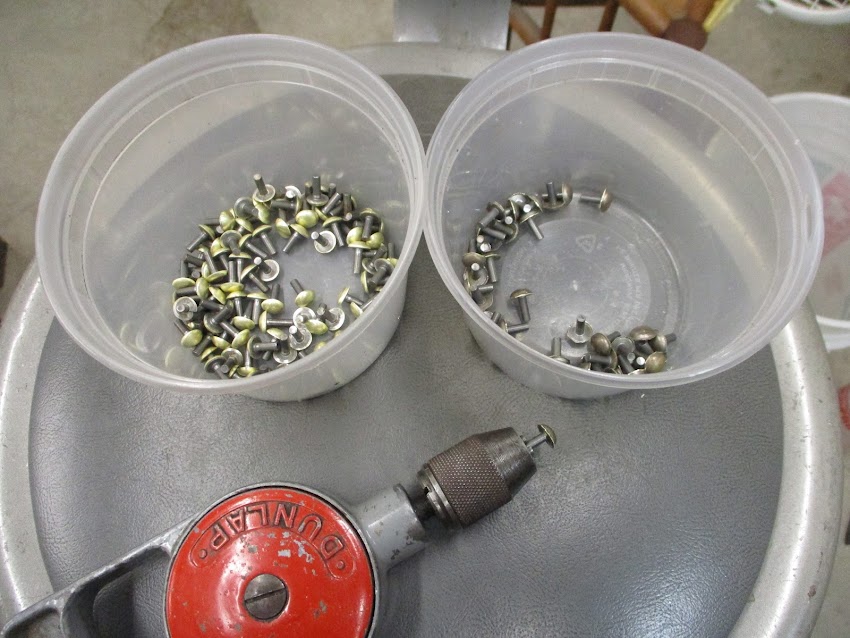
The blanks are in one take out container, and thee completed stampings go into the other. If this were the middle ages, I suppose I'd use bentwood boxes instead of Chinese soup containers.
https://lh3.googleusercontent.com/pw/AM ... authuser=0
Here, I'm cleaning the oxide off of the iron rivets with a Scotchbrite flap wheel. I like to old them in this vintage crank drill.

To get the same amount of solder for each rivet, I make up rings by wrapping solder around a mandrel and cutting it into rings.

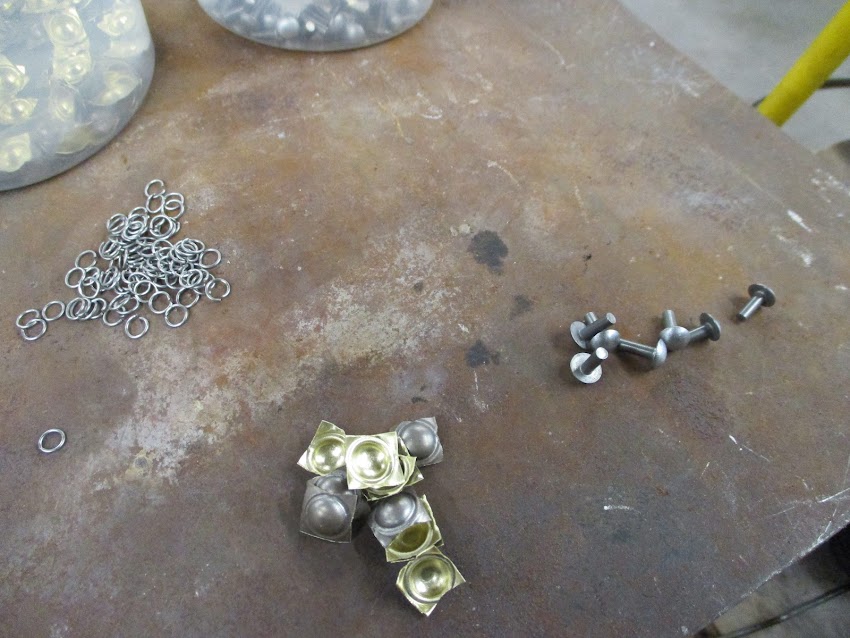
Rivets, caps, and solder on the work surface.
My favorite flux and a Q-tip to apply it. The rivet heads and thee insides of caps both get a wipe of flux. The black tool on the left will be used for picking up the caps and holding them over the flame.

I usually flux assemble about 10 or 12 at a time.
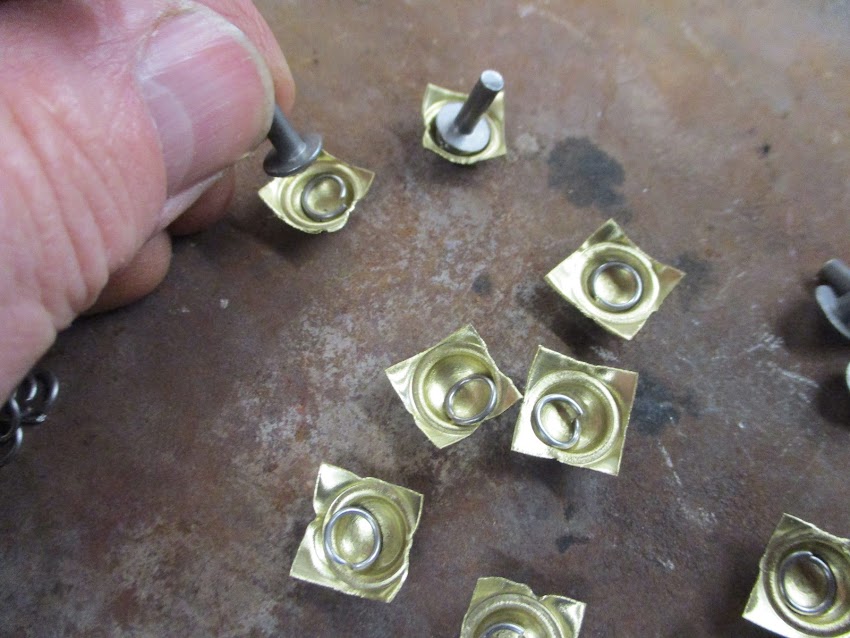
I slide the tool under an assembly and bring it over to the fire.
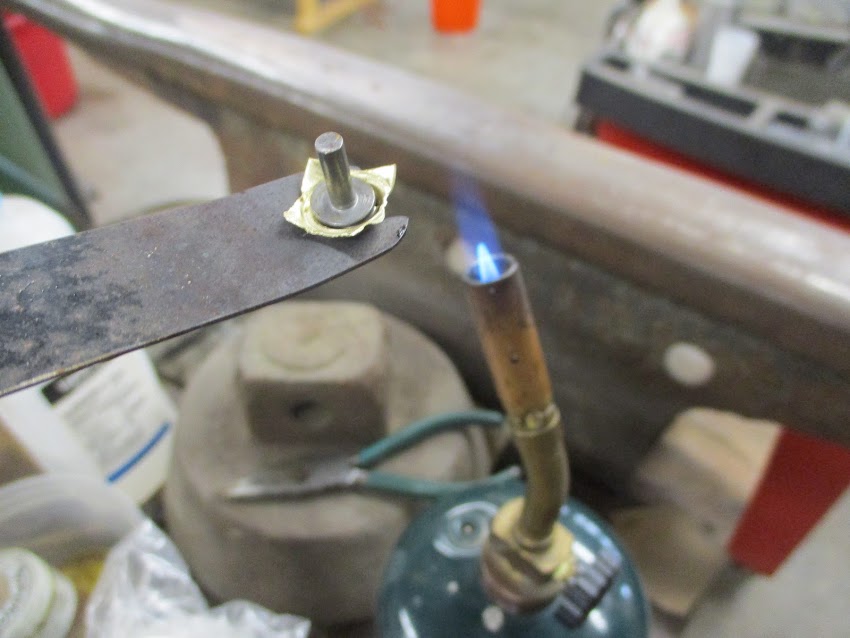
The solder melts almost imeadiatly, and a few seconds later the rivet is hot enough to accept the solder. In most cases, the rivet will sit more or less upright, compelled by the surface tension of the solder. If they don't stand on their own, I poke at them with a tweezers to get them looking straight.

About 150 soldered assemblies.
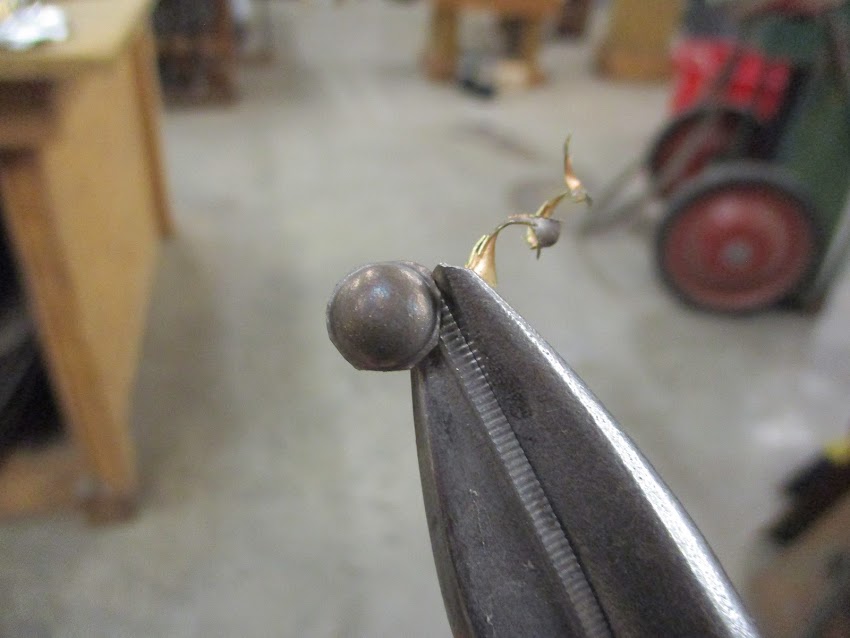
I trim the waste from each one with a sharp aviation snips.
Each one is chucked in the crank drill....

...and presented to the sanding disc to get rid of all the flange.
Then, I turn the drill sideways to trim the bottoms of the caps even with the bottoms of the rivets.
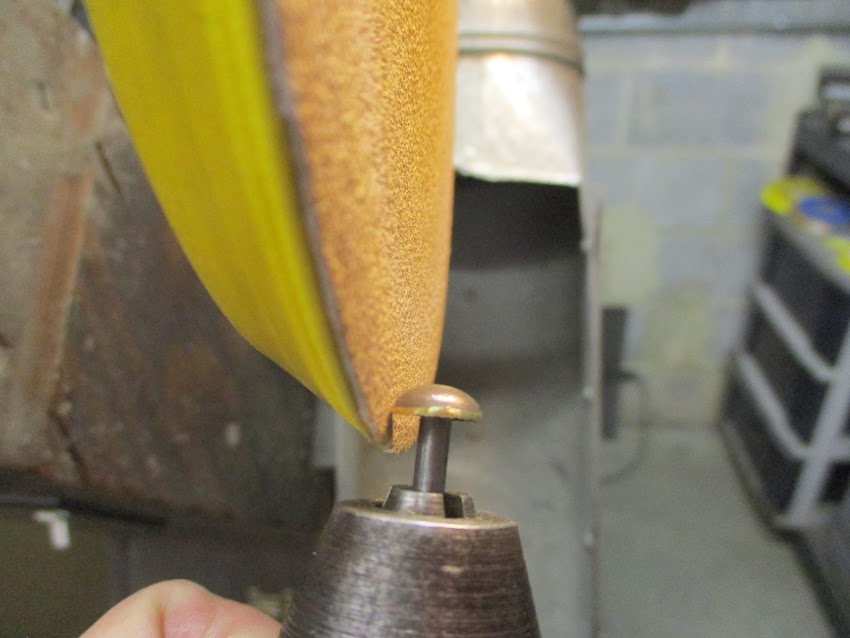
While the rivet is still chucked in the crank drill, I present the surface of the brass dome to the Scotchbrite flap-wheel. (That's the blurry thing at teh top of the pic... I should have shut off the machine for the pic) This gets rid of the "orange peel" surface that comes from the stamping process. It does, of course leave scratches which must be removed in the next step.

As always, the work moves from one take-out container to another.
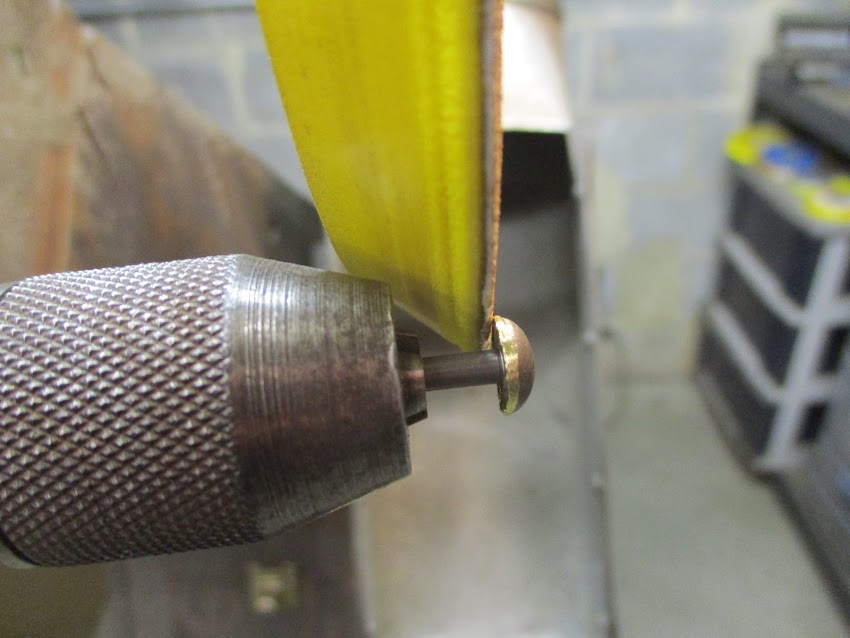
The thing on the left is an aluminum rod with a hole to accept the rivet. This is a new twist on the procedure. I used to grip the rivets with a pin vise to present them to the buffing wheel. The aluminum rod is faster, and conducts the heat away better. That latter point is important. If the rivets get too hot while they are being buffed, the solder can melt and the cap will fly off.
https://lh3.googleusercontent.com/pw/AM ... authuser=0
Here, I'm presenting the brass to a sisal buff with black emery compound. There are two things about this pic which are atypical. One is that I usually have both hands on the work, instead of on holding the camera. The other is that I took a break and washed my hands. This is a messy process, and I wear a respirator in addition to running a dust collection system.

This rivet is as smooth as the black emery will make it, and is ready for the next step. I can usually get four rivets done before I have to re-charge the buff.

All the rivets and the aluminum handle are in a bath of clock cleaning solution in an ultrasonic cleaner. All the black emery has to come off so as to not contaminate the next buff.

Cleaned, washed in water, dried with a hair drier, and waiting for the final buffing.

Somehow, I failed to get any pics of the next step, but it looks a lot like the previous one, except that the buff is cotton and the compound is red rouge.
Here is a little display of the stages. The one on the far right has been gilded.
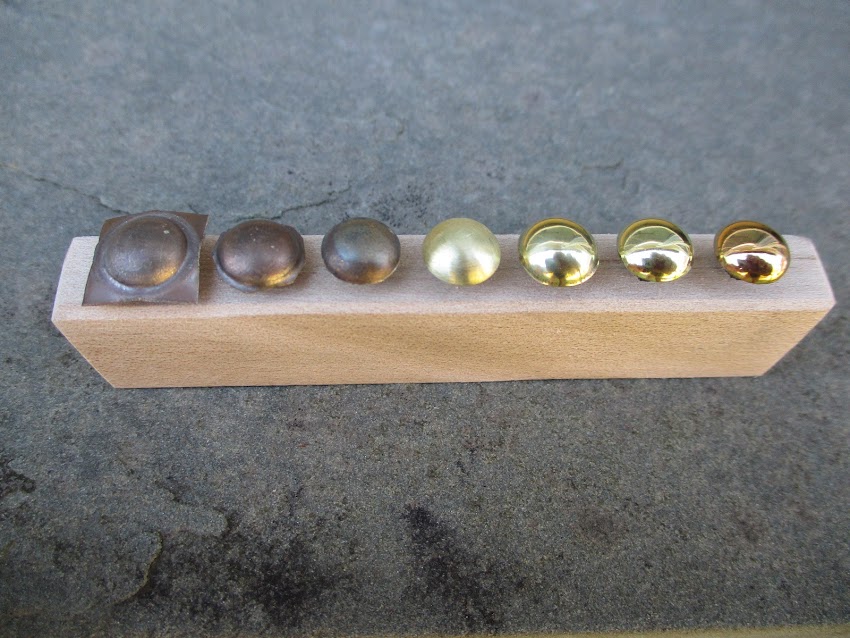
As of this writing, I have completed about 120 rivets. The other 30 are extras which I hope I will not need for this project.
I may start assembling tomorrow. The only other parts I need are a pair of 6 lobed gilt brass washers for the straps. I should make those now, but I will probably put them off till the end.
Mac
The caps will be made of 0.012" (.3mm) brass shim stock. The packaging of this brand sort of cracks me up.
The stock is 6" (150mm) wide, and I cut off a length that would produce about 100 caps. I already has about 50 blanks left over from the St. Florian project, so I should end up with nearly 150 caps. Here the piece is sitting there waiting for me to anneal it with the torch.
After annealing, I cleaned one the oxide off of one side using greaseless abrasive on a cotton buff. The clean side will be the surface the solder will adhere to. A piece of Masonite keeps the work flat.
Here, I'm ruling out 1/2" (13mm) divisions on the oxidized side of the sheet.
With a shears in the anvil, and a bucket to catch the squares.
This is the business end of the punch which will form the caps. The tin block shows a series of depressions. I try to keep three depressions in service at all times. The first one is to "break down" the stamping. The second refines the shape. The third one sharpens up the dome a bit. Each one serves its function for about 6 or 8 stampings. After that, I use second one for the break down etc.
This is the break down step. Next I'll use the depression on the right, then the shallow one above and left.
The blanks are in one take out container, and thee completed stampings go into the other. If this were the middle ages, I suppose I'd use bentwood boxes instead of Chinese soup containers.
https://lh3.googleusercontent.com/pw/AM ... authuser=0
Here, I'm cleaning the oxide off of the iron rivets with a Scotchbrite flap wheel. I like to old them in this vintage crank drill.
To get the same amount of solder for each rivet, I make up rings by wrapping solder around a mandrel and cutting it into rings.
Rivets, caps, and solder on the work surface.
My favorite flux and a Q-tip to apply it. The rivet heads and thee insides of caps both get a wipe of flux. The black tool on the left will be used for picking up the caps and holding them over the flame.
I usually flux assemble about 10 or 12 at a time.
I slide the tool under an assembly and bring it over to the fire.
The solder melts almost imeadiatly, and a few seconds later the rivet is hot enough to accept the solder. In most cases, the rivet will sit more or less upright, compelled by the surface tension of the solder. If they don't stand on their own, I poke at them with a tweezers to get them looking straight.
About 150 soldered assemblies.
I trim the waste from each one with a sharp aviation snips.
Each one is chucked in the crank drill....
...and presented to the sanding disc to get rid of all the flange.
Then, I turn the drill sideways to trim the bottoms of the caps even with the bottoms of the rivets.
While the rivet is still chucked in the crank drill, I present the surface of the brass dome to the Scotchbrite flap-wheel. (That's the blurry thing at teh top of the pic... I should have shut off the machine for the pic) This gets rid of the "orange peel" surface that comes from the stamping process. It does, of course leave scratches which must be removed in the next step.
As always, the work moves from one take-out container to another.
The thing on the left is an aluminum rod with a hole to accept the rivet. This is a new twist on the procedure. I used to grip the rivets with a pin vise to present them to the buffing wheel. The aluminum rod is faster, and conducts the heat away better. That latter point is important. If the rivets get too hot while they are being buffed, the solder can melt and the cap will fly off.
https://lh3.googleusercontent.com/pw/AM ... authuser=0
Here, I'm presenting the brass to a sisal buff with black emery compound. There are two things about this pic which are atypical. One is that I usually have both hands on the work, instead of on holding the camera. The other is that I took a break and washed my hands. This is a messy process, and I wear a respirator in addition to running a dust collection system.
This rivet is as smooth as the black emery will make it, and is ready for the next step. I can usually get four rivets done before I have to re-charge the buff.
All the rivets and the aluminum handle are in a bath of clock cleaning solution in an ultrasonic cleaner. All the black emery has to come off so as to not contaminate the next buff.
Cleaned, washed in water, dried with a hair drier, and waiting for the final buffing.
Somehow, I failed to get any pics of the next step, but it looks a lot like the previous one, except that the buff is cotton and the compound is red rouge.
Here is a little display of the stages. The one on the far right has been gilded.
As of this writing, I have completed about 120 rivets. The other 30 are extras which I hope I will not need for this project.
I may start assembling tomorrow. The only other parts I need are a pair of 6 lobed gilt brass washers for the straps. I should make those now, but I will probably put them off till the end.
Mac
Robert MacPherson
The craftsmen of old had their secrets, and those secrets died with them. We are not the better for that, and neither are they.
http://www.lightlink.com/armory/
http://www.billyandcharlie.com
https://www.facebook.com/BillyAndCharlie
The craftsmen of old had their secrets, and those secrets died with them. We are not the better for that, and neither are they.
http://www.lightlink.com/armory/
http://www.billyandcharlie.com
https://www.facebook.com/BillyAndCharlie
Re: Mac's blog
Mac, how do you protect the brass cap and gilding when setting the rivet?
Dia Mathessos, Dynamis
Member#71
Member#71
Re: Mac's blog
I'll see if I can get away with just using a bit of template cardboard to pad the anvil (like I usually do). If the doesn't work, I'll use a tin block to support them.
I wish I could remember what I did on the St Florian armor, but somehow it's all a blur.
Mac
Robert MacPherson
The craftsmen of old had their secrets, and those secrets died with them. We are not the better for that, and neither are they.
http://www.lightlink.com/armory/
http://www.billyandcharlie.com
https://www.facebook.com/BillyAndCharlie
The craftsmen of old had their secrets, and those secrets died with them. We are not the better for that, and neither are they.
http://www.lightlink.com/armory/
http://www.billyandcharlie.com
https://www.facebook.com/BillyAndCharlie
-
Scott Martin
- Archive Member
- Posts: 1074
- Joined: Wed May 23, 2012 3:34 pm
- Location: Calgary AB, Canada
- Contact:
Re: Mac's blog
This is one of the reasons why I'm going into painful detail on my build processes - so I can remember the next time. Thanks for taking the time to document this, I have several thousand images I need to upload to finish build articles - I should have one on finger / thumb assembly in the next week. I find that I need to have about 3 items in construction before I get all of the pictures that I need, even when I write the article and then get the pictures (as invariably I figure out a better way or sequence of doing things)
I wish that I had more appropriate rivet head shapes - the "round button" rivets are a bit jarring when the rest of my builds are getting quite close to the originals (although generally shinier and with less inclusions in the steel).
Is the difference in your "lineup" between the two polished but not gilded caps at the end is that you degrease from the red rouge before applying the gilding solution?
You may find using an autobody sander with 400-600 grit abrasives will make a good replacement for the black polish: it will take off the mild surface imperfections (orange peel) and since it is "sandpaper" it won't leave any polish behind to remove / degrease. My current finishing process is an autobody sander at low speed chucked into a vice - which is exactly what you seem to be doing (320 grit, 600 grit) then white tripoli (often sold as "White diamond") which works well on steel and brass. For stainless I omit the 600 grit, because it polishes much more easily in large part due to its horrible thermal properties.
Scott
Re: Mac's blog
Modern "truss head" rivets look Ok if you can find them.Scott Martin wrote: ↑Thu Nov 25, 2021 10:58 am
I wish that I had more appropriate rivet head shapes - the "round button" rivets are a bit jarring when the rest of my builds are getting quite close to the originals (although generally shinier and with less inclusions in the steel).
#5 is black emery on a sisal buff.Scott Martin wrote: ↑Thu Nov 25, 2021 10:58 amIs the difference in your "lineup" between the two polished but not gilded caps at the end is that you degrease from the red rouge before applying the gilding solution?
#6 is red rouge on a cotton buff.
There is a cleaning operation between the two, so as to not contaminate the finer buff.
There is no cleaning between the red rouge and the gold. The solution I use has no trouble at all getting under the residue. This stuff doesn't care about grease, it plates anyway.
Mac
Robert MacPherson
The craftsmen of old had their secrets, and those secrets died with them. We are not the better for that, and neither are they.
http://www.lightlink.com/armory/
http://www.billyandcharlie.com
https://www.facebook.com/BillyAndCharlie
The craftsmen of old had their secrets, and those secrets died with them. We are not the better for that, and neither are they.
http://www.lightlink.com/armory/
http://www.billyandcharlie.com
https://www.facebook.com/BillyAndCharlie
Re: Mac's blog
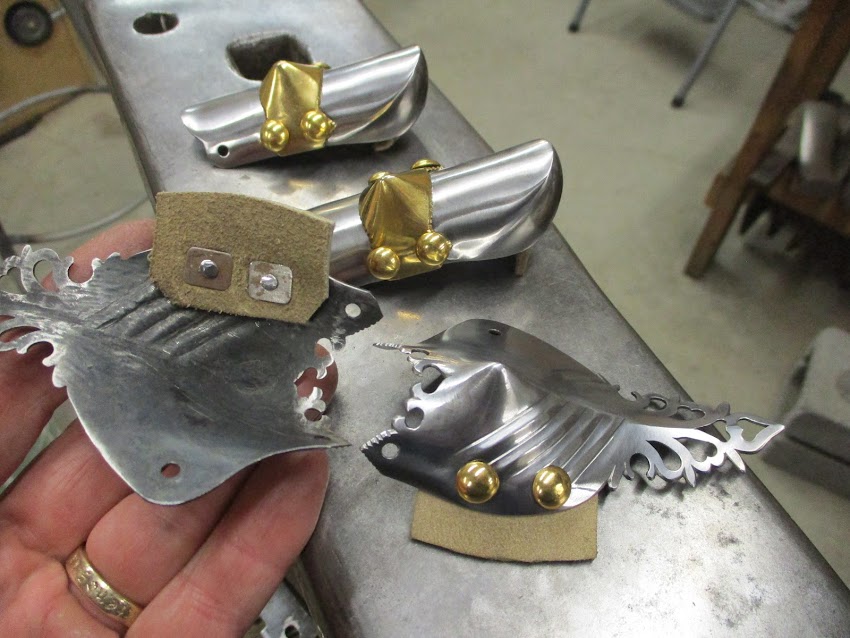
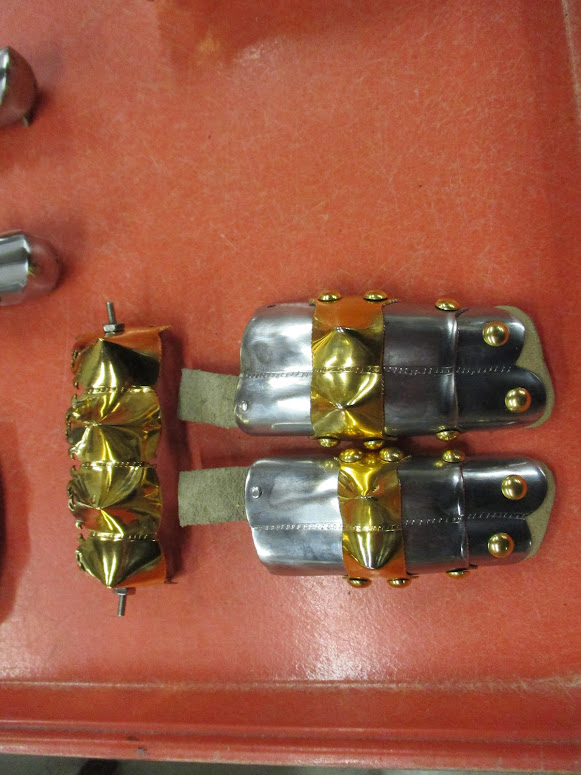
The last parts I have to make for these gauntlets are the washers which go under the strap rivets. Here is a pic of my first mock up of the strap and the washer. The washer will be about 7/8" (22mm) and the strap will taper down to fit the 3/4" (19mm) buckle.

The eye-like decorations seem to be punched in. The arcs are all the same radius and their idiosyncrasies are repeated. Likewise the circles appear to be punched. The lobes of the washer on the right gauntlet (shown here) have been flattened, but those on the left are still bossed up. I'm starting with .020" (.5mm) brass. If that' not stiff enough, I'll make them in something thicker.
The proportion of the washer to the rest of the cuff seems about right. I may have the strap a bit wide, though. I think I need to skinny it up just a bit just after is clears the washer.

I was going to start assembly today, and come back to these washers, but it would really be more convenient to have the straps attached early in the assembly.... so I guess I'll make the washers now.
Mac
The eye-like decorations seem to be punched in. The arcs are all the same radius and their idiosyncrasies are repeated. Likewise the circles appear to be punched. The lobes of the washer on the right gauntlet (shown here) have been flattened, but those on the left are still bossed up. I'm starting with .020" (.5mm) brass. If that' not stiff enough, I'll make them in something thicker.
The proportion of the washer to the rest of the cuff seems about right. I may have the strap a bit wide, though. I think I need to skinny it up just a bit just after is clears the washer.
I was going to start assembly today, and come back to these washers, but it would really be more convenient to have the straps attached early in the assembly.... so I guess I'll make the washers now.
Mac
Robert MacPherson
The craftsmen of old had their secrets, and those secrets died with them. We are not the better for that, and neither are they.
http://www.lightlink.com/armory/
http://www.billyandcharlie.com
https://www.facebook.com/BillyAndCharlie
The craftsmen of old had their secrets, and those secrets died with them. We are not the better for that, and neither are they.
http://www.lightlink.com/armory/
http://www.billyandcharlie.com
https://www.facebook.com/BillyAndCharlie
-
Scott Martin
- Archive Member
- Posts: 1074
- Joined: Wed May 23, 2012 3:34 pm
- Location: Calgary AB, Canada
- Contact:
Re: Mac's blog
The circles may be most easily made with a beading punch, although those look like they are in the ballpark of 1/16" to 3/32" if that is the case, you may find that a nail set (if you can still buy them) will work well. That was my plan for the circles on the cuff edges, which you used a "negative" punch for.
Re: Mac's blog
Mac, may Icompletely unrelated to anything else humbly request a frontal profile shot of your large fluting stake, the scary thin spatula type? Plus a ruler put against, or simply name the width. Yes I know, dimensions are not that important. It would help me finish something here though. I can't seem to get myself to attempting that side project like this. Lack of creativity in part. o.o
Re: Mac's blog
I needed a circle with a "hairy" edge, so I had to make a punch. I will post a pic in a couple of minutes.Scott Martin wrote: ↑Thu Nov 25, 2021 11:45 pm The circles may be most easily made with a beading punch, although those look like they are in the ballpark of 1/16" to 3/32" if that is the case, you may find that a nail set (if you can still buy them) will work well. That was my plan for the circles on the cuff edges, which you used a "negative" punch for.
Mac
Robert MacPherson
The craftsmen of old had their secrets, and those secrets died with them. We are not the better for that, and neither are they.
http://www.lightlink.com/armory/
http://www.billyandcharlie.com
https://www.facebook.com/BillyAndCharlie
The craftsmen of old had their secrets, and those secrets died with them. We are not the better for that, and neither are they.
http://www.lightlink.com/armory/
http://www.billyandcharlie.com
https://www.facebook.com/BillyAndCharlie
Re: Mac's blog
Having made a mock up to get an idea of the shape of the lobes, I then made a punch to stamp the curved lines. Like most of my punches, it's 1/4" (6mm) square W-1 steel, about 4" (100mm) long.

The business end has little cuts in its edges which I made with my smallest three-square file. I wish I had a better idea about this, because it ended up coarser than what I see on the original A58 washers.

For the rings, I made a punch on round stock. If orientation is important, I make square punches; If it's not, I'll make them round. Using round stock let me do the rough work easily on the lathe.

The working end has the same cuts around the edge as the other punch.

Neither of these punches is likely to see much further use, but I hardened and tempered them anyway. It doesn't take much effort, and it's cheap insurance against having a punch change it's shape in the middle of a project.
After stamping the surface, I bossed up the lobes with a tin block and a round punch from my dapping set. There was no sense in making up a special punch for this operation.

The resulting washers are OK. They are a bit heavier handed than the originals, but they carry the overall look. If I were going to make lots of these, I would try something different to get more delicate lines. My impression is that I am missing something in my understanding of how to make the punches, but I'm working at the limits of what I can see from the pics. To really understand, I think I would need to see what the tool marks look like under higher magnification.


This shows how my washers compare to the original which has not been flattened. Note that the left and right strap rivets on the A58 gauntlets are not the same size. Almost all the rivets on both gauntlets are similar in size to the ones I'm using, but a couple of them are larger and a couple are smaller. It's hard to know what that all means in terms of what is and is not original without examining them more closely.


Mac
The business end has little cuts in its edges which I made with my smallest three-square file. I wish I had a better idea about this, because it ended up coarser than what I see on the original A58 washers.
For the rings, I made a punch on round stock. If orientation is important, I make square punches; If it's not, I'll make them round. Using round stock let me do the rough work easily on the lathe.
The working end has the same cuts around the edge as the other punch.
Neither of these punches is likely to see much further use, but I hardened and tempered them anyway. It doesn't take much effort, and it's cheap insurance against having a punch change it's shape in the middle of a project.
After stamping the surface, I bossed up the lobes with a tin block and a round punch from my dapping set. There was no sense in making up a special punch for this operation.
The resulting washers are OK. They are a bit heavier handed than the originals, but they carry the overall look. If I were going to make lots of these, I would try something different to get more delicate lines. My impression is that I am missing something in my understanding of how to make the punches, but I'm working at the limits of what I can see from the pics. To really understand, I think I would need to see what the tool marks look like under higher magnification.
This shows how my washers compare to the original which has not been flattened. Note that the left and right strap rivets on the A58 gauntlets are not the same size. Almost all the rivets on both gauntlets are similar in size to the ones I'm using, but a couple of them are larger and a couple are smaller. It's hard to know what that all means in terms of what is and is not original without examining them more closely.
Mac
Robert MacPherson
The craftsmen of old had their secrets, and those secrets died with them. We are not the better for that, and neither are they.
http://www.lightlink.com/armory/
http://www.billyandcharlie.com
https://www.facebook.com/BillyAndCharlie
The craftsmen of old had their secrets, and those secrets died with them. We are not the better for that, and neither are they.
http://www.lightlink.com/armory/
http://www.billyandcharlie.com
https://www.facebook.com/BillyAndCharlie
-
Johann ColdIron

- Archive Member
- Posts: 7421
- Joined: Mon Mar 03, 2003 2:01 am
- Location: Raleigh, NC
Re: Mac's blog
I like the rivet head size you chose. The larger one looks out of place and it is sitting proud of the center area because it rests on top of the outer bumps. It would be interesting to see if they have different setting tool marks or obvious "replacement" tell tales.
There is a different quality to the original crescent punch marks that is hard to define. Is it that the top punch surface was thinner? Or perhaps toothed in the other axis to variegate the surface a bit? Hmmmmm.
There is a different quality to the original crescent punch marks that is hard to define. Is it that the top punch surface was thinner? Or perhaps toothed in the other axis to variegate the surface a bit? Hmmmmm.
John Cope/ Sir Johann ColdIron, Master- Order of the Laurel
I'm not dead yet!
I'm not dead yet!
Re: Mac's blog
Exactly. That rivet is too big to fit within the bosses of the washer.Johann ColdIron wrote: ↑Fri Nov 26, 2021 3:19 pm I like the rivet head size you chose. The larger one looks out of place and it is sitting proud of the center area because it rests on top of the outer bumps. It would be interesting to see if they have different setting tool marks or obvious "replacement" tell tales.
The first thing to look for (if one had the chance to look freely inside) would be how the peened ends of the rivet look. If any of the rivets are quite modern they would be mild steel and not wrought iron, and there would be none of the characteristic splitting we usually see in old rivets.
Johann ColdIron wrote: ↑Fri Nov 26, 2021 3:19 pm There is a different quality to the original crescent punch marks that is hard to define. Is it that the top punch surface was thinner? Or perhaps toothed in the other axis to variegate the surface a bit? Hmmmmm.
What I'm seeing on the originals is a fine but rather irregular zig zag. I'm confident that the lines are punched because the irregularities are the same in each line. The punch must have been made using a different technique than I used. I could make the lines thinner, but I could not get the zig zags any finer using a file.
It might be possible to get that effect with by dressing the edge of the punch with a sort of notched chisel. That migh something like one of those garden tools for pulling dandelions... but very much smaller. By applying that chisel at alternating angles, it might be possible to "walk" a sort of zig zag along the punch edge. An argument against that is how the punched rings are only zig zaggy on the outside, even though the overall effect is similar. Perhaps the same tool could be used on the ring punch, but then the hole would be drifted (or drilled) open a bit larger to obliterate the internal zigs and zags.
Mac
Robert MacPherson
The craftsmen of old had their secrets, and those secrets died with them. We are not the better for that, and neither are they.
http://www.lightlink.com/armory/
http://www.billyandcharlie.com
https://www.facebook.com/BillyAndCharlie
The craftsmen of old had their secrets, and those secrets died with them. We are not the better for that, and neither are they.
http://www.lightlink.com/armory/
http://www.billyandcharlie.com
https://www.facebook.com/BillyAndCharlie
-
James Arlen Gillaspie
- Archive Member
- Posts: 2098
- Joined: Mon Jan 13, 2003 2:01 am
- Location: NY
- Contact:
Re: Mac's blog
I'm thinking they chiseled the edge of the punch. That might explain why the circle punch is only irregular on the outside. They are going for a sharper edge on their punches, too. Considering that few of the hinges and latten bits other than the borders of A 62 are original (for example, the hinges of the gauntlet cuffs were originally internal, so the external ones are spurious), but seem to have been done to ready the harness for display by Ferdinand II's people, for me a big question that has already been asked is as to whether such washers are even original, but done at a later date. As has been commented, the size of the rivet is questionable.
Re: Mac's blog
My lines are certainly much coarser than the originals... and the originals may not be original.James Arlen Gillaspie wrote: ↑Mon Nov 29, 2021 12:52 pm I'm thinking they chiseled the edge of the punch. That might explain why the circle punch is only irregular on the outside. They are going for a sharper edge on their punches, too. Considering that few of the hinges and latten bits other than the borders of A 62 are original (for example, the hinges of the gauntlet cuffs were originally internal, so the external ones are spurious), but seem to have been done to ready the harness for display by Ferdinand II's people, for me a big question that has already been asked is as to whether such washers are even original, but done at a later date. As has been commented, the size of the rivet is questionable.
Mac
Robert MacPherson
The craftsmen of old had their secrets, and those secrets died with them. We are not the better for that, and neither are they.
http://www.lightlink.com/armory/
http://www.billyandcharlie.com
https://www.facebook.com/BillyAndCharlie
The craftsmen of old had their secrets, and those secrets died with them. We are not the better for that, and neither are they.
http://www.lightlink.com/armory/
http://www.billyandcharlie.com
https://www.facebook.com/BillyAndCharlie
Re: Mac's blog
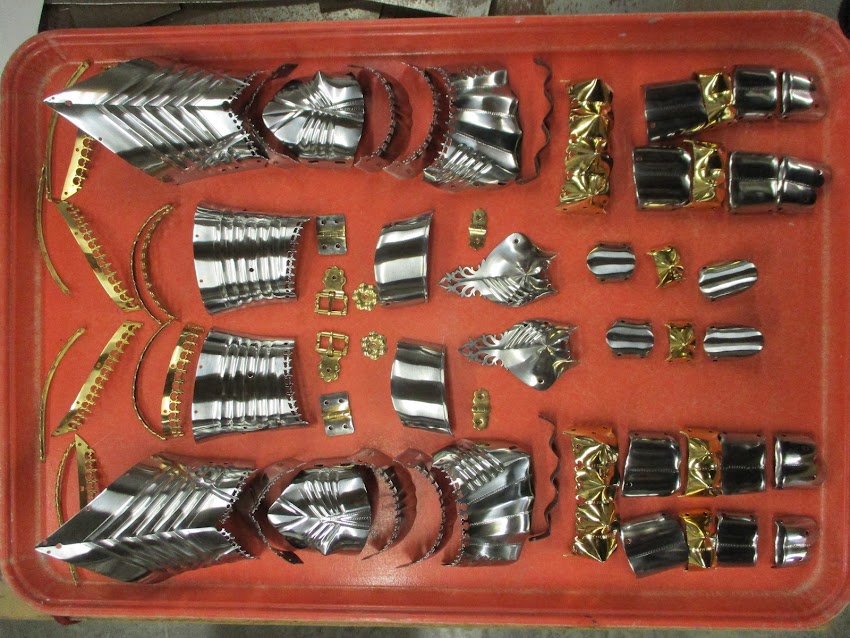
Assembly time!
Here are all the parts laid out on a tray. This is a pretty good way of keeping track of a lot of small parts.

The first phase was to install the brass. I used one screw in each assembly to make it easier to handle, and then replaced the screw with a rivet later.

Length is important. This rivet sticks out just a bit too much. This it brass trim, and it's better if a rivet pulls out easily to minimize the damage. It would be better to have about 2/3 this much sticking out....

... so, each rivet got just a bit trimmed off.

That looks better.

I mostly used this very dinky hammer.....

... and then finished up with this rivet set to round off the corners so it's let "catchy".

Once the brass was in place, I installed the cuff hinges. These rivets are also smoothed with a (different) set. Note, the mark on the hinge. A "line" means "left", and the mark is always on the "up" side of the hinge.

Next, the buckles. These rivets get a washer on the back to make it less damaging to the plate if they need to be removed for service in the future.


The thumb tips get the only non-brass rivets on this project. I want to keep the underside of the thumb as low-profile as possible. This is pretty normal for closed thumbs.

I used a rivet set to smooth out the sharp edges left from the hammer.

It's almost always best to attach the sewing tabs to single plates, rather than to assemblies. Here, we see the thumbs are riveted together and ready to be attached to the thumb bases.
The same ideas went into assembling the fingers. First the sewing tabs, then the assembly. These guys also have leather tabs at the proximal ends to secure them to the plate inside the knuckle rider.
Here, I'm figuring out the locations for the rivets which will secure the finger leathers to the knuckle.

Note, that the rivets have been modified to give the leather more room to buckle when the fingers are extended. I take this necessity as evidence that I'm going about this wrong. If I were to do this type of gauntlet again, I might opt for a full mitten lame to make the transition from knuckle to fingers. That would put the leather anchors back farther and alleviate the need for "rivet heroics" to get a reasonable working length of leather.

Here are all the completed sub-assemblies.

Getting ready for the final assembly. The overall order of assembly should be chosen to minimize the number of difficult steps. At some point there there will almost always be some balancing of squirmy parts while riveting. In this case it will be while securing the wrist.

I've glossed over the whole process of the sliding rivets. In retrospect, I should have tried to get some photos. In general, the rivets were cut down to about half length... sometimes just a bit longer, and other times just a bit shorter, as need seemed to dictate. All the moving joints have internal washers, and the rivets were peened with a small cross peen hammer. The shiny heads of the rivets were supported on a tin block on the anvil.
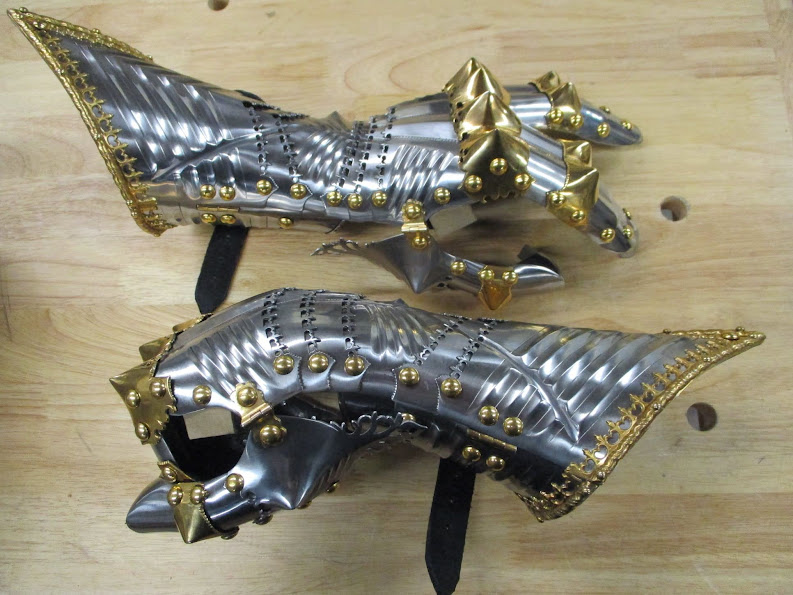
Here is what they look like now.


So... I'm all done, but for installing the gloves.
Mac
Here are all the parts laid out on a tray. This is a pretty good way of keeping track of a lot of small parts.
The first phase was to install the brass. I used one screw in each assembly to make it easier to handle, and then replaced the screw with a rivet later.
Length is important. This rivet sticks out just a bit too much. This it brass trim, and it's better if a rivet pulls out easily to minimize the damage. It would be better to have about 2/3 this much sticking out....
... so, each rivet got just a bit trimmed off.
That looks better.
I mostly used this very dinky hammer.....
... and then finished up with this rivet set to round off the corners so it's let "catchy".
Once the brass was in place, I installed the cuff hinges. These rivets are also smoothed with a (different) set. Note, the mark on the hinge. A "line" means "left", and the mark is always on the "up" side of the hinge.
Next, the buckles. These rivets get a washer on the back to make it less damaging to the plate if they need to be removed for service in the future.
The thumb tips get the only non-brass rivets on this project. I want to keep the underside of the thumb as low-profile as possible. This is pretty normal for closed thumbs.
I used a rivet set to smooth out the sharp edges left from the hammer.
It's almost always best to attach the sewing tabs to single plates, rather than to assemblies. Here, we see the thumbs are riveted together and ready to be attached to the thumb bases.
The same ideas went into assembling the fingers. First the sewing tabs, then the assembly. These guys also have leather tabs at the proximal ends to secure them to the plate inside the knuckle rider.
Here, I'm figuring out the locations for the rivets which will secure the finger leathers to the knuckle.
Note, that the rivets have been modified to give the leather more room to buckle when the fingers are extended. I take this necessity as evidence that I'm going about this wrong. If I were to do this type of gauntlet again, I might opt for a full mitten lame to make the transition from knuckle to fingers. That would put the leather anchors back farther and alleviate the need for "rivet heroics" to get a reasonable working length of leather.
Here are all the completed sub-assemblies.
Getting ready for the final assembly. The overall order of assembly should be chosen to minimize the number of difficult steps. At some point there there will almost always be some balancing of squirmy parts while riveting. In this case it will be while securing the wrist.
I've glossed over the whole process of the sliding rivets. In retrospect, I should have tried to get some photos. In general, the rivets were cut down to about half length... sometimes just a bit longer, and other times just a bit shorter, as need seemed to dictate. All the moving joints have internal washers, and the rivets were peened with a small cross peen hammer. The shiny heads of the rivets were supported on a tin block on the anvil.
Here is what they look like now.
So... I'm all done, but for installing the gloves.
Mac
Robert MacPherson
The craftsmen of old had their secrets, and those secrets died with them. We are not the better for that, and neither are they.
http://www.lightlink.com/armory/
http://www.billyandcharlie.com
https://www.facebook.com/BillyAndCharlie
The craftsmen of old had their secrets, and those secrets died with them. We are not the better for that, and neither are they.
http://www.lightlink.com/armory/
http://www.billyandcharlie.com
https://www.facebook.com/BillyAndCharlie
-
Rene K.

- Archive Member
- Posts: 443
- Joined: Tue Dec 02, 2014 11:50 am
- Location: Langenzenn, Germany
- Contact:
Re: Mac's blog
Very very beautifull !
Those who find spelling mistakes are allowed to keep hold of them...
www.eysenkleider.com
Master armouring and historic replicas
www.freyhand.com
https://de.pinterest.com/kohlstruck/
www.eysenkleider.com
Master armouring and historic replicas
www.freyhand.com
https://de.pinterest.com/kohlstruck/
Re: Mac's blog
Thank you!
I expect the leather gloves to arrive on Saturday. If all goes well, I'll have them installed soon.
Mac
Robert MacPherson
The craftsmen of old had their secrets, and those secrets died with them. We are not the better for that, and neither are they.
http://www.lightlink.com/armory/
http://www.billyandcharlie.com
https://www.facebook.com/BillyAndCharlie
The craftsmen of old had their secrets, and those secrets died with them. We are not the better for that, and neither are they.
http://www.lightlink.com/armory/
http://www.billyandcharlie.com
https://www.facebook.com/BillyAndCharlie
Re: Mac's blog
This has been a treat. As ever I'm sad to see this come to an end and I hope there is another project in the wings. I hope we have the chance to see these modelled on someone's hand. I don't recall if this was a commissioned work.
-Adair
-Adair
Re: Mac's blog
Thank you!
I'm not really sure what's up next. There is a barbute that I started years ago that needs to be finished, but that's not a very exciting project... at least not unless I use it as an opportunity to explore new grinding and polishing ideas.
I'll take some shots of the gauntlets when they have been gloved, but it's hard for me to really do a proper job of hand modeling. Perhaps Tom B. can be persuaded to take some shots after he takes possession of them.
Mac
Robert MacPherson
The craftsmen of old had their secrets, and those secrets died with them. We are not the better for that, and neither are they.
http://www.lightlink.com/armory/
http://www.billyandcharlie.com
https://www.facebook.com/BillyAndCharlie
The craftsmen of old had their secrets, and those secrets died with them. We are not the better for that, and neither are they.
http://www.lightlink.com/armory/
http://www.billyandcharlie.com
https://www.facebook.com/BillyAndCharlie
Re: Mac's blog
I'm glad to hear that Tom will be the proud owner. I don't know him personally, but he sure contributes a lot to this community.
-Adair
-Adair
Re: Mac's blog
I'm glad to hear that Tom will be the proud owner. I don't know him personally, but he sure contributes a lot to this community.
-Adair
-Adair
Re: Mac's blog
I'm glad to hear that Tom will be the proud owner. I don't know him personally, but he sure contributes a lot to this community.
-Adair
-Adair
-
Johann ColdIron
- Archive Member
- Posts: 7421
- Joined: Mon Mar 03, 2003 2:01 am
- Location: Raleigh, NC
Re: Mac's blog
Absolutely wonderful to look at completed. Your detail work and patience with the fiddly parts of the process are a gift. Great to see how splittens can be assembled.
The museum employee in me wants to put them under a vitrine and the fighter in me wants to know how they work on the battle field.
The museum employee in me wants to put them under a vitrine and the fighter in me wants to know how they work on the battle field.
John Cope/ Sir Johann ColdIron, Master- Order of the Laurel
I'm not dead yet!
I'm not dead yet!
Re: Mac's blog
Thank you!Johann ColdIron wrote: ↑Fri Dec 03, 2021 11:36 am Absolutely wonderful to look at completed. Your detail work and patience with the fiddly parts of the process are a gift. Great to see how splittens can be assembled.
The museum employee in me wants to put them under a vitrine and the fighter in me wants to know how they work on the battle field.
This is how I'd like them displayed in the vitrine, please.
Mac
Robert MacPherson
The craftsmen of old had their secrets, and those secrets died with them. We are not the better for that, and neither are they.
http://www.lightlink.com/armory/
http://www.billyandcharlie.com
https://www.facebook.com/BillyAndCharlie
The craftsmen of old had their secrets, and those secrets died with them. We are not the better for that, and neither are they.
http://www.lightlink.com/armory/
http://www.billyandcharlie.com
https://www.facebook.com/BillyAndCharlie
-
Scott Martin
- Archive Member
- Posts: 1074
- Joined: Wed May 23, 2012 3:34 pm
- Location: Calgary AB, Canada
- Contact:
Re: Mac's blog
He has been known to take some nice photographs. Bonus points if he can take photos and compare them to the "inspiration" in Vienna (hint hint). The gilding on the knuckle plates is gorgeous, so I may need to track down your plating solution and do that for my next set. On the A62, is the edge decoration gilded, or just brass?
I tend to agree that keeping the knuckle plate as a single piece would probably aid their function - that gets the "extension" dealt with and avoids (as you say) "leather heroics". I'm also curious why you didn't countersink the last set of rivets for holding on the cuff decoration. I know that it adds a bit of fiddling to get the rivet shaft length right, but I find that (particularly with brass rivets on tempered steel) this aids significantly in being abe to remove and replace rivets, since it helps center the drill for removal. I assume that this is a deliberate choice, and I'm glad that I'm not the only one who fidgets with rivet lengths to within a millimeter
On a bit of a tangent I've taken a bunch of photos today to show assembly of more "typical" finger gauntlets and should have that up in the near future (on a different thread) since it has taken some trial and error to figure out what the finger plate lengths should be. It's awesome to see your assembly, and (more importantly) your thinking in why you chose to do things in a particular way - it *really* helps inform my decisions to try other methods.
Scott