Mac's blog
-
Woodswork Armory

- Archive Member
- Posts: 159
- Joined: Thu Jan 18, 2018 7:52 pm
- Location: Buffalo, NY
Re: Mac's blog
The gauntlets look fantastic Mac, great job!
Re: Mac's blog
The gauntlets are on hold for a bit while we rethink some things about he gloves and their attachment. More on this later.....
Meanwhile.....
Sometimes one has to make a tool to make a tool etc. I'm planning to try to modify my grinder to take 2x72 belts with a big contact wheel on the main shaft and a "backstand" idler mounted to the body of the machine. To do this will first require some experimentation to see what's the biggest contact wheel I can actually drive. That will require making some wheels which are larger than my wood lathe will handle in its current form. Not only will I have to turn them "outboard", but I need to reduce the spindle speed. I've wanted a slower spindle speed for other projects anyway, and have been collecting parts for that.
Yesterday I finished assembling my bearings, shaft and pulleys into a new support for the old motor. The oil ports and vents on this motor prevent me from hanging it upside down like most people do for this sort of thing, so I not only had to mount it upright, but had to reverse the rotation as well. A bit of experimentation "under the hood" showed that I needed to swap the leads to the starter coils.
In any case, for better of worse, this it what it all looks like now.
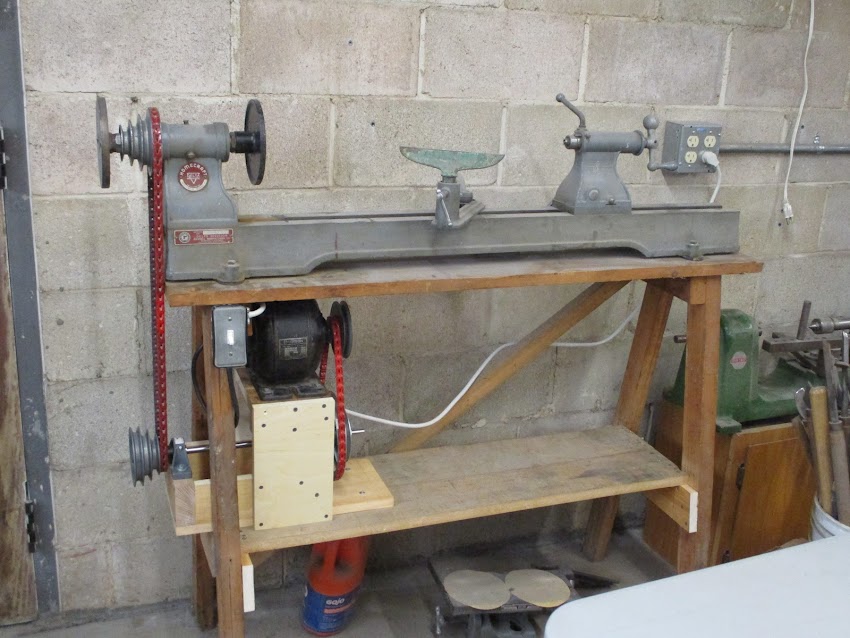
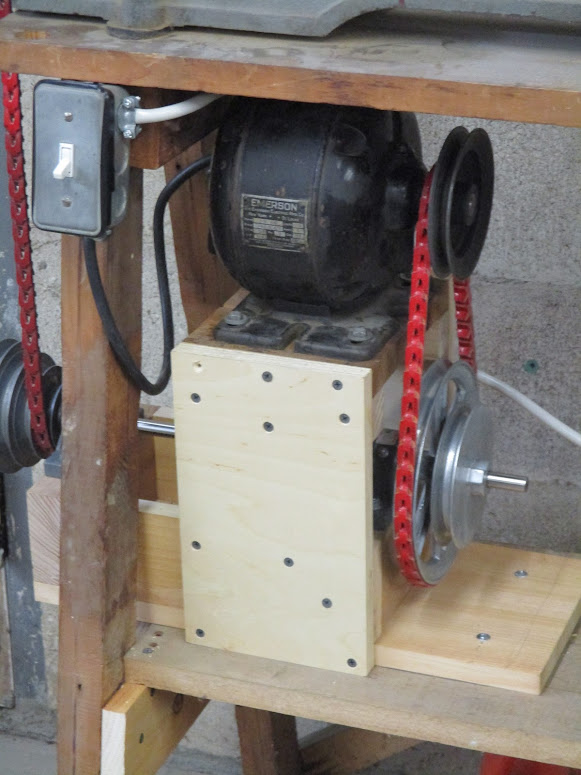
It's ugly, but it works. I'll start experimenting with making big wheels later today. It will require a way to drill the mounting hole coaxially with the turning. I have a cunning plan for a tool to do that. We'll see how it goes.
Mac
Meanwhile.....
Sometimes one has to make a tool to make a tool etc. I'm planning to try to modify my grinder to take 2x72 belts with a big contact wheel on the main shaft and a "backstand" idler mounted to the body of the machine. To do this will first require some experimentation to see what's the biggest contact wheel I can actually drive. That will require making some wheels which are larger than my wood lathe will handle in its current form. Not only will I have to turn them "outboard", but I need to reduce the spindle speed. I've wanted a slower spindle speed for other projects anyway, and have been collecting parts for that.
Yesterday I finished assembling my bearings, shaft and pulleys into a new support for the old motor. The oil ports and vents on this motor prevent me from hanging it upside down like most people do for this sort of thing, so I not only had to mount it upright, but had to reverse the rotation as well. A bit of experimentation "under the hood" showed that I needed to swap the leads to the starter coils.
In any case, for better of worse, this it what it all looks like now.
It's ugly, but it works. I'll start experimenting with making big wheels later today. It will require a way to drill the mounting hole coaxially with the turning. I have a cunning plan for a tool to do that. We'll see how it goes.
Mac
Robert MacPherson
The craftsmen of old had their secrets, and those secrets died with them. We are not the better for that, and neither are they.
http://www.lightlink.com/armory/
http://www.billyandcharlie.com
https://www.facebook.com/BillyAndCharlie
The craftsmen of old had their secrets, and those secrets died with them. We are not the better for that, and neither are they.
http://www.lightlink.com/armory/
http://www.billyandcharlie.com
https://www.facebook.com/BillyAndCharlie
Re: Mac's blog
The purpose of the work on the lathe was to make the wheels form my experimental attachments to my grinding machine.
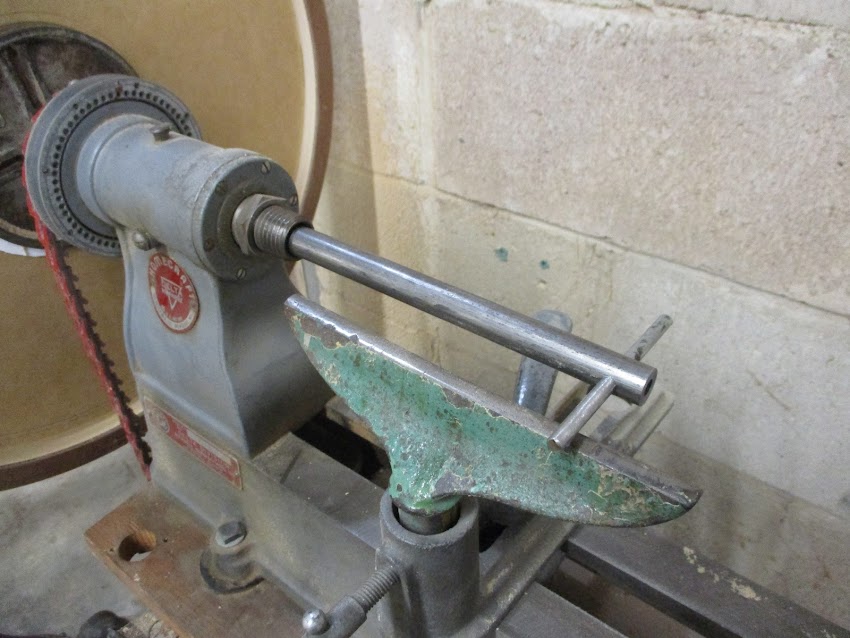
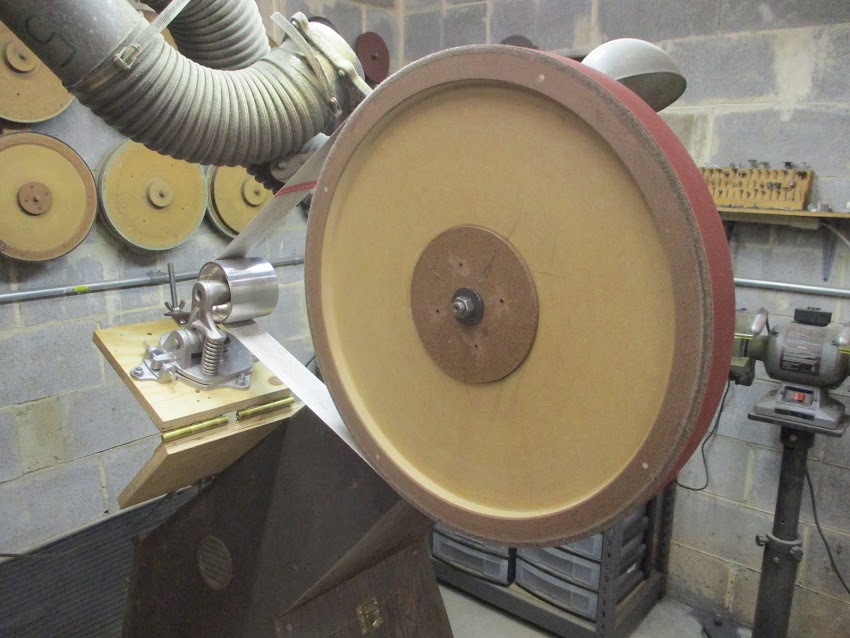
The first is designed to be the biggest wheel that can be covered with a 2X72 abrasive belt. It's something like 21.5 inches in diameter. The kludgy looking thing in the vise is a support for the turning tool.

This is the drill for making the mounting hole. It's a normal 1/2" brad-point, mounted in a 5/8" holder.

The holder is a running fit in the bore of the lathe arbor.
After mounting the wheel up on my grinding machine, I needed to turn the working surfaces true again. I lost some concentrically due to the drill wandering a bit in the previous operation.

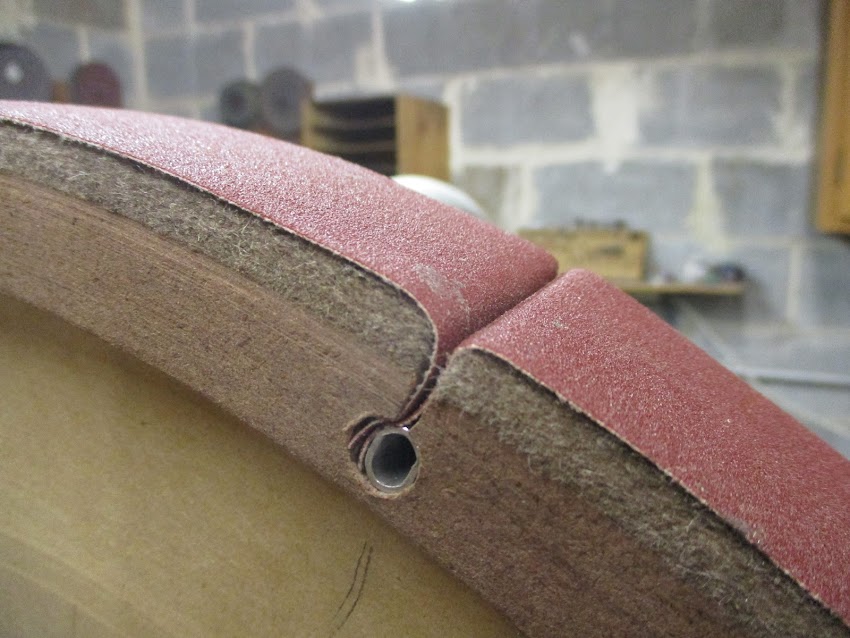
I used the gel type contact cement to attach a 1/4" (6mm) strip of felt to pad the edge. This was a very smelly procedure, and one which left the shop uninhabitable for many hours.

It took most of a tube of this stuff to get the surface of the felt ready for the belt. I have found on my smaller wheel of this sort that without the sticky glue, the belt will wander off the disc.

An oval shaped aluminum tube keeps the ends of the belt tucked in. The tube is turned with a sort of wrench to pinch the belt in the hole.
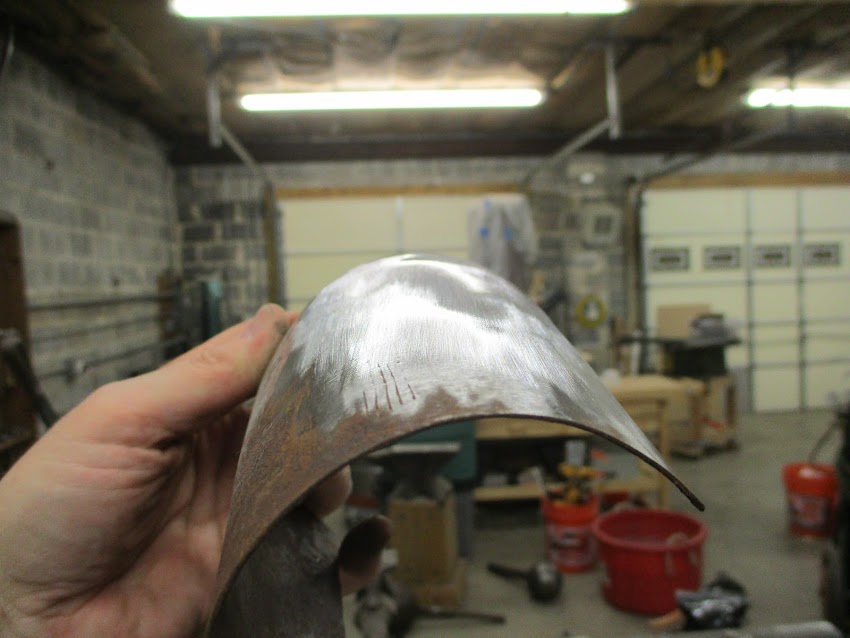
I tried it out on an old vambrace, and was able to pull off the hammer marks OK with a couple of cross passes on the wheel. There are still some little dips and hollows here, but the overall effect is promising.
Mac
The first is designed to be the biggest wheel that can be covered with a 2X72 abrasive belt. It's something like 21.5 inches in diameter. The kludgy looking thing in the vise is a support for the turning tool.
This is the drill for making the mounting hole. It's a normal 1/2" brad-point, mounted in a 5/8" holder.
The holder is a running fit in the bore of the lathe arbor.
After mounting the wheel up on my grinding machine, I needed to turn the working surfaces true again. I lost some concentrically due to the drill wandering a bit in the previous operation.
I used the gel type contact cement to attach a 1/4" (6mm) strip of felt to pad the edge. This was a very smelly procedure, and one which left the shop uninhabitable for many hours.
It took most of a tube of this stuff to get the surface of the felt ready for the belt. I have found on my smaller wheel of this sort that without the sticky glue, the belt will wander off the disc.
An oval shaped aluminum tube keeps the ends of the belt tucked in. The tube is turned with a sort of wrench to pinch the belt in the hole.
I tried it out on an old vambrace, and was able to pull off the hammer marks OK with a couple of cross passes on the wheel. There are still some little dips and hollows here, but the overall effect is promising.
Mac
Robert MacPherson
The craftsmen of old had their secrets, and those secrets died with them. We are not the better for that, and neither are they.
http://www.lightlink.com/armory/
http://www.billyandcharlie.com
https://www.facebook.com/BillyAndCharlie
The craftsmen of old had their secrets, and those secrets died with them. We are not the better for that, and neither are they.
http://www.lightlink.com/armory/
http://www.billyandcharlie.com
https://www.facebook.com/BillyAndCharlie
Re: Mac's blog
Mac,
Can you tell us a little about the advantage of the large wheel over a multi wheel belt grinder with various platens? Is your goal perhaps to approximate the tools and effect of historical abrasive wheels or is there another advantage you'd like to explore with this mock-up?
It's funny how one ambition in the shop can lead to so many other projects just to get back to the initial task. Such distractions have sent me down diverging paths for years.
-Adair
Re: Mac's blog
This is more about examining some different options than anything else. I've had pretty successful results with a 12" X 1" wheel for finer grits, and wanted to see what would happen if I scaled that up to the largest conveniently obtainable sort of belt. From the mid 15thC on, we see armor being polished on really big wheels, and part of me has always wanted to head in that direction. The big thing standing in the way is not knowing what sort of abrasive they were using and how they were presenting it on those wheels. This project provides a sort of a bridge by using commercially available belts. I suppose the whole thing could be taken further by finding a source of the material belt material in long rolls. I could imagine making wheels as big as 48" using sheets of MDF or particle board. That would require a different drive system, of course, but that's easy enough.Armadillo wrote: ↑Tue Dec 28, 2021 12:13 pm Mac,
Can you tell us a little about the advantage of the large wheel over a multi wheel belt grinder with various platens? Is your goal perhaps to approximate the tools and effect of historical abrasive wheels or is there another advantage you'd like to explore with this mock-up?
Another thing I'm doing here is testing my machine to see how large a wheel I can put on it. Having seen that I have enough power (albeit just barely) for a 21" wheel, I now have reason to think the next experimental attachment is feasible. This will be a contact wheel of about 18" with an idler wheel attached to the carcass of the machine. This will give me a way to use 2 X 27 belts without having to glue them on to the wheel. That should make it easy to change grits. It will also make it easy to swap out contact wheels of diferent profiles and firmness.
I don't expect to abandon the idea of a belt sander and platen. I'm very satisfied with the sorts of things I can do with that. I may move on to replacing my 1 x 45 belt sander for something that will take the 2 x 72 belts. A longer machine will bring the work farther away from the bulk of the machine and make it easier to work on large objects. The wider belt may also be more economical than the narrow belts I am currently using.
These are the sorts of projects that I never felt I had the time to do before. This may be the big advantage to being semi-retired old goat. I get to screw around with these projects that probably won't pay off. In a sense, I'm F-ing around with these ideas so you guys don't have to.
Mac
Robert MacPherson
The craftsmen of old had their secrets, and those secrets died with them. We are not the better for that, and neither are they.
http://www.lightlink.com/armory/
http://www.billyandcharlie.com
https://www.facebook.com/BillyAndCharlie
The craftsmen of old had their secrets, and those secrets died with them. We are not the better for that, and neither are they.
http://www.lightlink.com/armory/
http://www.billyandcharlie.com
https://www.facebook.com/BillyAndCharlie
Re: Mac's blog
A couple of weeks ago, I made a 22" wheel that could be wrapped in a 2 X 72" sanding belt. That project was a side track from the main project, which was to make an attachment to use those 2 X 72" belts in a more conventional way. That is "conventional" except for the size of the contact wheel, which was to be be big.
One of the technological problems I had with the 22" wheel was drilling a mounting hole that was acceptably straight and coaxial. In the mean time I have tried three different varients on half-round bits. This pic shows those bits and some test pieces. The ones with a long flat area did not remain straight. The one with a short flat drilled a good hole, but the whole set up had to be disassembled frequently to clear the swarf.

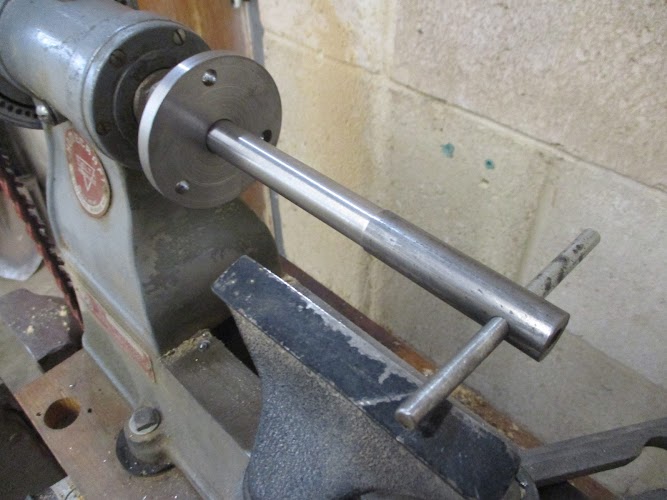
I decided that I needed to go back to the brad-point wood bit, but to make some provisions to keep it straight and concentric. The first thing I needed was a way to keep the drill itself well centered as it entered the work. For this, I made up a bushing which fit into the outboard end of the lathe arbor.

The next thing I needed was a way to keep the drill carrier centered on the inboard end of the arbor. For this, I bored a hole in a small faceplate which would screw onto the arbor.
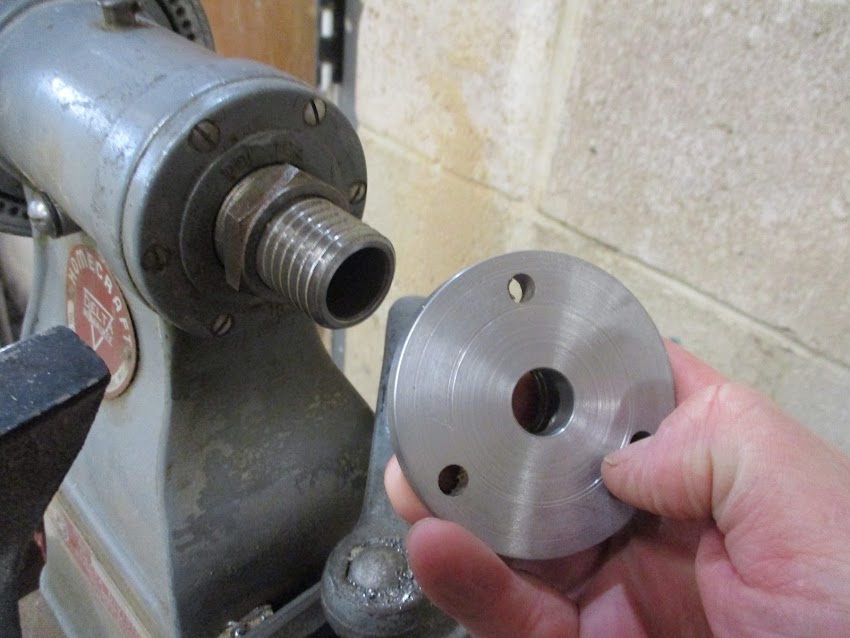
Thus, with tool supported at both ends of the arbor, the drill should have no choice but to make a coaxial hole straight through the work.

This test piece shows the lathe in motion as the drill emerges. The work is blurred, but the drill is steady. It seems to work OK.

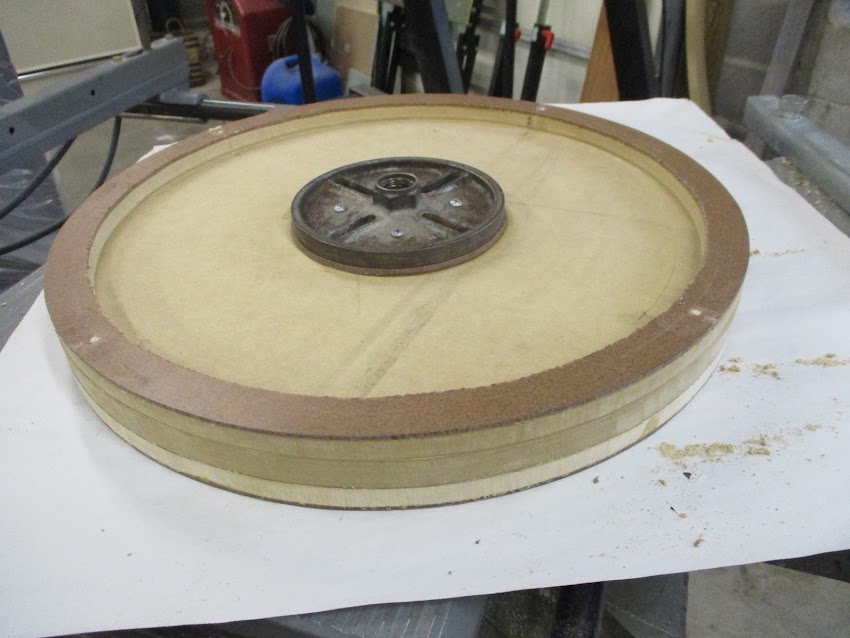
With that under control, I built the new wheel. It is 18 1/2" in diameter, and will be 19" when the felt rim is glued on.
Here is the new attachment as it currently stands. I just got it working last night and have not had much chance to play with it, but it looks like it will work well.
This back idler is a commercial unit. It is not very well made, but it was available and relatively inexpensive.

If the whole idea turns out to be worth the effort, I will probably replace it with something I like better. In the mean time, I have just ordered up a couple of small knobs to replace the flat thumb screws on the tracking mechanism and a big one to replace the wing nut on the tension adjustment.
I just realized last night that the only 2 X 72 belts I has were the 150gr ones I bought to experiment with. I need to get some coarser ones and some finer ones to put this thing through its paces and see what it will do.
Mac
One of the technological problems I had with the 22" wheel was drilling a mounting hole that was acceptably straight and coaxial. In the mean time I have tried three different varients on half-round bits. This pic shows those bits and some test pieces. The ones with a long flat area did not remain straight. The one with a short flat drilled a good hole, but the whole set up had to be disassembled frequently to clear the swarf.
I decided that I needed to go back to the brad-point wood bit, but to make some provisions to keep it straight and concentric. The first thing I needed was a way to keep the drill itself well centered as it entered the work. For this, I made up a bushing which fit into the outboard end of the lathe arbor.
The next thing I needed was a way to keep the drill carrier centered on the inboard end of the arbor. For this, I bored a hole in a small faceplate which would screw onto the arbor.
Thus, with tool supported at both ends of the arbor, the drill should have no choice but to make a coaxial hole straight through the work.
This test piece shows the lathe in motion as the drill emerges. The work is blurred, but the drill is steady. It seems to work OK.
With that under control, I built the new wheel. It is 18 1/2" in diameter, and will be 19" when the felt rim is glued on.
Here is the new attachment as it currently stands. I just got it working last night and have not had much chance to play with it, but it looks like it will work well.
This back idler is a commercial unit. It is not very well made, but it was available and relatively inexpensive.
If the whole idea turns out to be worth the effort, I will probably replace it with something I like better. In the mean time, I have just ordered up a couple of small knobs to replace the flat thumb screws on the tracking mechanism and a big one to replace the wing nut on the tension adjustment.
I just realized last night that the only 2 X 72 belts I has were the 150gr ones I bought to experiment with. I need to get some coarser ones and some finer ones to put this thing through its paces and see what it will do.
Mac
Robert MacPherson
The craftsmen of old had their secrets, and those secrets died with them. We are not the better for that, and neither are they.
http://www.lightlink.com/armory/
http://www.billyandcharlie.com
https://www.facebook.com/BillyAndCharlie
The craftsmen of old had their secrets, and those secrets died with them. We are not the better for that, and neither are they.
http://www.lightlink.com/armory/
http://www.billyandcharlie.com
https://www.facebook.com/BillyAndCharlie
-
Johann ColdIron

- Archive Member
- Posts: 7421
- Joined: Mon Mar 03, 2003 2:01 am
- Location: Raleigh, NC
Re: Mac's blog
Getting center holes and outside diameters concentric and on axis is always a challenge. Looks read good! I understand your care in this step. Any misalignment and the "lope" of the wheel quickly becomes visible and affects tracking. The ones I did as axles for zoetropes for an exhibit drove me mad.
I hope this pans out as I have often wondered what the benefit of the historically used big wheel would be since they clearly used them. Be interesting to see what feet per second cuts most optimally. Is this on a VFD?
The Idle wheel arrangement doesn't look too bad aside from rough casting and cheap hardware. Half my shop started that way...
John Cope/ Sir Johann ColdIron, Master- Order of the Laurel
I'm not dead yet!
I'm not dead yet!
Re: Mac's blog
I suspect that the big wheel was about surface speed and relative "flatness" of the tool surface. The bigger the wheel, the faster you can get it edge moving, and the closer it is to being a file.Johann ColdIron wrote: ↑Sun Jan 23, 2022 2:52 pm
I hope this pans out as I have often wondered what the benefit of the historically used big wheel would be since they clearly used them. Be interesting to see what feet per second cuts most optimally.
No. I have no idea how those work, and I haven't figured out how to figure it out.
The most irritating thing about that backstand idler is that the shaft of the roller was not in line with the tracking tab. The deviation was not great enough that I noticed it, and I set it up as if the mounting holes were "true". The result was that I had to adjust the tracking all the way to one extreme to center the belt. It took a bit of head scratching to understand the problem. I ended up turning the mounting board over so I could drill fresh holes in the right locations. That worked OK.Johann ColdIron wrote: ↑Sun Jan 23, 2022 2:52 pm The Idle wheel arrangement doesn't look too bad aside from rough casting and cheap hardware. Half my shop started that way...
I've also done some work on tracking mechanism. As it arrived, it was stiff and gritty. I smoothed on the mating surfaces with a flat sanding block, and put on some high pressure grease. I've also removed the big-assed lock washer from the pivot and replaced it with a flat washer and a "star" washer supply the necessary pressure. It works smoothly now.
We have a saying in amateur astronomy which describes how the affordable equipment always needs some work right out of the box. "Even if you buy 'em, you have to build 'em!"
Mac
Robert MacPherson
The craftsmen of old had their secrets, and those secrets died with them. We are not the better for that, and neither are they.
http://www.lightlink.com/armory/
http://www.billyandcharlie.com
https://www.facebook.com/BillyAndCharlie
The craftsmen of old had their secrets, and those secrets died with them. We are not the better for that, and neither are they.
http://www.lightlink.com/armory/
http://www.billyandcharlie.com
https://www.facebook.com/BillyAndCharlie
-
Johann ColdIron
- Archive Member
- Posts: 7421
- Joined: Mon Mar 03, 2003 2:01 am
- Location: Raleigh, NC
Re: Mac's blog
It would be nice to worry less about grinding scallops into work with smaller diameter wheels. Though you have muddled through... 
My only experience with VFD like devices has been a phase converter I put on a 220V 3 phase buffer I got from Tracy. It allowed me to run it on 110v single phase and coincidently gave me a dial to control RPM. Quite handy to find a sweet spot in it's speed range to polish with on a machine with no pulleys to swap. You are kind of doing the same thing mechanically, and probably more cheaply!
That is weird that the shaft and tab were not aligned. Guess they didn't think through their relationship. Hope it tracks well!
It is true that everything is a "Kit" till it works the way you want.
John Cope/ Sir Johann ColdIron, Master- Order of the Laurel
I'm not dead yet!
I'm not dead yet!
Re: Mac's blog
I'm very curious about this experiment. I've had a notebook of drawings for a belt grinding station and I want to make sure I build it with as much flexibility/adaptability as I can. The merits of your experiment might influence how I proceed.
I've had my eye on this large belt grinder at a salvage yard near me as a parts carcass. It comes with a number of 14" contact wheels and is set up for very long belts. The contact wheels mount like a ring gear rather than individual hubs. The main appeal is that I would just stop designing and have a tool to use that is nearly "plug and play". I've been working with a 2"x48" pedestal style belt grinder forever.
I've had my eye on this large belt grinder at a salvage yard near me as a parts carcass. It comes with a number of 14" contact wheels and is set up for very long belts. The contact wheels mount like a ring gear rather than individual hubs. The main appeal is that I would just stop designing and have a tool to use that is nearly "plug and play". I've been working with a 2"x48" pedestal style belt grinder forever.
Re: Mac's blog
It's difficult to strike a balance between planning and action. On the one hand, we have the example of how I'm trying to make the best of a situation who's groundwork I laid over thirty years ago. On the other hand, If I had thought it through carefully I might not have been able to decide to build anything.
If the price is right, I'd say "grab that machine" and see what you can do with it.Armadillo wrote: ↑Mon Jan 24, 2022 12:41 pm I've had my eye on this large belt grinder at a salvage yard near me as a parts carcass. It comes with a number of 14" contact wheels and is set up for very long belts. The contact wheels mount like a ring gear rather than individual hubs. The main appeal is that I would just stop designing and have a tool to use that is nearly "plug and play". I've been working with a 2"x48" pedestal style belt grinder forever.
20210403_111541.jpg
Mac
Robert MacPherson
The craftsmen of old had their secrets, and those secrets died with them. We are not the better for that, and neither are they.
http://www.lightlink.com/armory/
http://www.billyandcharlie.com
https://www.facebook.com/BillyAndCharlie
The craftsmen of old had their secrets, and those secrets died with them. We are not the better for that, and neither are they.
http://www.lightlink.com/armory/
http://www.billyandcharlie.com
https://www.facebook.com/BillyAndCharlie
Re: Mac's blog
I think one of the keys to not getting scallops is to run the wheel slowly enough that the work can follow any imperfections in the balance etc. The other thing I have been playing with is making my passes by "rolling" the work under the wheel, rather than making back and forth cuts. This is not the way I have worked with my belt-and-platen attachment, so it will take some getting used to.Johann ColdIron wrote: ↑Mon Jan 24, 2022 11:08 am It would be nice to worry less about grinding scallops into work with smaller diameter wheels. Though you have muddled through...
My only experience with VFD like devices has been a phase converter I put on a 220V 3 phase buffer I got from Tracy. It allowed me to run it on 110v single phase and coincidently gave me a dial to control RPM. Quite handy to find a sweet spot in it's speed range to polish with on a machine with no pulleys to swap. You are kind of doing the same thing mechanically, and probably more cheaply!
I'm not sure where they went wrong. I suspect that the tension arm is difficult object to chuck into a machine to bore the hole for the roller shaft. One would think that the casting would have been cored, and they could reference from the pivot hole, but maybe it's not as easy as all that. Then again, perhaps the basic issue is that their pattern simply has the tracking tab in the wrong location. In any case it's only a degree or two and it's hard to see. It may be the case that it is less of a problem if the idler is farther away from the contact wheel. I imagine that the closer together the two wheels are, the more control authority thee tracking mechanism has. It may be that my set up is "twitchier" than they desired for.Johann ColdIron wrote: ↑Mon Jan 24, 2022 11:08 am
That is weird that the shaft and tab were not aligned. Guess they didn't think through their relationship. Hope it tracks well!
"All the World's a kit, and and all the men and women merely bashers"Johann ColdIron wrote: ↑Mon Jan 24, 2022 11:08 am It is true that everything is a "Kit" till it works the way you want.
Mac
Robert MacPherson
The craftsmen of old had their secrets, and those secrets died with them. We are not the better for that, and neither are they.
http://www.lightlink.com/armory/
http://www.billyandcharlie.com
https://www.facebook.com/BillyAndCharlie
The craftsmen of old had their secrets, and those secrets died with them. We are not the better for that, and neither are they.
http://www.lightlink.com/armory/
http://www.billyandcharlie.com
https://www.facebook.com/BillyAndCharlie
Re: Mac's blog
After several false starts which I did not document, I think I finally have the newfangled adjustable dust collector hood working on my machine. It replaces the fixed location hood which has been inadequate for 25 years. The two new systems that use large wheels on the arbor have forced me to deal. Here are some pics of the new hood in various positions to accommodate the different abrasive configurations.
The 22" wheel throws a nice shower of sparks here which show that I might have to shorten the hood arm a bit so I can move it in a little closer to the machine. It looks like it will work as it is, but I'm still messing with it.

The 19" wheel for the 2 x 72" belt sander configuration uses a similar hood position, but a bit higher. Again, I might profit by moving it closer to the machine.
The 12" wheel used to be the biggest thing I could use with the old hood. I've got the new hood moved up and back to accommodate this size.

It's tough to get any hood in the right place for the 1 x 42 belt sander attachment. I should probably take another pic with the machine running faster so I can see where the sparks are going.

This deburring wheel sees a lot of use for pewter goods. Here I have the hood up and back nearly as far as it will go.

There will probably be some fine tuning in this system, but I think the basic plan is sound enough. The "shake down cruise" will be on that barbute that features in the earlier pics. Before that happens in earnest, I need to swap in some new pulleys that will let me run lower arbor speeds. I also have a slightly more powerful motor waiting to see if I need the extra 1/4 hp. The conversion is waiting on the two new step pulleys.
Mac
The 22" wheel throws a nice shower of sparks here which show that I might have to shorten the hood arm a bit so I can move it in a little closer to the machine. It looks like it will work as it is, but I'm still messing with it.
The 19" wheel for the 2 x 72" belt sander configuration uses a similar hood position, but a bit higher. Again, I might profit by moving it closer to the machine.
The 12" wheel used to be the biggest thing I could use with the old hood. I've got the new hood moved up and back to accommodate this size.
It's tough to get any hood in the right place for the 1 x 42 belt sander attachment. I should probably take another pic with the machine running faster so I can see where the sparks are going.
This deburring wheel sees a lot of use for pewter goods. Here I have the hood up and back nearly as far as it will go.
There will probably be some fine tuning in this system, but I think the basic plan is sound enough. The "shake down cruise" will be on that barbute that features in the earlier pics. Before that happens in earnest, I need to swap in some new pulleys that will let me run lower arbor speeds. I also have a slightly more powerful motor waiting to see if I need the extra 1/4 hp. The conversion is waiting on the two new step pulleys.
Mac
Robert MacPherson
The craftsmen of old had their secrets, and those secrets died with them. We are not the better for that, and neither are they.
http://www.lightlink.com/armory/
http://www.billyandcharlie.com
https://www.facebook.com/BillyAndCharlie
The craftsmen of old had their secrets, and those secrets died with them. We are not the better for that, and neither are they.
http://www.lightlink.com/armory/
http://www.billyandcharlie.com
https://www.facebook.com/BillyAndCharlie
-
wcallen
- Archive Member
- Posts: 4777
- Joined: Mon Oct 29, 2001 2:01 am
- Location: North Carolina, USA
- Contact:
Re: Mac's blog
I noticed you were playing with one of your barbutes... what does this one look like?
Wade
Wade
Re: Mac's blog
Yep. It's one of the barbutes from the shelf of lost helmets. This hat will be the test subject on the shake down cruise when I finish the work on the grinder. There will be more pics later.
Mac
Robert MacPherson
The craftsmen of old had their secrets, and those secrets died with them. We are not the better for that, and neither are they.
http://www.lightlink.com/armory/
http://www.billyandcharlie.com
https://www.facebook.com/BillyAndCharlie
The craftsmen of old had their secrets, and those secrets died with them. We are not the better for that, and neither are they.
http://www.lightlink.com/armory/
http://www.billyandcharlie.com
https://www.facebook.com/BillyAndCharlie
Re: Mac's blog
The new belt sander attachment is working OK. It's a bit underpowered, but otherwise pretty capable.
I made good progress on the barbute this afternoon.

The big contact wheel is able to get all the convex surfaces ....

....and the shallow concavities as well.

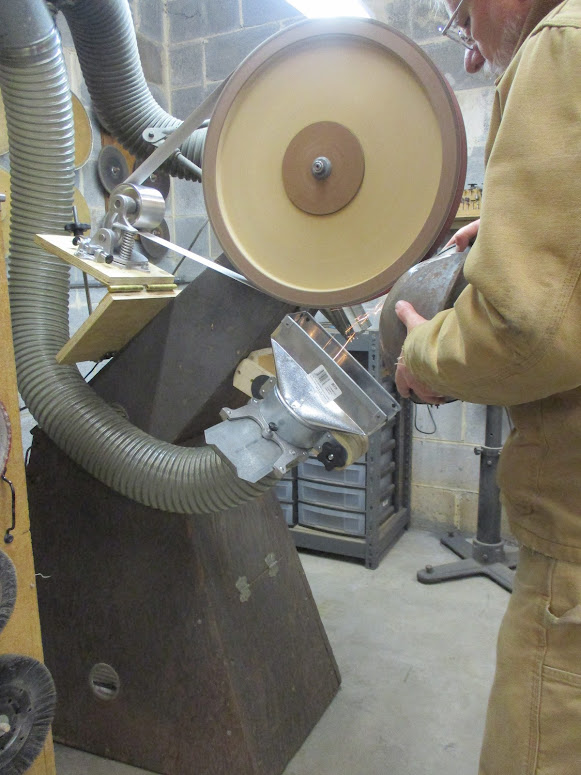
The place I can't get is the deep concavity in the back. I've outlined the place that needs a different tool in black here.

For that, I used a hard disc on the other side of the machine.

I'll come back to that area with the 2 x 42 belt sander and a curved platen tomorrow.... If I find I can lift my arms.... I'm old, out of shape, and out of practice.
Mac
I made good progress on the barbute this afternoon.
The big contact wheel is able to get all the convex surfaces ....
....and the shallow concavities as well.
The place I can't get is the deep concavity in the back. I've outlined the place that needs a different tool in black here.
For that, I used a hard disc on the other side of the machine.
I'll come back to that area with the 2 x 42 belt sander and a curved platen tomorrow.... If I find I can lift my arms.... I'm old, out of shape, and out of practice.
Mac
Robert MacPherson
The craftsmen of old had their secrets, and those secrets died with them. We are not the better for that, and neither are they.
http://www.lightlink.com/armory/
http://www.billyandcharlie.com
https://www.facebook.com/BillyAndCharlie
The craftsmen of old had their secrets, and those secrets died with them. We are not the better for that, and neither are they.
http://www.lightlink.com/armory/
http://www.billyandcharlie.com
https://www.facebook.com/BillyAndCharlie
-
Johann ColdIron
- Archive Member
- Posts: 7421
- Joined: Mon Mar 03, 2003 2:01 am
- Location: Raleigh, NC
Re: Mac's blog
That is looking good Mac! The world needs more of your barbutes.
Its very tempting to go down the same rabbit hole. I find my 2x72" Grizzly digs in at the edges when using it as a slack belt on inward curved surfaces. Can cause some really aggressive scour with heavier grits. I may need to play with some curved plattens and see what that gets me.
Could you tell more about your "hard disc" set up on the other side? Is it an abrasive disc or sanding disc backed up by something?
John Cope/ Sir Johann ColdIron, Master- Order of the Laurel
I'm not dead yet!
I'm not dead yet!
-
wcallen
- Archive Member
- Posts: 4777
- Joined: Mon Oct 29, 2001 2:01 am
- Location: North Carolina, USA
- Contact:
Re: Mac's blog
John,
Some knife makers have suggested he try the wavy edge belts like:
https://popsknife.supplies/collections/ ... 312-j-flex
We look forward to Mac's results, but we could try them too.. It seems interesting.
Wade
Some knife makers have suggested he try the wavy edge belts like:
https://popsknife.supplies/collections/ ... 312-j-flex
We look forward to Mac's results, but we could try them too.. It seems interesting.
Wade
Re: Mac's blog
Johann ColdIron wrote: ↑Mon Feb 14, 2022 10:22 am That is looking good Mac! The world needs more of your barbutes.
Thanks! When I started the barbute project years ago, it seemed like there was no market for them.
In a slack belt, the edges are in as much tension as the middle, so they will cut more or less as aggressively. With a platen, you can support the middle and let the edges be free, thus controlling what part of the belt cuts more aggressively.Johann ColdIron wrote: ↑Mon Feb 14, 2022 10:22 am
Its very tempting to go down the same rabbit hole. I find my 2x72" Grizzly digs in at the edges when using it as a slack belt on inward curved surfaces. Can cause some really aggressive scour with heavier grits. I may need to play with some curved plattens and see what that gets me.
Johann ColdIron wrote: ↑Mon Feb 14, 2022 10:22 am Could you tell more about your "hard disc" set up on the other side? Is it an abrasive disc or sanding disc backed up by something?
It's one of these guys. I spend a lot of time making them run nice and true and use them a low RPM. I described the truing process somewhere here... perhaps in the "cobwebs" thread.
Robert MacPherson
The craftsmen of old had their secrets, and those secrets died with them. We are not the better for that, and neither are they.
http://www.lightlink.com/armory/
http://www.billyandcharlie.com
https://www.facebook.com/BillyAndCharlie
The craftsmen of old had their secrets, and those secrets died with them. We are not the better for that, and neither are they.
http://www.lightlink.com/armory/
http://www.billyandcharlie.com
https://www.facebook.com/BillyAndCharlie
-
James Arlen Gillaspie
- Archive Member
- Posts: 2098
- Joined: Mon Jan 13, 2003 2:01 am
- Location: NY
- Contact:
Re: Mac's blog
Wade Allen wrote:
Wow! I didn't know those had been invented. The J-Flex belts I bought years ago are already incredibly flexible and, with my soft contact wheel (stacked tightly spirally sewn flannel buffs) that is a bit pressed down at the edges, contour really well. I will have to get some of these.
https://popsknife.supplies/collections/ ... 312-j-flexSome knife makers have suggested he try the wavy edge belts like:
Wow! I didn't know those had been invented. The J-Flex belts I bought years ago are already incredibly flexible and, with my soft contact wheel (stacked tightly spirally sewn flannel buffs) that is a bit pressed down at the edges, contour really well. I will have to get some of these.
Re: Mac's blog
James Arlen Gillaspie wrote: ↑Wed Feb 16, 2022 10:29 pm Wade Allen wrote:
Wow! I didn't know those had been invented. The J-Flex belts I bought years ago are already incredibly flexible and, with my soft contact wheel (stacked tightly spirally sewn flannel buffs) that is a bit pressed down at the edges, contour really well. I will have to get some of these.
I ordered up a few of these the other day and look forward to trying them out.wcallen wrote: ↑Tue Feb 15, 2022 8:58 am
Some knife makers have suggested he try the wavy edge belts like:
https://popsknife.supplies/collections/ ... 312-j-flex
We look forward to Mac's results, but we could try them too.. It seems interesting.
Wade
Mac
Robert MacPherson
The craftsmen of old had their secrets, and those secrets died with them. We are not the better for that, and neither are they.
http://www.lightlink.com/armory/
http://www.billyandcharlie.com
https://www.facebook.com/BillyAndCharlie
The craftsmen of old had their secrets, and those secrets died with them. We are not the better for that, and neither are they.
http://www.lightlink.com/armory/
http://www.billyandcharlie.com
https://www.facebook.com/BillyAndCharlie
-
Rene K.

- Archive Member
- Posts: 443
- Joined: Tue Dec 02, 2014 11:50 am
- Location: Langenzenn, Germany
- Contact:
Re: Mac's blog
A short note about the cutting in belt edge on a beltsander. On my setup i use a middle to very low beld tension, and i have no trouble with cutting in the surface while grinding.
I use 40mm belts and a plastazote ( hard foam) dressed wheel. With this it is important for me don't forgeting the belt on the wheel to not getting compression-dents in the foam.
I also had ideas about big wheel diameters, but had less time and my setup conclusion work very well.

my first mashine i gave away to a friend, actually i'm at mk3, but didn't changed the system.

some weeks ago i added an additional setup for grinding knifes or other.
I use 40mm belts and a plastazote ( hard foam) dressed wheel. With this it is important for me don't forgeting the belt on the wheel to not getting compression-dents in the foam.
I also had ideas about big wheel diameters, but had less time and my setup conclusion work very well.
my first mashine i gave away to a friend, actually i'm at mk3, but didn't changed the system.
some weeks ago i added an additional setup for grinding knifes or other.
Those who find spelling mistakes are allowed to keep hold of them...
www.eysenkleider.com
Master armouring and historic replicas
www.freyhand.com
https://de.pinterest.com/kohlstruck/
www.eysenkleider.com
Master armouring and historic replicas
www.freyhand.com
https://de.pinterest.com/kohlstruck/
Re: Mac's blog
I was looking back over this thread and remembered a unique belt grinder setup that I had seen before. I wish I could remember where this photo is from, but it would allow for some mighty big contact wheels.
-A.
-A.
-
John Vernier
- Archive Member
- Posts: 232
- Joined: Mon Mar 14, 2011 5:57 pm
- Location: south central Indiana
Re: Mac's blog
I'm pretty sure this is a Stephen Bader Co. Space Saver belt grinder. I know they had an active website just a couple of years ago, but I can't find it now so I wonder if they are out of business. These are very large machines, taking belts on the order of 140" long, although with a lot of room for length adjustment. I recall they also offered belts in many widths including extraordinarily narrow - 1/4" or something like that. These machines were aimed at the aerospace industry and other military contractors, and the new costs reflected that.
Re: Mac's blog
I've finally got the Gothic gauntlet project done.
Tom Biliter and I have been working on glove patterens for a while. This is the latest iteration of our pattern.

Tom sewed up a nice pair from dearskin.

Last night I finally sewed the glove in.

Mac
Tom Biliter and I have been working on glove patterens for a while. This is the latest iteration of our pattern.
Tom sewed up a nice pair from dearskin.
Last night I finally sewed the glove in.
Mac
Robert MacPherson
The craftsmen of old had their secrets, and those secrets died with them. We are not the better for that, and neither are they.
http://www.lightlink.com/armory/
http://www.billyandcharlie.com
https://www.facebook.com/BillyAndCharlie
The craftsmen of old had their secrets, and those secrets died with them. We are not the better for that, and neither are they.
http://www.lightlink.com/armory/
http://www.billyandcharlie.com
https://www.facebook.com/BillyAndCharlie
-
John Vernier
- Archive Member
- Posts: 232
- Joined: Mon Mar 14, 2011 5:57 pm
- Location: south central Indiana
Re: Mac's blog
What a fantastic conclusion to this project! I hope you or Tom will post a video of the gauntlet in motion. If ever there was an object designed to catch your eye with movement...
It's only a pity there's so little traffic on this site these days. I see there are eyes on your photo over on FB. Thanks for posting the final mitten pattern. That thumb is most interesting.
It's only a pity there's so little traffic on this site these days. I see there are eyes on your photo over on FB. Thanks for posting the final mitten pattern. That thumb is most interesting.
-
Keegan Ingrassia

- Archive Member
- Posts: 6423
- Joined: Thu Jul 16, 2009 4:07 pm
- Location: College Station, Texas (Shadowlands)
Re: Mac's blog
A handsome conclusion to a breathtaking project. Many thanks for sharing the pattern here and explaining its finer points over on FB. I've definitely saved all of it for future use!
"There is a tremendous amount of information in a picture, but getting at it is not a purely passive process. You have to work at it, but the more you work at it the easier it becomes." - Mac
-
Ilkka Salokannel
- Archive Member
- Posts: 265
- Joined: Mon Nov 09, 2015 3:35 pm
- Location: Burnaby BC
Re: Mac's blog
Hi Mac:
Are the cuffs of the gloves rivetted into the metal cuff in any way?
Ilkka
Are the cuffs of the gloves rivetted into the metal cuff in any way?
Ilkka
Re: Mac's blog
Thank!John Vernier wrote: ↑Sat May 27, 2023 4:33 pm What a fantastic conclusion to this project! I hope you or Tom will post a video of the gauntlet in motion. If ever there was an object designed to catch your eye with movement...
It's only a pity there's so little traffic on this site these days. I see there are eyes on your photo over on FB. Thanks for posting the final mitten pattern. That thumb is most interesting.
A thing that surprised me a bit about these is that they look OK from a lot of different angles. When I made this pic, I just slapped them down on a bench without much concern. All I did was arrange them to fit the frame of the pic. Yet, they look alright. That seems like a measure of success.
I look forward to seeing how they look with the rest of Tom's stuff. They are in a box now, and I'll put them in the mail on Tuesday.
The migration to FB is thrice cursed. I'm trying to post more here again, but it's tough. There's something about real time feed back that makes FB work in spite of all its problems.
Mac
Robert MacPherson
The craftsmen of old had their secrets, and those secrets died with them. We are not the better for that, and neither are they.
http://www.lightlink.com/armory/
http://www.billyandcharlie.com
https://www.facebook.com/BillyAndCharlie
The craftsmen of old had their secrets, and those secrets died with them. We are not the better for that, and neither are they.
http://www.lightlink.com/armory/
http://www.billyandcharlie.com
https://www.facebook.com/BillyAndCharlie
Re: Mac's blog
I hope the patterns work well for you, and look forward to seeing them used.Keegan Ingrassia wrote: ↑Sat May 27, 2023 5:53 pm A handsome conclusion to a breathtaking project. Many thanks for sharing the pattern here and explaining its finer points over on FB. I've definitely saved all of it for future use!
Mac
Robert MacPherson
The craftsmen of old had their secrets, and those secrets died with them. We are not the better for that, and neither are they.
http://www.lightlink.com/armory/
http://www.billyandcharlie.com
https://www.facebook.com/BillyAndCharlie
The craftsmen of old had their secrets, and those secrets died with them. We are not the better for that, and neither are they.
http://www.lightlink.com/armory/
http://www.billyandcharlie.com
https://www.facebook.com/BillyAndCharlie
Re: Mac's blog
To the best of my understanding, it is typical and normal for the cuffs of the gloves not to be attached in any way on Gothic gauntlets. That's not the way I would design them, but it seems to be the way they did.Ilkka Salokannel wrote: ↑Sat May 27, 2023 11:37 pm Hi Mac:
Are the cuffs of the gloves rivetted into the metal cuff in any way?
Ilkka
Mac
Robert MacPherson
The craftsmen of old had their secrets, and those secrets died with them. We are not the better for that, and neither are they.
http://www.lightlink.com/armory/
http://www.billyandcharlie.com
https://www.facebook.com/BillyAndCharlie
The craftsmen of old had their secrets, and those secrets died with them. We are not the better for that, and neither are they.
http://www.lightlink.com/armory/
http://www.billyandcharlie.com
https://www.facebook.com/BillyAndCharlie
Re: Mac's blog
Wow, so all that fancy brass trim is not hiding the rivets of a leather strip that you sew the cuffs of the leather gloves to?
It seems like the people who defined 1470-1500 South German armour were brilliant artists but not so good at ergonomics. In another life they would have made good costume designers for film and TV (maybe as penance?)
Edit: Edward W. Niedermeyer observes that most companies' cars look the same because if you have to compete on price and reliability drawing on a global pool of parts and expertise and technologies you have to make more or less the same choices as everyone else; people making small runs of sportscars can be creative because their customers don't care abut price or reliability. I wonder if armour design in the 15th century followed the same trends leading up to Pietro Monte complaining that armour everywhere is pretty much the same except armour from Austria?
DIS MANIBUS GUILLELMI GENTIS MCLEANUM FAMILIARITER GALLERON DICTI
VIR OMNIBUS ARTIBUS PERITUS
Check out Age of Datini: European Material Culture 1360-1410
VIR OMNIBUS ARTIBUS PERITUS
Check out Age of Datini: European Material Culture 1360-1410
Re: Mac's blog
That would be a good place to look, but as far as I can tell it's not what they did.
I don't think their ergonomics were any worse or any better than those of other times or places. My working assumption is that when I think something about a historical object is ergonomically substandard it probably means I'm not understanding the object correctly.
I should probably read Pietro Monte...
Mac
Robert MacPherson
The craftsmen of old had their secrets, and those secrets died with them. We are not the better for that, and neither are they.
http://www.lightlink.com/armory/
http://www.billyandcharlie.com
https://www.facebook.com/BillyAndCharlie
The craftsmen of old had their secrets, and those secrets died with them. We are not the better for that, and neither are they.
http://www.lightlink.com/armory/
http://www.billyandcharlie.com
https://www.facebook.com/BillyAndCharlie
Re: Mac's blog
I have been fascinated by the armored statue in Munich for quite a while. In addition to what is almost certainly a rotating bevor, it has a butt defense of steel lames.

After a lot of careful thought, I made up sketches of how I think the tops of the cuisses and the butt armor might work. As far as I can tell, there is no connection at the crotch, and the two cuisses with their individual butt cheeks are analogous to split hosen. There is an articulated codpiece as well, but I don't think it interacts with the rest of the armor in a structured way, and I will address it later in the project.
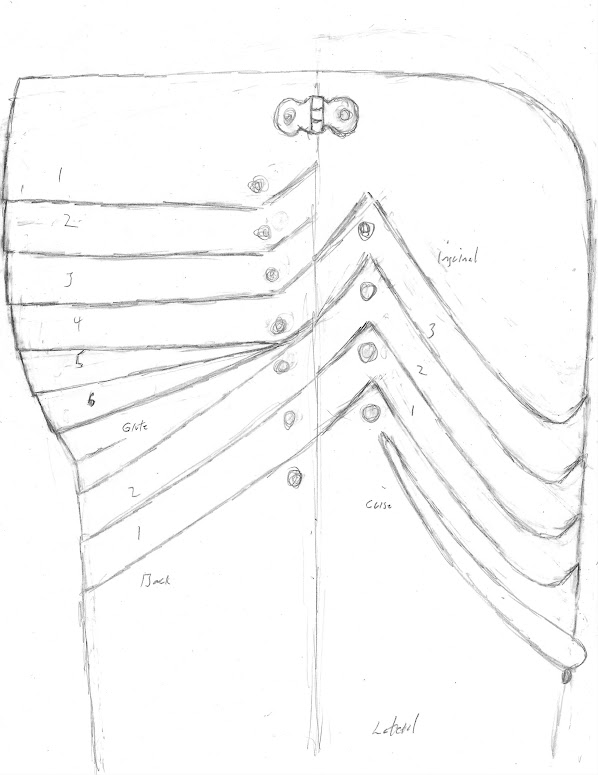


I then set out to make a mock up in cardboard. These pics are of my second attempt. It differs from the first in the treatment of the three articulations between the back of the cuisse and the gluteal plate.


My current idea about those articulations is that they work on simple pivots on the lateral side, and long sliding rivets on the medial side. Internal leathers will constrain the dorsal aspect. In the mock up, the leather is simulated with a ribbon.

The idea is to allow the armor to expand when the leg is extended and adducted at the hip joint.

I may or may not be overthinking all of this.
The geometry of the upper lames has not been properly simulated yet, an the lames as they are a more or less place holders for something with more carefully considered shapes. I hope that they will expand along the dorsal aspect and be constrained by internal leathers.
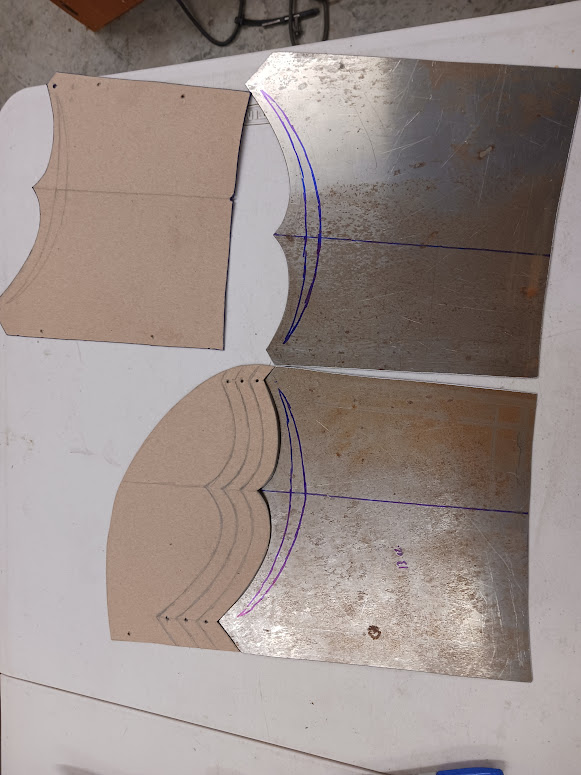
Working with the cardboard has its limitations. Among them is the general floppiness of the whole thing. Having settled on the shape of the front plate and its upper lames, I have begun cutting parts out in steel. I hope that will serve as a foundation upon which I can more conveniently experiment with the less well understood parts in back.
This represents the front plate and its lames.

The lames have been separated to generate the template for the main plate.

A right and a left were laid out on some 0.035" 1050 steel.
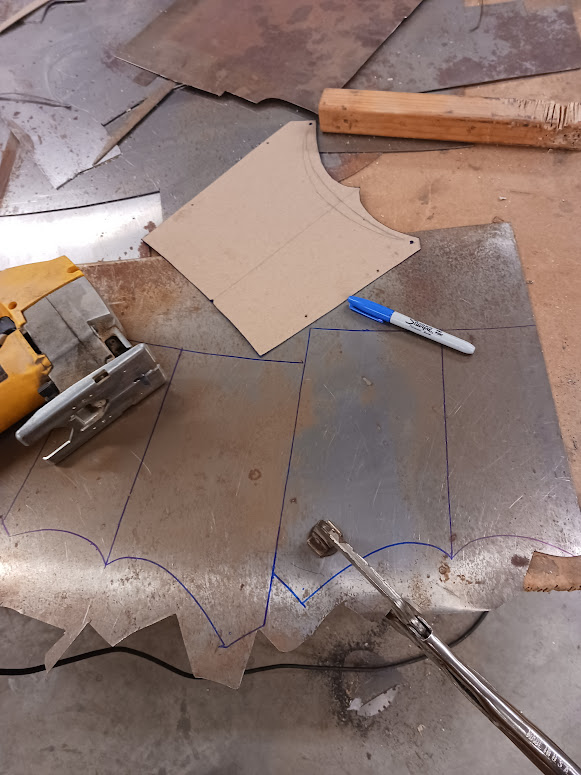
The plates are ready for shaping, which I hope to do tomorrow.
Mac
After a lot of careful thought, I made up sketches of how I think the tops of the cuisses and the butt armor might work. As far as I can tell, there is no connection at the crotch, and the two cuisses with their individual butt cheeks are analogous to split hosen. There is an articulated codpiece as well, but I don't think it interacts with the rest of the armor in a structured way, and I will address it later in the project.
I then set out to make a mock up in cardboard. These pics are of my second attempt. It differs from the first in the treatment of the three articulations between the back of the cuisse and the gluteal plate.
My current idea about those articulations is that they work on simple pivots on the lateral side, and long sliding rivets on the medial side. Internal leathers will constrain the dorsal aspect. In the mock up, the leather is simulated with a ribbon.
The idea is to allow the armor to expand when the leg is extended and adducted at the hip joint.
I may or may not be overthinking all of this.
The geometry of the upper lames has not been properly simulated yet, an the lames as they are a more or less place holders for something with more carefully considered shapes. I hope that they will expand along the dorsal aspect and be constrained by internal leathers.
Working with the cardboard has its limitations. Among them is the general floppiness of the whole thing. Having settled on the shape of the front plate and its upper lames, I have begun cutting parts out in steel. I hope that will serve as a foundation upon which I can more conveniently experiment with the less well understood parts in back.
This represents the front plate and its lames.
The lames have been separated to generate the template for the main plate.
A right and a left were laid out on some 0.035" 1050 steel.
The plates are ready for shaping, which I hope to do tomorrow.
Mac
Robert MacPherson
The craftsmen of old had their secrets, and those secrets died with them. We are not the better for that, and neither are they.
http://www.lightlink.com/armory/
http://www.billyandcharlie.com
https://www.facebook.com/BillyAndCharlie
The craftsmen of old had their secrets, and those secrets died with them. We are not the better for that, and neither are they.
http://www.lightlink.com/armory/
http://www.billyandcharlie.com
https://www.facebook.com/BillyAndCharlie