The "Nurenberg butt armor"

This forum is designed to help us spread the knowledge of armouring.
Mac
Archive Member
Posts: 9953
Joined: Thu Jan 04, 2001 2:01 am
Location: Jeffersonville, PA

The "Nurenberg butt armor"

Post by Mac »

There is a statue in Nurnberg which has been a shop sign since the late 15th century. The current statue is said to have been copied (molded?) from the old one. There is reason to think that the original was made of actual armor. Tom Biliter has an album of pics he took of it here.

The most interesting thing about this statue (and presumably the real armor it's based on) are the parts for the groin and the butt.

Image

Yesterday, I made up a sketch of what the upper cuisses and butt defense might look like.

The ventral view....

Image

The dorsal view.....

Image

The lateral view.....

Image

... and the medial view.

Image

Since then, I have made some small changes, which I will write about later.

I'm not at all sure what my plans are for this project. I might be satisfied to just make the sketches, but then again I might build something. If it did build it, I would not copy the decoration of the original. While the decoration is very interesting, it would be a world-o-trouble to grind and polish, and I don't really need that.

Image

Mac
Robert MacPherson

The craftsmen of old had their secrets, and those secrets died with them. We are not the better for that, and neither are they.

http://www.lightlink.com/armory/
http://www.billyandcharlie.com
https://www.facebook.com/BillyAndCharlie
Mac
Archive Member
Posts: 9953
Joined: Thu Jan 04, 2001 2:01 am
Location: Jeffersonville, PA

Re: The "Nurenberg butt armor"

Post by Mac »

I did a round of modifications to these four views last night. Some of it was about refining the interpretation of the statue. To that end, I moved the pivots of the upper but assembly a bit and altered the lines and proportions slightly.

The one big change I made was about interpreting a place on the statue where things were clearly weird. The area in the circle has two things to say. The first is about the rivet. It is far too close to the edges of lames "6" and "back 2". The other is about the disturbance in the surface in a location where we might expect a rivet. If we assume that the modern statue was cast from a mold of the old statue/armor, the disturbance might be an old rivet hole. We can postulate that the end of lame "6" may have been damaged or rusted away, and that someone had stabilized the structure by putting in the rivet that we see today.

Image


To me, this all makes more sense if the end of lame "6" is supposed to be pivoted on the rivet that currently attaches "5" to the "gluteal plate". This will let these short lames deploy fan like over the more curved part of the butt. This change shows well in the latest lateral view.

Image

The change looks cleaner on the inside as well, as seen in the medial view.

Image


The next step is to try "flexing" the assemblies by redrawing them lame by lame on the light table.

Here is the ventral or front part flexed as fully as I can imagine flexing it. The deviation from a straight line is about 51°.

Image

When we do the same thing to the dorsal or back assembly, the deviation from straight is about 54°. (note that I have not shown the underlaping parts of the lames etc.)

Image

This might seem at first like everything it working out OK, but there's a problem. When we superimpose the two parts on the light table and match them back up a the cuisse hinge, we see that the front is now significantly taller than the back. The "two point" hinge which would connect them will not allow for such a significant mismatch.

Image

All is not lost, though. I think I have a plan.....

Mac
Robert MacPherson

The craftsmen of old had their secrets, and those secrets died with them. We are not the better for that, and neither are they.

http://www.lightlink.com/armory/
http://www.billyandcharlie.com
https://www.facebook.com/BillyAndCharlie
User avatar
Christian Wiedner
Archive Member
Posts: 263
Joined: Wed Mar 18, 2009 7:33 pm
Location: Germany
Contact:

Re: The "Nurenberg butt armor"

Post by Christian Wiedner »

It looks like you have drawn the flexed state of the front part in the "streched position" of the slots?
Maybe it already helps if you draw it in the compressed state... you could also try to elongate the slots to the bottom side.
Mac
Archive Member
Posts: 9953
Joined: Thu Jan 04, 2001 2:01 am
Location: Jeffersonville, PA

Re: The "Nurenberg butt armor"

Post by Mac »

Christian Wiedner wrote: Wed Oct 11, 2023 3:55 am It looks like you have drawn the flexed state of the front part in the "streched position" of the slots?
Maybe it already helps if you draw it in the compressed state... you could also try to elongate the slots to the bottom side.
You are right about the sliding rivets. If I let the ones in front collapse, the two sides can match up at the top.

I am worried, though, that if we "use up" all that compression we will not have enough to deal with adduction at the hip. My current thought is to make the slots in the side of the back assembly work the other way, so they can compress when the hip is flexed.

I will make those changes on the main sketches and post them later today.

Mac
Robert MacPherson

The craftsmen of old had their secrets, and those secrets died with them. We are not the better for that, and neither are they.

http://www.lightlink.com/armory/
http://www.billyandcharlie.com
https://www.facebook.com/BillyAndCharlie
Mac
Archive Member
Posts: 9953
Joined: Thu Jan 04, 2001 2:01 am
Location: Jeffersonville, PA

Re: The "Nurenberg butt armor"

Post by Mac »

Following Christian Wiedner's suggestion, I have redrawn the front part with the sliding rivets compressed. The sides line up a lot better.

Image

At some point I just need to build something and see what it does. I wish I didn't have to begin that process from the knees, but it seems like that's the right way to do it.

Mac
Robert MacPherson

The craftsmen of old had their secrets, and those secrets died with them. We are not the better for that, and neither are they.

http://www.lightlink.com/armory/
http://www.billyandcharlie.com
https://www.facebook.com/BillyAndCharlie
User avatar
Armadillo
Archive Member
Posts: 652
Joined: Thu Aug 10, 2000 1:01 am
Location: Seattle, WA USA

Re: The "Nurenberg butt armor"

Post by Armadillo »

Bold, exciting new territory! This armchair armourer will be eagerly awaiting the next installment. It's impressive how much can be accomplished in graphic studies.
Mac
Archive Member
Posts: 9953
Joined: Thu Jan 04, 2001 2:01 am
Location: Jeffersonville, PA

Re: The "Nurenberg butt armor"

Post by Mac »

So.... sometimes I wonder about the "beautiful and natural" aging process. I had not posted to this thread in a couple of weeks, and I literally forgot that I had started it. Only after posting a couple of things on my other thread did I remember this one.

I'm going to consolidate and bring those posts over here. Please forgive the redundancy.


I have been fascinated by the armored statue in Munich for quite a while. In addition to what is almost certainly a rotating bevor, it has a butt defense of steel lames.

Image

After a lot of careful thought, I made up sketches of how I think the tops of the cuisses and the butt armor might work. As far as I can tell, there is no connection at the crotch, and the two cuisses with their individual butt cheeks are analogous to split hosen. There is an articulated codpiece as well, but I don't think it interacts with the rest of the armor in a structured way, and I will address it later in the project.

Image

Image

Image

Image

I then set out to make a mock up in cardboard. These pics are of my second attempt. It differs from the first in the treatment of the three articulations between the back of the cuisse and the gluteal plate.

Image

Image

My current idea about those articulations is that they work on simple pivots on the lateral side, and long sliding rivets on the medial side. Internal leathers will constrain the dorsal aspect. In the mock up, the leather is simulated with a ribbon.

Image

The idea is to allow the armor to expand when the leg is extended and adducted at the hip joint.

Image

I may or may not be overthinking all of this.

The geometry of the upper lames has not been properly simulated yet, an the lames as they are a more or less place holders for something with more carefully considered shapes. I hope that they will expand along the dorsal aspect and be constrained by internal leathers.

Working with the cardboard has its limitations. Among them is the general floppiness of the whole thing. Having settled on the shape of the front plate and its upper lames, I have begun cutting parts out in steel. I hope that will serve as a foundation upon which I can more conveniently experiment with the less well understood parts in back.

This represents the front plate and its lames.

Image

The lames have been separated to generate the template for the main plate.

Image

A right and a left were laid out on some 0.035" 1050 steel.

Image

The plates are ready for shaping, which I hope to do tomorrow.

Image

Mac
Robert MacPherson

The craftsmen of old had their secrets, and those secrets died with them. We are not the better for that, and neither are they.

http://www.lightlink.com/armory/
http://www.billyandcharlie.com
https://www.facebook.com/BillyAndCharlie
Mac
Archive Member
Posts: 9953
Joined: Thu Jan 04, 2001 2:01 am
Location: Jeffersonville, PA

Re: The "Nurenberg butt armor"

Post by Mac »

Today I shaped up the cuisse fronts.

Image

I'll probably trim at least this much off the lateral side. It seems way too deep at the knee.

Image

The medial side seems a bit deep as well. I also expect to move the pivot for the first lame, and trim the point so it looks OK.

Image

I have marked on the template the changes I expect to make, but will not trim the template until I have actually trimmed the steel.

Image

I expect to start templating and cutting the lames this evening.

Mac
Robert MacPherson

The craftsmen of old had their secrets, and those secrets died with them. We are not the better for that, and neither are they.

http://www.lightlink.com/armory/
http://www.billyandcharlie.com
https://www.facebook.com/BillyAndCharlie
Mac
Archive Member
Posts: 9953
Joined: Thu Jan 04, 2001 2:01 am
Location: Jeffersonville, PA

Re: The "Nurenberg butt armor"

Post by Mac »

Today, I finished roughing out the lames and inguinal plates for the cuisse fronts. The crest lines are bossed in, but not yet sharpened up. The parts are fitting well enough for this stage, but I will do some hot fitting and further fussing later.

Image

Here is a lateral view of the right cuisse. Note the overall curve of the horizon at the central crest.

Image

In this medial view, I have rotated the cuisse to show how the difference in depth between the medial and lateral sides. That is to say, when held so the sagittal plane is perpendicular to the camera, we can see a bit of the inside of the lateral side.

Image

In this inside view of the right cuisse, we can see how the underlapps of the lames and inguinal plate are handled. I have not followed the shape of the central points in the underlap. This will allow for more or less equal working lengths of the central leather in spite of the presence of stop rib in the main plate. This will become obvious when I install the internal leathers.

Image

I had to do a bit of trimming on the medial sides of the central points to get the crest line going where I wanted. Here are the templates with that trim indicated, but not yet removed. I will need to be a bit of trimming on the medial points as well, but I have not worked that out yet.

Image

Mac
Robert MacPherson

The craftsmen of old had their secrets, and those secrets died with them. We are not the better for that, and neither are they.

http://www.lightlink.com/armory/
http://www.billyandcharlie.com
https://www.facebook.com/BillyAndCharlie
Mac
Archive Member
Posts: 9953
Joined: Thu Jan 04, 2001 2:01 am
Location: Jeffersonville, PA

Re: The "Nurenberg butt armor"

Post by Mac »

I've been working on the final shape for the back of the cuisse, but am having difficulty because it is not necessarily in the same place on my leg from one fitting to another. It's clear that I need to make the knees as a point to anchor the assembly to my leg.

Here are a couple of pics of what the knees need to look like. The first two are from the modern statue.

Image

Image

The second is from the old statue, which was sadly lost in WWII.

Image

To keep everything light, I'm making the knees in 0.035" (0.89mm) 1050 steel. I can't remember ever making knees in such light stuff.

Image

It's been a while since I raised a pair of knees. I thought about doing it with heat, but decided to just fall back on my old habits and work them cold.

Image

I hope to get some lames on these later today.

Mac
Robert MacPherson

The craftsmen of old had their secrets, and those secrets died with them. We are not the better for that, and neither are they.

http://www.lightlink.com/armory/
http://www.billyandcharlie.com
https://www.facebook.com/BillyAndCharlie
Mac
Archive Member
Posts: 9953
Joined: Thu Jan 04, 2001 2:01 am
Location: Jeffersonville, PA

Re: The "Nurenberg butt armor"

Post by Mac »

Yesterday evening, I made up templates for the lames of the knees. I usually use shorter paper fasteners, but these long ones were all they had at Staples the other day.

Image

I consider only the template nearest the cop to be ready to cut. The others are just place holders. They may or may not need alteration.

Image

The saw cuts away the blue outlines, leaving an accurate copy of the template. Note that the holes are marked and lightly centerpunched.

Image

All four lames are identical in outline, but two of them have the hole locations marked on one side and two have them marked on other.

Image

In addition to cleaning up all the arrises, I chamfer the exterior edges of the overlaps.....

Image

....and the interior edges of the underlapps.

Image

A bit of hammer work from the back gives the proper curves and adds "life" to the lames.

Image

The first lames fully extended....

Image

....and fully compressed.

Image

It turned out that the "place holder" templates were OK as they were, so I cut, shaped, and fitted them all.

Image

I can't attach them yet. I need to do the decorative edge on the pointy plates first, since that will effect how they sit.

Image

If all goes well tomorrow, I should have the knees attached, and can finalize the template for the back of the cuisses.

Mac
Robert MacPherson

The craftsmen of old had their secrets, and those secrets died with them. We are not the better for that, and neither are they.

http://www.lightlink.com/armory/
http://www.billyandcharlie.com
https://www.facebook.com/BillyAndCharlie
User avatar
Kristoffer
Archive Member
Posts: 1697
Joined: Sat Sep 09, 2000 1:01 am
Location: Ostersund - Sweden
Contact:

Re: The "Nurenberg butt armor"

Post by Kristoffer »

Nice legs! We are eagerly waiting for you to get to the (even more) interesting parts.

Code: Select all

           )       (
         /\  -_λ_   )   <--------- 
      ./   /   |   )
     (  -⧼      |- (
     _\  \      |  )
   (_____ ⌋     (__)
Kristoffer Metsälä
Mac
Archive Member
Posts: 9953
Joined: Thu Jan 04, 2001 2:01 am
Location: Jeffersonville, PA

Re: The "Nurenberg butt armor"

Post by Mac »

Kristoffer wrote: Tue Nov 07, 2023 3:16 am Nice legs! We are eagerly waiting for you to get to the (even more) interesting parts.

Code: Select all

           )       (
         /\  -_λ_   )   <--------- 
      ./   /   |   )
     (  -⧼      |- (
     _\  \      |  )
   (_____ ⌋     (__)
Thanks!
Is that what they call "asscii art" :lol:

I hope to get the something more interesting later in the week.

Mac
Robert MacPherson

The craftsmen of old had their secrets, and those secrets died with them. We are not the better for that, and neither are they.

http://www.lightlink.com/armory/
http://www.billyandcharlie.com
https://www.facebook.com/BillyAndCharlie
Mac
Archive Member
Posts: 9953
Joined: Thu Jan 04, 2001 2:01 am
Location: Jeffersonville, PA

Re: The "Nurenberg butt armor"

Post by Mac »

Just a quick update today.

I put the decorative borders on the upper knee plates. I was afraid that if I located the holes before I did the borders that they would not fit those holes later.
In addition, I went through and sharpened the crest lines on all the lames.

Here is what they look like just lying on the table.

Image

With the knee and upper lames fully flexed. The knee wings are still blank, because I've not yet decided what to do about the decoration.

Image


Now, I can return to templating the cuisse back, knowing that the cuisses will be in the same place on my leg every time.

Mac
Robert MacPherson

The craftsmen of old had their secrets, and those secrets died with them. We are not the better for that, and neither are they.

http://www.lightlink.com/armory/
http://www.billyandcharlie.com
https://www.facebook.com/BillyAndCharlie
Mac
Archive Member
Posts: 9953
Joined: Thu Jan 04, 2001 2:01 am
Location: Jeffersonville, PA

Re: The "Nurenberg butt armor"

Post by Mac »

Since roughing out the knees, my work in the last couple of days has centered around the plate voiders. I can't really be confident about the shape of the cuisse backs until I am sure that I can make the voiders work within the space allowed.

Now..... This should not be difficult, but it turns out that it is. Let's step back a bit and think about voiders.

The ones we are all familiar with are what I like to thing of as the "newfangled style". It seems to have been developed toward the end of the fifteenth century. In this style, there is a central plate in the middle of the joint, and the lames overlap that plate both distally and proximally. This leg from Henry VIII's famous armor is a nice example. Note, that the pivots of the voider are hidden from view. We will come back to that later.

Image

Here is the mate to that leg, shown partially open. The construction is obvious.

Image

By contrast, early plate voiders do not have a central plate, and all of the lames lap in the same direction. Here are several examples from 15th C art.

Image

Image

Image

Image

Image

Here is an extant example from a jousting armor. It's a bit of an odd man out because it sits entirely on the outside of the armor for reasons specific to jousting.


Image

The Nuremberg statue armor has this early type of voider, so that's what I need to make.

Image

Here are the problems.....
--The first is that there are only five lames and a terminal plate. That's not many places for articulation.
--The second is that the lames sit at a steeper angle to the axis of the limb than we see on later type of voider. This makes the internal edge of each lame intrude into the armor more than if the angle were shallower.
--The third is that the statue clearly shows the medial rivets. This means that they are not concealed under the ventral parts of the armor. This is subtle but important.

To address the first point, I added another couple of lames.

To address the second point, I made the lames less curved to decrease the angle and thus the intrusion.

Let me elaborate on that last point. The rivets of an articulation should more or less coincide with the neutral axis of the organic joint. If they do not line up, the armor will end up either too long or too short when the joint is flexed. This applies to the voider as well as the main armor. In an ideal world, the lines of rivets for both the parts of the armor should lie in the same place. This is obviously difficult, and to overcome the problem, all voiders need to be attached to in a way that allows for some lengthwise movement. In the example above of Henry's leg, the voider is attached to the greave with a single sliding rivet. In other examples leathers might be used.

To address the third point, I made the lames longer, so that the pivots were closer to the pivots of the cop and its lames.

With all that done, I had something that worked, but it didn't look anything like what's on the statue, so I scrapped it and went back to what was there. Unfortunately I don't have any pics of those modifications and iterations. That's all just scrap cardboard in the trash can.

Here's what I have now. Note, that the terminal plate more or less lines up with the demigreave.

Image

When the knee is flexed, we see that the terminal plate of the voider no longer lines up. This is because the pivot of the dorsal and ventral components do not lie atop one another.

Image

The astute observer will have seen these diagonal rivet slots in one of the earlier images. These are central to my "cunning plan" 8) .

Image

If the voider lames are constrained to telescope when they are flexed ( as they would be if the terminal plate was attached to the greave) then the parts more or less line up throughout the range of motion.

Image

I'm not convinced that I have the problem solved entirely, but I think I'm on the right track. This gives me confidence to cut out a pair of cuisse backs and get them installed. That will allow me to work on the next problem; the butt.

Mac
Robert MacPherson

The craftsmen of old had their secrets, and those secrets died with them. We are not the better for that, and neither are they.

http://www.lightlink.com/armory/
http://www.billyandcharlie.com
https://www.facebook.com/BillyAndCharlie
User avatar
Armadillo
Archive Member
Posts: 652
Joined: Thu Aug 10, 2000 1:01 am
Location: Seattle, WA USA

Re: The "Nurenberg butt armor"

Post by Armadillo »

Wow, I'm very curious about the intrusion of the voider lames into the back of the knee. It seems a bit limiting from the mock up despite all your efforts to optimize the variables. Of course that depends on how much movement was originally expected. It's painful for me to imagine over-flexing this joint resulting in pinched ligaments, particularly since the weight of the entire body plus acceleration could come to bear on it.

With the "new fangled" examples the central plate allows the lames to bind against steel as they contract. Not so in this case.

-Adair
Mac
Archive Member
Posts: 9953
Joined: Thu Jan 04, 2001 2:01 am
Location: Jeffersonville, PA

Re: The "Nurenberg butt armor"

Post by Mac »

Armadillo wrote: Thu Nov 09, 2023 11:11 am Wow, I'm very curious about the intrusion of the voider lames into the back of the knee. It seems a bit limiting from the mock up despite all your efforts to optimize the variables. Of course that depends on how much movement was originally expected. It's painful for me to imagine over-flexing this joint resulting in pinched ligaments, particularly since the weight of the entire body plus acceleration could come to bear on it.

With the "new fangled" examples the central plate allows the lames to bind against steel as they contract. Not so in this case.

-Adair
It's definitely a challenge. I don't expect to get more than about 100° of flexion, and hope that can come with no threat of injury.

Mac
Robert MacPherson

The craftsmen of old had their secrets, and those secrets died with them. We are not the better for that, and neither are they.

http://www.lightlink.com/armory/
http://www.billyandcharlie.com
https://www.facebook.com/BillyAndCharlie
Sean M
Archive Member
Posts: 2392
Joined: Mon Oct 05, 2009 11:24 pm
Location: in exile in Canada

Re: The "Nurenberg butt armor"

Post by Sean M »

Mac wrote: Tue Nov 07, 2023 7:24 pm With the knee and upper lames fully flexed. The knee wings are still blank, because I've not yet decided what to do about the decoration.

Image
Seeing the upper part of the cuisse flex feels 'so wrong yet so right.'

I think the Hellenistic and Roman manicae are overlapped like rooftiles with the highest lame near the shoulder and the lowest at the wrist.
DIS MANIBUS GUILLELMI GENTIS MCLEANUM FAMILIARITER GALLERON DICTI
VIR OMNIBUS ARTIBUS PERITUS
Check out Age of Datini: European Material Culture 1360-1410
Mac
Archive Member
Posts: 9953
Joined: Thu Jan 04, 2001 2:01 am
Location: Jeffersonville, PA

Re: The "Nurenberg butt armor"

Post by Mac »

Armadillo wrote: Thu Nov 09, 2023 11:11 am Wow, I'm very curious about the intrusion of the voider lames into the back of the knee. It seems a bit limiting from the mock up despite all your efforts to optimize the variables.
-Adair
You are quite right to be concerned. I've just come to a better understanding of the problem, and there will be an overhaul of the assumptions underpinning the voiders.

I will need to work on how to describe and illustrate the issues, but for the moment let me say that the sliding rivets are out. They fix one (apparent) problem, but make an underlying problem even worse.

Mac
Robert MacPherson

The craftsmen of old had their secrets, and those secrets died with them. We are not the better for that, and neither are they.

http://www.lightlink.com/armory/
http://www.billyandcharlie.com
https://www.facebook.com/BillyAndCharlie
Mac
Archive Member
Posts: 9953
Joined: Thu Jan 04, 2001 2:01 am
Location: Jeffersonville, PA

Re: The "Nurenberg butt armor"

Post by Mac »

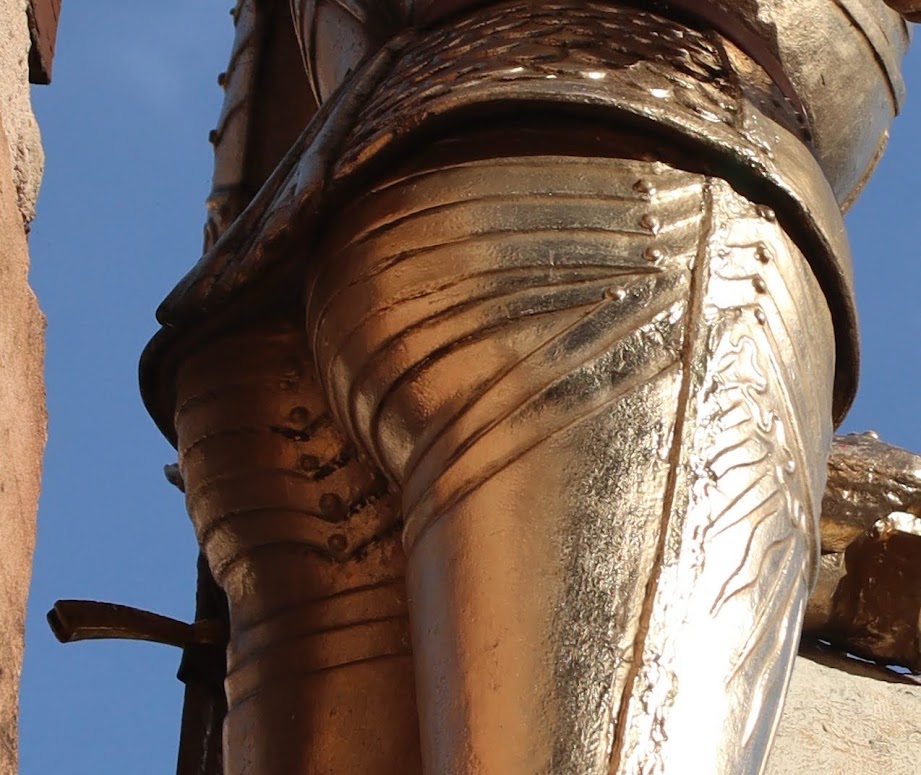
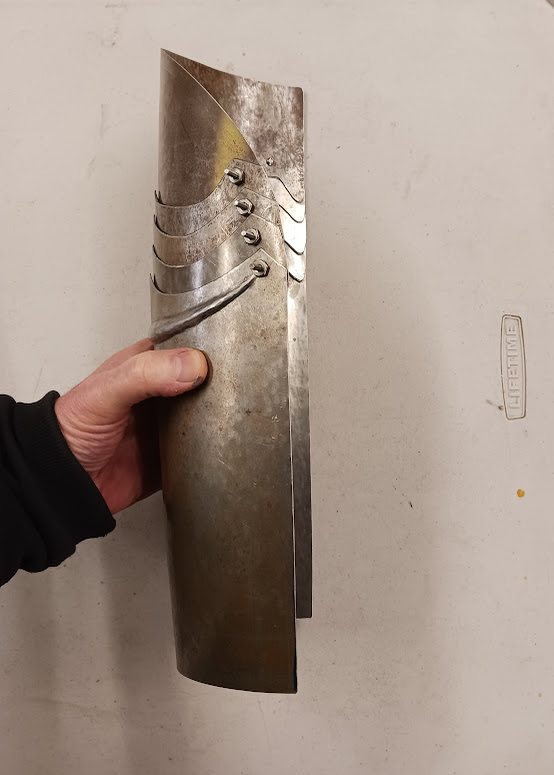
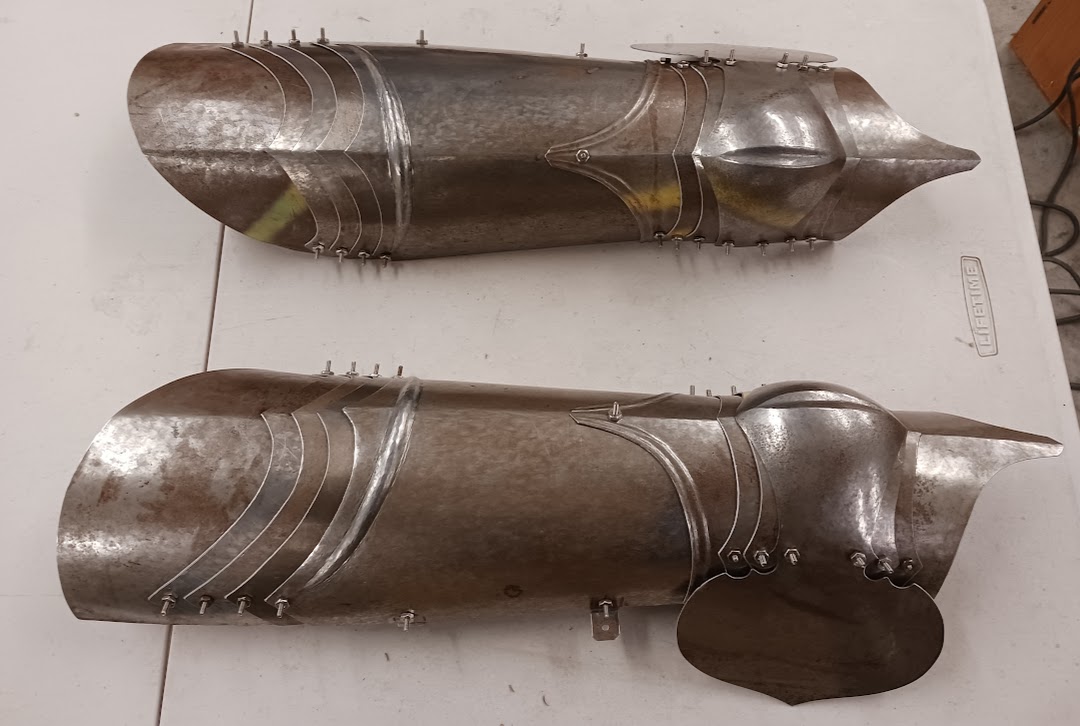
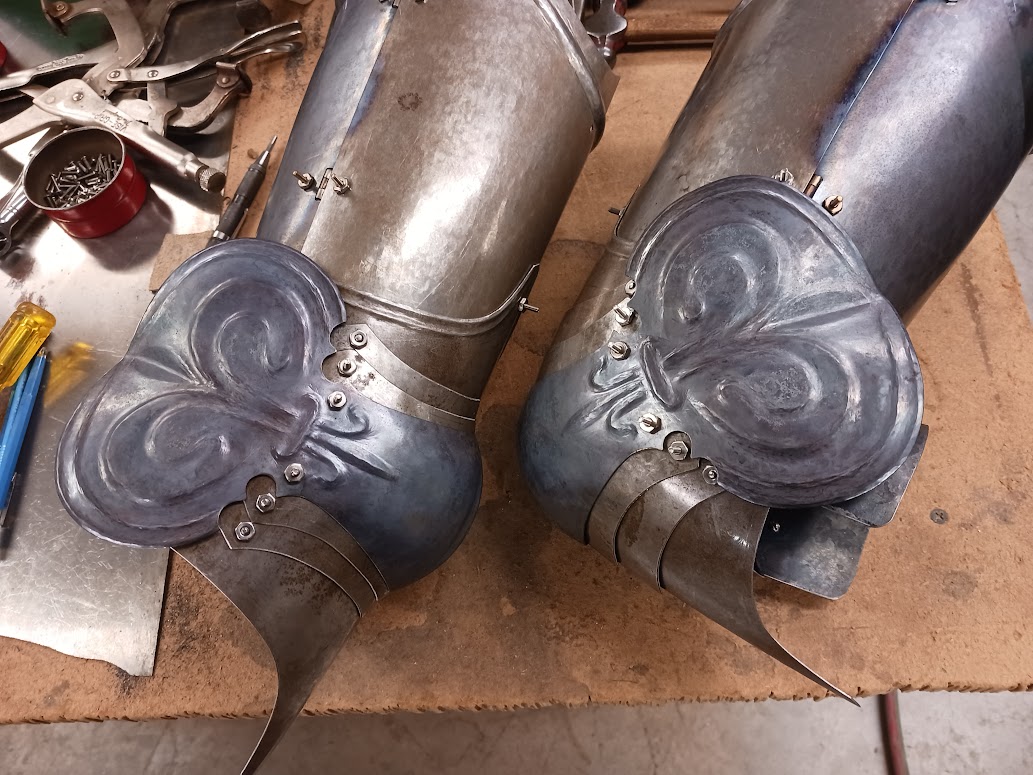
I made what appeared to be good progress on the butt plates over the last two weeks, but it turned out to be illusory. The whole assembly will be replaced in the next week or so to correct some problems

Here is a list of the things I hope to address...

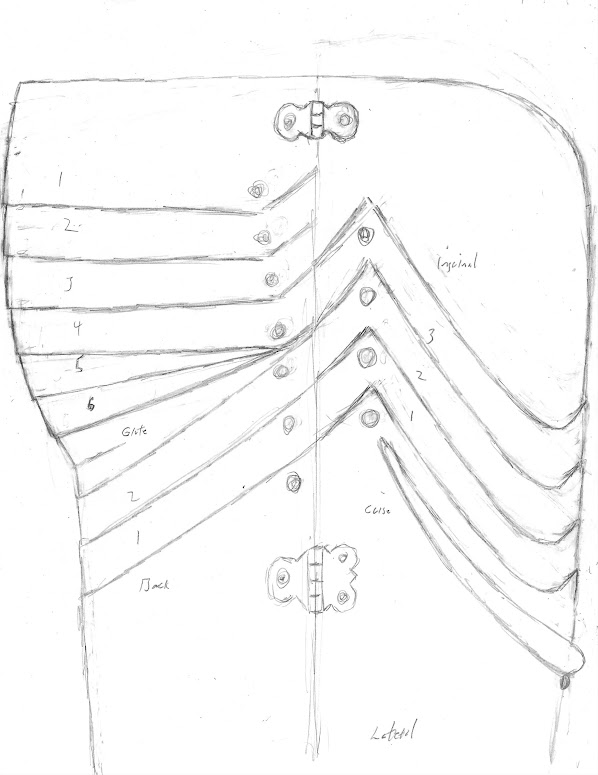
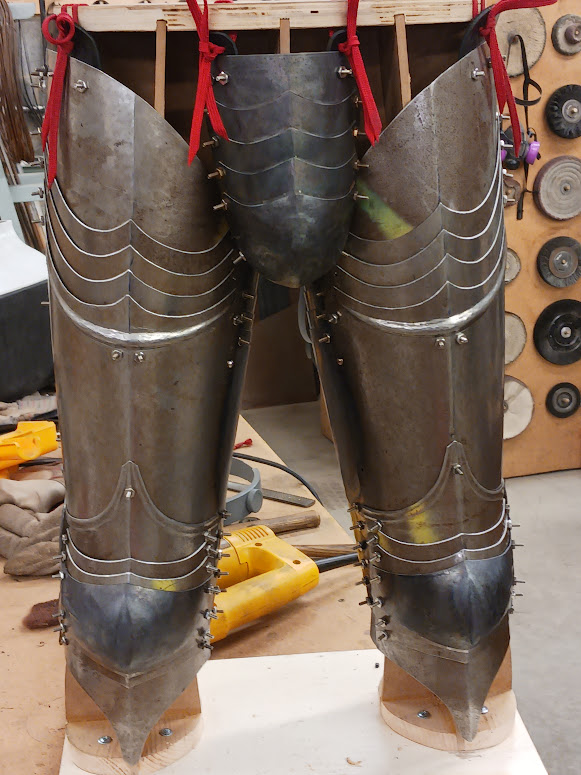
--I failed to start curving back in soon enough. At the barest minimum I would have to replace plates 4, 5, and 6.
--My heroic efforts to gain more motion in bulgiest part of the butt turn out to be misguided, and the result is clumsy looking when extended.
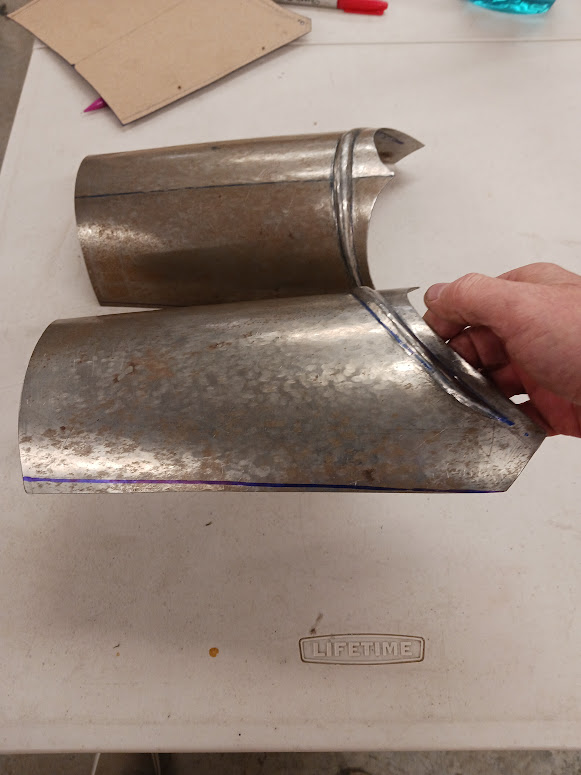
--I need to remove some material along the centerline to keep the two cheeks from interacting with one another when walking. The placement of the sliding rivets makes it impossible to just trim the plates.
--I need to be more systematic about how the underlapps interact along the sliding rivet line.
--If I can get another 10% out of each slider, that would be nice.
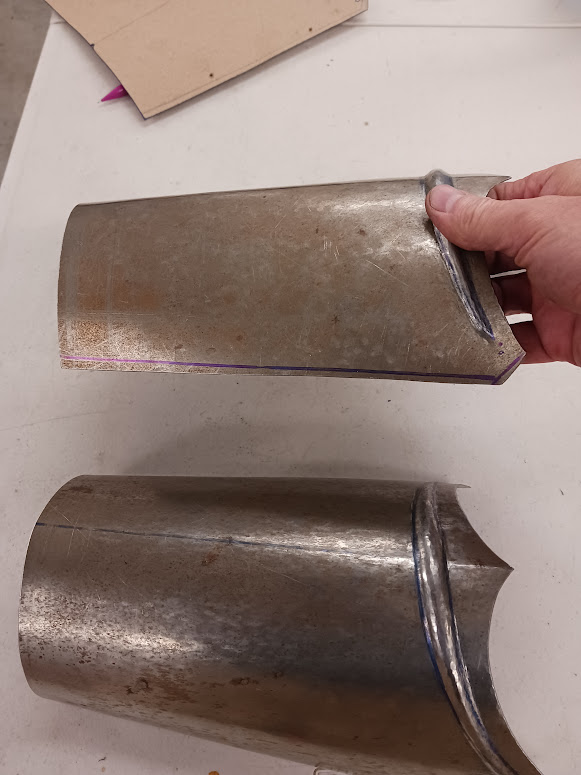
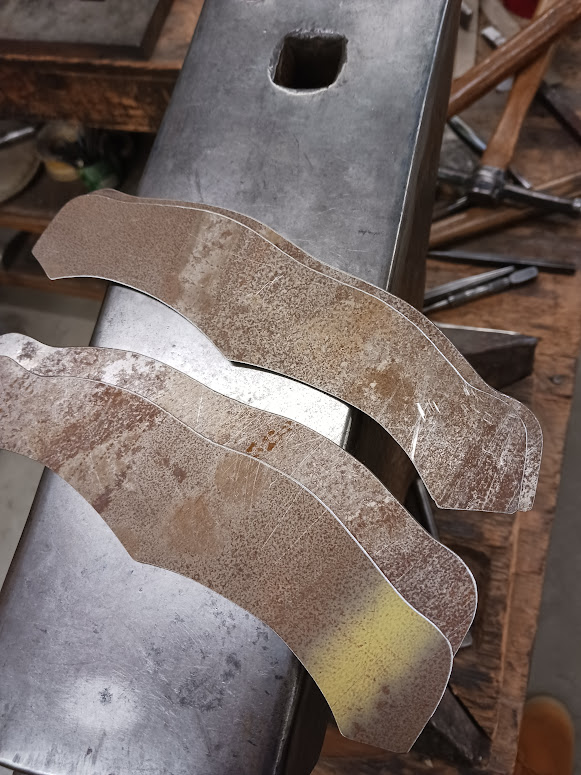
--I flared the gluteal plate too much and ended up raising it back in, leading to thin and "tired" metal along the edge. Replacing it will clean the slate.
--Bad templating of lames 1 and 2 lead to my having to raise a lot of material back. I welcome a chance to correct that.


There is probably some other stuff as well.

Many of the problems are the sort that happens when you template one lame onto the previous, and don't have an adequate understanding of where you are going. This was exacerbated by the fact that it all happens behind me, and it's difficult to tell if there is trouble till you are a lame or too past the problem.

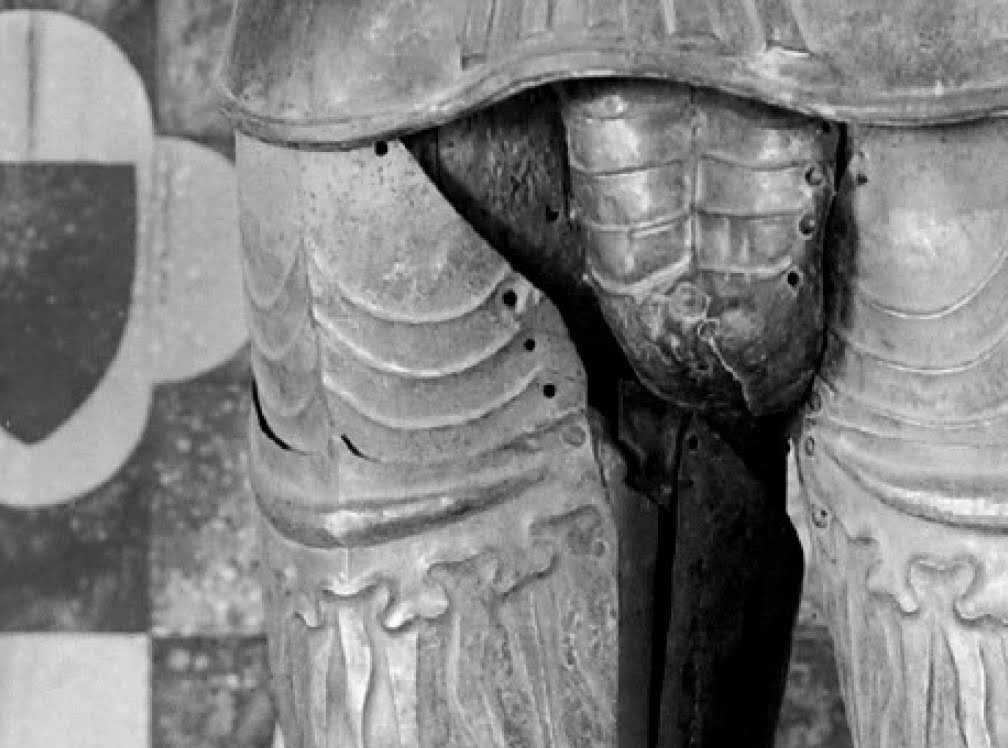
The ideal thing would be a good life cast, but that's not possible when working alone. The next best thing is a good "buck" to work over; and that's what I am doing now.

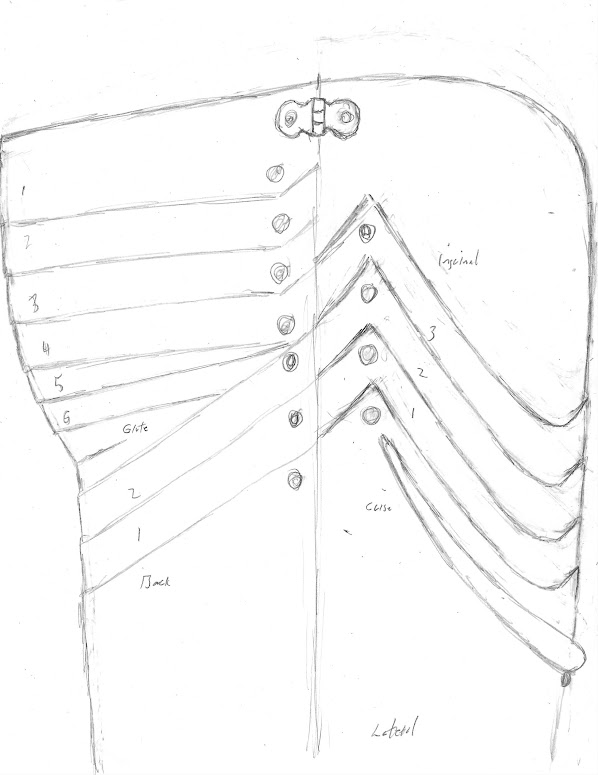
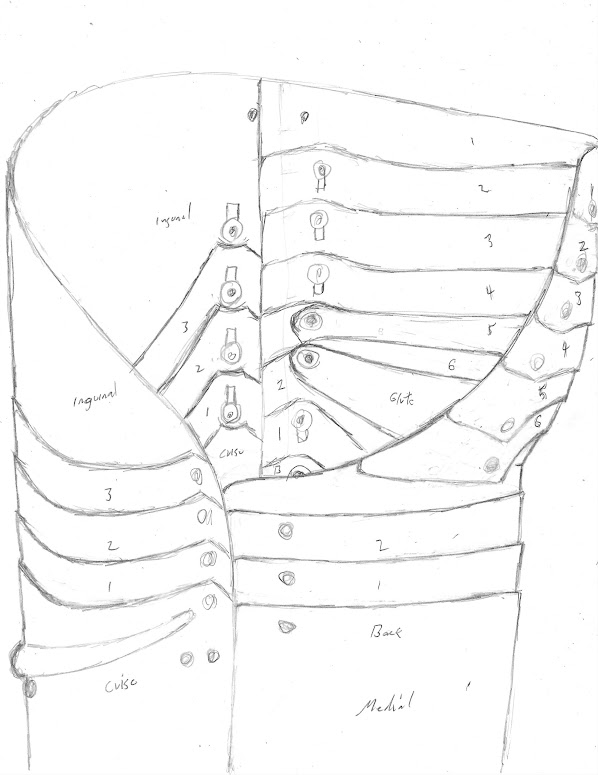
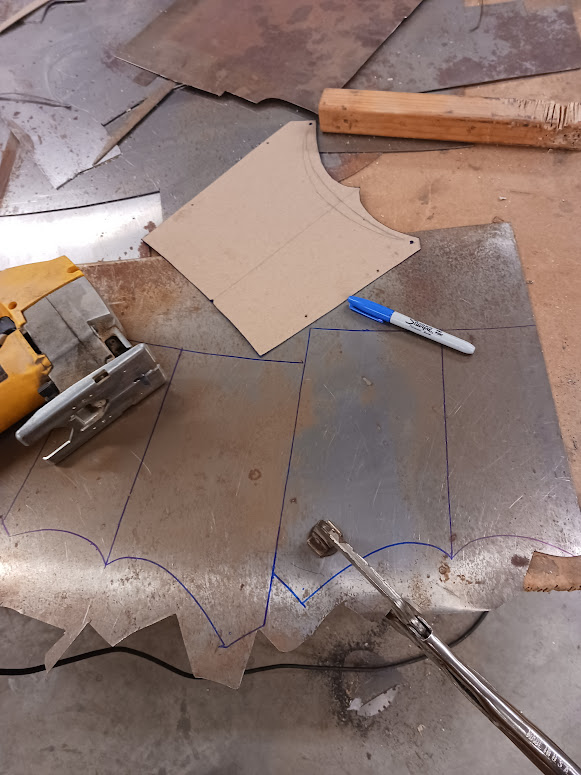
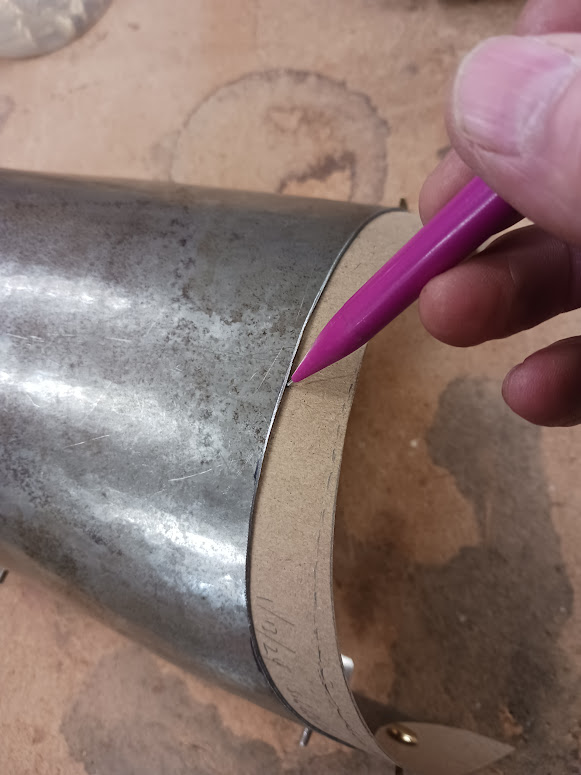
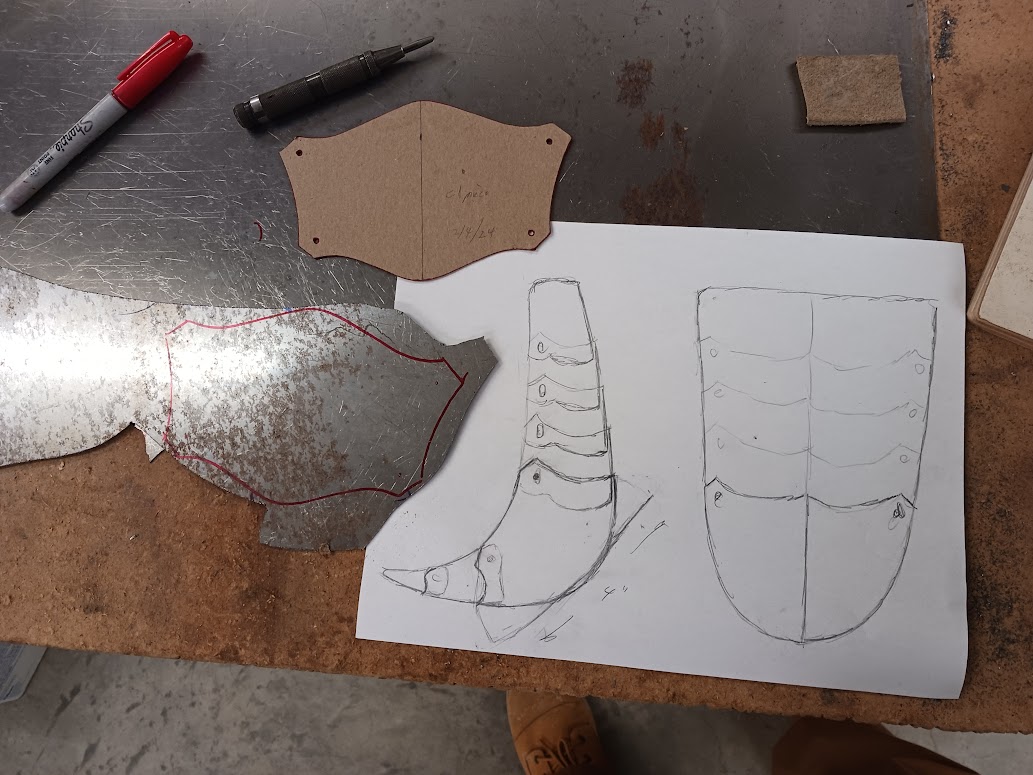
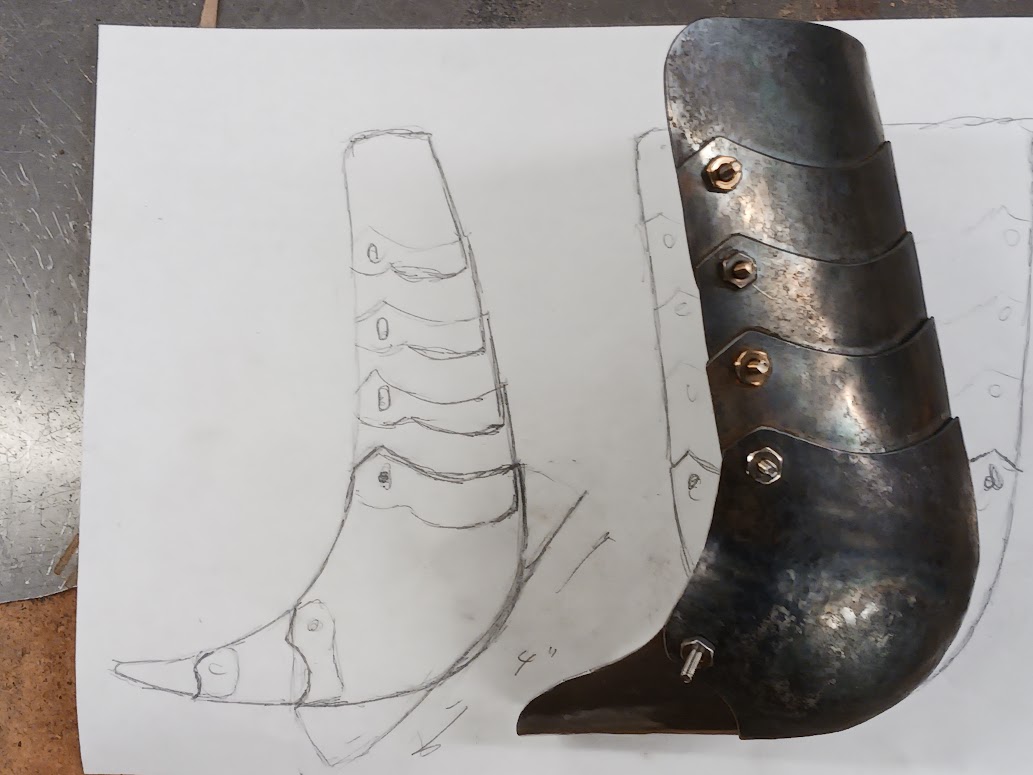
The first thing was to start with the tracings that I used to plan the project out in the first place. I dressed up the lines a bit to correct for known problems, and planned out where the seams of the buck would be.

Image

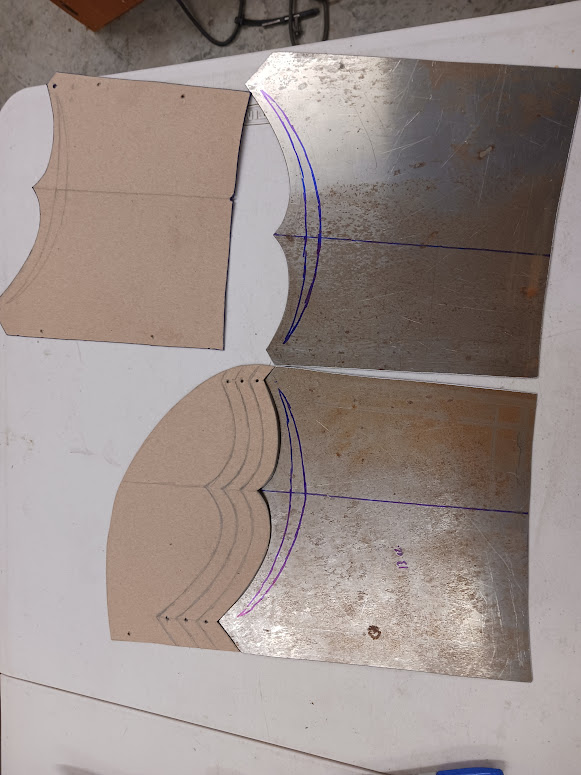
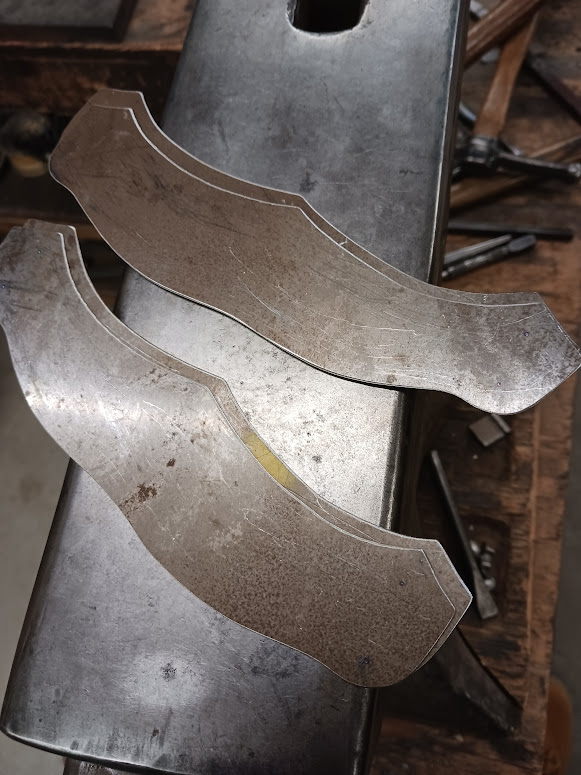
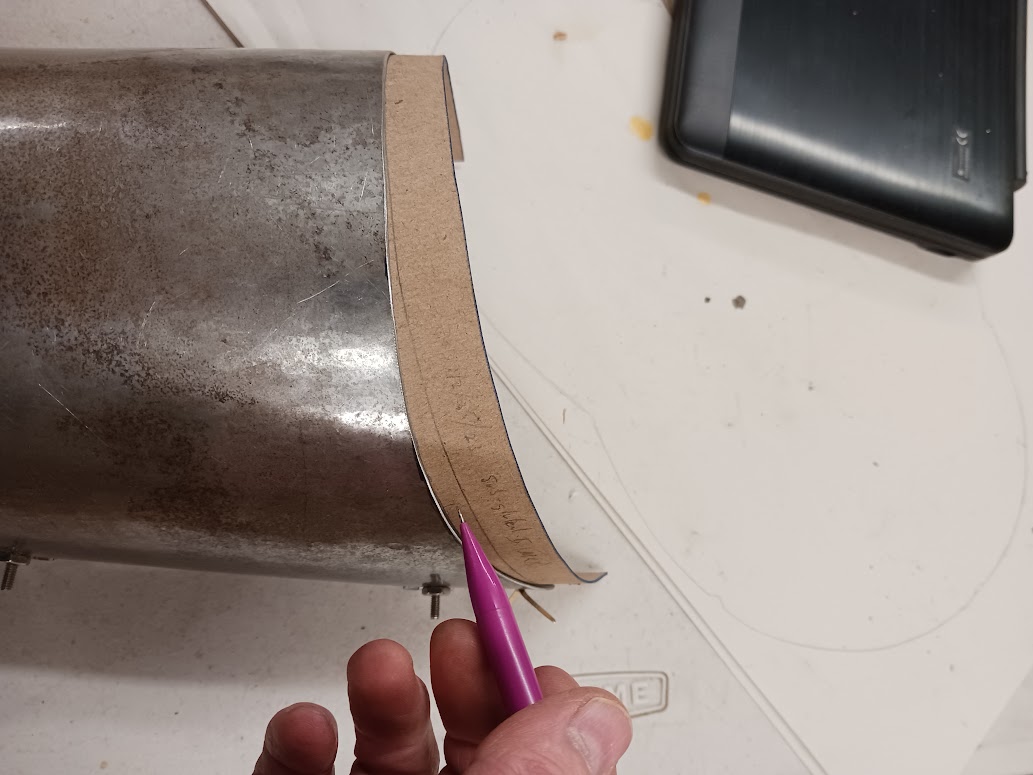
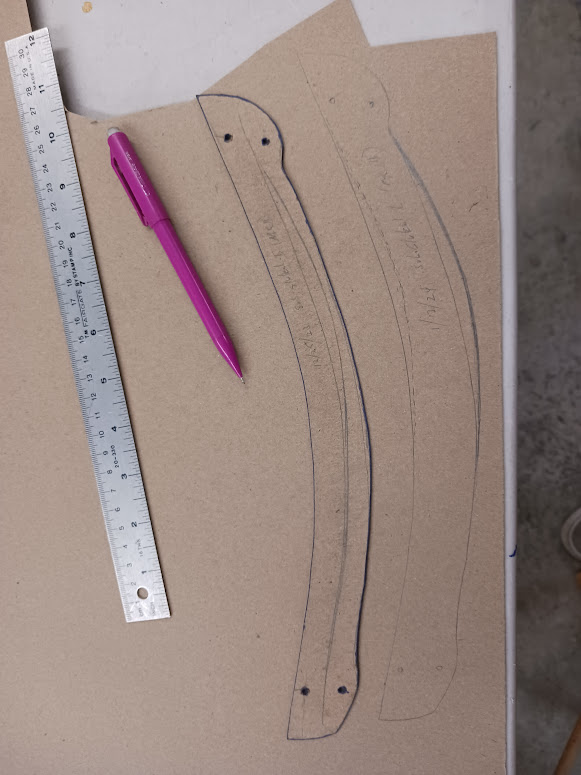
I cut that out and used it to trace out templates.

Image

Here are the templates. Note that I needed to shorten a couple of the slots with some bits of cardboard and paper packing tape. This is about having made some changes in the plan and not following through in both views.

Image

The parts were cut out of 1/4" (6mm) MDF (medium density fiberboard).

Image

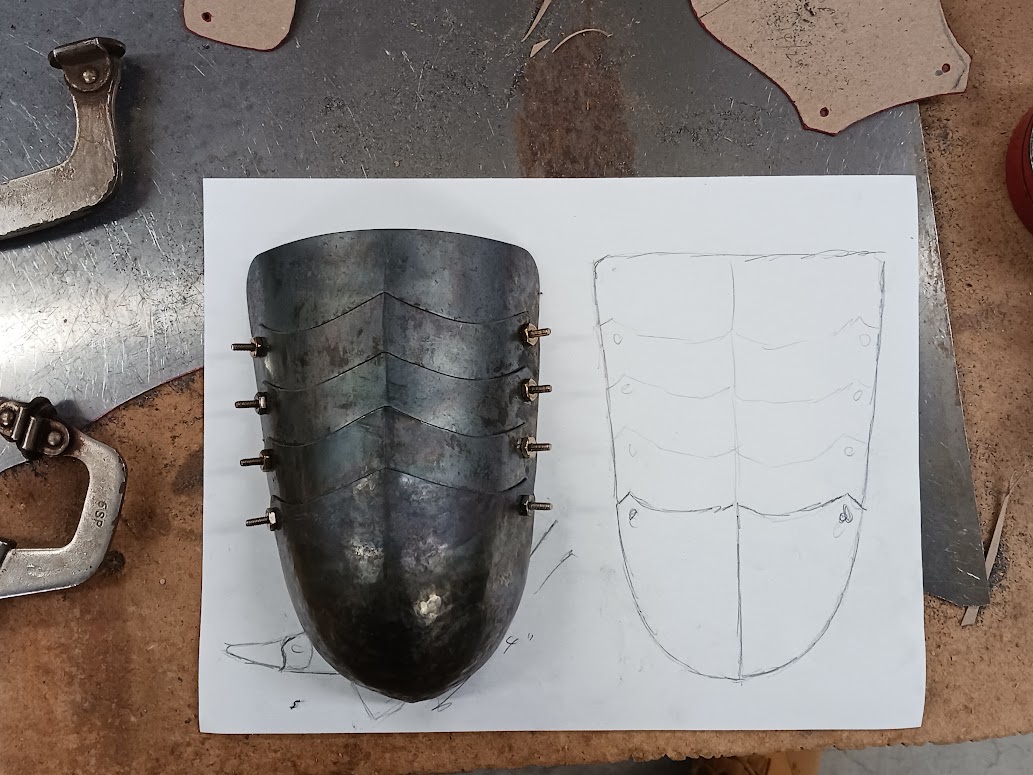
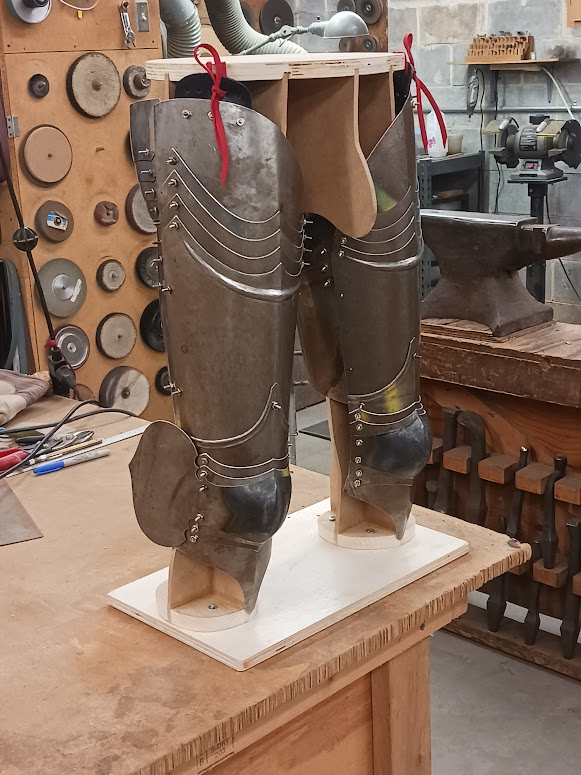
Here is the first dry assembly of the parts. It took a certain amount of fussing to get all the tabs to fit correctly.

Image

After gluing it all together and adding some blocks, I screwed it to a base. I also put a plate on top to firm it all up and give a place to attach the arming points.

Image

Some material needed to be removed in a couple of places before I could get the armor to fit the buck.

Image

Image


There are to phases to the plan. The first is to get the buck to be a reasonable approximation of my body so the armor fits it the same way it does me... for better or worse.

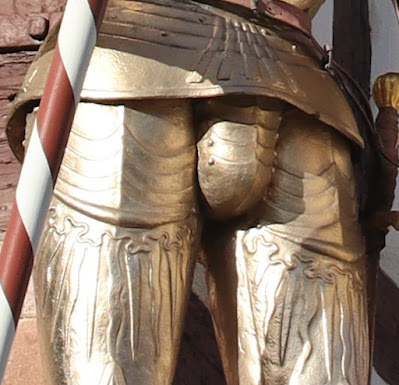
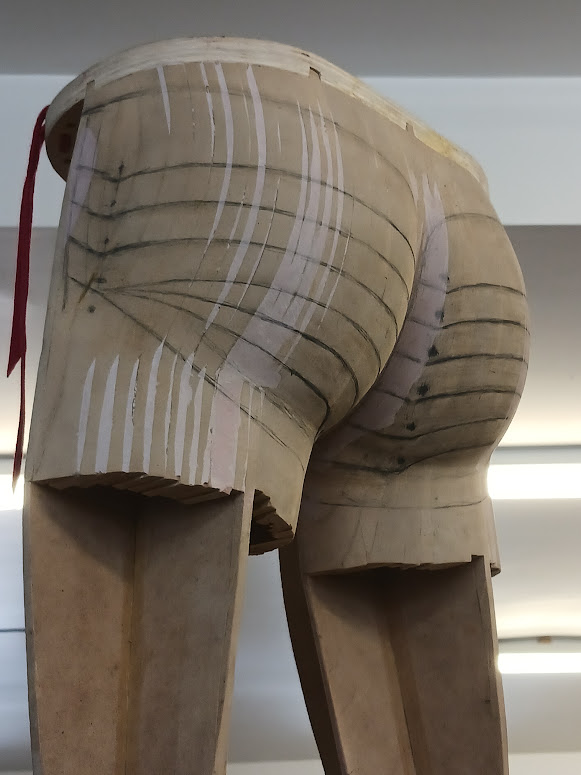
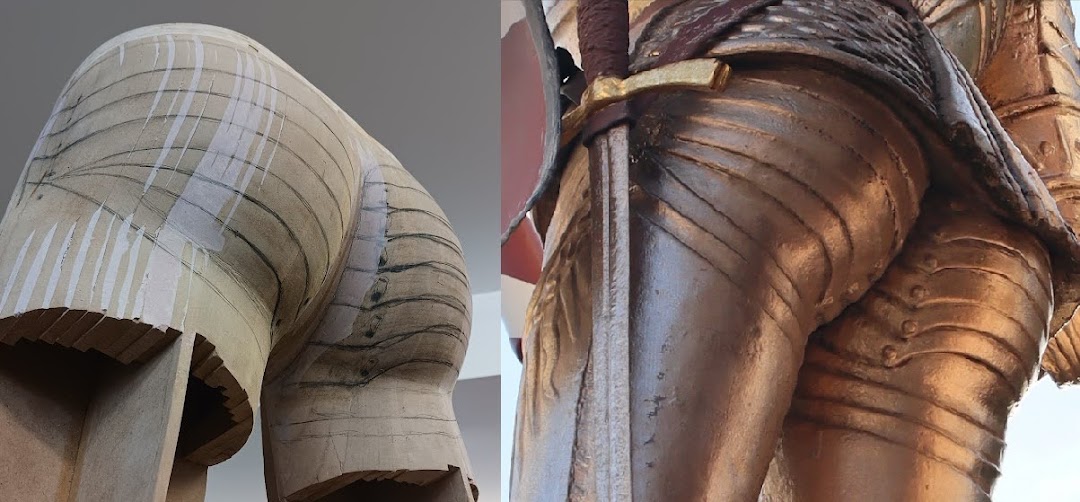
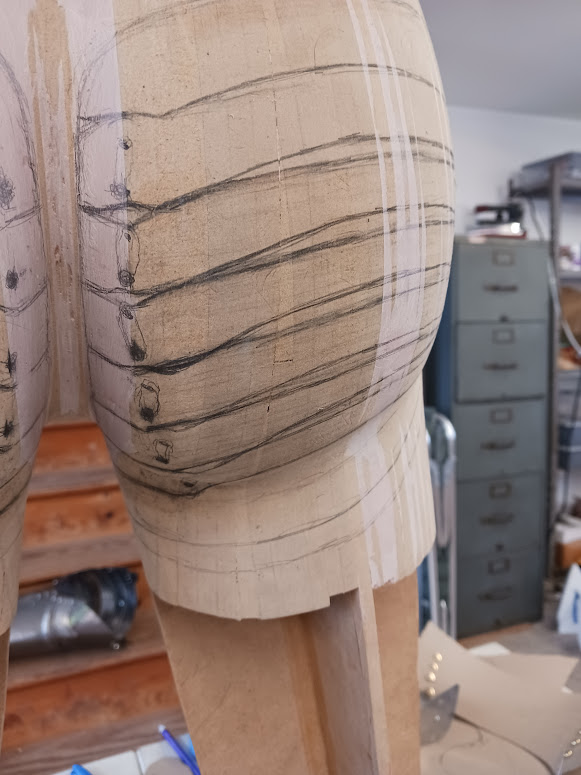
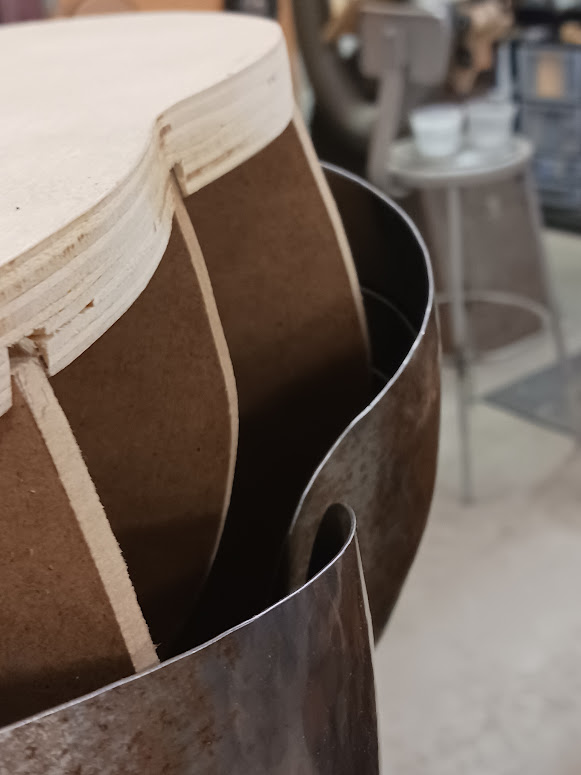
This view shows clearly one of the problems I have. The two cheeks touch across the centerline. It is reassuring that they do it on the buck as well. That shows that the buck is doing it's (first) job.

Image

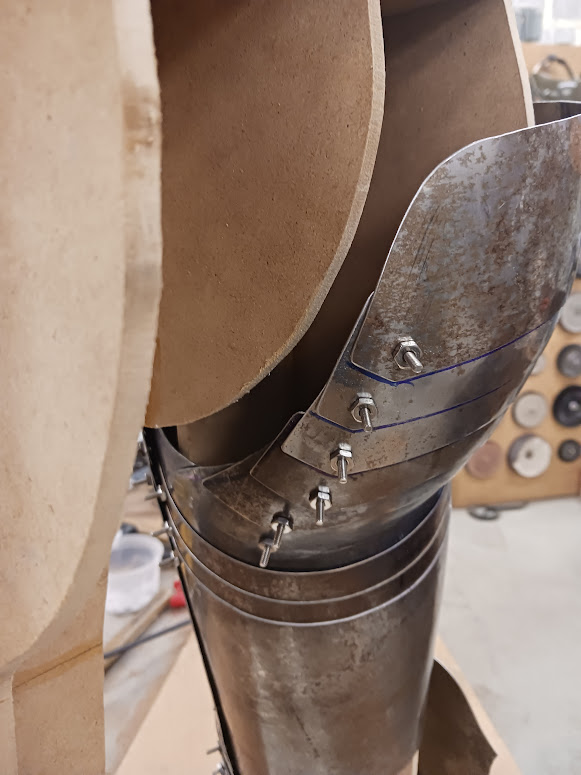
This pic shows two things. The first is that there is too much room between the buck and the armor in the upper butt. This is like the way it fits on me; so this is good. The second thing it shows it that there is lots or room between the edges of the assemblies and the mid-sagittal former of the buck. This part is not accurate; as the armor is in contact with my body here. This means I need to add material to that former to make the buck more like my body.

Image

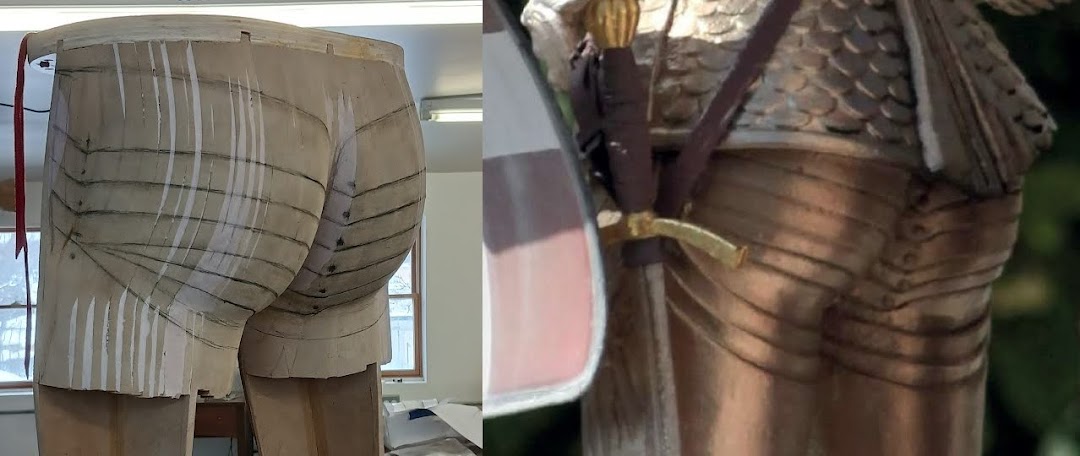
Here's another view, showing how much space there is that needs to be corrected in order for the buck to be a good simulacrum.

Image

Here we can see where I have added material in several places to bring the buck closer to the shape of my body. Ive added to the mid-sagittal former, to the backs of the leg formers, and to the groin of the transverse pelvic former.

Image

The next phase will be to make new plates to follow the lines of the buck. This will correct several of the errors. Before I do that, though, I will add some infill between the formers to help take the guesswork out of the templating. I'll take that opportunity to make it all be an attractive butt shape, even if it does not look like mine.

More on that in the next couple days...

Mac
Robert MacPherson

The craftsmen of old had their secrets, and those secrets died with them. We are not the better for that, and neither are they.

http://www.lightlink.com/armory/
http://www.billyandcharlie.com
https://www.facebook.com/BillyAndCharlie
RWWT
Archive Member
Posts: 166
Joined: Fri Jan 24, 2020 11:10 am

Re: The "Nurenberg butt armor"

Post by RWWT »

Things I never thought I would hear, yet seems potentially imminent: "Does this armor make my butt look big?"
Vogt_Armors
New Member
Posts: 1
Joined: Mon Jan 08, 2024 10:08 am

Re: The "Nurenberg butt armor"

Post by Vogt_Armors »

These are the types of projects that i absolutely love. Been keeping my eyes on it like a hawk. Keep up the amazing work Mac.

Do you mind showing a picture of the inside? Last we saw of the butt was the cardboard cutouts (with some black magic sliding rivets that i dont quite understand). Ive been working on an armor based on louis II foot combat armor, and im wondering if this is the missing link that has been plaguing me.

Also a few questions. The butt lames look to be fully extended in the standing position. An issue i ran into is that the butt needs to expand some 4-5 inches to lift the leg. How are you handling this? Are you just expecting the top edge of the butt to drop down?

Any thoughts to having the top most lame be a single piece that connects the 2 halves? (This wouldnt be possible of you dont intend to solve the butt expansion issue.) The statue doesnt go that far up to show whats actually happening. It would solve some potential pinching and spacing issues, but would also make the legs a pair of clamshelling pants.
Last edited by Vogt_Armors on Mon Jan 08, 2024 11:02 am, edited 1 time in total.
User avatar
Otto von Teich
Archive Member
Posts: 17440
Joined: Thu Nov 09, 2000 2:01 am
Location: The Great State of Texas.

Re: The "Nurenberg butt armor"

Post by Otto von Teich »

This is an amazing feat of engineering! And beauty. I'm...amazed, as usual.
People sleep peaceably in their beds at night only because rough men stand ready to do violence on their behalf.
Mac
Archive Member
Posts: 9953
Joined: Thu Jan 04, 2001 2:01 am
Location: Jeffersonville, PA

Re: The "Nurenberg butt armor"

Post by Mac »

Vogt_Armors wrote: Mon Jan 08, 2024 10:34 am These are the types of projects that i absolutely love. Been keeping my eyes on it like a hawk. Keep up the amazing work Mac.
Thank you!
Vogt_Armors wrote: Mon Jan 08, 2024 10:34 amDo you mind showing a picture of the inside? Last we saw of the butt was the cardboard cutouts (with some black magic sliding rivets that i dont quite understand). Ive been working on an armor based on louis II foot combat armor, and im wondering if this is the missing link that has been plaguing me.
I'll show the inside of MK II.... or whichever MK I'm on when I'm satisfied.
Vogt_Armors wrote: Mon Jan 08, 2024 10:34 amAlso a few questions. The butt lames look to be fully extended in the standing position. An issue i ran into is that the butt needs to expand some 4-5 inches to lift the leg. How are you handling this? Are you just expecting the top edge of the butt to drop down?
The lames have a generous underlap to let them to open out to allow the leg to flex. I expect to have to tie the upper back edge to the doublet of belt, and hope that it does not pull too much.
Vogt_Armors wrote: Mon Jan 08, 2024 10:34 amAny thoughts to having the top most lame be a single piece that connects the 2 halves? (This wouldnt be possible of you dont intend to solve the butt expansion issue.) The statue doesnt go that far up to show whats actually happening. It would solve some potential pinching and spacing issues, but would also make the legs a pair of clamshelling pants.
It can't be a single lame connecting both cheeks, or that legs would be difficult to put on and off. I am considering whether or not it might be beneficial to join them with a strap and buckle etc. I'll have a better feel for that when the assemblies are working properly, but I suspect that it's better to leave them separate.

The only pinching issue I expect to have to deal with is much farther forward. I think the back will behave itself.

Mac
Last edited by Mac on Mon Jan 08, 2024 6:15 pm, edited 2 times in total.
Robert MacPherson

The craftsmen of old had their secrets, and those secrets died with them. We are not the better for that, and neither are they.

http://www.lightlink.com/armory/
http://www.billyandcharlie.com
https://www.facebook.com/BillyAndCharlie
Mac
Archive Member
Posts: 9953
Joined: Thu Jan 04, 2001 2:01 am
Location: Jeffersonville, PA

Re: The "Nurenberg butt armor"

Post by Mac »

Otto von Teich wrote: Mon Jan 08, 2024 10:58 am This is an amazing feat of engineering! And beauty. I'm...amazed, as usual.
Thank you! It's only amazing if I get it to work... :wink:

Mac
Robert MacPherson

The craftsmen of old had their secrets, and those secrets died with them. We are not the better for that, and neither are they.

http://www.lightlink.com/armory/
http://www.billyandcharlie.com
https://www.facebook.com/BillyAndCharlie
User avatar
Christian Wiedner
Archive Member
Posts: 263
Joined: Wed Mar 18, 2009 7:33 pm
Location: Germany
Contact:

Re: The "Nurenberg butt armor"

Post by Christian Wiedner »

Vogt_Armors wrote: Mon Jan 08, 2024 10:34 am The butt lames look to be fully extended in the standing position.
That is a good point. In my opinion, however, it has to be the opposite. So more or less full compression. To achive this without gaps it would be easier to reverse the direction of the upper lames?
Otherwise you have to fight against gravity. You need to "hang" them up which might result in an uneven spacing. Of course you could use an internal (stiff) leather acting as a "spring" holding them up but this would create gaps in the compressed state...
Mac
Archive Member
Posts: 9953
Joined: Thu Jan 04, 2001 2:01 am
Location: Jeffersonville, PA

Re: The "Nurenberg butt armor"

Post by Mac »

Having more or less shaped up the infill in the buck/form, I spent some time trying to compare what I had to the images.

Here, I'm sitting so that the armor can be view along the same line as one of the photographs. I'm comparing it to the photo on my tablet.

Image

As far as I can tell, I need to remove some material from the cuisse backs to get the line right. This is not the first time I have done this, but I hope it's the last. The black sharpy marks show what I will remove.

Image

The amount to be removed is recorded on the template as well.

Image

Here, I'm marking the new line on the old lame template.

Image

The proposed Mk III template has more material added along the underlap, and a suggested line for the upper edge.

Image

With the new template in place, I can mark the actual line and evaluate the underlap and reveal.

Image

The finalized Mk III template.

Image

After cutting and shaping the new first lames, I repeated the process with the new second lames.

Here is what I currently have. The new sub-gluteal lames are in place, and I've spent some time refining the shape of the butt form. I hope I'm ready to start in on the gluteal fold plates tomorrow.

Image

Mac
Robert MacPherson

The craftsmen of old had their secrets, and those secrets died with them. We are not the better for that, and neither are they.

http://www.lightlink.com/armory/
http://www.billyandcharlie.com
https://www.facebook.com/BillyAndCharlie
Mac
Archive Member
Posts: 9953
Joined: Thu Jan 04, 2001 2:01 am
Location: Jeffersonville, PA

Re: The "Nurenberg butt armor"

Post by Mac »

I don't have a lot to show for the last week, but I am slowly making progress.

Having reshapesd the butt several times, I finally started drawing some lines on it to represent the lames. I wish I had not had to use any bondo at all, but I fell short in my guesses about the shapes of the infill pieces. I keep trying to remind myself that this is only a tool, and it doesn't matter what it looks like.

Image

One or the big problems I've had to deal with is reconciling lines as they appear with the probably location of the camera which took the pictures.

This one is, I think, a pretty good match.

Image

Here, I may be a bit low... or perhaps it's more a question of too close.

Image

This one includes a detail from the only image I have which was taken at about the same level as the statue.

Image

I'm reasonably satisfied with the lines, and am ready to start templating and building parts.

The first step here is to sketch in the hidden lines of the underlapping parts of the plates. This really confuses the picture; but luckily there are two buttocks, and I only need to mark the underlapps on one of them.

I'm planning on the medial sliding rivets to move about 1/2" (13mm)

Image

The lateral rivets will slide about 3/8" (10mm).

Image

I did not originally plan to put the lateral rivets on sliders at all, but it turns out that it's necessary if the upper plates of both the front and back are going to remain attached to one another. More on that later.

Mac
Robert MacPherson

The craftsmen of old had their secrets, and those secrets died with them. We are not the better for that, and neither are they.

http://www.lightlink.com/armory/
http://www.billyandcharlie.com
https://www.facebook.com/BillyAndCharlie
Mac
Archive Member
Posts: 9953
Joined: Thu Jan 04, 2001 2:01 am
Location: Jeffersonville, PA

Re: The "Nurenberg butt armor"

Post by Mac »

I've been a bit quiet while wrestling with this project, but I hope to bring it up to date here.

Building the new butt plates over the 3D form worked well, and I think I have a thing which will work. In order to allow the front and back parts to be hinged together at the hip, I needed to mount the inguinal lames on medial and central leathers, and cut slots for the lateral rivets. These are things I would do anyway, but I had hoped not to have to do them before dealing with heat treatment.

Image

The next hurtle was the knee voiders. They were more trouble than I had hoped, and required the sort of inspiration that comes from a good night's sleep. I had allowed the assemblies to become conical, which is not what is required. The knee is a similar width below as it is above, and the voider needed to respect that. In any case, I got them working OK. Because of the rivet locations (dictated by the statue) the voiders effectively lengthen when flexed. I had thought that would be a problem, but it's really a feature. If they did not lengthen, the terminal plate would end up too high in the back of the knee and there would be no room for it.

Image

In spite of having sworn that I would do some other decorative scheme in order to simplify the clean up, I ended up going with the statue's scheme anyway. No one was surprised... right?

Image

This brings us to the ventral focus point of the project; the codpiece. In a sense, this project was all about the codpiece from the beginning. I wanted to build it, but realized that I needed cuisses to check the interaction. Next thing ya' know, I'm building the butt armor.

Here is a quick sketch of the cod in two views, along with the template for the main plate.

Image

I started shaping the "cod cop" with cold raising to "give it the idea"....

Image

...and then moved on to hot raising. I would like to have done that over a ball, but the locking pliers got in the way, and I needed to do it as an "angle raising" on the end of this T-stake.

Image

It did not take long to get it roughed out.

Image

Image

It turns out that the same template can be used for all three of the lames....

Image

... so I did.

Image

Here is the basic assembly after getting the lames and terminal plate bolted together. I heated it all up with a torch to "relax" the assembly.

Image

In my sketch, I drew two perineal plates, but I thought I would try it with one first and see how that works. I expect to need some flexibility there for sitting, but I don't know how much. If I can get away with a less "floppy" assembly, I might not need a posterior strap to keep it all in place.

Image

Here is a view of the perineal plate, looking like a platypus. :lol:

Image

The top-down view.....

Image

... and an oblique view.

Image

It looks OK with the rest of the armor on the manikin.

Image

Image

I have, of course, tried the codpiece on by itself; but have not yet put the cuisses on with it. I'll try that this evening.

Mac
Robert MacPherson

The craftsmen of old had their secrets, and those secrets died with them. We are not the better for that, and neither are they.

http://www.lightlink.com/armory/
http://www.billyandcharlie.com
https://www.facebook.com/BillyAndCharlie
Ilkka Salokannel
Archive Member
Posts: 265
Joined: Mon Nov 09, 2015 3:35 pm
Location: Burnaby BC

Re: The "Nurenberg butt armor"

Post by Ilkka Salokannel »

Hi Mac:

Wonderful work. Should not the codpiece have side flanges and articulated plates that slide in behind the tops of the leg harness. I just cringe at the thought of a sharp point glancing in down there and getting around the codpiece.

Ilkka
Ilkka Salokannel
Archive Member
Posts: 265
Joined: Mon Nov 09, 2015 3:35 pm
Location: Burnaby BC

Re: The "Nurenberg butt armor"

Post by Ilkka Salokannel »

Reference the Henry VIII armour. It has a codpiece like what I am mentioning, although the armour is a different construction.
See pic below, it shows rear view of codpiece of Henry VIII
Ilkka
Attachments
44333031_10215809523643997_3895619020614795264_n.jpg
Mac
Archive Member
Posts: 9953
Joined: Thu Jan 04, 2001 2:01 am
Location: Jeffersonville, PA

Re: The "Nurenberg butt armor"

Post by Mac »

Ilkka Salokannel wrote: Mon Feb 05, 2024 2:57 pm Hi Mac:

Wonderful work.
Thank you!
Ilkka Salokannel wrote: Mon Feb 05, 2024 2:57 pm Should not the codpiece have side flanges and articulated plates that slide in behind the tops of the leg harness. I just cringe at the thought of a sharp point glancing in down there and getting around the codpiece.

Ilkka
It all depends on what you mean by "should". It would certainly be more secure with flanges like Henry VIII had, but the pic of the original statue clearly shows that it did not have them.

Image

I suspect that that if the statue were a functional armor, the codpiece would have been worn over a mail brayette. That's not as secure as flanges, but it's better than a mail brayette with no plate codpiece.

Mac
Robert MacPherson

The craftsmen of old had their secrets, and those secrets died with them. We are not the better for that, and neither are they.

http://www.lightlink.com/armory/
http://www.billyandcharlie.com
https://www.facebook.com/BillyAndCharlie
Indianer
Archive Member
Posts: 598
Joined: Fri Nov 06, 2015 8:07 am
Location: Northern Germany

Re: The "Nurenberg butt armor"

Post by Indianer »

Mac wrote: Mon Nov 06, 2023 8:08 pm Image
Mac, I am late to this. I have a big request that would give me big value: an image.

When you disassemble again, right in this state, before any polishing: would you retake that image for me? Cardboard lames and everything. I want to work with it.

1. .....
° I need the same angle from the side, just a tiny bit more of a frontview so I have the flesh of the Medial side of the cop in it, ever so slightly.

° But i hope for a more centered view, not a view from below like here.

2.....
° also centered, same angle but from the back, showing the cardboard lames from the inside. Bit like a mirrored front- back view.

That would be wonderful. I wanna make a collage from it for my book. I'll pay you for the inconvenience if you'll let me.
Last edited by Indianer on Thu Feb 22, 2024 1:02 pm, edited 2 times in total.
Indianer
Archive Member
Posts: 598
Joined: Fri Nov 06, 2015 8:07 am
Location: Northern Germany

Re: The "Nurenberg butt armor"

Post by Indianer »

Mac wrote: Tue Nov 07, 2023 7:24 pm Image
Third one: Would you replicate this left/bottom view for me, just with the top flexed like in the image below?
Sean M
Archive Member
Posts: 2392
Joined: Mon Oct 05, 2009 11:24 pm
Location: in exile in Canada

Re: The "Nurenberg butt armor"

Post by Sean M »

Mac wrote: Thu Nov 09, 2023 10:19 am Now..... This should not be difficult, but it turns out that it is. Let's step back a bit and think about voiders.

The ones we are all familiar with are what I like to thing of as the "newfangled style". It seems to have been developed toward the end of the fifteenth century. In this style, there is a central plate in the middle of the joint, and the lames overlap that plate both distally and proximally. This leg from Henry VIII's famous armor is a nice example. Note, that the pivots of the voider are hidden from view. We will come back to that later.

Image

Here is the mate to that leg, shown partially open. The construction is obvious.

Image

By contrast, early plate voiders do not have a central plate, and all of the lames lap in the same direction. Here are several examples from 15th C art.

Image

Image
Over the years we have talked about how sometimes mail voiders at the knee and elbow may have been attached to the plates rather than sewn to the doublet and hose. Mail fringes on 15th century Italian armour are some good examples. Could your old way be related to that? They would have been used to the mail moving around a bit inside the knee and elbow armour as the knee and the elbow bent.
DIS MANIBUS GUILLELMI GENTIS MCLEANUM FAMILIARITER GALLERON DICTI
VIR OMNIBUS ARTIBUS PERITUS
Check out Age of Datini: European Material Culture 1360-1410
Post Reply