Help Needed: Close Burgonet- Can/ House Construction

This forum is designed to help us spread the knowledge of armouring.
RWWT
Archive Member
Posts: 166
Joined: Fri Jan 24, 2020 11:10 am

Help Needed: Close Burgonet- Can/ House Construction

Post by RWWT »

Hi all. A friend talked me into trying to make a helmet for him. When we went "shopping" we, of course, ended up picking one where I am substantially punching far above my weight. However, it seems like fun, a good opportunity to learn a lot, and we have an understanding that it's 50/ 50 on whether he will end up with a helmet or a sad lump of metal that we will never speak about again, so I am giving it a shot.

I am currently working through the sketching and design process I've read about here for years but not gotten around to trying yet. That has been enlightening on a lot of levels. I am also trying to wrap my head around how best to slice this helmet up in a house/ can. I've played around with lots of lines on digital and physical paper and some crude cardboard and paper models, but I feel like I am either overthinking things or I missing something that should be obvious, or probably both.

This process seems perfectly obvious to me for a bascinet. My thinking is breaking down when I try to go from the cone a straight lines of that style of helmet to the roundness and curves of this one. Anyhow, here is my current thinking of where the weld lines go. Any comments, corrections, advice, etc. would be greatly appreciated.

Image
Mac
Archive Member
Posts: 9953
Joined: Thu Jan 04, 2001 2:01 am
Location: Jeffersonville, PA

Re: Help Needed: Close Burgonet- Can/ House Construction

Post by Mac »

That seems fundamentally OK. The points where all the parts come together does not match up perfectly in both views, but that's a think which will become obvious and easily fixable when you make up the templates.

I look forward to seeing how this goes!

Mac
Robert MacPherson

The craftsmen of old had their secrets, and those secrets died with them. We are not the better for that, and neither are they.

http://www.lightlink.com/armory/
http://www.billyandcharlie.com
https://www.facebook.com/BillyAndCharlie
RWWT
Archive Member
Posts: 166
Joined: Fri Jan 24, 2020 11:10 am

Re: Help Needed: Close Burgonet- Can/ House Construction

Post by RWWT »

Thanks Mac! Yeah, I was sloppy with this version. I have some drawings that line up better. The camera angle and distortion is driving me nuts. I posted this one because I want to make sure my thinking was right and not confuse things with my other doodling. Once I get the drawings cleaned up, I will probably ask for further comment on those.

If you say this looks fundamentally ok, that's a huge help. I could not be sure I didn't botch it entirely on my own. My follow up question is due to lack of experience in general and this method in particular: How much is too much metal to move at the points? The "roof" corners are what have been worrying me. It seems like a lotto metal to push in, at least compared to stuff I've seen here, but perhaps I am just being paranoid and too used to the old and busted ways of doing things.
wcallen
Archive Member
Posts: 4777
Joined: Mon Oct 29, 2001 2:01 am
Location: North Carolina, USA
Contact:

Re: Help Needed: Close Burgonet- Can/ House Construction

Post by wcallen »

Answering for my experience, not Mac's.
You can move massive amounts of material in if you want to. Generally you pick an amount that optimizes whatever matters most to you.
You might want to "lock in" all of the edges and make sure that you are only pushing in the weld.
Or you might want to do a little bit of light raising on edges to tuck things in. Each of these will require a different amount of metal pushed in at the weld.
I have personally made a piece by welding a flat disk to a tube and pushing in everything to for a semi-sphere on the end of a tube. I don't expect that is "best" or even all that reasonable, but it did work. I could have started with a shallow cone and a tube and done a lot less work.

Wade
RWWT
Archive Member
Posts: 166
Joined: Fri Jan 24, 2020 11:10 am

Re: Help Needed: Close Burgonet- Can/ House Construction

Post by RWWT »

Thanks Wade! That helps a lot. I've raised flat sheet into knees, elbows, and such but, for whatever reason, this feels a lot different in my head. That said, I saw mentioned here on a similar topic some time ago that pushing metal in along the weld lines has the corresponding benefit of thickening the helmet pretty much exactly where you might want it to be thickest. That, along with much else, has appealed to me a lot and had be anxious to try this method.

I'm working on drawings right now and hope to post those later today so everyone can tell me what I am doing wrong!

Side note: the advice here to really work these things through on paper has proven to be immensely helpful. I am learning more from this project, which hasn't left paper yet, than I have in years.
RWWT
Archive Member
Posts: 166
Joined: Fri Jan 24, 2020 11:10 am

Re: Help Needed: Close Burgonet- Can/ House Construction

Post by RWWT »

So, everyone take off your reading glasses so you can look past all the smudges and my absence of any drawing skills.

Here's what I think I am seeing (and not seeing) for the skull:

Image

As evidenced by the excessing smudging and redrawing (some day, maybe I will learn not to draw with such a heavy hand until I am happy with a line), I am not particularly happy with the bottom edges, in particular. I know it's not right and I am not sure how much of that is error in what I think it should look like and the limits of my ability to translate 3D into 2D on paper. The wavy eye slot and cheek line is my imagination, coupled with what I have seen in other helmets that I have picture of in the open position. Since I don't have open pics of this one, that's my best guess at the moment.

My tentative plan is to hand wave over getting those lines entirely right, focus on making sure I have more than enough metal (I plan on adding at least and inch around all the cut out edges for error and rolling the edge of the eye slot). For now, I will ponder these ideas and lines some more, then go back and try to do a better job than the attempt posted above at drawing in house/ can lines.

So, what am I getting wrong?
Mac
Archive Member
Posts: 9953
Joined: Thu Jan 04, 2001 2:01 am
Location: Jeffersonville, PA

Re: Help Needed: Close Burgonet- Can/ House Construction

Post by Mac »

I've just now noticed this, but it getting late tonight. I'll draw some lines and make some suggestions tomorrow.

Mac
Robert MacPherson

The craftsmen of old had their secrets, and those secrets died with them. We are not the better for that, and neither are they.

http://www.lightlink.com/armory/
http://www.billyandcharlie.com
https://www.facebook.com/BillyAndCharlie
RWWT
Archive Member
Posts: 166
Joined: Fri Jan 24, 2020 11:10 am

Re: Help Needed: Close Burgonet- Can/ House Construction

Post by RWWT »

Thanks Mac! Hopefully you see this before you start drawing. I rethought several things and redid a substantial part of the front view (now front and back view) last night and this morning. Here is the latest. Sorry that SmudgeFest continues. I was short on time to recopy a clean version.

Image
Mac
Archive Member
Posts: 9953
Joined: Thu Jan 04, 2001 2:01 am
Location: Jeffersonville, PA

Re: Help Needed: Close Burgonet- Can/ House Construction

Post by Mac »

RWWT wrote: Thu Nov 02, 2023 12:19 pm So, everyone take off your reading glasses so you can look past all the smudges and my absence of any drawing skills.

Here's what I think I am seeing (and not seeing) for the skull:

Image

As evidenced by the excessing smudging and redrawing (some day, maybe I will learn not to draw with such a heavy hand until I am happy with a line), I am not particularly happy with the bottom edges, in particular. I know it's not right and I am not sure how much of that is error in what I think it should look like and the limits of my ability to translate 3D into 2D on paper. The wavy eye slot and cheek line is my imagination, coupled with what I have seen in other helmets that I have picture of in the open position. Since I don't have open pics of this one, that's my best guess at the moment.

My tentative plan is to hand wave over getting those lines entirely right, focus on making sure I have more than enough metal (I plan on adding at least and inch around all the cut out edges for error and rolling the edge of the eye slot). For now, I will ponder these ideas and lines some more, then go back and try to do a better job than the attempt posted above at drawing in house/ can lines.

So, what am I getting wrong?
I have a couple of things to point out, and have put some lines on your sketch to illustrate them (within my abilities to use MS Paint).

The green lines in the side view are there to point out a basic property of most helmets. That is that the brow and the back are typically sort of parallel. This is a thing we see very frequently in authentic helmets and much more rarely in out modern attempts. I have a Pinterest board which explores that idea. In keeping with that, I have resketched the brow closer to where I feel sure it should be.

The next thing in the side view is the shape of the edge of the skull which is hidden from view by the bevor. What I have drawn is the typical line. There is, of course, some variation; but lacking any information about the specific helmet, something like this is the best assumption to make.

In the front view, I have put a green line to indicate the widest place in the head. This is typically about two fingers above the ears. The widest place in a helmet is usually at or just slightly above that line. I've sketched a new curve in red to illustrate where I think shape of the helmet should be. I realize that the back view seems to show the bulgiest place being lower, but that is largely an artifact of camera placement. The camera is a bit lot, and it's close to the helmet. That makes the areas just behind the ears look bigger than they are. It's a bit like the "selfie nose" phenomenon.

I've also reduced the volume of the cheek areas for the same reason.

I re-sketched the shape of the facial opening in the skull to reflect the changes made in the side view.

The pivot should probably be lowered a bit, and perhaps moved a little toward the back, as indicated in red. This will probably be the widest place in the helmet skull.

Now... about that "smudging and redrawing".... What sort of pencil are you using? I recommend something with an "HB" lead. Mechanical pencils are convenient, and I typically use a .5mm, but .7mm may suit you better. If you use a light, "sketchy" hand, erasure will be easier. It is no shame to use the eraser...... a lot. I believe I spend more time erasing than laying lines, and it is probably never the case that a line ends up in the first place I put it. Get comfortable erasing. This can be taken metaphorically as well.

Mac


Image
Robert MacPherson

The craftsmen of old had their secrets, and those secrets died with them. We are not the better for that, and neither are they.

http://www.lightlink.com/armory/
http://www.billyandcharlie.com
https://www.facebook.com/BillyAndCharlie
Mac
Archive Member
Posts: 9953
Joined: Thu Jan 04, 2001 2:01 am
Location: Jeffersonville, PA

Re: Help Needed: Close Burgonet- Can/ House Construction

Post by Mac »

No.. Wait... !

I just looked at the pics of the helmet, and I see why you made the facial opening the way you did. This new sketch has my (new) best understating of that line in blue.

....it's like I was saying about the eraser. :wink:

Image

Mac
Robert MacPherson

The craftsmen of old had their secrets, and those secrets died with them. We are not the better for that, and neither are they.

http://www.lightlink.com/armory/
http://www.billyandcharlie.com
https://www.facebook.com/BillyAndCharlie
RWWT
Archive Member
Posts: 166
Joined: Fri Jan 24, 2020 11:10 am

Re: Help Needed: Close Burgonet- Can/ House Construction

Post by RWWT »

That is immensely helpful, Mac! Thanks a trillion!

I entirely agree on your changes. I had not noticed the parallel lines between front and back that you pointed out before (and will be studying your board later), however, that spot was troubling me because it seemed like too much space inside and awkwardness with the lining. My error was neglecting to correct that when I made other adjustments for camera angles and lens distortion.

The same goes for the pivot placement and the brow adjustment. Your way solves several things that were bothering me and I should have considered that with the other adjustments.

On the "No.. Wait.." blue lines, thanks! A question on where those follow back to the red facial opening lines. Your lines make perfect sense and that was my initial thinking, however, I looked at A182 and A183 in the Wallace Collection (the photos on the catalog thumb drive show those open, though for the obvious reasons, I can't post them for everyone here) and both had wavy lines and seemed to cover the ear more than I'd expected (I initially though of just leaving about 1/4" overlap with the side/ chin plate and calling it good). Your proposed lines doesn't seem to change the coverage aspects a whole lot. For my part, I hadn't quite figured out why both of these other helmets had the wavy shape and coverage more than I originally expected, so I drew them in figuring the old guys might have known something that I hadn't figured out yet. Any thoughts?

I had intended to hold the drawing below back until I finished thinking through the other elements and sloppy placeholder stuff, but this seems helpful to illustrate my thinking with those lines better. So, please ignore everything apart from the basic lines for the time being. I will be soliciting advice from here on the rest later. The facial line is here closer to your blue line, I think. I lowered it my skull only drawing, perhaps due to overthinking.

I will make all your proposed adjustments tonight or tomorrow. Assuming those done, is the facial opening line worth exploring further, in your opinion?

Image

Finally, on pencils... well, I am using whatever my friend handed me. I am currently living in a temporary apartment, due to odd work stuff and didn't actually have pencils or anything else here. This should make this project rather entertaining as I am used to working with my own stuff, in my own space, and having several useful tools at hand. Here, my light board is a window and masking tape and the metalwork will be done in another friend's shop. This should be a fun experiment in vagrant armor design and construction!
Mac
Archive Member
Posts: 9953
Joined: Thu Jan 04, 2001 2:01 am
Location: Jeffersonville, PA

Re: Help Needed: Close Burgonet- Can/ House Construction

Post by Mac »

RWWT wrote: Fri Nov 03, 2023 1:37 pm

I had intended to hold the drawing below back until I finished thinking through the other elements and sloppy placeholder stuff, but this seems helpful to illustrate my thinking with those lines better. So, please ignore everything apart from the basic lines for the time being. I will be soliciting advice from here on the rest later. The facial line is here closer to your blue line, I think. I lowered it my skull only drawing, perhaps due to overthinking.

I will make all your proposed adjustments tonight or tomorrow. Assuming those done, is the facial opening line worth exploring further, in your opinion?

In general, it looks good!

There are a couple of things that you might address sooner rather than later......

--I see that you have elected to make the buff removable. There are two things that need to be thought out there. One is that using the same spring post for both functions means you can't open the helmet without the buff falling off. The other is that the shape of the hook must fall on a circle with the rivet at its center.

--The helmet, as it is in the photograph, is not fully closed. That's why we can see so much of the notch in the underlapping part of the proximal rear gorget lame and the flattened hem on the distal lame. Closing the helmet fully will bring the bevor closer to your chin and neck, and increase the curve of the line of the neck. I think it's worth the effort to "close the helmet" in the drawing.

--The gorget lames should exhibit a smooth curve from the neck to the place where the sunk border begins when they are in their "down" position. In most helmets this line is very subtle, but in this one it's very bold. That seems to be throwing you off a bit.

--Your earlier line of the back of the neck is probably closer to what it really going on. These helmets tend to fit more closely around the neck than we expect them to. They leave more space between skull and helmet than they leave between neck and helmet. This sounds scary, but it makes sense in terms of what they have to protect.

The last item is one of style. I like to render these side views as "projections" or "elevations", rather than perspectives. I'm not sure that's really better, but I find it useful to help in understanding the fit of the helmet with respect to the body.

Mac
Robert MacPherson

The craftsmen of old had their secrets, and those secrets died with them. We are not the better for that, and neither are they.

http://www.lightlink.com/armory/
http://www.billyandcharlie.com
https://www.facebook.com/BillyAndCharlie
RWWT
Archive Member
Posts: 166
Joined: Fri Jan 24, 2020 11:10 am

Re: Help Needed: Close Burgonet- Can/ House Construction

Post by RWWT »

Thank you, Mac! As always your observations are precisely correct and immensely appreciated. I got there on my own on a couple of them. The removable falling buff issues in particular, which has me laughing quite a bit here.

A little background about this project. My friend ordered a "custom" helmet for SCA use that ended up being one of the Indian- made things that really shouldn't be used for anything. Fortunately, my other friend and I were able to convince him of this fact and we discussed making him something to better suit his needs. One of the *cough* attributes of the ArmorMart helmet that he is quite attached to, however, is that it came with multiple visors (one for fencing, a bar grill, etc.) that all pretty much fall off as a function of putting on and taking off the helmet. In short, I am working to convince him that this is a bug and not a feature, and this rendering is part of my effort to coax him back to sanity. I am considering doing a sketch that includes bruised toes. So, yeah, I was lazy about the hook shape as it is intended to be erased. :lol: Well, probably. There are a couple things I like about it, but more on that later.

I was also considering seeking advice on better ways to accomplish this if he insists on removable faceplates. My other thought was to make the pivots unscrew, but I must admit that I am not enthusiastic about making 3 full versions of the whole chin/ visor assembly and he was grudgingly accepting of the less easy method of swapping out visors. There are related items I intended to ask for advice here a little further on, also.

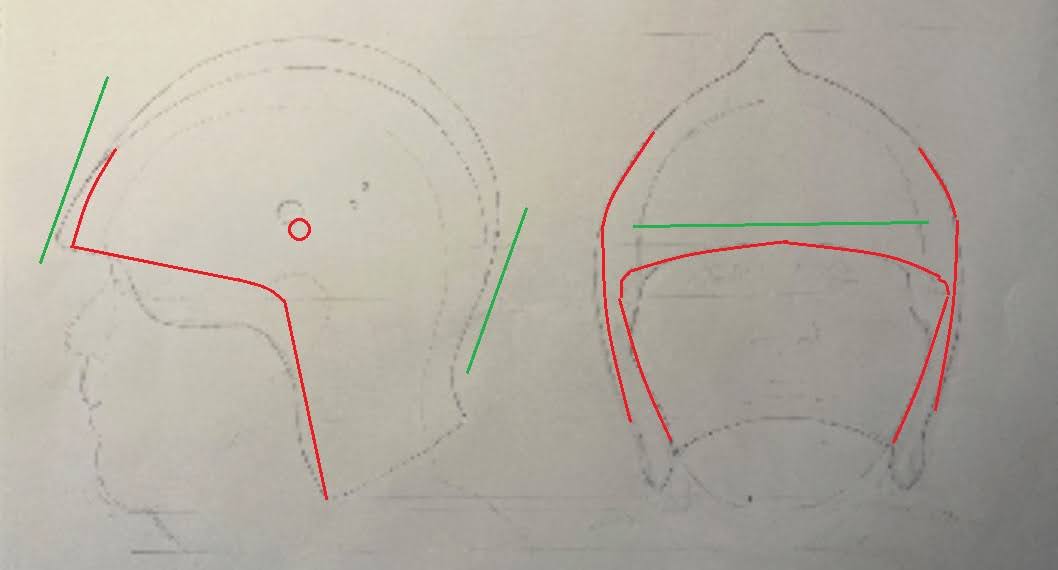
- Yup, I caught that it was not fully closed. Again, I was being lazy with this drawing and just faithfully traced over the photos as a base to start playing with things. I didn't fix it since the outside lines seemed to work reasonably well with his head for a first draft and figured I'd work out the size and proportion stuff, then back into those things. This was probably not the best approach, in hindsight, particularly as it contributes to the neck curve issue.

- On the neck curve, I am really glad you saw my ham handed change there. This was my lazy fix to concerns about getting this helmet to work well with a gorget. I was aware that they should fit more closely than we expect and the original line was probably correct, however, my friend has fairly thick neck with a fat roll in the back (that I have had lots of fun teasing him about, since he was surprised to see it in his profile pictures.) In short, I am having trouble figuring out the best way to fit everything in there that needs to be there and have not yet done enough homework on how gorgets work with this type of helmet. I'll see if he's comfortable with me posting his actual pictures because I'd like to get better advice on getting all this work in a better way than my lazy, "I'll just push this line out" solution. Alternatively, I will do some better drawings of what's going on with neck shapes and start working a gorget into the drawings (yup, I really should have done that first). I really could use advice on all this. I've never played with this style of helmet before and I'm more used to the early stuff. Aventails are much more forgiving.

- You are entirely correct on the lames and they are throwing me. I honestly just hand waved over those for the moment with the thought of using that as a base to then sort out the more fiddly things. I intended to ask about those a bit later but figured I'd do some more reading of your 'Articulation" thread and pencil work first. Thanks for the Articulation thread, BTW. I have been trying to figure that stuff out for some time, in my very on again/ off again playing with armor. I've been looking for the time and excuse to work through it all in a practical way and my intention was to play around with it all in the course of working on this project. I foresee lots of cardboard and paper fasteners in my near future while I replicate your examples, and I am looking forward to it!

- Working on this has made me more fully appreciate your point about "projections" and "elevations" vs. perspectives. A lot of what you are seeing, particularly in this drawing, is my first attempts at carrying that very sensible principle into execution. I simply lack the pencil and paper time and drafting/ drawing experience. One of my intentions with this project is improving on this stuff and having a practical means of wrapping my head out these things.

On this project, there are several overlapping goals:
1. Get my friend a helmet that will look good and protect him.
2. An opportunity for me to work through a lot of fundamental design and construction things that I haven't gotten around in my on again/ off again armor career.
3. Develop my understanding of this style and period of armor.

My friend and I accepted on the outset that Goal 1 may not happen, at least as well as we'd like, since this is a significant stretch of my limited abilities and experience. Goals 2 and 3, however, offset that in our opinions, particularly given I'll be working in a mutual friend's shop. This provides the opportunity for several people to benefit from the knowledge building aspects. The shop owning friend is very ambitious on helping people to learn stuff and has people in and out all the time. Hopefully if Goal 1 fails, we end up with several people who learn a whole lot from this and have a greater knowledge base and some additional material to build on.

For all those reasons, I really appreciate the help in working through stuff and getting this as right as my skills and experience permit!
Mac
Archive Member
Posts: 9953
Joined: Thu Jan 04, 2001 2:01 am
Location: Jeffersonville, PA

Re: Help Needed: Close Burgonet- Can/ House Construction

Post by Mac »

To retain the idea of exchange visors/buffs you need to separate the attachment from the bevor lock. They just need to be two different mechanisms. You could, for example, return to the rivet locations of the original but make one of the rivets be a post and the other be a spring post. A hook going through the spring post will keep it secure. If the post on the other side is long enough, it probably does not need a hook.

I can see the shape of your friend's neck in the clean version of the original sketch. (somehow, I missed that sketch yesterday when I went to draw lines) There should be no problem getting the helmet to fit him and look good, but you really do need to figure the gorget into the equation. I expect the upper edge of the gorget to end up just below the flange of the helmet skull in back, and just above the flange of the bevor. That is to say, a bit of the front of the gorget will end up inside the bevor. When designing the gorget, you will need to consider what flesh is easily compressible and what it not. The roll on the back of his neck will not compress, but the flesh under his chin will. So.. your line in back will have to be at or just outside the neck fat, but the line under the chin can intrude a bit. It may be instructive to make up a sort of model of the neck opening of the gorget by cutting semicircles of various sizes out of cardboard (or whatever) and seeing what he can be made to wear. The upper rings of gorgets are typically round, even if they do not interface with the sort of helmet that needs to lock to them.

The more I think about the idea of having gorget neck sizing models, the more I think it would be a cool thing for a shop to have a set of in different sizes. Here are some thoughts about material and form.....
--plywood rings with a hinge hinge on one side.
--rings of Masonite with an overlap to accommodate a pivot.
--hinged plastic rings made up on a 3D printer. This is an idea for the high tech guys. If anyone wants to make up a file to print that, I would be pleased to consult with them about design.

Mac
Robert MacPherson

The craftsmen of old had their secrets, and those secrets died with them. We are not the better for that, and neither are they.

http://www.lightlink.com/armory/
http://www.billyandcharlie.com
https://www.facebook.com/BillyAndCharlie
RWWT
Archive Member
Posts: 166
Joined: Fri Jan 24, 2020 11:10 am

Re: Help Needed: Close Burgonet- Can/ House Construction

Post by RWWT »

As usual, Mac, I like your idea better. I kicked around something of the sort in my head a bit, then happened on Charles V's very rounded burgonet, was intrigued with several aspects of that helm, and slapped on an adaptation of the way that helmet works to this one as a placeholder. One of the things I was trying to avoid was multiple turn hooks, but I suppose that doesn't matter as much as I previously considered. There's more on how the visor and brim function that I'd like to explore a bit more a little later.

I sent you a PM about your gorget model ideas. This might be right up a mutual friend's alley.

Thanks for the advice on the gorget fitting! I was more or less thinking along those line, but you have provided much needed clarity.

Next steps for me are taking a couple of steps back and correcting my laziness and a few of my omissions, work in some gorget ideas into the drawings, and take a fresh look at the back of the neck after I don't have so many other errors and omissions impacting things.

I realized that I was a too quick to think, "Yup, I saw all that" in my earlier post. I need to eat a slice of humble pie and admit that I really need to fix these things before proceeding, as I was starting to make adjustments based on "fixes" and placeholders. Thanks for saving me from flushing through easily fixed things that were beginning to become compounded errors further into the process. :oops:
RWWT
Archive Member
Posts: 166
Joined: Fri Jan 24, 2020 11:10 am

Re: Help Needed: Close Burgonet- Can/ House Construction

Post by RWWT »

I did some work trying to design a gorget to go with this helmet, which proved more difficult than I expected. Most of the difficulty, I think, is that I haven't previously done much thinking about the style and period of armor before. Another is that my brain wants to think in three dimensions and not in two, so creating an elevation drawing of something with several varying depths and curves was driving me nuts.

I think I arrived at something going in more or less the right direction, but still needs quite a bit of work.

Here's my thoughts:
1. I think I am being too generous with how much space I am allowing, however, it seems like I need the space that is there for things to function correctly. The item I am thinking the most about is that the leathers need to kink, and I figure that needs about a cm. I most examples of gorgets that I have looked like they have lining rivets around the top lame, so that needs a but of room for that strip of leather and a thin liner. My thoughts are around .5 cm-1 cm for that.

2. On the front, I think it needs to come up high enough so that the top edge isn't in contact with the Adam's apple and rest around the fleshy part above it. That seems to make sense, but I really have no idea how these are supposed to fit. I've also noticed that from a profile view, every gorget I've looked at forms a right angle or really close from the top edge and the line down the back. I just noticed that I screwed that up a bit in this drawing and intend to steal some space back on the back for that and make that line straighter. In any case, if these assumptions are correct, I have concerns about interfering with the bottom edge of the helmet skull, since that shows the nice little neck curve in the back which I foolishly bumped out in my prior drawings. I am a bit stumped as to where to go with this.

Here's where my thinking is at so far. I hope things aren't too confusing with the lines I left in from tracing over my friend's shirt. Those were helpful landmarks for me in laying things out and I wasn't ready to erase them yet. I also gave up trying to render the front view for the moment, as the differences in heights and lining things up was driving me crazy.

Image

I can get everything to work nicely with some paper cutouts (I do much better with 3D, carving, and sculpting that I do with drawings), but I am mainly concerned on how it's all supposed to fit.

Any help would be greatly appreciated.
RWWT
Archive Member
Posts: 166
Joined: Fri Jan 24, 2020 11:10 am

Re: Help Needed: Close Burgonet- Can/ House Construction

Post by RWWT »

Oh, I should mention that my primary reference for the gorget is A217 from Wade's collection, here: https://european-armour.com/A-127.html

Thanks for all the great pics, Wade!
Mac
Archive Member
Posts: 9953
Joined: Thu Jan 04, 2001 2:01 am
Location: Jeffersonville, PA

Re: Help Needed: Close Burgonet- Can/ House Construction

Post by Mac »

RWWT wrote: Fri Nov 10, 2023 11:58 pm I did some work trying to design a gorget to go with this helmet, which proved more difficult than I expected. Most of the difficulty, I think, is that I haven't previously done much thinking about the style and period of armor before. Another is that my brain wants to think in three dimensions and not in two, so creating an elevation drawing of something with several varying depths and curves was driving me nuts.
Even though it's mind bending, I think it's a good exercise to do the drawings. It forces you to think about things that need to be considered.
RWWT wrote: Fri Nov 10, 2023 11:58 pm 1. I think I am being too generous with how much space I am allowing, however, it seems like I need the space that is there for things to function correctly. The item I am thinking the most about is that the leathers need to kink, and I figure that needs about a cm. I most examples of gorgets that I have looked like they have lining rivets around the top lame, so that needs a but of room for that strip of leather and a thin liner. My thoughts are around .5 cm-1 cm for that.
For the most part, you don't really need to presume space within the neck of the gorget. It's only really close to the neck at the top and along the back. The neck is more or less cylindrical, while the gorget is more or less conical. There will be plenty of space for the leather to kink.

RWWT wrote: Fri Nov 10, 2023 11:58 pm 2. On the front, I think it needs to come up high enough so that the top edge isn't in contact with the Adam's apple and rest around the fleshy part above it. That seems to make sense, but I really have no idea how these are supposed to fit. I've also noticed that from a profile view, every gorget I've looked at forms a right angle or really close from the top edge and the line down the back. I just noticed that I screwed that up a bit in this drawing and intend to steal some space back on the back for that and make that line straighter. In any case, if these assumptions are correct, I have concerns about interfering with the bottom edge of the helmet skull, since that shows the nice little neck curve in the back which I foolishly bumped out in my prior drawings. I am a bit stumped as to where to go with this.
The height is not really constrained by the Adam's apple. So long as the upper ring is sized correctly, it will not interfere. Some collars are tall enough that they reach the jaw.

The observation that there is a right angle between the plane of the upper rim and the line of the back is a good one! This holds for the vast majority of gorgets.

I'm not sure I follow you about your concerns with the edge of the helmet skull. Can you clarify that? It's good to consider how the parts will interact, but I don't think I see a problem brewing there.


RWWT wrote: Fri Nov 10, 2023 11:58 pm Here's where my thinking is at so far. I hope things aren't too confusing with the lines I left in from tracing over my friend's shirt. Those were helpful landmarks for me in laying things out and I wasn't ready to erase them yet. I also gave up trying to render the front view for the moment, as the differences in heights and lining things up was driving me crazy.
The shirt lines are not a problem. If you get a chance, though, you might do a fresh drawing with his head in a more relaxed position. As it is, he has his head tipped back a bit. That effects how the helmet will have to be drawn. While it's important to consider how the head and helmet will move with respect to the body and the gorget, it's easier to make the drawings with the head in the most "neutral" position.

Remember that the rim of the gorget (and all the lames) will appear as ovals in the front and back view. The coffee cup sitting at your desk will serve as a good model for what circles look like when viewed from slightly above or below.


RWWT wrote: Fri Nov 10, 2023 11:58 pm
I can get everything to work nicely with some paper cutouts (I do much better with 3D, carving, and sculpting that I do with drawings), but I am mainly concerned on how it's all supposed to fit.

Any help would be greatly appreciated.
Drawing is a useful skill, and it improves with practice. I think it's always worth the time invested.

I thought I'd begin with some notes and give you a chance to think about that and make changes, rather than just drawing my infamous red lines on your sketch. Tell me if you think you would like red lines. :)


Mac
Robert MacPherson

The craftsmen of old had their secrets, and those secrets died with them. We are not the better for that, and neither are they.

http://www.lightlink.com/armory/
http://www.billyandcharlie.com
https://www.facebook.com/BillyAndCharlie
RWWT
Archive Member
Posts: 166
Joined: Fri Jan 24, 2020 11:10 am

Re: Help Needed: Close Burgonet- Can/ House Construction

Post by RWWT »

I completely agree about drawing! Despite the frustration, I've learned more doing this over that past couple of weeks than I did in several years of playing around with this stuff. The coffee cup example is helpful. I do okay with the circles. It's the relative distance between lines when things are sloping toward or away that have been messing me up the most. I had a bit of an "Ah ha!"/ "D'oh!" moment on that, so we'll see how that works out with the revision.

On the interaction with the helmet, I'm paying close attention to where height of the gorget in the back and the lowest part of the helmet rim in the back. Those points seem to want to occupy the same space. The rest I am not worried about.

I do have to admit that I had a good laugh earlier while reworking things some more. I slapped the helmet on top of the gorget drawing and, just as you said, the front of the gorget sits above the jaw of the helmet. If you heard some choice words with your name involved from a distance, they were meant in complement to you and mocking my slightly decreasing ignorance.

In reworking things, I can't seem to keep the right angle between the back of the gorget and the top. My friend has a fairly broad, sloping back. To get the back of his neck and shoulders in, it seems like that line needs to be more obtuse. Part of that is I've been strict about getting the front rim above the Adam's apple, through, now that you mention it doesn't matter so much (and that makes perfect sense, now that I think about it that way), perhaps I can rework that angle some more and come to a more happy medium on that angle.

I will monkey around a some more and post v2.986. If I don't have it right by that point, I will definitely request the infamous (yet much appreciated) red lines.
Mac
Archive Member
Posts: 9953
Joined: Thu Jan 04, 2001 2:01 am
Location: Jeffersonville, PA

Re: Help Needed: Close Burgonet- Can/ House Construction

Post by Mac »

RWWT wrote: Sat Nov 11, 2023 12:31 pm I completely agree about drawing! Despite the frustration, I've learned more doing this over that past couple of weeks than I did in several years of playing around with this stuff. The coffee cup example is helpful. I do okay with the circles. It's the relative distance between lines when things are sloping toward or away that have been messing me up the most. I had a bit of an "Ah ha!"/ "D'oh!" moment on that, so we'll see how that works out with the revision.
If your two views are well reconciled then you can project a point from one view to the other. I see that you have done that with the height of the back of the collar. Here's how to think about the sides. The side view shows the angle of the top of the collar. You know that the collar is circular, so you know that its widest point is midway from the front to the back. Take the point half way between the front and the back of the collar and project it to the front/back view. That will give you the height at which the collar "goes around the corner" or it's horizon. It will be the same on both the front and back views but it will look different.... like the coffee cup from above vs. from below. I frequently draw the entire oval, and then erase what I know I can't see.

Whenever you need a height, ask yourself if you can find it in the other view and project it across. You will end up doing this a lot.
RWWT wrote: Sat Nov 11, 2023 12:31 pm On the interaction with the helmet, I'm paying close attention to where height of the gorget in the back and the lowest part of the helmet rim in the back. Those points seem to want to occupy the same space. The rest I am not worried about.
If your guy did not have his head tipped up, those points may well not interact. This is why it's important to start with a "neutral" position. In the real world, when he tipped his head up like that, the back of the helmet would push the gorget down a bit.
RWWT wrote: Sat Nov 11, 2023 12:31 pm I do have to admit that I had a good laugh earlier while reworking things some more. I slapped the helmet on top of the gorget drawing and, just as you said, the front of the gorget sits above the jaw of the helmet. If you heard some choice words with your name involved from a distance, they were meant in complement to you and mocking my slightly decreasing ignorance.
I had a sense that somewhere someone was saying "Fuck! That smart ass was right...." :lol:
RWWT wrote: Sat Nov 11, 2023 12:31 pm In reworking things, I can't seem to keep the right angle between the back of the gorget and the top. My friend has a fairly broad, sloping back. To get the back of his neck and shoulders in, it seems like that line needs to be more obtuse. Part of that is I've been strict about getting the front rim above the Adam's apple, through, now that you mention it doesn't matter so much (and that makes perfect sense, now that I think about it that way), perhaps I can rework that angle some more and come to a more happy medium on that angle.
RWWT wrote: Sat Nov 11, 2023 12:31 pm
It looks to me like just removing the empty space in the back will mostly do it. That right angle is not sacred, but you should try to approximate it.
RWWT wrote: Sat Nov 11, 2023 12:31 pm I will monkey around a some more and post v2.986. If I don't have it right by that point, I will definitely request the infamous (yet much appreciated) red lines.
The red pen is always at your command! :wink:

Mac
Robert MacPherson

The craftsmen of old had their secrets, and those secrets died with them. We are not the better for that, and neither are they.

http://www.lightlink.com/armory/
http://www.billyandcharlie.com
https://www.facebook.com/BillyAndCharlie
RWWT
Archive Member
Posts: 166
Joined: Fri Jan 24, 2020 11:10 am

Re: Help Needed: Close Burgonet- Can/ House Construction

Post by RWWT »

Mac wrote: Sat Nov 11, 2023 4:05 pm If your guy did not have his head tipped up, those points may well not interact. This is why it's important to start with a "neutral" position. In the real world, when he tipped his head up like that, the back of the helmet would push the gorget down a bit.
You caught me again. I did note the head tilt but did not fully consider the compression at the back of the neck. I will fix the head position in the next drawing. It's an easy fix if I had a proper light board. It's a bit more annoying when I'm taping stuff up to a window and unwisely set it aside when I meant to do it on the most recent head tracing. :lol:
Mac wrote: Sat Nov 11, 2023 4:05 pm It looks to me like just removing the empty space in the back will mostly do it. That right angle is not sacred, but you should try to approximate it.
Hmmm. You and I are seeing it a bit differently. I played with the space in back and it kept deviating from the right angle more than looked acceptable to me. Your advice on it not being necessary for the front edge to be higher than the Adam's apple seemed to do the trick in my most recent attempt. The right angle isn't entirely there in this version, but it's much less obtuse than other variations I tried. I dropped the front a bit, though I suspect once I have light in the window again and correct for the head tilt, the front edge will still fall in the area I was previously aiming for. I feel like changing the angle slightly in this version gives me room to play with on the height while maintaining the angles. I suspect you might say that I'm still being too generous with space, though my thinking is that will be easier to adjust while fitting a template to my friend... at least while I am working through the learning curve of all this.

Here's the the latest attempt. I welcome red pens and comments from anyone who would like to destroy my illusions of getting this right and steer me closer to the path of illumination. :D

Image
Mac
Archive Member
Posts: 9953
Joined: Thu Jan 04, 2001 2:01 am
Location: Jeffersonville, PA

Re: Help Needed: Close Burgonet- Can/ House Construction

Post by Mac »

RWWT wrote: Sun Nov 12, 2023 4:21 am


Hmmm. You and I are seeing it a bit differently. I played with the space in back and it kept deviating from the right angle more than looked acceptable to me. Your advice on it not being necessary for the front edge to be higher than the Adam's apple seemed to do the trick in my most recent attempt. The right angle isn't entirely there in this version, but it's much less obtuse than other variations I tried. I dropped the front a bit, though I suspect once I have light in the window again and correct for the head tilt, the front edge will still fall in the area I was previously aiming for. I feel like changing the angle slightly in this version gives me room to play with on the height while maintaining the angles. I suspect you might say that I'm still being too generous with space, though my thinking is that will be easier to adjust while fitting a template to my friend... at least while I am working through the learning curve of all this.

Here's the the latest attempt. I welcome red pens and comments from anyone who would like to destroy my illusions of getting this right and steer me closer to the path of illumination. :D

I think the reason you are having trouble with the right-angle thing is about his head carriage. In addition to having his head tipped back (which we talked about already) he has his head quite far forward. That second thing is what's making it difficult to fit a gorget with the typical angle to him. Now... if this is his normal head carriage, you will have to adjust the design of the gorget to accommodate that. On the other hand, he may have been holding his head/neck at an unusual angle while you were doing the tracing. If that's the case, you don't want to make a gorget that takes into account a posture he doesn't usually have. In any case, I think it's prudent to bring him back for another tracing. This time try to make sure that he holds his head the way he is accustomed to.

If his head is always forward, than that's the way his armor will have to be. On the other hand, he should not tip his head back for the tracing. The head to neck angle is something that we all alter from moment to moment, and it's best to work with the assumption that that he is looking straight and level. The neck to back angle is harder to alter, and will need to be accommodated to a greater of lesser degree. Some people may be Ok with the idea that they will have to stand differently in armor, and that the gorget will remind them to "stand up straight" like their mother told them. Others will only find discomfort and dissatisfaction with such an orthopedic approach. It may be possible to reach for some middle ground. Back when I used to wear armor, I found that my posture was improved while I was armed, but it wouild make my back hurt after a few hours.

You might investigate getting an LED light table. They are not expensive, and have better illumination than the old fashioned ones with bulbs. Of course it's so much better than taping paper to a window as to be ridiculous. This one may or may not be the one I have. https://www.amazon.com/Voilamart-Bright ... A27C6?th=1

Mac
Robert MacPherson

The craftsmen of old had their secrets, and those secrets died with them. We are not the better for that, and neither are they.

http://www.lightlink.com/armory/
http://www.billyandcharlie.com
https://www.facebook.com/BillyAndCharlie
RWWT
Archive Member
Posts: 166
Joined: Fri Jan 24, 2020 11:10 am

Re: Help Needed: Close Burgonet- Can/ House Construction

Post by RWWT »

I used to have one of those light tables... until I sold my shop and pretty much everything else to move across the country for work. One of the challenges of this project is that I currently live in a temporary apartment with absolutely nothing to work with. I didn't even have pencils or paper at "home". As my situation here is temporary, acquiring new tools and things is off the table, so I have to make do with whatever is available to me. While one part of me is looking forward to the challenge of Vagrant Armoring, my want-to-be perfectionist side is in rebellion against accepting that I will necessarily have to compromise on several things, in addition to my limited skill set and experience, to try to make this work.:lol: I am immensely grateful for the help in offsetting the skill and experience deficits!

Alas, today was a bright sunny day and I took advantage of the well lit window to make my best attempt at correcting the head angle... which I really should have done from the beginning. I didn't have time today to rework the gorget, but- per usual- you are right and it seems to make a larger difference than I'd anticipated.

I think the answer will be a bit of all your observations and suggestions. My friend really does have mountainous trapezius muscles which contribute to somewhat hunched profile in his normal, relaxed posture. I've been focused on that and disregarded the head tilt as more inconsequential that it is. I've been tracing over photos taken by a mutual friend (who did a really nice job of standing back, zooming in, and keeping a consistent camera height). I will see if I can get together with my friend sometime this week and reshoot the profile to clear things up some more. I will also probably make up some paper versions to try on him. Perhaps that will help me to see some of what I am missing more clearly.
RWWT
Archive Member
Posts: 166
Joined: Fri Jan 24, 2020 11:10 am

Re: Help Needed: Close Burgonet- Can/ House Construction

Post by RWWT »

So, I went back and re-sketched the helmet with the visor fully closed and can now see some of my problems more clearly. When I was originally trying to fit the helmet on my friend's head digitally, I was rotating things around and proportionally scaling things until everything fit. The combination of my friend's head tilt and the visor being slightly tilted up led to mistaken assumptions on how the helmet was tilted... and everything went even more wrong from there. What is extremely frustrating is that I saw all tilt problems from the get go but somehow talked myself into believing that things were in their relatively correct spaces after rotating the pictures around. This, of course was entirely incorrect and I am am annoyed at myself because I know better.

I am a moron. I now have a pile of shame drawings. And Mac is a witch for seeing all of this instantly. And I am twice as dumb since Mac pointed all this out and my troglodyte brain kept thinking I'd fixed it :D

Ah well. It's a heck of a lot better than realizing this after I'd cut and shaped a bunch of metal. Back to taping paper to the window...
Mac
Archive Member
Posts: 9953
Joined: Thu Jan 04, 2001 2:01 am
Location: Jeffersonville, PA

Re: Help Needed: Close Burgonet- Can/ House Construction

Post by Mac »

RWWT wrote: Tue Nov 14, 2023 2:08 pm

I am a moron. I now have a pile of shame drawings. And Mac is a witch for seeing all of this instantly. And I am twice as dumb since Mac pointed all this out and my troglodyte brain kept thinking I'd fixed it :D

Ah well. It's a heck of a lot better than realizing this after I'd cut and shaped a bunch of metal. Back to taping paper to the window...

I've been thinking about this sort of thing since 1979. There may or may not be some witchcraft in addition. :wink:

I look forward to seeing your next drawings.

Mac
Robert MacPherson

The craftsmen of old had their secrets, and those secrets died with them. We are not the better for that, and neither are they.

http://www.lightlink.com/armory/
http://www.billyandcharlie.com
https://www.facebook.com/BillyAndCharlie
RWWT
Archive Member
Posts: 166
Joined: Fri Jan 24, 2020 11:10 am

Re: Help Needed: Close Burgonet- Can/ House Construction

Post by RWWT »

I think I found another problem with how I have been thinking about all of this. I am quite shocked at how little I knew and how much I misunderstood (hopefully the past tense is increasingly appropriate, though it remains to be confirmed) about how gorgets are supposed to fit.

On my prior iterations, I thought that the top edge of the gorget needed to sit below the lower edge of the helmet where the articulated plates attach. this seemed to be the only place where there was sufficient room to accommodate the widest points, both in profile and front/ back views. This was causing me all manner of difficulty in trying to make the thing low enough, still function, not have all the angles get weird and hideous, and all manner of other problems.

My next iteration, I hoped that my making the changed to my friend's head angle and getting the visor closed properly would provide clarity and everything would work. Well, it didn't.

So, my new mode of thinking is taller rather than shorter on the gorget. Here is my basic reasoning.
1. I know the top ring gorgets are round or vaguely round (It seems like the width can often be about 1/4 less than the depth). For example Wade's measurements on his website to outer edge of the roll on A 127 in his collection are 6 1/4" D x 6" W. (Thanks Wade!)
2. I can get 6 1/4", no problem, monkeying around with the slope of the top edge in profile, which is what I was doing. The trouble is, this invariably runs through points that are too narrow on the helmet to accommodate the 6" width. Alas, my many difficulties and trying to make the whole thing work under the edge of the helmet. The only places wide enough are in the area were the articulated plates flare out, except...
3. If I jam the whole thing up to my buddy's chin, there is plenty of room, I don't have to create wacky angles, or elongate his neck into giraffe proportions.

I've gotten tired of erasing and redrawing and my window light table is now dark, so here is a rough mock up of my latest thinking on how this all needs to work.

Image

It seems a somewhat excessive to have everything overlapping so much, but I have yet to find another way to get everything to fit.
Mac
Archive Member
Posts: 9953
Joined: Thu Jan 04, 2001 2:01 am
Location: Jeffersonville, PA

Re: Help Needed: Close Burgonet- Can/ House Construction

Post by Mac »

RWWT wrote: Wed Nov 15, 2023 11:08 pm

So, my new mode of thinking is taller rather than shorter on the gorget. Here is my basic reasoning.
I'm pretty sure you want to keep that gorget below the helmet everywhere but directly in front.


RWWT wrote: Wed Nov 15, 2023 11:08 pm
2. I can get 6 1/4", no problem, monkeying around with the slope of the top edge in profile, which is what I was doing. The trouble is, this invariably runs through points that are too narrow on the helmet to accommodate the 6" width. Alas, my many difficulties and trying to make the whole thing work under the edge of the helmet. The only places wide enough are in the area were the articulated plates flare out, except...
This is where thinking it through is difficult. Imagine two identical rings. At first, you might think that either one of the other would have to be above, and that they would have to be parallel. However, if they are not parallel, one of those rings might partially enter the other. This is what I believe should be happening with the helmet neck and the gorget top. We know that the gorget top will be more or less circular, and essentially flat. We can see from the side view of the helmet that its neck is not all in one plane, It dips down in front. It is here that the gorget goes from being uner the halme to intruding into the helmet.

RWWT wrote: Wed Nov 15, 2023 11:08 pm

3. If I jam the whole thing up to my buddy's chin, there is plenty of room, I don't have to create wacky angles, or elongate his neck into giraffe proportions.
Is I say above, you already have a wacky angle because the helmet neck does not exist on a plane. If you stick the entire goreget rim into the helmet you will not have enough room in back. That's a place where the helmet shoulf fit close uneder the occiput.

Have a look at side views of some other 16thC helmets which do not lock onto gorgets. Many of them have a very abrupt kick out in the flange to accommodate the gorget rim. I would look for images, but I'm hobbled by my internet connection till I get back home.


RWWT wrote: Wed Nov 15, 2023 11:08 pm
It seems a somewhat excessive to have everything overlapping so much, but I have yet to find another way to get everything to fit.
That feeling you have there is telling you that something is wrong. :)

Mac
Robert MacPherson

The craftsmen of old had their secrets, and those secrets died with them. We are not the better for that, and neither are they.

http://www.lightlink.com/armory/
http://www.billyandcharlie.com
https://www.facebook.com/BillyAndCharlie
RWWT
Archive Member
Posts: 166
Joined: Fri Jan 24, 2020 11:10 am

Re: Help Needed: Close Burgonet- Can/ House Construction

Post by RWWT »

Mac, you are a saint for replying while away (witchcraft notwithstanding), but I hope your wife isn't getting angry with me and you're not squandering your away time on my account!

I think I understand what you are saying and have been doing exactly what you said and looking at other examples to try to get a better understanding of how this all works. My assumption coming into this was that the gorget rear edge should sit below the "kick out", as you described, however I can't seem to get it to work that way on this helmet.

In attempting to illustrate what I am seeing, I just found another mistake in the drawing I've been working on for the past two days. :oops: If I ever find the photographer who shot the newer pictures for The Met, I am going to show him something else he can do with whatever goofy fisheye lens he shot stuff with. :evil:

I'll keep messing with stuff and see if I can figure it out or find a clear way to show what I am seeing that makes it seem to not want to work that way.
Mac
Archive Member
Posts: 9953
Joined: Thu Jan 04, 2001 2:01 am
Location: Jeffersonville, PA

Re: Help Needed: Close Burgonet- Can/ House Construction

Post by Mac »

RWWT wrote: Thu Nov 16, 2023 5:30 pm
In attempting to illustrate what I am seeing, I just found another mistake in the drawing I've been working on for the past two days. :oops: If I ever find the photographer who shot the newer pictures for The Met, I am going to show him something else he can do with whatever goofy fisheye lens he shot stuff with. :evil:

The desktop computor here at my folk's place has it's aspect ratio set to make everything look squat and fat, so I can't commont on the Met's imige till I can see it on a different monitor.

Mac
Robert MacPherson

The craftsmen of old had their secrets, and those secrets died with them. We are not the better for that, and neither are they.

http://www.lightlink.com/armory/
http://www.billyandcharlie.com
https://www.facebook.com/BillyAndCharlie
RWWT
Archive Member
Posts: 166
Joined: Fri Jan 24, 2020 11:10 am

Re: Help Needed: Close Burgonet- Can/ House Construction

Post by RWWT »

Don't worry about it, Mac! Enjoy the time with your folks! I think I have the photography issues mostly handled. I found another oversight of mine this morning that many spare the photographer a bit. :oops:

It turns out that the left side and right side are a LOT more asymetrical than I'd previously noticed. I'll lay it out for anyone who happens upon this thread in the future and his having similar difficulties to mine, as well as a present day laugh for anyone reading along at my expense.

I found some older images of this helmet that are shot better and have the added benefit of having the visor fully closed and the bottom front lames fully extended. The downside is I only have the right side and a 3/4 view from this set of images. No problem! I flipped right horizontally and started checking my most recent drawings for corrections, find some of the space Mac and I have been discussing, and anything else I wasn't seeing. To my horror, the silhouettes lined up pretty well but the entire visor assembly and pivot were a good 1" or more off. In my frustration, I went back and remeasured everything, retraced my steps, and could not find where I went wrong. I slapped it back on the head and my pivot was exactly were Mac suggested it should be and matched up perfectly with my revised drawings and tracings. I went to bed extremely frustrated and debating my choices in life.

This morning, I thought, "All can can think do to is overlay my original left side image and the new (old) right side and see if I can find what I'm not seeing. Well, I did. I turns out that Kolman and his apprentices must have really tied one on while making this helmet. The left and right pivots are really that far off. I've known for a long time to expect this sort of thing, but somehow it slipped my mind while trying to muddle through everything else. I really didn't expect to find them that far off.

Still, the newer photographer deserves to be flogged for the massive "selfie nose" on the front image but my apologies for mistaking Kolman's drunken apprentices errors for his, in this case.

Yet another case of, "As frustrating as this is, it's far better to find these sorts of things on paper than trying to beat metal into submission around them." Note to my future self and any other inexperience armorers: Never assume anything as a fixed navigation point between images.

Before this is all over, I may have as much a drinking problem as one of Kolman's apprentices. Perhaps that will help me get this "right". :lol:
RWWT
Archive Member
Posts: 166
Joined: Fri Jan 24, 2020 11:10 am

Re: Help Needed: Close Burgonet- Can/ House Construction

Post by RWWT »

Progress continues and I believe I am beginning to see the gorget/ bottom edge of the helmet situation in the manner that Mac has been patiently trying to beat into my head. Today, however, I need a break from drawing and erasing and have turned my attention to another mystery, at least to me.

Holes. Specifically, these:

Image

I really don't know what they're there for. I suspect some type of strap/ suspension system inside the helmet, but the placement doesn't make sense to me compared to the few I've seen in other helmets. I'd except there to be additional holes hidden under the visor if it is for suspension straps. This theory seems supported this other fun example by Kolman Helmschmid:

Image

So, my working theory is hidden rivets holding a strap in front, it crosses over the head diagonally, and gets laced in the rear. That's how things seem to work in the examples where we can see the inside of the helmet and extant straps in place. These holes, however, being so up near the visor pivot seem to be in an odd spot for that arrangement, at least as I understand it. Add the lower pair of holes and, well, it I don't know what to make of it.

There's also a pair in the back:

Image

So, strap up over the head? This seems much more complicated than the simple "x" on the inside examples I've seen. Anyone have any pictures or insights that can clear these holes up for me?
RWWT
Archive Member
Posts: 166
Joined: Fri Jan 24, 2020 11:10 am

Re: Help Needed: Close Burgonet- Can/ House Construction

Post by RWWT »

I just saw Kristoff's thread about his burgonet and wish I found that earlier. It seems he was working through many of the same challenges that I am.

I took some steps back over the past couple of weeks and focused just on the gorget. It seems that there is a lot more to learn about them than I'd originally anticipated. My learning curve with drawing skills, wrapping my head around the subtle shapes in gorgets, and all else was a bit too much to tackle in one shot in the correct manner, so I did some drawings that were close enough, then started playing with some paper models to better understand the rest. I think I am on a right enough track to start moving some metal for the upper ring... and probably figuring out more that I don't know.

Question 1: Order of operations for top ring construction
It seems that the consensus here is first roll the edge of the flat plate, then curve it to shape; which makes a lot of sense for the reasons everyone illustrated in Kristoff's burgonet thread and seem to have turned out quite well in the pictures he shared. My concern is that I will be roping the edge of mine and I am worried about beating out the roping while curving the plate. I assume that I will be dealing with that one way or another, since I always expect to adjust things after rolling an edge a bit, however minimizing hammer blows to a roped edge seems preferable. Can anyone offer more insight?

Question 2: Metal thickness
My homework has been suggesting making the lames around 0.76mm (22 ga.) - 1mm. Wade helpfully included thicknesses with the picture of the gorget in his collection and puts things at .030 - .052". My assumption has been that the thicker measurements were the front and back plates.

In Kristoff's thread, he jumped up to 1.5mm for the top ring to accommodate stretching the flair in. After spending an inordinate amount of time reshaping templates to get the flair I am looking for on the bottom edge, I have to say that simply hammering it out seems like the way I should have gone from the beginning. In any case, anyone have any thoughts on thickness of metal?
Mac
Archive Member
Posts: 9953
Joined: Thu Jan 04, 2001 2:01 am
Location: Jeffersonville, PA

Re: Help Needed: Close Burgonet- Can/ House Construction

Post by Mac »

RWWT wrote: Sun Nov 19, 2023 12:31 pm ]

So, my working theory is hidden rivets holding a strap in front, it crosses over the head diagonally, and gets laced in the rear. That's how things seem to work in the examples where we can see the inside of the helmet and extant straps in place. These holes, however, being so up near the visor pivot seem to be in an odd spot for that arrangement, at least as I understand it. Add the lower pair of holes and, well, it I don't know what to make of it.

There's also a pair in the back:

Image

So, strap up over the head? This seems much more complicated than the simple "x" on the inside examples I've seen. Anyone have any pictures or insights that can clear these holes up for me?
I'm sorry I missed this.

The holes over the ears as a persistent mystery. They are frequently found on helmets that are very wide, (there was a fashion for that) and my working assumption was that they were for ties to help stabilize and center the head in the helmet. They may well be for internal strapping to adjust the height of the lining, as you speculate. Whatever they did, it has not left much evidence for us.

I would like to point something out on this one, though.

Image

That pair of holes in the brow is almost certainly for securing a spring for a missing visor lock. It looks like there used to be a spring mounted rectangular peg on each side to hold the visor down. Now, that does not prevent the helmet from having internal crossed straps. They could be anchored with the lining rivets on the brow of the skull. There are surviving examples of this.

Mac
Robert MacPherson

The craftsmen of old had their secrets, and those secrets died with them. We are not the better for that, and neither are they.

http://www.lightlink.com/armory/
http://www.billyandcharlie.com
https://www.facebook.com/BillyAndCharlie
Mac
Archive Member
Posts: 9953
Joined: Thu Jan 04, 2001 2:01 am
Location: Jeffersonville, PA

Re: Help Needed: Close Burgonet- Can/ House Construction

Post by Mac »

RWWT wrote: Wed Dec 13, 2023 8:27 am
Question 1: Order of operations for top ring construction
It seems that the consensus here is first roll the edge of the flat plate, then curve it to shape; which makes a lot of sense for the reasons everyone illustrated in Kristoff's burgonet thread and seem to have turned out quite well in the pictures he shared. My concern is that I will be roping the edge of mine and I am worried about beating out the roping while curving the plate. I assume that I will be dealing with that one way or another, since I always expect to adjust things after rolling an edge a bit, however minimizing hammer blows to a roped edge seems preferable. Can anyone offer more insight?
I typically start the upper ring with the parts curved more or less to shape before turning the hem, but it seems like there are different ways to do this job. Since you plan to rope the hem, you will want to work in a way that yields a good hem profile. I think you stand to mess that up if you "hem first and curve later". In any case, it's always helpful to make the lames longer (circumference) than you need and trim them down to the final size once they are hemmed. This lets you trim away the ends which always hem badly. It also lets you approach the final curve and circumference incrementally. I would not do the roping until I had the upper ring satisfactorily sized, shaped, hinged, and bolted closed. That lets you lay out the ropes so the pattern goes nicely across the joints.
RWWT wrote: Wed Dec 13, 2023 8:27 am My homework has been suggesting making the lames around 0.76mm (22 ga.) - 1mm. Wade helpfully included thicknesses with the picture of the gorget in his collection and puts things at .030 - .052". My assumption has been that the thicker measurements were the front and back plates.

In Kristoff's thread, he jumped up to 1.5mm for the top ring to accommodate stretching the flair in. After spending an inordinate amount of time reshaping templates to get the flair I am looking for on the bottom edge, I have to say that simply hammering it out seems like the way I should have gone from the beginning. In any case, anyone have any thoughts on thickness of metal?
As far as I can tell, gorget thicknesses are quite variable. They are sometimes thin, and sometimes thick. They sometimes have the front heavier than the back, and sometimes they are the same. I would chose a thickness I thought I could work with for the upper ring and use it for both front and back. The rest of the lames do not have to be the same thickness as the upper ring.

Mac
Robert MacPherson

The craftsmen of old had their secrets, and those secrets died with them. We are not the better for that, and neither are they.

http://www.lightlink.com/armory/
http://www.billyandcharlie.com
https://www.facebook.com/BillyAndCharlie
RWWT
Archive Member
Posts: 166
Joined: Fri Jan 24, 2020 11:10 am

Re: Help Needed: Close Burgonet- Can/ House Construction

Post by RWWT »

Mac wrote: Wed Dec 13, 2023 9:06 am I would not do the roping until I had the upper ring satisfactorily sized, shaped, hinged, and bolted closed. That lets you lay out the ropes so the pattern goes nicely across the joints.
Thanks Mac!

Ah! You bring up the other element of Order of Operations I have been debating! What you describe is how I initially intended to approach it. I'm always paranoid about hinges and was somewhat dreading the prospect of getting everything else done nicely and screwing up the hinge. The challenge I foresee, however, is getting the angle cut correctly at the joints after everything else is to final size. To abate this difficulty, my thinking went:
1. Basic form
2. Roll
3. Hinge

The idea being that I could file my way into a nice fit for both the hinge and the angle cut hem. Any suggestions for dealing the the angle cut right with your suggested OoO?

As the the pattern, your point is well taken and what I was originally thinking. The piece I've mostly been referencing (A-127 in Wade's collection https://european-armour.com/A-127.html) seems to address this by flipping the roping direction at the joints and otherwise not worrying about it too much. :D
Post Reply