Need Help: 16th Century Gorget Top Ring

This forum is designed to help us spread the knowledge of armouring.
RWWT
Archive Member
Posts: 166
Joined: Fri Jan 24, 2020 11:10 am

Need Help: 16th Century Gorget Top Ring

Post by RWWT »

I've been working on the top ring for a 16th century gorget. It's giving me a whole lot of problems and taking an extraordinary amount of time. Clearly I am approaching it wrong. Hopefully, some of you fine folks and steer me in a better direction.

I'll lay out what I have done so far to better facilitate finding the errors of my ways.

First, the drawing. This is the latest iteration with several changes from the versions I posted in my burgonet thread.

Image

From here I created this template:

Image

Then I proceeded to cut it out and form it up. As it gets a roped edge, I need to form the roll hollow. Per Mac's recommendation in my burgonet thread- or, I should say, my understanding of Mac's recommendation (I may have mixed things up in my head a bit and Mac is not to be blamed for that), the order of operations went:
1. Basic shape (the obvious cone-ish thing that would result from the template). This went easily and fast.
2. Hinge and bolt. This went in the usual, somewhat tedious fashion, typical of making hinges. I was mostly satisfied with the result. One thing that was worrying me was the notch I needed to cut to form the hinge for the back plate (the small line visible on the template). This seemed to be begging to be the start of a crack as I starting banging down the top. I filed and rounded things as best I could in the small space and hoped for the best.
3. Roll the edge. It fought me over every inch. Deformation was a constant battle. I'd move the top a bit and, more or less, have to beat everything else back into shape, then repeat for the next bit. After about 6 hours of battle, I finally started getting things flared out between 45 and 90 degrees... and the crack near the area I mentioned showed up. Also, at issue, was the tab that should end up being a roll above absolutely refused to cooperate. It just kept flaring out from the circle, worse and worse, no matter what I did.

Image

All things considered, It seemed the wisest choice to consign this to the dung heap and start fresh. So, we move on to Mark II.
Mac
Archive Member
Posts: 9953
Joined: Thu Jan 04, 2001 2:01 am
Location: Jeffersonville, PA

Re: Need Help: 16th Century Gorget Top Ring

Post by Mac »

It it best to form those pieces without any of the hinge or overlap detail, and then cut away what you need to after they are hemmed and curved into shape. I would also recommend making them a bit longer then you think you need. The hem at the ends of the plates never goes as well as the rest, and it best to budget for this to be cut off.

Image

This may seem wasteful, but it's only a small amount of metal which is thrown away.

Mac
Robert MacPherson

The craftsmen of old had their secrets, and those secrets died with them. We are not the better for that, and neither are they.

http://www.lightlink.com/armory/
http://www.billyandcharlie.com
https://www.facebook.com/BillyAndCharlie
RWWT
Archive Member
Posts: 166
Joined: Fri Jan 24, 2020 11:10 am

Re: Need Help: 16th Century Gorget Top Ring

Post by RWWT »

Mark II

In case it isn't obvious, my method for forming the roll has been the "beat it out to 45, then 90 degrees, then fold it back on itself" approach." I did a test piece prior to this and played around with trying to boss the thing out, but I could not manage to get it out far enough and wasn't able to get at the edge enough to clean it up and keep it straight going about things that way. I think a lot of that is related to my inexperience and some other issues, and would like to play around with this some more. It seems sensible to not move the top edge of the roll all the way out, just to bring it back in again. I just haven't managed to get my head around doing it in practice.

For the next attempt, I had a few thoughts:
1. Considering the constant deformation battle and flaring, I didn't see much benefit in hinging and bolting things in Step 2. If I was going to fight these fights, it seemed easier to do so without having the other half of the gorget in the way. Another downside was trying to deal with where things overlap at the seams, i.e. where I left some extra material, so that I could trim off the inevitable ugly bits at the ends and files things up to match up nicely. To get the lines to match up required moving the overlapping parts close, disassembling, then moving the line of the back plate to where it is supposed to be... which means it no longer fits together again... In any case, I figured I would try doing the halves separately.

2. Given Point 1, I figured I would leave the notch for the hinge uncut until I was done abusing things. My thought was 1- eliminate the spot that seemed destined to crack, and 2- give myself attached material at the bottom that would, hopefully, help track the top around and help mitigate some of the flaring.

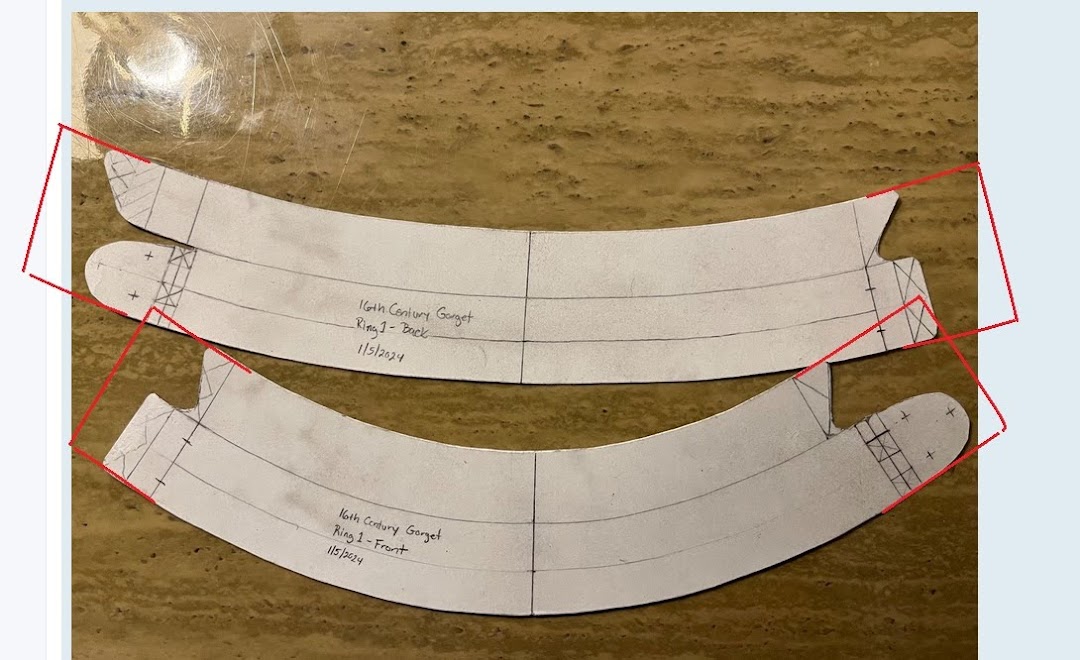
I also felt I had a little too much volume in the thing, the bottom edge flared out a little too much from the top, so I dialed that back a bit for the Mark II template. I also decided to dress up the inside part of the hinge overlaps a bit because, why not?

Image

Things started out well enough, at least to my simple mind.
Image

Image

Then it all went awry with the back half.

My thoughts, so far, before moving on to Mark III:
1. The back half was a constant fight against deformation. I suspect the same would be true of the front half (shown above) if I tried to move it down further. By the time I got to 90 degrees, both corners, near the fold, were cracking and the flaring was unacceptable. I am fairly sure the cracks are, in large part, due to overworking things through the fight to keep the curl while bending over the edge.
2. It also, thanks to a thought from a friend, finally sunk in to my troglodyte brain that I did not leave myself enough metal to move outward for the roll. I am still having a battle in my mind on this point, though. One part of my brain keeps thinking "it's a cone (albeit, a shallow one), therefore it must taper upwards". The other part understands that a cone means stretching the heck out of things to do what I am trying to do, and this is likely a large factor how much effort this is taking and many of my other problems. I am not entirely sure how to reconcile this.

I am pondering two basic approaches to Mark III:

A) Keep the curved template and form it over a sinusoidal stake to get everything moving in a nice round, anticlastic curve, then raise the line line a crease, and proceed from there. I've done stuff like this for jewelry. It's quick, easy, and everything behaves nicely. I am not sure how well this translates to steel and armor, however, some playing around has be optimistic enough to order a cheap stake that seems like it might serve the purpose. It was only $40, so I figured even if it doesn't it will be useful for other stuff.

B) Drop the curved template in favor of a straight line. Form the roll, then flair out the bottom end. As had been noted, there's not a whole lot of shape there and I am wondering if I am putting too much effort into that, as a starting point, then fighting that the rest of the way.

C) Some combination of A an B.

D) Form the roll from a flat, straight piece and deal with the curl later. I had previously rejected this approach, due to the hollow, roped edge. I intend to stuff some wire in it, since that would be consistent with how things were done on the helmet I hope to get to, however, the "flat, then beat the curve in" approach seemed less than optimal in this case. I would hate to get things looking all nice and roped, only to beat the hell out of it to curl the thing. Second, that presents me with the difficult of getting the rope lines to match up nicely. Considering how difficult and poorly things have gone, beating the curl in with a leather mallet after the rest is done is sounding attractive again.

Any advice would be greatly appreciated!
Last edited by RWWT on Tue Feb 27, 2024 8:56 am, edited 1 time in total.
RWWT
Archive Member
Posts: 166
Joined: Fri Jan 24, 2020 11:10 am

Re: Need Help: 16th Century Gorget Top Ring

Post by RWWT »

Mac wrote: Tue Feb 27, 2024 8:30 am It it best to form those pieces without any of the hinge or overlap detail, and then cut away what you need to after they are hemmed and curved into shape. I would also recommend making them a bit longer then you think you need. The hem at the ends of the plates never goes as well as the rest, and it best to budget for this to be cut off.

Image

This may seem wasteful, but it's only a small amount of metal which is thrown away.

Mac

Thanks Mac! You're too fast! I was writing up my Mark II summary when you replied.

Mark II stepped in the direction of your red lines. Mark III will definely go all in in that direction. I am not concerned about waste. Metal is relatively cheap.

It seems like I need to give myself enough metal to work with lengthen the top-most line. In other words, the top most line should be longer than the bottom most line, so that, when pushed down to 90 degrees, the sides are straight. One of the issues I had with Mk II was the metal wanted curl in the center and flair on the sides. Some of this, I am sure, is due to my inexperience and technique. That said, it seems like I am stretching things too far no matter what.

Question: Does it make sense to lengthen the top line, then angle it back to the center line? Essentially make your red boxes more pointy?
Mac
Archive Member
Posts: 9953
Joined: Thu Jan 04, 2001 2:01 am
Location: Jeffersonville, PA

Re: Need Help: 16th Century Gorget Top Ring

Post by Mac »

RWWT wrote: Tue Feb 27, 2024 8:40 am

One of the issues I had with Mk II was the metal wanted curl in the center and flair on the sides. Some of this, I am sure, is due to my inexperience and technique. That said, it seems like I am stretching things too far no matter what.
The ends of a hem of any sort always want to behave badly. The stuff in the middle of a run has material on either side to support it. When you get to the end, it only has support on one side, so it is less constrained. With a part that is mostly hem (like a collar neck) it easier to plan on cutting off the part that will misbehave than it is to try to make it do what you want it to do.

There may be a trick to make the ends behave, but I have not found it. :?


RWWT wrote: Tue Feb 27, 2024 8:40 am Question: Does it make sense to lengthen the top line, then angle it back to the center line? Essentially make your red boxes more pointy?
I'm not sure I understand why you want to do that. So long as the starting pieces are long enough, the end shape does not matter; since you will be cutting it off.

Mac
Robert MacPherson

The craftsmen of old had their secrets, and those secrets died with them. We are not the better for that, and neither are they.

http://www.lightlink.com/armory/
http://www.billyandcharlie.com
https://www.facebook.com/BillyAndCharlie
Indianer
Archive Member
Posts: 598
Joined: Fri Nov 06, 2015 8:07 am
Location: Northern Germany

Re: Need Help: 16th Century Gorget Top Ring

Post by Indianer »

RWWT wrote: Tue Feb 27, 2024 8:32 am D) Form the roll from a flat, straight piece and deal with the curl later. I had previously rejected this approach, due to the hollow, roped edge. I intend to stuff some wire in it, since that would be consistent with how things were done on the helmet I hope to get to, however, the "flat, then beat the curve in" approach seemed less than optimal in this case. I would hate to get things looking all nice and roped, only to beat the hell out of it to curl the thing. Second, that presents me with the difficult of getting the rope lines to match up nicely.
Soo...earlier reproduction here on the board did just that. Hemmed first, curled later. People did put a copper wire in the roll so it doesn't flatten in the process. Seemed to work...And the nice roping, wouldn't you do that to the peoce once it's pretty much finished anyway? Meaning hem, curl, then rope all nice and regular?
Gordon Thompson
Archive Member
Posts: 88
Joined: Thu Jan 10, 2019 7:04 am

Re: Need Help: 16th Century Gorget Top Ring

Post by Gordon Thompson »

Doing detailed pattern seems mostly counterintuitive to me. Ive made one gorget, started with top lames. I took two almost straight strips, bend them, did a roll and then I did hinges and all the cutting. It went without fuss and its OK as far as I can tell.
- "There's three of you, and only one of me. But that doesn't mean there are more of you. It's a mathematical paradox and an exception from the rule.
- What? What does that mean?
- That means *uck off. While you still can".
RWWT
Archive Member
Posts: 166
Joined: Fri Jan 24, 2020 11:10 am

Re: Need Help: 16th Century Gorget Top Ring

Post by RWWT »

Mac wrote: Tue Feb 27, 2024 9:52 am I'm not sure I understand why you want to do that. So long as the starting pieces are long enough, the end shape does not matter; since you will be cutting it off.

Mac
I am certain it's rooted in my inexperience and overthinking things. :oops: :D

My thought was that some sort of relief cut out was needed to let the different lines move in the direct they need to without being pulled around by the shorter lines. On reflection, however, this mode of thinking seems to at the root of some of my flaring problems.

Thanks for slapping some sense into me!
Last edited by RWWT on Tue Feb 27, 2024 3:30 pm, edited 1 time in total.
RWWT
Archive Member
Posts: 166
Joined: Fri Jan 24, 2020 11:10 am

Re: Need Help: 16th Century Gorget Top Ring

Post by RWWT »

Indianer wrote: Tue Feb 27, 2024 12:38 pm
Soo...earlier reproduction here on the board did just that. Hemmed first, curled later. People did put a copper wire in the roll so it doesn't flatten in the process. Seemed to work...And the nice roping, wouldn't you do that to the peoce once it's pretty much finished anyway? Meaning hem, curl, then rope all nice and regular?
Yup! Those earlier threads have been part of my homework in planning this project. The trouble I see in this case is the roping. If I close off the roll entirely around the wire necessary to support the "roll now, curve later" approach, I can't get back in there with a roping tool. The other drawback is that, since I know I am going to be doing a significant amount of trimming after it's all formed, it's shooting in the dark to get the final rope lines arranged nicely where they meet at the seams.

I guess the difference is between the examples where the roped edge is filed in after all is said and done and those where it's hammered in. Again, this is the pondering of a relative noob, so I might be mistaken. My theory is based on the tools that Mac and Rene have show they used to achieve the more shaped roping. I like this method, since it seems a nice crutch for someone like me to get things hammered in with some degree of consistency (Though it remains to be seen how well I execute this and both Mac and Rene have specified that it takes some practice to get the hammer work right. I foresee some test piece in my future before I try it on a final piece... if I can get a piece far enough to be final). I suppose something similar could be done with a chisel from the outside, but that sounds harder and beyond my current ability.

If I am missing something that should be obvious, I am not embarrassed to be told I am wrong. I knew I was punching above my weight when I decided to try this and appreciate all insights.
RWWT
Archive Member
Posts: 166
Joined: Fri Jan 24, 2020 11:10 am

Re: Need Help: 16th Century Gorget Top Ring

Post by RWWT »

Gordon Thompson wrote: Tue Feb 27, 2024 1:47 pm Doing detailed pattern seems mostly counterintuitive to me. Ive made one gorget, started with top lames. I took two almost straight strips, bend them, did a roll and then I did hinges and all the cutting. It went without fuss and its OK as far as I can tell.
You're probably right.

I have spent a lot of time with pencil and paper on this project. For all the benefits of doing so, it has also given me too much time to overthink several things.

How did you deal with the spreading while forming the roll? My attempts to keep that under control seem to be the root of this being harder for me that it really should be. I've rolled stuff before without much fuss, however this, where it is almost all roll, is fighting me like hell.
Mac
Archive Member
Posts: 9953
Joined: Thu Jan 04, 2001 2:01 am
Location: Jeffersonville, PA

Re: Need Help: 16th Century Gorget Top Ring

Post by Mac »

Gordon Thompson wrote: Tue Feb 27, 2024 1:47 pm Doing detailed pattern seems mostly counterintuitive to me. Ive made one gorget, started with top lames. I took two almost straight strips, bend them, did a roll and then I did hinges and all the cutting. It went without fuss and its OK as far as I can tell.
I have always used starting pieces which had the curve that I was going to need. Next time, though, I think I'll try using straight pieces and flaring the lower part once the hem is turned. That really does seem like the easier way to go.

Mac
Robert MacPherson

The craftsmen of old had their secrets, and those secrets died with them. We are not the better for that, and neither are they.

http://www.lightlink.com/armory/
http://www.billyandcharlie.com
https://www.facebook.com/BillyAndCharlie
Mac
Archive Member
Posts: 9953
Joined: Thu Jan 04, 2001 2:01 am
Location: Jeffersonville, PA

Re: Need Help: 16th Century Gorget Top Ring

Post by Mac »

RWWT wrote: Tue Feb 27, 2024 3:29 pm

How did you deal with the spreading while forming the roll? My attempts to keep that under control seem to be the root of this being harder for me that it really should be. I've rolled stuff before without much fuss, however this, where it is almost all roll, is fighting me like hell.
To some extent, it's easier to just let the thing spread out and fix it later.

Mac
Robert MacPherson

The craftsmen of old had their secrets, and those secrets died with them. We are not the better for that, and neither are they.

http://www.lightlink.com/armory/
http://www.billyandcharlie.com
https://www.facebook.com/BillyAndCharlie
Indianer
Archive Member
Posts: 598
Joined: Fri Nov 06, 2015 8:07 am
Location: Northern Germany

Re: Need Help: 16th Century Gorget Top Ring

Post by Indianer »

RWWT wrote: Tue Feb 27, 2024 3:23 pm
Indianer wrote: Tue Feb 27, 2024 12:38 pm
Soo...earlier reproduction here on the board did just that. Hemmed first, curled later. People did put a copper wire in the roll so it doesn't flatten in the process. Seemed to work...And the nice roping, wouldn't you do that to the peoce once it's pretty much finished anyway? Meaning hem, curl, then rope all nice and regular?
I guess the difference is between the examples where the roped edge is filed in after all is said and done and those where it's hammered in.
If I understand You correctly, you think of two choices. 1. Rope, Close. 2. Close, file. There may be a third one: Shape, close, rope.
Rene wrote:For making the roping on the middle border on the breastplate i tryed something new and filled the hollow border with a lead-tin mixture to punch and hammer in the roping. The forming of the roping went very good with the mild core in it. A more rounded border would allow also more deep roping, but this came out how i wanted to create it.
This is from Rene's Blog, here, middle of the page.
RWWT
Archive Member
Posts: 166
Joined: Fri Jan 24, 2020 11:10 am

Re: Need Help: 16th Century Gorget Top Ring

Post by RWWT »

Indianer wrote: Tue Feb 27, 2024 12:38 pm
This is from Rene's Blog, here, middle of the page.
Interesting. I'd missed that. Thanks!

That sounds like a whole lot of fun to try, but I think I've run out of experimentation patience for now with this project. Someday I'd like my helmet project to actually involve building a helmet. :lol:

I'd seen someone do some rather elaborate roping with just chisels from the outside on a hollow roll. The end product looked great. Again, something I'd like to try, but not for this project.
Last edited by RWWT on Wed Feb 28, 2024 12:37 am, edited 2 times in total.
RWWT
Archive Member
Posts: 166
Joined: Fri Jan 24, 2020 11:10 am

Re: Need Help: 16th Century Gorget Top Ring

Post by RWWT »

Mac wrote: Tue Feb 27, 2024 6:13 pm
Gordon Thompson wrote: Tue Feb 27, 2024 1:47 pm Doing detailed pattern seems mostly counterintuitive to me. Ive made one gorget, started with top lames. I took two almost straight strips, bend them, did a roll and then I did hinges and all the cutting. It went without fuss and its OK as far as I can tell.
I have always used starting pieces which had the curve that I was going to need. Next time, though, I think I'll try using straight pieces and flaring the lower part once the hem is turned. That really does seem like the easier way to go.

Mac
I am becoming more convinced of the same thing. I had a bit of an epiphany about this the other day and realized I've spent a lot of time focused on getting just the right flair on the bottom, while ignoring the fact the the flair not the top to form the roll involves moving the metal a heck of a lot more metal movement. Simply flaring the thing out when all else is done seems trivial.

I suppose it might be time to abandon my curved templates that I spent hours getting to lay just right. It's hard to imagine our predecessors spending tons of time measuring angles and circles, when they could simply bend a piece of metal around someone's neck and flair it out a bit later.
Gordon Thompson
Archive Member
Posts: 88
Joined: Thu Jan 10, 2019 7:04 am

Re: Need Help: 16th Century Gorget Top Ring

Post by Gordon Thompson »

"How did you deal with the spreading while forming the roll? My attempts to keep that under control seem to be the root of this being harder for me that it really should be. I've rolled stuff before without much fuss, however this, where it is almost all roll, is fighting me like hell."

Same way as I did with every other 'curved' roll - did the curve, and as it spreads during the rolling I fixed it "on the fly". There was one time when I used rivet holes to bind the piece with wire to prevent spreading, but It was not working as good as I thought and I had to fix deformation in "nomal" manner (with a mallet XD) anyway. May be a little barbaric but it worked for me. But on the other hand, subtlety is desirable to not squish the roll.
- "There's three of you, and only one of me. But that doesn't mean there are more of you. It's a mathematical paradox and an exception from the rule.
- What? What does that mean?
- That means *uck off. While you still can".
wcallen
Archive Member
Posts: 4777
Joined: Mon Oct 29, 2001 2:01 am
Location: North Carolina, USA
Contact:

Re: Need Help: 16th Century Gorget Top Ring

Post by wcallen »

I just wandered over here and noticed the thread. I guess I should look more often.
Straight strips. Really, it's the way to go. I think that there are lots of reasons for this. For me the most important is that it teaches you that what you start with isn't what you end with and it frees your mind to just do what you need to to. That probably sounds weird. But I definitely find it to be true.
<short digression here>
What is my favorite pattern for a breastplate gusset with a big tapered roll? A rectangle. Seriously. It's a long, thin rectangle, but it is a rectangle. Cutting the arc shape locks things in, and its usually wrong by the time you try to do the roll. Curl the thing up some, flare both sides, roll the roll back in. It shows you that you can fix almost anything that appears to be wrong.
<end digression>
No matter what you do, as you roll the upper edge, you will mess up any curl and you will mess up any flare you think you got right. That's just how things work. The flare on the bottom of the front plate is subtle, so it is trivial to obtain with a little flare when you get the roll done and the piece curled up.
It looks like you were aiming for a little bit of flare in the rear plate. I usually end up with some flare there because I at least end up curling the piece some after the roll happens and the piece curls on the center of mass, not the flat area, so it kicks out naturally. And then I find that the shape I want actually tapers in some at the center and I have to raise it back in.
Always have extra length on the ends. Mac is right, the ends are a pain and will be ill-behaved. The work needed to roll the "extra" is trivial compared to the work to make the next one.

Keep pounding.

Wade
User avatar
Keegan Ingrassia
Archive Member
Posts: 6423
Joined: Thu Jul 16, 2009 4:07 pm
Location: College Station, Texas (Shadowlands)

Re: Need Help: 16th Century Gorget Top Ring

Post by Keegan Ingrassia »

Different kind of project, but a good visual example of the kind of arc you can achieve from a straight rectangle of material.

https://forums.armourarchive.org/phpBB3 ... 1#p2852551
"There is a tremendous amount of information in a picture, but getting at it is not a purely passive process. You have to work at it, but the more you work at it the easier it becomes." - Mac
RWWT
Archive Member
Posts: 166
Joined: Fri Jan 24, 2020 11:10 am

Re: Need Help: 16th Century Gorget Top Ring

Post by RWWT »

wcallen wrote: Thu Feb 29, 2024 10:09 am I just wandered over here and noticed the thread. I guess I should look more often.
Straight strips. Really, it's the way to go. I think that there are lots of reasons for this. For me the most important is that it teaches you that what you start with isn't what you end with and it frees your mind to just do what you need to to. That probably sounds weird. But I definitely find it to be true.
Thanks Wade! Amongst others, I was hoping you'd weigh in. I've been following your insights on gorgets for quite some time and been reviewing a lot of what you've said in preparation for this project.

That doesn't sound weird at all. You've pretty much nailed the change in thinking going on in my head right now.
wcallen wrote: Thu Feb 29, 2024 10:09 am That's just how things work. The flare on the bottom of the front plate is subtle, so it is trivial to obtain with a little flare when you get the roll done and the piece curled up.
It looks like you were aiming for a little bit of flare in the rear plate. I usually end up with some flare there because I at least end up curling the piece some after the roll happens and the piece curls on the center of mass, not the flat area, so it kicks out naturally. And then I find that the shape I want actually tapers in some at the center and I have to raise it back in.
It's funny, when I first started studying pictures for this project, I was saying pretty much exactly what you said to myself about the flairs. They really look like they're sort of "deliberately by accident", for the most part. It seems like one of those things that more or less happens on it's own if we get it right and do things the way the old folks did... or as close as we're likely to get. I definitely overthought that all through the process of drawing and templating.

Yeah, straight really does seem the way to go. There is a nagging part of my brain that says there is something useful to be learned about templating here, however, all things considered, I don't think that continuing down the rabbit hole of complex templates for a gorget ring is the right piece to figure it out.

I will try to find some time in the next several days to bang on a straight piece of metal, see how it goes, and report back for criticism.
Last edited by RWWT on Thu Feb 29, 2024 6:43 pm, edited 1 time in total.
RWWT
Archive Member
Posts: 166
Joined: Fri Jan 24, 2020 11:10 am

Re: Need Help: 16th Century Gorget Top Ring

Post by RWWT »

Keegan Ingrassia wrote: Thu Feb 29, 2024 10:54 am Different kind of project, but a good visual example of the kind of arc you can achieve from a straight rectangle of material.

https://forums.armourarchive.org/phpBB3 ... 1#p2852551
Thanks! I remember this thread! I was very fortunate that is showed up around the time I was doing some brass trim work, just in time to play with this way of doing things. I worked quite well. I don't know why it didn't occur to me to think about this in a similar way.
wcallen
Archive Member
Posts: 4777
Joined: Mon Oct 29, 2001 2:01 am
Location: North Carolina, USA
Contact:

Re: Need Help: 16th Century Gorget Top Ring

Post by wcallen »

I haven't been looking here much. I will try to do better.
Enjoy the straight strip. It really is a different way to play the game. The working method feels more crafty and less mechanical to me. So, it is more fun for me.

Wade
RWWT
Archive Member
Posts: 166
Joined: Fri Jan 24, 2020 11:10 am

Re: Need Help: 16th Century Gorget Top Ring

Post by RWWT »

I was able to scrape up a couple of hours of shop time today. Good news and bad news.

The good news is that the straight template (Actually, I didn't even bother with a real template. I just cut cut out a rectangle to the size I needed) resulted in having some more metal to play with/ not need to stretch out the top of a cone. No cracking, no major problems...

Except, flaring. I can't seem to keep the thing round once I go past 45 degrees or so on the edge. I gave up trying to police the thing and just let it flare out. I guess I will try to bring the incipient hem back around on itself when I have some time again, then my only recourse it to try to beat it back from curved to round after that. It seems like this should be a lot easier and I am missing something simple yet important.

I only played with one half today. I think I am going to use the other strip of metal and try to for it as a long, round, anticlastic curve, rather than beating over the edge from 45- 90, etc. It seems like this should be a faster and easier way to get to where I'm at in terms of getting the edges going opposite the center, while being a much easier way to keep the round curve while I getting there. Or I will have another decorative piece for the box of shame.
Indianer
Archive Member
Posts: 598
Joined: Fri Nov 06, 2015 8:07 am
Location: Northern Germany

Re: Need Help: 16th Century Gorget Top Ring

Post by Indianer »

Wierd thought... what happens if you turn an inwards roll on a straight piece and only then curl it up keeping the roll inwards... does the roll magically turn outwards where it is needed, all without thinning?

[Now why would I ask sth stupid like that... simple. Someone here once wrote sth that I interpret this way).
RWWT
Archive Member
Posts: 166
Joined: Fri Jan 24, 2020 11:10 am

Re: Need Help: 16th Century Gorget Top Ring

Post by RWWT »

Indianer wrote: Sun Mar 03, 2024 5:51 pm Wierd thought... what happens if you turn an inwards roll on a straight piece and only then curl it up keeping the roll inwards... does the roll magically turn outwards where it is needed, all without thinning?

[Now why would I ask sth stupid like that... simple. Someone here once wrote sth that I interpret this way).
One way or another, you're stretching the metal. I don't know about anything happening magically. Metal tends to go where you put it or where it needs to be because you don't have enough where you need it. At least in my minimal experience.

Interestingly, however, if you're careful, not nearly as much as I thought going about it the 45- 90 degree way. As I've been working on this, I have been trying to take the opportunity to better understand how the metal is moving, amongst other things I am trying to learn in through the process. There's quite a bit happening aside from just stretching it out and, it seems, plenty of opportunities to move thickness around where you want it. Out of curiosity, I slapped a caliper on different parts as I've been doing this, to test theories. Pushing out the narrow side of a cone on the first two tries really should have been more disastrous that it ended up being, if you think about just thinning. The outermost edge need to expand about 1 cm larger than the widest part of the template and about 3 cm from its original diameter. It was interesting that it almost worked without turning into tissue paper.

I just need to figure out how to move it so it's not flaring outward. :oops: :D
wcallen
Archive Member
Posts: 4777
Joined: Mon Oct 29, 2001 2:01 am
Location: North Carolina, USA
Contact:

Re: Need Help: 16th Century Gorget Top Ring

Post by wcallen »

Indianer wrote: Sun Mar 03, 2024 5:51 pm Wierd thought... what happens if you turn an inwards roll on a straight piece and only then curl it up keeping the roll inwards... does the roll magically turn outwards where it is needed, all without thinning?

[Now why would I ask sth stupid like that... simple. Someone here once wrote sth that I interpret this way).
To start, I have never tried it. So this is a guess based on other things I have done.
Assuming that really just did an inward turn and didn't do anything to kick it out before you curl the piece up, I expect that you will end up with a piece that slightly flares out on the non rolled end and that slightly sweeps out at the roll. But it won't look anything like a full inward-turned-but-pushed-out-roll.
This happens because metal will tend to curl on a like that is near the center of mass, not the outside or inside surface.
I have certainly put a roll on a straight piece and then curled it up, just not quite exactly the way you described.

Wade
Indianer
Archive Member
Posts: 598
Joined: Fri Nov 06, 2015 8:07 am
Location: Northern Germany

Re: Need Help: 16th Century Gorget Top Ring

Post by Indianer »

Thank You for clearing that up Wade!
wcallen wrote: Mon Mar 04, 2024 11:06 am I have certainly put a roll on a straight piece and then curled it up, just not quite exactly the way you described.
That's what I would do as well. I tried here to find a way around that however since RWWT wishes to avoid stretching and flattening the roll.

I need to look sth up now... peace out.
RWWT
Archive Member
Posts: 166
Joined: Fri Jan 24, 2020 11:10 am

Re: Need Help: 16th Century Gorget Top Ring

Post by RWWT »

I did some more experimenting yesterday.

I think one of my challenges is that I've been trying to apply a 14th/ 15th century solution to a 16th century problem.

Here's my thinking. Please feel free to correct my ignorance:

With the earlier outward rolls, they're more or less self correcting. Bang 'em out, the metal spreads. Bang 'em back in to finish the roll and things more or less end up where they started. All in all, things work out fairly well since the rolls tend to be pretty straight forward without much embellishment and they're, for the most part, pretty narrow. Of course you have the wavy line, compression issue when closing it up, but that either gets managed, ground out, and/ or ignored.

Jump to the 16th century and rolls go inward, get bigger, more hollow volume, and all manner of hammered embellishment. Some part of my brain said, early on, "boss it out". Then I picked up a hammer and started forming things in the traditional outward roll manner because 'that's how rolls are done". The consequence is that with more metal on top to accommodate the larger circumference of the roll itself, in the process of pushing it out to 90 degrees, I am telling the metal to become a much larger circumference.

If I boss out the edge, I can allow the top most part, that I want to end up at my starting circumference anyway, to stay there and just move the middle- the 45 degree bit that the metal seems to grudgingly accept without going out of shape. It the simplest sense, If I want something to curl in, I hit it with a round hammer on the inside. Why not stick with this for forming the whole thing?

I played around with this yesterday and the results were encouraging, despite being really, really sloppy. My order of operations went:

1. Boss out roll from the flat metal.
First, I hammered a line with a ball peen over an edge, no different than the traditional start. From there, I hammered it over a slightly opened vise to try to get some depth and volume. Sadly, my friend's vise has surfaces that looks like they were attacked by a chainsaw, so this made hot mess of things, but the principle seemed to work ok. I think I should have kept going with this more, but I couldn't bring myself to continue putting gouges in the thing.

2. Flatten out the part beneath the roll.
This also went pretty well since the curl was now too tight. I allowed myself to get sloppy with my hammer work here, since the outer surface was beyond redemption, so things went more awry than they should. Again, though, I think the principle is fairly sound.

3. Refine the roll and lines from the outside over a cresting stake.
If I wanted a triangular roll, it would have been almost trivial to raise in at this point. Alas, I want a round, hollow form for this one. Here I errored. I really should have had more depth and more curl before I started doing this as, naturally, hammering a curve from the outside causes it to spread. I think some of the refining I tried to do here should have been done from the inside first, and just left the fine "polish" stuff for the outside. Raising the thing in to get more depth, like I tried to do at this point, seemed to be mostly an error.

After that, it was a bunch of back and forth trying to push and pull things back where I wanted them. I think more care in the preceding steps could have avoided most of this. I probably could have made it work, but, as I said, I'd already made a dog's breakfast of the outside and resolved to just screw around and try to get a better understanding of how to work with things. So I have a messy piece of garbage that I can use to practice hammering rope line on later.

Interestingly, going about things this way, it doesn't seem to matter much whether I start with a curved or straight template. I had curved piece, so decided to play with that for this experiment. I *think*, going about things this way, a curved template starts to become somewhat desirable again, since I am not trying to force out the top nearly as much and want the larger radius at the bottom. Another encouraging result is that my caliper tells me that, despite much violence and abuse, metal thickness has remained pretty consistent through the whole piece. There really aren't any danger zones where things risk failure simply by being thinned out too much.

I don't have an armor sized swage block, but running things through a couple of channels on one seems like a better way to go than using the beat up vise. I have a little jeweler's swage that kind of worked, but I'll need to figure out a way to keep it from bouncing around if I use that for the next iteration.

I really would like to make Step 1, "Form things up to a basic shape", because it makes it easier to see where things are going and follow all my lines. That, however, makes it more difficult to get at the areas I need to inside while keep the outside supported or over a void with what I have available to work with. Perhaps some more tinkering will allow me to sort that out. Perhaps this really is not the best way to go and I just need to force my brain to adapt to the idea that, for this particular piece, it's mostly a roll. Form that up and the rest should follow easily.

So, frustrated that my project is still stalled on Step 1 but at least I feel like I've gained some knowledge. Again, I welcome any thoughts or criticism.
Indianer
Archive Member
Posts: 598
Joined: Fri Nov 06, 2015 8:07 am
Location: Northern Germany

Re: Need Help: 16th Century Gorget Top Ring

Post by Indianer »

Sooo... are we still talking about the roll you have sketched in your OP? That one doesn't appear inordinately large so as to give you this much trouble. This is from someone who still didn't manage to get access to one of the 3 empty garages in his backyard.

Other point, you just described a process starting with the regular 90° bend, followed by bossing- I.e. dishing the center of the future roll into a dishing form... right? So you'd make a tunnel shape with minimal rolling?

Next iteration, please take a of somewhere! This shows so much promise.. :)
izirath
New Member
Posts: 30
Joined: Mon Mar 21, 2016 1:49 pm

Re: Need Help: 16th Century Gorget Top Ring

Post by izirath »

When I've made the top rings I've used a long strip, made the roll (while flat) and then curl it into a ring. Roped decoration is made while it's flat as well. With this you'll have sides perpendicular to the top of the circle. To achieve the angle at the front I flare that area.

This is after talking to Lillelund and this is how he usually does it.
User avatar
Kristoffer
Archive Member
Posts: 1697
Joined: Sat Sep 09, 2000 1:01 am
Location: Ostersund - Sweden
Contact:

Re: Need Help: 16th Century Gorget Top Ring

Post by Kristoffer »

Here are a couple of alternative approaches.

1. Roll first method around a brass wire. Melt brass wire out once shaping is done. This gives a round, hollow roll that can be hot worked with a chisel from the outside to sculpt the roping. For finer roping, just roll over a wire, chisel and file the roping.

2. Shape first method with similar method that you already attempted. Turn upper edge outwards 90 degrees over the edge of an anvil.
Make what I call a "hinge block", basically half of a drilled hole, like a gutter, in a flat piece of steel. I make mine two at a time by clamping two pieces of thicker steel together in my drill press vice, then drill right where the pieces meet.
Tapping on the inside of the upper edge of the lame, drive your turned edge down along the side of the gutter. This will force it to start rolling. This is a similar concept to how blacksmiths make hinges. If needed at some point, use a piece of wire or nail or other suitable diameter steel piece, place it in the half shaped roll and hammer over it to smooth out the roll. A suitable chisel could also be used if you have one. This will take you to a "U" shaped roll that can be worked from the outside over a roping stake before getting closed.

3. Jenny method. Shape the piece and use a bead roller to form parts of, or all of the roll. Then make the roping.

4. Thick forehead method. Practice on a whole bunch of scraps until you are able to do it with a hammer, an anvil and a stake.
Kristoffer Metsälä
RWWT
Archive Member
Posts: 166
Joined: Fri Jan 24, 2020 11:10 am

Re: Need Help: 16th Century Gorget Top Ring

Post by RWWT »

Indianer wrote: Wed Mar 06, 2024 10:57 am Sooo... are we still talking about the roll you have sketched in your OP? That one doesn't appear inordinately large so as to give you this much trouble. This is from someone who still didn't manage to get access to one of the 3 empty garages in his backyard.

Other point, you just described a process starting with the regular 90° bend, followed by bossing- I.e. dishing the center of the future roll into a dishing form... right? So you'd make a tunnel shape with minimal rolling?

Next iteration, please take a of somewhere! This shows so much promise.. :)
Yup, same thing. Yeah, it really isn't huge by contemporary standards. I honestly did not expect it to give me this much trouble. Part of the problem is certainly me, though I've never had a roll be this annoying.

Yes, Mark I and II I bent it over how everyone usually does it to 90 degrees. The cracking wasn't too big a deal but the flaring was driving me nuts and it was way more time consuming that it should be, so I've been looking for a better way or something I'm missing.

Mark III (well, a deliberate practice piece and not the true Mark III), I tried sinking in it in. I don't have a suitable dishing form available and used an open vise/ swage block half round channels.

Yup, next round, I will try to remember to take some pictures so everyone can learn from my mistakes!

Thanks!
RWWT
Archive Member
Posts: 166
Joined: Fri Jan 24, 2020 11:10 am

Re: Need Help: 16th Century Gorget Top Ring

Post by RWWT »

izirath wrote: Wed Mar 06, 2024 1:01 pm When I've made the top rings I've used a long strip, made the roll (while flat) and then curl it into a ring. Roped decoration is made while it's flat as well. With this you'll have sides perpendicular to the top of the circle. To achieve the angle at the front I flare that area.

This is after talking to Lillelund and this is how he usually does it.
Interesting. I was thinking about that but was being fussy about getting the rope lines to line up later. If I can't get it to work well otherwise, I may come back to this method and live with the potential for things to not line up at the seams as nicely as I'd like.

Thanks!
RWWT
Archive Member
Posts: 166
Joined: Fri Jan 24, 2020 11:10 am

Re: Need Help: 16th Century Gorget Top Ring

Post by RWWT »

Kristoffer wrote: Wed Mar 06, 2024 1:05 pm Here are a couple of alternative approaches.

1. Roll first method around a brass wire. Melt brass wire out once shaping is done. This gives a round, hollow roll that can be hot worked with a chisel from the outside to sculpt the roping. For finer roping, just roll over a wire, chisel and file the roping.

2. Shape first method with similar method that you already attempted. Turn upper edge outwards 90 degrees over the edge of an anvil.
Make what I call a "hinge block", basically half of a drilled hole, like a gutter, in a flat piece of steel. I make mine two at a time by clamping two pieces of thicker steel together in my drill press vice, then drill right where the pieces meet.
Tapping on the inside of the upper edge of the lame, drive your turned edge down along the side of the gutter. This will force it to start rolling. This is a similar concept to how blacksmiths make hinges. If needed at some point, use a piece of wire or nail or other suitable diameter steel piece, place it in the half shaped roll and hammer over it to smooth out the roll. A suitable chisel could also be used if you have one. This will take you to a "U" shaped roll that can be worked from the outside over a roping stake before getting closed.

3. Jenny method. Shape the piece and use a bead roller to form parts of, or all of the roll. Then make the roping.

4. Thick forehead method. Practice on a whole bunch of scraps until you are able to do it with a hammer, an anvil and a stake.

Thanks!

1. Sound like fun and I want to try that at some point. I am not sure if this is the project to do it, but maybe. I was apprehensive about my ability to get the lines even, so made up a roping tool. That requires me to get at it from the inside and seemed the easier way, but I am wondering if it's more trouble than it's worth... at least for me.
2. Gah! I forgot all about hinge blocks! Made 'em and used 'em several times. That might be just the thing.
3. Don't have a bead roller but was joking with my buddy that it would have made life a lot easier. It's his shop and he is a notorious tool nut.
4. Haha. Yeah, I am mastering the Thick Forehead Method, I think. It's frustrating but part of this project was intended as a learning experience for me and others. Learning is occurring. I will feel better about that when I finally learn enough to get to an acceptable, final result.
izirath
New Member
Posts: 30
Joined: Mon Mar 21, 2016 1:49 pm

Re: Need Help: 16th Century Gorget Top Ring

Post by izirath »

RWWT wrote: Wed Mar 06, 2024 7:34 pm
izirath wrote: Wed Mar 06, 2024 1:01 pm When I've made the top rings I've used a long strip, made the roll (while flat) and then curl it into a ring. Roped decoration is made while it's flat as well. With this you'll have sides perpendicular to the top of the circle. To achieve the angle at the front I flare that area.

This is after talking to Lillelund and this is how he usually does it.
Interesting. I was thinking about that but was being fussy about getting the rope lines to line up later. If I can't get it to work well otherwise, I may come back to this method and live with the potential for things to not line up at the seams as nicely as I'd like.

Thanks!
I try to not fuss too much with symmetry but when it's together you can sort of line up the lines and even them out (if it's very off) with heat.
Indianer
Archive Member
Posts: 598
Joined: Fri Nov 06, 2015 8:07 am
Location: Northern Germany

Re: Need Help: 16th Century Gorget Top Ring

Post by Indianer »

RWWT wrote: Tue Feb 27, 2024 8:32 am Mark II

Image
Brother, it just Struck me... you can't just turn it outwards like that. You have to stretch it with a straight peen. Did u do that? You nick the line where the roll starts, bend out just a few degrees, then you stretch. It'll roll itself out a good bit like that. That's how Dubé does it.

This thread is long and I'm on my phone. Sry if I missed sth.
Post Reply