-Mag
the making of a suit in pictures
-
Magmaforge

- Archive Member
- Posts: 3281
- Joined: Wed Nov 22, 2000 2:01 am
- Location: sweet home Chicago, Rome of the 21st c.
-
Patrick Thaden
- Archive Member
- Posts: 644
- Joined: Thu May 24, 2001 1:01 am
- Location: Denton TX, USA
- Contact:
Here is another pic of the knees and the start of the articulations

here is what I used to create the anticlasic curve of the wing and reenforce plate
"tool image?"
basically just do some stretching with a cross pein, you can also use a saddle type stake if you want to stretch the inner line of the wing some so as to reduce some of the stretching on the wings
"tool image?"
Here is a pic of some of my most used stakes
top left, a 4" diameter bar, all purpose tweaking bar
bottom left 3" ball, handy for elbows and other raising and planishing
second from left, a crooked stake that is great for setting the crease in knees and planishing the sides in to get the nice arch seen on the knees
3rd from left, handy stake for cleaning up creases over and working flutes in
4th a homemade offset mushroom stake great for cleaning up and planishing elbows and knees over, forged out from a 1 1/2" round bar
far right a 2 1/2" bar forged out into an offset mushroom stake about a 4" radius, great for plaishing helmets over as well as other larger radiused pieces, handy for planishing larger knees over as well
Last edited by Patrick Thaden on Sun Apr 30, 2017 10:32 am, edited 2 times in total.
-
Brian W. Rainey

- Archive Member
- Posts: 2646
- Joined: Thu Jun 26, 2003 1:01 am
- Location: McHenry, IL USA
- Contact:
Padrig wrote:Great pics of the stakes.
I am always amazed how much you are willing to share with us and take some of your valuable time to do so. Very much appreciated.
Pad
Patrick is a great guy.
If anyone is in the Chicago/Milwaukee area, we are having Patrick up in July:
http://www.armourresearchsociety.org/workshop.html
I am sure there will be LOTS of great things to learn and discuss!
I think that's Lionello Boccia's "Le Armature di Santa Maria delle Grazie di Curtatone di Mantova e L'Armatura Lombarda del '400". No finer book has ever been published. 
"When a land rejects her legends, Sees but falsehoods in the past;
And its people view their Sires in the light of fools and liars,
'Tis a sign of its decline and its glories cannot last."
And its people view their Sires in the light of fools and liars,
'Tis a sign of its decline and its glories cannot last."
-
Patrick Thaden
- Archive Member
- Posts: 644
- Joined: Thu May 24, 2001 1:01 am
- Location: Denton TX, USA
- Contact:
here are some more pics of things

here are the second set of lames stuck on

here is the flat plate for the cuisse main plate

here it is shaped and stuck in place from the outside

Here is the same from the inside, it'll probably get tweaked into shape a little more when I roll the top edge and fit in the upper two plates. All need to get a demi roughed in for these and then onto the greaves
Yeah I made all the stakes shown, one is just a rock mill ball, the two mushrooms started out as large round stock, the flat fluting one was a floor chisel. The wierd crooked over stake is a 1" square bar that I domed over and bent and such, but not polished, I've found a polish really isn't necesarry when working steel, even when planishing items a perfect polish is just too much work to bother with when your going to sand the plates anyway. You don't want any major dings or gouges in the stake or hammer as these will leave heavy marks that can be annoying.
here are the second set of lames stuck on
here is the flat plate for the cuisse main plate
here it is shaped and stuck in place from the outside
Here is the same from the inside, it'll probably get tweaked into shape a little more when I roll the top edge and fit in the upper two plates. All need to get a demi roughed in for these and then onto the greaves
Yeah I made all the stakes shown, one is just a rock mill ball, the two mushrooms started out as large round stock, the flat fluting one was a floor chisel. The wierd crooked over stake is a 1" square bar that I domed over and bent and such, but not polished, I've found a polish really isn't necesarry when working steel, even when planishing items a perfect polish is just too much work to bother with when your going to sand the plates anyway. You don't want any major dings or gouges in the stake or hammer as these will leave heavy marks that can be annoying.
Last edited by Patrick Thaden on Sun Apr 30, 2017 10:27 am, edited 1 time in total.
-
greeneel22
- Archive Member
- Posts: 133
- Joined: Fri Apr 22, 2005 11:45 pm
- Location: Alta Loma, CA
- Contact:
A-Bob,
Thanks for the additional explanation on the stakes. Plenty of 1" and 1-1/4" stock lying around the shop waiting to become stakes.
Now, on a second topic, in the last pic where the inside of the cuisse is shown, the distance from the outside edge of the cuisse to the location where you placed the articulation point does not seem to be the same on the left and right sides. Is this a technique that in some way enhances the articulation of a leg armor? Is it that the cuisse needs to wrap further around the leg on the fan side? Perhaps there something else going on that I have not thought of?
-
Krag
- Archive Member
- Posts: 2178
- Joined: Thu Aug 10, 2000 1:01 am
- Location: Clear Lake (Houston), TX
- Contact:
Great thread...definite giganto thanks for sharing!
Any chance you'll swing down here for the armour-in? The price of thug labor has gone up these days and I simply can't afford to have you kidnapped for the weekend.
Any chance you'll swing down here for the armour-in? The price of thug labor has gone up these days and I simply can't afford to have you kidnapped for the weekend.
Krag von Berghen
<a href="http://www.kragaxe.com"> KragAxe Armoury</a>
<a href="http://www.100megsfree3.com/kragaxe/arc ... ">Member's Pics</a>
<a href="http://www.kragaxe.com"> KragAxe Armoury</a>
<a href="http://www.100megsfree3.com/kragaxe/arc ... ">Member's Pics</a>
-
Jan van Nyenrode
- Archive Member
- Posts: 781
- Joined: Sat May 17, 2003 1:01 am
- Location: Polderslot, Drachenwald, Netherlands
-
Brian W. Rainey
- Archive Member
- Posts: 2646
- Joined: Thu Jun 26, 2003 1:01 am
- Location: McHenry, IL USA
- Contact:
-
Patrick Thaden
- Archive Member
- Posts: 644
- Joined: Thu May 24, 2001 1:01 am
- Location: Denton TX, USA
- Contact:
Signo basically said it in regards to the pivot points, they aren't always where we think initally they should be. I've actually seen some legs where they only have a true pivot on the outside, the inner edge of the leg cut so short any rivets for articulation would prevent proper movement so they put the inner edge of the knee on leathers. You can over articulate legs if you want by carefull placement of the points and getting things real symetrical, but this really wasn't done, a lot of SCA designed armour articulates FAR more than a lot of original pieces, they don't necesarily work better though 
The book sitting there is as Josh and Brian pointed out.
Depends on what type of steel I'm looking to get, here in the Dallas metroplex if I buy over a ton I can get my mildsteel delivered from a company about 1/2hr away, if I'm after spring steel I go through admiral up in the chicago area, other metals such as stainless brass bronze, I just pick up the phone book and start calling companies and then do an online check to get some additonal price quotes and hit the one that works best
Krag, I've thought about trying to make it down almost every year I've heard you were doing one, I've just not ever really made it
not sure about this year either due to money and time as usual. I'll see about doing a day trip down on saturday or something, it's about 4hrs though so who knows.
Well, thought you might like some more pics so here is the rolling of the large triangular roll seen on the upper cuisse of some italian legs
http://www.thadenarmory.com/customers/s ... /index.htm
I best get back to the shop to get the other one done now and get the rest of the plates fitted up.
-
Patrick Thaden
- Archive Member
- Posts: 644
- Joined: Thu May 24, 2001 1:01 am
- Location: Denton TX, USA
- Contact:
Here are a couple new pics, the uppers are about done

Here is a shot of the upper cuisse plate after rough fit and before rolling the top edge

Here is a shot of the pair all about ready, one of them shown exploded so you can see somewhat the shape of the parts, the knee lames will get trimmed a little to remove a little excess material that isn't doing anything

Here is a little bit closer a shot of the upper leg roll, not as big as the mid leg and done without heat and only two hammers, a slightly roundfaced one and a narrow crosspein styled one to close it. The two shown here actually
[img]"tool%20image?"[/img]
I'll use heat on larger rolls as more metal has to get moved around and it really speeds things up and I don't have to hit it as hard or as much
It is possible to do the larger ones and close them neatly without heat though.
Lorenzo, the reason I use the one you mention is to stretch the material for the roll as it's flared over, any crosspein hammer will do this, you just don't want to sharp a face as this will leave marks that are harder to get out later.
Here is a shot of the upper cuisse plate after rough fit and before rolling the top edge
Here is a shot of the pair all about ready, one of them shown exploded so you can see somewhat the shape of the parts, the knee lames will get trimmed a little to remove a little excess material that isn't doing anything
Here is a little bit closer a shot of the upper leg roll, not as big as the mid leg and done without heat and only two hammers, a slightly roundfaced one and a narrow crosspein styled one to close it. The two shown here actually
[img]"tool%20image?"[/img]
I'll use heat on larger rolls as more metal has to get moved around and it really speeds things up and I don't have to hit it as hard or as much
It is possible to do the larger ones and close them neatly without heat though.
Lorenzo, the reason I use the one you mention is to stretch the material for the roll as it's flared over, any crosspein hammer will do this, you just don't want to sharp a face as this will leave marks that are harder to get out later.
Last edited by Patrick Thaden on Sun Apr 30, 2017 10:35 am, edited 1 time in total.
how much articulation do you get via the funny shaped lane at the top of cuisse? it looks like it would't articulate at all because of the shape,
as usual though impecable work,
when do you polish and assemble though? only at the very end?
keep up the cool work work
tom
as usual though impecable work,
when do you polish and assemble though? only at the very end?
keep up the cool work work
tom
whhhhhhhhhhhhhhhhhhhhaaaaaaaaaaaaaaaaa
-
Mystic_Kavu
- Archive Member
- Posts: 57
- Joined: Wed Nov 12, 2003 2:01 am
- Contact:
-
Jason Grimes

- Archive Member
- Posts: 2387
- Joined: Wed Jul 25, 2001 1:01 am
- Location: Fairbanks, AK, USA
- Contact:
Hi Mystic_Kavu,
The old armourers did this and you can see the evidence of their hammer marks on the origional pieces of armour. This is also why many modern reproductions just don't look quite right. They don't have the subtle curves that a fully hammered piece does. And as a cool side effect the work hardening makes the armour all that more durable and hard.
The old armourers did this and you can see the evidence of their hammer marks on the origional pieces of armour. This is also why many modern reproductions just don't look quite right. They don't have the subtle curves that a fully hammered piece does. And as a cool side effect the work hardening makes the armour all that more durable and hard.
Jason
Yes, the picture surely can't show the real shapes of the metal, it's unfinished surface hide it's shape too.
When it will be sanded we will see that the pieces have a very very subtle curve, probably it could be seen looking the piece from real and not from a small picture.
It's the difference from a nice reproduction and a outstanding reproduction.
About those marks, they look quite oblong to me, like if you want to push the metal in a very precise direction, can we see the face of the hammer you used?.
-
Patrick Thaden
- Archive Member
- Posts: 644
- Joined: Thu May 24, 2001 1:01 am
- Location: Denton TX, USA
- Contact:
Belmtho, The upper two plates actually do move a bit, when you pull your leg up towards your chest, or lean forward is when this comes into play a little bit. As far as polishing goes, the customer is coming down in about a week so my goal at this point is to make sure everything is together and working properly. If I need to move a rolled edge or adjust any lines I'd hate to have gone through all the trouble of polishing just to have to do it again.
Mystic, Yes the plates have been hammered over most the surface, As Jason noted if you look at the original pieces you will see the insides are hammered throughout. Part of this is that no plate of armour has a truly flat surface, Also, when you start just bending a piece, it will sometimes recurve slightly giving the wrong shape as well. By hammering the inside you correct this as well as can give the piece the added shape it really needs if it is to look like an original piece of armour.
Signo, I have but a few hammers I really like, the flat crosspein looking hammer is the one I use to form the cuisses giving the look of the oblong hammer marks.
Here are some new pics of the cuisses mostly done.
You can also see that the top plates do have a little motion there.

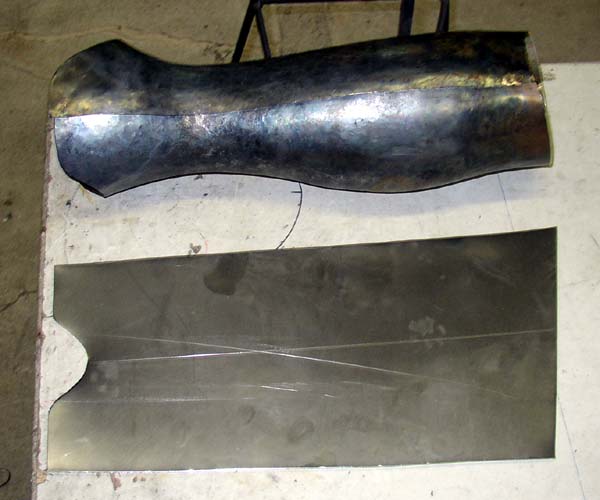
here we have a plate cut out for one of the greaves, this will be the front right portion

[img]not%20sure%20what%20pic[/img]
Here we have it mostly roughed in, still needs to have a talking to before its done
"tool image?"
These were the only tools (along with my anvil) that I used to get it this far. Not a lot, there are a few things like custom stakes that can make things go a little easier, but a little ingenuity can often go just as far.
Mystic, Yes the plates have been hammered over most the surface, As Jason noted if you look at the original pieces you will see the insides are hammered throughout. Part of this is that no plate of armour has a truly flat surface, Also, when you start just bending a piece, it will sometimes recurve slightly giving the wrong shape as well. By hammering the inside you correct this as well as can give the piece the added shape it really needs if it is to look like an original piece of armour.
Signo, I have but a few hammers I really like, the flat crosspein looking hammer is the one I use to form the cuisses giving the look of the oblong hammer marks.
Here are some new pics of the cuisses mostly done.
You can also see that the top plates do have a little motion there.
here we have a plate cut out for one of the greaves, this will be the front right portion
[img]not%20sure%20what%20pic[/img]
Here we have it mostly roughed in, still needs to have a talking to before its done
"tool image?"
These were the only tools (along with my anvil) that I used to get it this far. Not a lot, there are a few things like custom stakes that can make things go a little easier, but a little ingenuity can often go just as far.
Last edited by Patrick Thaden on Sun Apr 30, 2017 10:39 am, edited 2 times in total.
Armour Bob wrote:These were the only tools (along with my anvil) that I used to get it this far. Not a lot, there are a few things like custom stakes that can make things go a little easier, but a little ingenuity can often go just as far.
The skill in the hand and brain are far more important than the variety of tools. Sure, a billion different tools might work pretty well, but I'm willing to bet that most of the best do 90%+ of their work on 10%or less of their tools.
My 10yo daughter says I'm pretty!
Squire to Jarl Asgeirr Gunnarson, Barony of Vatavia, Calontir
Squire to Jarl Asgeirr Gunnarson, Barony of Vatavia, Calontir
-
Patrick Thaden
- Archive Member
- Posts: 644
- Joined: Thu May 24, 2001 1:01 am
- Location: Denton TX, USA
- Contact:
-
Patrick Thaden
- Archive Member
- Posts: 644
- Joined: Thu May 24, 2001 1:01 am
- Location: Denton TX, USA
- Contact:
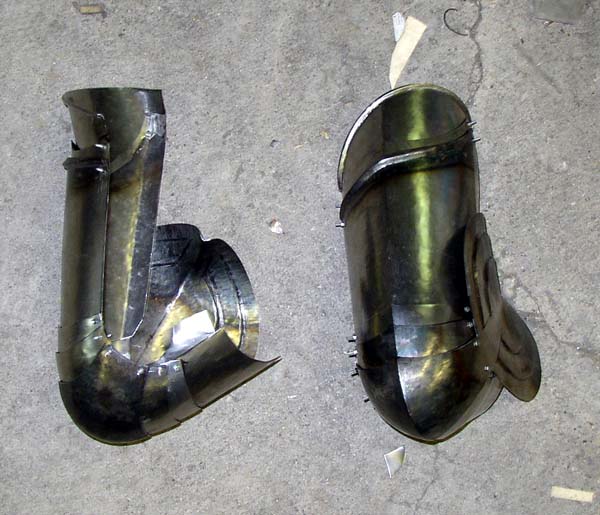
Here is a pic of the right greave roughed in and the plate for the back half of the left greave. The rear piece currently fitted will get some trimming on the upper region before getting a roll, and the lower ankle area still needs some work to get the shaping right.
Shark_ef, the knee lames do have a little bit of shape to them, they aren't really dished across the plate though, the outer edges of them are really pretty flat, but in towards the middle it does have a little bit of arc to it.
Lorenzo2, Yeah, basically most the work is done on the anvil, I will also stretch this inner line down over a bar though so the outer edge of the wing is not the only place getting major stretching, but this doesn't have to be done to get the same shape.
Sorry Ceramite, I really can't afford to feed and clothe a 27 year old around here
Patrick
Last edited by Patrick Thaden on Sun Apr 30, 2017 10:38 am, edited 1 time in total.