A-Bob
Hey how's things?
Nice work!
In my mercenary merchant capacity I offer my services as your UK/European agent for distribution of book/video/dvd.
Give me a PM!
the making of a suit in pictures
-
Mike Garrett (Orc)

- Archive Member
- Posts: 7151
- Joined: Fri Jan 30, 2004 2:01 am
- Location: Somerset, ENGLAND
- Contact:
It'z coz I iz green, innit?!
Youtube - http://www.youtube.com/user/Orcsmith?feature=mhum
Blog - http://orktork.wordpress.com/
Website - http://houseoforc.yolasite.com/
Youtube - http://www.youtube.com/user/Orcsmith?feature=mhum
Blog - http://orktork.wordpress.com/
Website - http://houseoforc.yolasite.com/
A-Bob,
Beautiful the way those rolls are flaring out, so even and smooth. Ugo showed me the basics one evening in aluminum so I can appreciate how difficult it is to get them really right. If it is not too late, could you post a pick where the second angle is in place? That and closing the roll are where I have the most trouble. Anyway, thanks for the progress pics!
Beautiful the way those rolls are flaring out, so even and smooth. Ugo showed me the basics one evening in aluminum so I can appreciate how difficult it is to get them really right. If it is not too late, could you post a pick where the second angle is in place? That and closing the roll are where I have the most trouble. Anyway, thanks for the progress pics!
-
Patrick Thaden
- Archive Member
- Posts: 644
- Joined: Thu May 24, 2001 1:01 am
- Location: Denton TX, USA
- Contact:
Sorry for the delay on getting new pics, yesterday I only managed to get 30 minutes of work time in the shop due to other business that needed to be caught up on, calls emails and such. Here are the rolls another half hour into it, I'll be getting them all closed up today and well see what else happens 


here is just the begining of folding over the next roll

I'll click a couple more as I close them up completely.
here is just the begining of folding over the next roll
I'll click a couple more as I close them up completely.
Last edited by Patrick Thaden on Sat Apr 29, 2017 9:20 pm, edited 1 time in total.
Thankyou those are just what I was looking for! Next question, am I understanding from the pics that you will be sharpening up the point of the roll after it is closed? This seems counter intuitive to me. Not that I am questioning it. . . Just want to make sure that I understand what I think I am seeing. Got to get out the torch, stakes and some scrap this weekend and do some more practice triangular rolls!
-
Zweihammer
- Archive Member
- Posts: 580
- Joined: Wed Dec 04, 2002 2:01 am
- Location: Salinas, California, United States
- Contact:
-
eldana the not so meek
- Archive Member
- Posts: 66
- Joined: Wed Mar 30, 2005 6:46 am
- Location: formerly Canberra, Australia; now bloody wagga wagga
reply
hi that is the exact breastplate that i want to make and i have been trying to find a pattern of it for some time ...so can you please post the patterns or send me to a site that has such a pattern? the book/dvd that has been talked about i want one!
-
Jiri Lucius.
- Archive Member
- Posts: 844
- Joined: Wed Mar 12, 2003 2:01 am
- Location: Czech Republic
- Contact:
-
Patrick Thaden
- Archive Member
- Posts: 644
- Joined: Thu May 24, 2001 1:01 am
- Location: Denton TX, USA
- Contact:
yeah, I only get a rough start point for where I want the sharp corner to be, as sometimes I change it a little after I get the roll down, you can see it's been crisped up a bit and is not hard to do at this point, I think easier than trying to put a sharp corner on something that is going to want to stretch a bit more. I make patterns for each customer, no two are really alike, for this suit some of the pieces would look quite odd seeing as what they've become, in some instances I'll actually form the piece and trim it in to fit, as was done with the placard on this suit. It was basically a rectangle of steel with a center line, I formed it and trimmed it to fit where I wanted it. I'll take a pic or two of the tools I used to make the rolls. There really isn't anything special to them, basically a hammer, an anvil edge and a small scrap of 1/8" X1" X4" long that I used as a punch to close the rolls edge down tight.
Last edited by Patrick Thaden on Sun Apr 30, 2017 9:57 am, edited 1 time in total.
Thanks A-Bob. When Ugo was experimenting with this and showing me at the shop he said there must be some sort of tool to finish the closing and make the edge have a neater appearance. He improvised with the edge of a square stake. Getting the stake to catch the edge was a bit fiddley so he surmised that a purpose built tool should be made.
-
Patrick Thaden
- Archive Member
- Posts: 644
- Joined: Thu May 24, 2001 1:01 am
- Location: Denton TX, USA
- Contact:
Here are the tools I used to do the rolls, like I said nothing really special.

the first hammer on the left I use to stretch the material over to about the 90 deg point, the third hammer I use to knock it down towards the side it's getting closed up on, as well as to knock start knocking over the material for the second bend, I just do this over the edge of the anvil, or if I can't get at it that way, I'll sometimes use a stake that is basically like a blunt chisel. I'll then use the middle hammer to close it up, then back to the middle hammer to square up the corners, and I'll use a scrap of steel or a punch if it's handy to tighten up the joint between the roll and the armour. Don't know that it made any sense there .
.
No new pics at the moment really, I've closed up the back of the neck roll, but been working on tweaking and trimming some of the lines to where I want them, nothing that could really be seen in a picture though. Patrick
the first hammer on the left I use to stretch the material over to about the 90 deg point, the third hammer I use to knock it down towards the side it's getting closed up on, as well as to knock start knocking over the material for the second bend, I just do this over the edge of the anvil, or if I can't get at it that way, I'll sometimes use a stake that is basically like a blunt chisel. I'll then use the middle hammer to close it up, then back to the middle hammer to square up the corners, and I'll use a scrap of steel or a punch if it's handy to tighten up the joint between the roll and the armour. Don't know that it made any sense there
No new pics at the moment really, I've closed up the back of the neck roll, but been working on tweaking and trimming some of the lines to where I want them, nothing that could really be seen in a picture though. Patrick
-
Jiri Lucius.
- Archive Member
- Posts: 844
- Joined: Wed Mar 12, 2003 2:01 am
- Location: Czech Republic
- Contact:

-
Patrick Thaden
- Archive Member
- Posts: 644
- Joined: Thu May 24, 2001 1:01 am
- Location: Denton TX, USA
- Contact:
here we go, finally getting onto some new stuff,


just starting into the pauldrons, so yep, they'll need a little trimming and tweaking still, I'll get pics as they come.
The larger rolls like this I'll do hot, smaller ones I'll do cold, all depends on how much metal I have to move and how far. I'm guessing Hal is talking about the hammer shown second from the left, it has a slight angle up towards the hand thats holding it, and the top is pretty squared up, this allows you to strike right up close to the main body of the armour while closing the rolls. Patrick
just starting into the pauldrons, so yep, they'll need a little trimming and tweaking still, I'll get pics as they come.
The larger rolls like this I'll do hot, smaller ones I'll do cold, all depends on how much metal I have to move and how far
Last edited by Patrick Thaden on Sun Apr 30, 2017 10:03 am, edited 1 time in total.
-
Otto von Teich

- Archive Member
- Posts: 17440
- Joined: Thu Nov 09, 2000 2:01 am
- Location: The Great State of Texas.
I've a question:
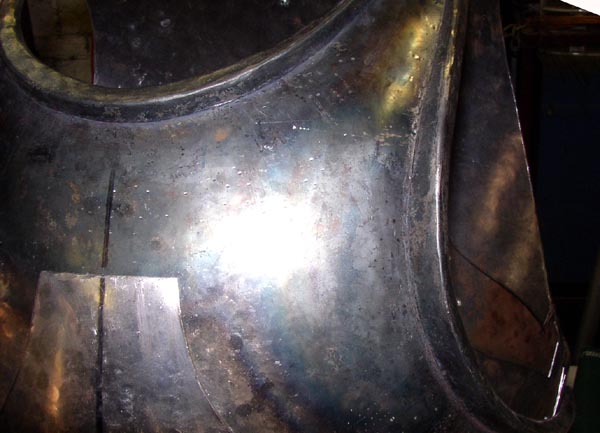
I notice that you heated the metal here and there, i think you worked hot more than needed to anneal the metal in those spot. My curiosity born from the fact that you heated spots that have just suble and smooth curve, so i exclude that you needed heat to shape it. I tend to think that you heated some part of the pieces to focus the deformation to the hot area and reduce the "counter effect" that tends sometime to flatten a piece or someother to curl it.
Am i totally out , or this is what you do?
In other words you often heat some area of the piece to be sure to keep the overall shape of the piece costant while you shape some (relatively) small area?
-
eldana the not so meek
- Archive Member
- Posts: 66
- Joined: Wed Mar 30, 2005 6:46 am
- Location: formerly Canberra, Australia; now bloody wagga wagga
-
Patrick Thaden
- Archive Member
- Posts: 644
- Joined: Thu May 24, 2001 1:01 am
- Location: Denton TX, USA
- Contact:
Sorry forgot to get pics today, the pauldrons are both well under way, they should be pretty well roughed in and trimmed up tomorrow, I'll get pics then
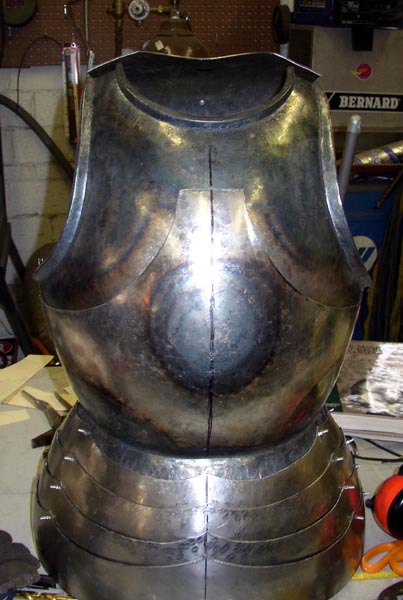
The holes in this case are for a strap that will attach it to the plackard. The holes you mention seeing on later suits are as far as I've seen only done on suits made in the germany region. My guess is construction holes, I saw an example in vienna that had a matched pair of holes on the gorget, though I don't know that this explains every instance as you sometimes see them on 15th cent breasts/backs that were worn with bevors, typically being shown over the top of the breastplates, and though you do sometimes see holes in those, they are usually spaced further apart than those on the breastplate, so no sighn they were to temporarily hold the two together during construction.
Signo, yeah, I heat the metal where I need to when wanting to tweak it a bit here or there without having to resort to extreme violence.
Eldana, I really don't have any idea where there may be patterns for this type armour, I make the suit to fit the customer and fit the pieces as they come.
A-Bob,
I have a question about the selective heating. It appears from the pic that the pauldron lames had been shaped cold and bolted together. Then you heated and shaped the the bottom lame and a small part of the second to bottom lame because these need more of a dished curve than the upper lames. Is that correct? If so, does the heating while assembled leave a mark on the lame underneath the heated one that has to be ground off latter? Also, the heated areas on the lames have a very smooth finish. Was it necessary to remove the lame after shaping with heat to planish it? From my point of view these unfinished pieces are even more interesting than finished ones because of all the artisitc clues to forming have not yet been erased by polishing.
I have a question about the selective heating. It appears from the pic that the pauldron lames had been shaped cold and bolted together. Then you heated and shaped the the bottom lame and a small part of the second to bottom lame because these need more of a dished curve than the upper lames. Is that correct? If so, does the heating while assembled leave a mark on the lame underneath the heated one that has to be ground off latter? Also, the heated areas on the lames have a very smooth finish. Was it necessary to remove the lame after shaping with heat to planish it? From my point of view these unfinished pieces are even more interesting than finished ones because of all the artisitc clues to forming have not yet been erased by polishing.
-
Ld Thomas Willoughby

- Archive Member
- Posts: 1344
- Joined: Wed Jul 02, 2003 1:01 am
- Location: Shire of Vogelburg
eldana the not so meek wrote:bob can you post some links or some where that has patterns on this style of armour?
I'm a loooong way from being Bob
http://helmschmiedt.narod.ru/cuirass.htm
Insanity: Driving forty minutes to a health club, then waiting thirty minutes to get on a treadmill for twenty minutes
-
Patrick Thaden
- Archive Member
- Posts: 644
- Joined: Thu May 24, 2001 1:01 am
- Location: Denton TX, USA
- Contact:


The right one still needs to be kicked a couple times to get it where I want it
Lorenzo2 I've not planished any of the pauldron parts so far, any marks that might get knocked in will get planished out. Right now I'm just roughing the pauldrons in, they'll get taken appart planished and then rechecked for fit, then polished up, then assembled.
Last edited by Patrick Thaden on Sun Apr 30, 2017 10:02 am, edited 1 time in total.
-
Magmaforge

- Archive Member
- Posts: 3281
- Joined: Wed Nov 22, 2000 2:01 am
- Location: sweet home Chicago, Rome of the 21st c.

Wow! I want I want.
Too bad it will be several years before I can consider buying any more armor. That would go great with the sallet and legs you made for me.
Is this based on a particular cuirass or is it a composite? It certainly looks familiar.
Keep up the good work, and the prices down
Too bad it will be several years before I can consider buying any more armor. That would go great with the sallet and legs you made for me.
Is this based on a particular cuirass or is it a composite? It certainly looks familiar.
Keep up the good work, and the prices down
--Edric de Aldebury--
Flos est puellarum, quam diligio, et rosa rosarum, quam sepe video.
"My love is a flower among virgins, and a rose among roses"
Flos est puellarum, quam diligio, et rosa rosarum, quam sepe video.
"My love is a flower among virgins, and a rose among roses"

-
Patrick Thaden
- Archive Member
- Posts: 644
- Joined: Thu May 24, 2001 1:01 am
- Location: Denton TX, USA
- Contact:


here are the pauldrons, got the reenforce on the left, I'll get the right one on tomorrow. Slowly but surely it's coming together.
Edric, It is based on a number of different elements, most can be seen in the mantova book though some of the elements can be seen on some of the suits in Vienna. Your right though, this would go quite well with what you've got now.
Signo, I make it glow, I don't just warm it up
Next I think I'll get going on a set of arms for this suit
Last edited by Patrick Thaden on Sun Apr 30, 2017 10:01 am, edited 1 time in total.
-
Patrick Thaden
- Archive Member
- Posts: 644
- Joined: Thu May 24, 2001 1:01 am
- Location: Denton TX, USA
- Contact:
here we are pauldrons all pretty much roughed in and with reenforcing plates

I'm going to be spending today working on all the details and proportions for the arms today, so pics of that will be coming soon
I'm going to be spending today working on all the details and proportions for the arms today, so pics of that will be coming soon
Last edited by Patrick Thaden on Sun Apr 30, 2017 10:00 am, edited 1 time in total.
-
Zweihammer
- Archive Member
- Posts: 580
- Joined: Wed Dec 04, 2002 2:01 am
- Location: Salinas, California, United States
- Contact: