Woodworking Project Diary

An area for discussing methods for achieving or approximating a more authentic re-creation, for armour, soft kit, equipment, ...

Moderator: Glen K

Sean M
Archive Member
Posts: 2392
Joined: Mon Oct 05, 2009 11:24 pm
Location: in exile in Canada

Re: Woodworking Project Diary

Post by Sean M »

Image

On the bright side, the ancient Egyptians had trouble covering their sketch and layout lines with light coloured pigments too! Click to see more closeups of this cartonnage mummy case from ca. 892 BCE.
DIS MANIBUS GUILLELMI GENTIS MCLEANUM FAMILIARITER GALLERON DICTI
VIR OMNIBUS ARTIBUS PERITUS
Check out Age of Datini: European Material Culture 1360-1410
Sean M
Archive Member
Posts: 2392
Joined: Mon Oct 05, 2009 11:24 pm
Location: in exile in Canada

Re: Woodworking Project Diary

Post by Sean M »

Wall painting from Alexandrovo tumulus, Bulgaria

Image

redrawn in B&W for an article

Image
DIS MANIBUS GUILLELMI GENTIS MCLEANUM FAMILIARITER GALLERON DICTI
VIR OMNIBUS ARTIBUS PERITUS
Check out Age of Datini: European Material Culture 1360-1410
Sean M
Archive Member
Posts: 2392
Joined: Mon Oct 05, 2009 11:24 pm
Location: in exile in Canada

Re: Woodworking Project Diary

Post by Sean M »

I have an idea of another test piece to paint: one of the ceilings of the palace of Amenhotep III at Malqata in Egypt (Amenhotep III was Akhenaten's father). This will give me more practice at brushwork and tempering the pigments while still not being very complicated.

Image

If you look closely you can see that it is not a perfect geometric construction. Here is my first attempt at reconstructing the design on a grid of squares. In my version the spiral ropes are not as close to the flowers as in the original painting. Maybe painting the ropes a bit thicker would help? Any suggestions?

Image
DIS MANIBUS GUILLELMI GENTIS MCLEANUM FAMILIARITER GALLERON DICTI
VIR OMNIBUS ARTIBUS PERITUS
Check out Age of Datini: European Material Culture 1360-1410
Mac
Archive Member
Posts: 9953
Joined: Thu Jan 04, 2001 2:01 am
Location: Jeffersonville, PA

Re: Woodworking Project Diary

Post by Mac »

Sean M wrote: Sat Apr 29, 2023 9:39 pm I have an idea of another test piece to paint: one of the ceilings of the palace of Amenhotep III at Malqata in Egypt (Amenhotep III was Akhenaten's father). This will give me more practice at brushwork and tempering the pigments while still not being very complicated.

Image

If you look closely you can see that it is not a perfect geometric construction. Here is my first attempt at reconstructing the design on a grid of squares. In my version the spiral ropes are not as close to the flowers as in the original painting. Maybe painting the ropes a bit thicker would help? Any suggestions?

Image
The first thing I notice is that the cow heads need to be oriented along the long axes of the red/blue figures. they also need to take up more space within them. Making the "ropes" thicker will help, but really the important thing is that each of the spirals needs to be bigger. At any point there is at least three "rope" thicknesses, but sometimes four. I think I'd use a compass to extablish the outer edge of a typical spiral and see about getting enough turns inside. The other thing I see is that the decorative element within the cow's horns is intended to be circular.

Now.... all of this has clearly been done by eye, but the intent of the artist was circles, and you could do a lot worse than to rely on the compass to get the proportions; even if you chose to ignore it later and do it all by eye.


Mac
Robert MacPherson

The craftsmen of old had their secrets, and those secrets died with them. We are not the better for that, and neither are they.

http://www.lightlink.com/armory/
http://www.billyandcharlie.com
https://www.facebook.com/BillyAndCharlie
Sean M
Archive Member
Posts: 2392
Joined: Mon Oct 05, 2009 11:24 pm
Location: in exile in Canada

Re: Woodworking Project Diary

Post by Sean M »

I think on the larger-sized drawing I will use a compass as well as a grid to lay things out. If I had been painting this style since I was 7 I could do it by hand and make it look good.

I agree that my ox / cow heads seem about 10% smaller than in the original, especially from side to side.

I have asked someone who draws mandalas for money in case she has suggestions. This is not as precise as a mandala but its still a repeated pattern.

Are you suggesting rotating the cow's heads like this (counterclockwise):

Image
DIS MANIBUS GUILLELMI GENTIS MCLEANUM FAMILIARITER GALLERON DICTI
VIR OMNIBUS ARTIBUS PERITUS
Check out Age of Datini: European Material Culture 1360-1410
Mac
Archive Member
Posts: 9953
Joined: Thu Jan 04, 2001 2:01 am
Location: Jeffersonville, PA

Re: Woodworking Project Diary

Post by Mac »

I drew some quick lines with MS Paint.... The circles where the "ropes" enter the spirals need to be bigger, so that there is room for the three (or four) layers within. Also, the cow head's axis needs to be angled so at to point up into the corners of the red or blue spaces. I think you presumed that the heads are at 45°, but that's not what's actually happening.

Image

Mac
Robert MacPherson

The craftsmen of old had their secrets, and those secrets died with them. We are not the better for that, and neither are they.

http://www.lightlink.com/armory/
http://www.billyandcharlie.com
https://www.facebook.com/BillyAndCharlie
Sean M
Archive Member
Posts: 2392
Joined: Mon Oct 05, 2009 11:24 pm
Location: in exile in Canada

Re: Woodworking Project Diary

Post by Sean M »

Here is another construction based on sketching out circles for the coiled ropes, connecting them, then filling in the twisted ropes as they approach the flowers.

Image

Filling in this part has taken all of Sunday. Next will come the ox heads.
DIS MANIBUS GUILLELMI GENTIS MCLEANUM FAMILIARITER GALLERON DICTI
VIR OMNIBUS ARTIBUS PERITUS
Check out Age of Datini: European Material Culture 1360-1410
Sean M
Archive Member
Posts: 2392
Joined: Mon Oct 05, 2009 11:24 pm
Location: in exile in Canada

Re: Woodworking Project Diary

Post by Sean M »

Today I beat some egg white into glair. Its a slow process! Cennini only describes how to make glair for gilding, where he mixed it with water. Does anyone know whether glair for paint is usually watered down like egg yolk for paint? Or have thouughts on glair v. gum arabic as a binder on paper?

I think I will leave it until tomorrow morning then collect the liquid that drips out of the white foam and paint with it. Cennini said "from evening to morning", Joumana Medlej just leaves it for a few hours. I still have to draw the ox heads in the voids.
DIS MANIBUS GUILLELMI GENTIS MCLEANUM FAMILIARITER GALLERON DICTI
VIR OMNIBUS ARTIBUS PERITUS
Check out Age of Datini: European Material Culture 1360-1410
Sean M
Archive Member
Posts: 2392
Joined: Mon Oct 05, 2009 11:24 pm
Location: in exile in Canada

Re: Woodworking Project Diary

Post by Sean M »

On Thursday I had a chance to visit a local wood supplier and pick out an 11" wide, 10 ft long, 1" thick plank of red alder for another project. I cut out a 3" wide, 33" long piece for a scabbard blank. The late medieval laws prefer beech, but in the ancient world and the Viking Age some Europeans used softer hardwoods for the cores.

Image

This plank was cut close to the surface of the log, so the grain does not run from side to side. When I sawed the plank end to end with a handsaw it worked pretty well, but I could not saw all the way through and when I tried to split the plank in two the wood cracked. I am debating whether to try and save both halves (maybe visit someone with a table saw?) or carve away the cracked half and use the good half.

Now I am trying to finish the sketch and start painting. Some people at home are unwell and the weather has been hot so working can be tricky.
DIS MANIBUS GUILLELMI GENTIS MCLEANUM FAMILIARITER GALLERON DICTI
VIR OMNIBUS ARTIBUS PERITUS
Check out Age of Datini: European Material Culture 1360-1410
Sean M
Archive Member
Posts: 2392
Joined: Mon Oct 05, 2009 11:24 pm
Location: in exile in Canada

Re: Woodworking Project Diary

Post by Sean M »

Image

I finished resawing the red alder board into laths for a sheath for a sword! If I plane one of the sawed surfaces, I can salvage the lathe that splintered (the splintered part will be towards outside where most of the wood is removed).

I have been doing this because its easier to do when my body eyes and mind are tired than finishing the drawing. And now its done and I can put it aside.
DIS MANIBUS GUILLELMI GENTIS MCLEANUM FAMILIARITER GALLERON DICTI
VIR OMNIBUS ARTIBUS PERITUS
Check out Age of Datini: European Material Culture 1360-1410
Sean M
Archive Member
Posts: 2392
Joined: Mon Oct 05, 2009 11:24 pm
Location: in exile in Canada

Re: Woodworking Project Diary

Post by Sean M »

Finally hafted my axe by the late Wiliam Kastner

Image

This has a butter-knife-sharp blade and I am try to decide how to sharpen it. Start with hammer and anvil like a scythe, or move straight to grinding? Bronze Age people like VikingAge people all carried a hone on their person but that may have been more for fine polishing.
DIS MANIBUS GUILLELMI GENTIS MCLEANUM FAMILIARITER GALLERON DICTI
VIR OMNIBUS ARTIBUS PERITUS
Check out Age of Datini: European Material Culture 1360-1410
Sean M
Archive Member
Posts: 2392
Joined: Mon Oct 05, 2009 11:24 pm
Location: in exile in Canada

Re: Woodworking Project Diary

Post by Sean M »

A sword bought with mad money from the day job arrived (an Oakeshott type XV):

Image

Now I am carving out one of those slats into half a scabbard core. The other slat would need to be smoothed with a plane. As a type XV it tapers more in width than thickness which makes the carving a bit easier. Once I have a core to keep the blade safe I can think about how to hang the scabbard.

I trace the blade on the wood, measure the thickness of the sword every 10 cm, divide that in half, and add about 0.5 mm to get the depth to hollow out at that point. Does anyone else use a different strategy?
DIS MANIBUS GUILLELMI GENTIS MCLEANUM FAMILIARITER GALLERON DICTI
VIR OMNIBUS ARTIBUS PERITUS
Check out Age of Datini: European Material Culture 1360-1410
Matthew Amt
Archive Member
Posts: 1151
Joined: Wed Sep 20, 2000 1:01 am
Location: Laurel, MD USA
Contact:

Re: Woodworking Project Diary

Post by Matthew Amt »

I rout out scabbard slabs with the little router ball on my drill. I just go at it aggressively and eyeball until it seems to be close, both halves, then clamp them together and try the blade. Keep hitting the high spots until the blade fits freely, even a tad loose. I always find that once I glue the wood together and cover it, it's TIGHTER! Really annoying sometimes...

Love the axe and sword, by the way, congrats!

Matthew
Sean M
Archive Member
Posts: 2392
Joined: Mon Oct 05, 2009 11:24 pm
Location: in exile in Canada

Re: Woodworking Project Diary

Post by Sean M »

Humh, not sure if our electric drill has a fitting like that, but a Dremel would be a useful tool to buy next time I have money. I am going to buy one or two big gouges for hollowing out shields and so on.
DIS MANIBUS GUILLELMI GENTIS MCLEANUM FAMILIARITER GALLERON DICTI
VIR OMNIBUS ARTIBUS PERITUS
Check out Age of Datini: European Material Culture 1360-1410
Sean M
Archive Member
Posts: 2392
Joined: Mon Oct 05, 2009 11:24 pm
Location: in exile in Canada

Re: Woodworking Project Diary

Post by Sean M »

Image

Here is my current setup. Something like a drawbench would help so I am not stooped over like a peasant in Plato. When I was living in Europe I realized that coins make good gauges of how deep to carve: usually the thickness of a sword at a given point is somewhere between 1 and 2 of a common coin.

Carving to the middle line helps me make sure I reach the intended depth (I have the full thickness of the wood to compare the deepest part to).

I should note that most French guild rules and Diderot say that beech wood is best, but surviving scabbards from the pre-Roman Iron Age and the first half of the Middle Ages are often made of softer woods such as alder, poplar, or willow. And I had some spare alnus rubra, but I did not have some spare fagus sylvatica. It seems like opinion went back and forth between "use a soft light wood that is easy to carve!" and "use a hard, dense wood that is strong!"

To save the link here is Paul Sellers' video on carving a wooden bowl. His approach is useful for domed shields too. https://piped.mha.fi/watch?v=aR1PHUq9kLQ or https://youtube.com/watch?v=aR1PHUq9kLQ

Image

I like his simple scrapers for smoothing the inside of a curve. He just takes some sheet steel, cuts a curve on one end, and grinds the curve sharp. For slightly fancier rivet it into a wooden handle so it does not scorch your fingers as it heats up. You can also use the blade of a broad axe or an adze the same way, but the simple scrapers are easy to make in a variety of sizes if you have an angle grinder, belt sander, or similar.
DIS MANIBUS GUILLELMI GENTIS MCLEANUM FAMILIARITER GALLERON DICTI
VIR OMNIBUS ARTIBUS PERITUS
Check out Age of Datini: European Material Culture 1360-1410
Sean M
Archive Member
Posts: 2392
Joined: Mon Oct 05, 2009 11:24 pm
Location: in exile in Canada

Re: Woodworking Project Diary

Post by Sean M »

Image

The scabbard cores are shaped on the inside! They are a tight fit so I will remove just a little bit of wood until they go in easily. It sounds like most people make their first scabbard a bit too tight and forget that the leather will compress the core as it dries.

I do need to clamp the slats to keep them true to one another. I think once the wood is less than 3 mm or 1/8" thick this will be easier.

Shields and scabbards both use a thin, flexible wooden core to support rawhide or leather or linen that strengthen it.

Oh, and happy Canada Day!
DIS MANIBUS GUILLELMI GENTIS MCLEANUM FAMILIARITER GALLERON DICTI
VIR OMNIBUS ARTIBUS PERITUS
Check out Age of Datini: European Material Culture 1360-1410
Sean M
Archive Member
Posts: 2392
Joined: Mon Oct 05, 2009 11:24 pm
Location: in exile in Canada

Re: Woodworking Project Diary

Post by Sean M »

Image

About 70% of the wood has been removed from one side of the back of one lathe. I am leaving the other side for now because I can treat it as a straightedge when I clamp the slats together. Because as the wood gets thinner its easy to break it or carve too deep, I am trying to be careful.

A rasp would probably be another good tool at this stage.
DIS MANIBUS GUILLELMI GENTIS MCLEANUM FAMILIARITER GALLERON DICTI
VIR OMNIBUS ARTIBUS PERITUS
Check out Age of Datini: European Material Culture 1360-1410
Matthew Amt
Archive Member
Posts: 1151
Joined: Wed Sep 20, 2000 1:01 am
Location: Laurel, MD USA
Contact:

Re: Woodworking Project Diary

Post by Matthew Amt »

I generally cut out the outer outline *before* I start hollowing out the cavity. After the pieces are glued together I rasp and sand off the outside to thin and round it. There is a little chance of going through the wood to the cavity, but the 2 pieces support each other at that point, and it's usually going to be covered anyway.

Matthew
Sean M
Archive Member
Posts: 2392
Joined: Mon Oct 05, 2009 11:24 pm
Location: in exile in Canada

Re: Woodworking Project Diary

Post by Sean M »

Looks like I don't have a choice because I cracked the wood too badly to patch :( I will see if the ash board I have works, ash scabbard cores are not unknown in the Viking Age and High Middle Ages. Beech tends to be expensive and imported.
DIS MANIBUS GUILLELMI GENTIS MCLEANUM FAMILIARITER GALLERON DICTI
VIR OMNIBUS ARTIBUS PERITUS
Check out Age of Datini: European Material Culture 1360-1410
Sean M
Archive Member
Posts: 2392
Joined: Mon Oct 05, 2009 11:24 pm
Location: in exile in Canada

Re: Woodworking Project Diary

Post by Sean M »

Image

Resawed a 33" ash board into two thin laths. Those who have handsawed seasoned ash or oak will know. I like Matt's idea of removing the wood from the sides early but I have to make sure I don't remove too much wood. Because the blade is very tapered, wiggling the blade a few degrees in either direction can move the point outside the

Image

Glued up the blank for a second, smaller, shallower alder shield. I would like to make it 16" wide but the second plank may be about 1/4" too short to make a perfect circle so I would have to paint it in a way that the imperfection was not obvious. I am not sure how successful the glue will be, it will have to survive all the pounding from chiselling it into a domed shape and I didn't make the two planks meet as well as cabinetry. I am good at getting the skim milk to separate into thin yellowish wey and thick white curds.

I do these posts to keep myself honest and increase the chance that I actually complete these projects. Usually what happens is that I reach a problem that I can't solve when I am already past my capacity of moving things in space and juggling tools and materials so I have no more mental resources to do whatever would be necessary to solve the problem. This thread also serves as my lab notebook. I can't flip to an old Facebook post like I can this thread, and I'd still rather post this here than on Age of Datini.
DIS MANIBUS GUILLELMI GENTIS MCLEANUM FAMILIARITER GALLERON DICTI
VIR OMNIBUS ARTIBUS PERITUS
Check out Age of Datini: European Material Culture 1360-1410
Sean M
Archive Member
Posts: 2392
Joined: Mon Oct 05, 2009 11:24 pm
Location: in exile in Canada

Re: Woodworking Project Diary

Post by Sean M »

Image

Hollowing out the shield with the big gouge. The gouge arrived with a 1 mm or 1/32" notch in the edge so I will need to grind it a lot. So far the glued seam is holding up to the pounding but I have managed to collapse the table as I hammer the gouge with a wooden mallet!

I am using the white card as a gouge for the maximum desired depth. I am aiming for about 1 cm of wood in the center and 6 mm at the rim. Those seem within the historical range for a smallish shield covered in rawhide.

I think I could remove all the wood from the center in an easy six-hour day.
DIS MANIBUS GUILLELMI GENTIS MCLEANUM FAMILIARITER GALLERON DICTI
VIR OMNIBUS ARTIBUS PERITUS
Check out Age of Datini: European Material Culture 1360-1410
Sean M
Archive Member
Posts: 2392
Joined: Mon Oct 05, 2009 11:24 pm
Location: in exile in Canada

Re: Woodworking Project Diary

Post by Sean M »

Image

Since last post I have hollowed out the center of the shield and started to remove wood from the back. This plank was cut from close to the surface of the tree, so the grain at the edges can be tricky to work with. I am using rasps, files, gouges, chisels, and files to reduce the wood to a circular outline, then using the gouge to remove depth. If I can borrow a drawknife it will probably be good for the final smoothing.
DIS MANIBUS GUILLELMI GENTIS MCLEANUM FAMILIARITER GALLERON DICTI
VIR OMNIBUS ARTIBUS PERITUS
Check out Age of Datini: European Material Culture 1360-1410
Sean M
Archive Member
Posts: 2392
Joined: Mon Oct 05, 2009 11:24 pm
Location: in exile in Canada

Re: Woodworking Project Diary

Post by Sean M »

Image

As you see I have it within a few millimeters of the final outline. Carving the front is tricky because I want to make the same curve all over and its a lot of crossgrain carving. I may make a cardboard template.

So far I have been tending to leave the shield too thick near the edges which is probably good (easier to remove more wood than add it).

The gouge came mirror polished and it works better than any of my other carving tools. I don't know if I should dump some iron oxide on a scrap of leather to buff the edge? I have never sharpened a curved edge before.
DIS MANIBUS GUILLELMI GENTIS MCLEANUM FAMILIARITER GALLERON DICTI
VIR OMNIBUS ARTIBUS PERITUS
Check out Age of Datini: European Material Culture 1360-1410
Sean M
Archive Member
Posts: 2392
Joined: Mon Oct 05, 2009 11:24 pm
Location: in exile in Canada

Re: Woodworking Project Diary

Post by Sean M »

Image

I have carved it enough that I am starting to use sandpaper around a wooden block to smooth out the high spots and blend the curves. I don't think you want a silky-smooth finish, just one which won't look lumpy under the rawhide and painting. I am using 150-grit sandpaper but I suspect that coarser paper would work just fine. I managed to tear the sandpaper wrapped around the first block, maybe I should not have creased the paper?

There is some hard knotwood near the end of one of the seams which I have to work down with the rasp. The gouge wants to skip off it.
DIS MANIBUS GUILLELMI GENTIS MCLEANUM FAMILIARITER GALLERON DICTI
VIR OMNIBUS ARTIBUS PERITUS
Check out Age of Datini: European Material Culture 1360-1410
Sean M
Archive Member
Posts: 2392
Joined: Mon Oct 05, 2009 11:24 pm
Location: in exile in Canada

Re: Woodworking Project Diary

Post by Sean M »

Image
Looking over the shield deciding whether it needs any more sanding. The small gouge marks will probably be invisible under the rawhide and gesso, but there are a few low spots 3 mm below the curve and I may fill them in with hide glue and sawdust.

Once its covered with rawhide I will need 4 nails to hold the straps on. I think it would be best to clench the nails rather than peen them over washers, but I never clenched a broad-headed nail in wood just 10-12 mm thick.
DIS MANIBUS GUILLELMI GENTIS MCLEANUM FAMILIARITER GALLERON DICTI
VIR OMNIBUS ARTIBUS PERITUS
Check out Age of Datini: European Material Culture 1360-1410
Sean M
Archive Member
Posts: 2392
Joined: Mon Oct 05, 2009 11:24 pm
Location: in exile in Canada

Re: Woodworking Project Diary

Post by Sean M »

I had a few minutes today when I did not have the brainspace or light for anything fiddly like fitting scraps into low spots in the small shield. So I tried the big gouge on the awkward side planks of the big round shield. The right tool makes a big difference! For these long curved cuts in the side planks, a big gouge or adze is the right tool and the square chisels and little scorp were wrong.

Image

Bracing the short boards so all the force of the mallet blows does not go into the glued seam is tricky. On the other hand, if I had cut all the boards the same length I would have to remove more wood in the end. And this glued seam never failed.
DIS MANIBUS GUILLELMI GENTIS MCLEANUM FAMILIARITER GALLERON DICTI
VIR OMNIBUS ARTIBUS PERITUS
Check out Age of Datini: European Material Culture 1360-1410
Sean M
Archive Member
Posts: 2392
Joined: Mon Oct 05, 2009 11:24 pm
Location: in exile in Canada

Re: Woodworking Project Diary

Post by Sean M »

Image
Made a batch of casein, carved some planks of the big domed shield, and glued the patches onto the small domed shield. I took a round wooden toothpick and forced some leftover glue into cracks in the glued joints. The glued joints on the small shield are pretty good, the glued joints on the big shield are iffier. Mixing casein glue is an art, you have to judge when the lumps of cheese or curd are sufficiently dissolved in the limewater.

Because the mallet-and-gouge work is rough on the glued joints, I am trying to get the big domed shield carved into close to its final shape before I glue it up one more time. I will saw it from a rectangle into a circle after it is glued, but that does not involve so much pounding.
DIS MANIBUS GUILLELMI GENTIS MCLEANUM FAMILIARITER GALLERON DICTI
VIR OMNIBUS ARTIBUS PERITUS
Check out Age of Datini: European Material Culture 1360-1410
Sean M
Archive Member
Posts: 2392
Joined: Mon Oct 05, 2009 11:24 pm
Location: in exile in Canada

Re: Woodworking Project Diary

Post by Sean M »

The weather is warming up and its time to finish the woodworking. Before I visit the closest leather dealer I have been thinking about how to fasten the two straps to the back of the shield like a separ or dhal. On the small round shield I think I will try the toggle method from Marburg care of Roland Warzecha. It does not require metal cotter pins or figuring out how to clench nails through the quite thin curved wood without splitting the wood.

Image

Would soaked dog-chew rawhide do for the hide? Some people think they do something to the rawhide that can make it brittle, but lots of people have edged shields in dog chews. I could file down a section of dowel or a scrap of hardwood into the toggles.
Last edited by Sean M on Wed Mar 20, 2024 11:49 pm, edited 1 time in total.
DIS MANIBUS GUILLELMI GENTIS MCLEANUM FAMILIARITER GALLERON DICTI
VIR OMNIBUS ARTIBUS PERITUS
Check out Age of Datini: European Material Culture 1360-1410
Sean M
Archive Member
Posts: 2392
Joined: Mon Oct 05, 2009 11:24 pm
Location: in exile in Canada

Re: Woodworking Project Diary

Post by Sean M »

Tonight I had a few minutes in the carport and worked on the ash scabbard core. With the wooden mallet the work goes faster!

I managed to drop the small U.J. Ramelson C gouge and dent the edge. This Paul Sellers video on sharpening large gouges seems pretty good https://youtube.com/watch?v=m-Dy7R8xQBM I don't have any buffing compound, would something like this which is meant for polishing wheels do? https://www.homedepot.ca/product/ryobi- ... 1001764708
DIS MANIBUS GUILLELMI GENTIS MCLEANUM FAMILIARITER GALLERON DICTI
VIR OMNIBUS ARTIBUS PERITUS
Check out Age of Datini: European Material Culture 1360-1410
Sean M
Archive Member
Posts: 2392
Joined: Mon Oct 05, 2009 11:24 pm
Location: in exile in Canada

Re: Woodworking Project Diary

Post by Sean M »

The small Ramelson gouge does not seem as sharp as before, maybe having a leather strop with buffing compound to polish the inside would help. Still interested in comments if the compounds for power buffers would work OK.

It seems like the big 'thigh bone shaped' dog chews are our of fashion (some dogs tear off big chunks and hurt their stomachs eating them) but you can buy packs of smaller thinner rawhide cuts at most shops with pet supplies.

I also have to think about what kind of leather to use for the straps. Iron Age Eurasian leather was probably not much like modern veg tan or chrome tan, it was probably fat cured or alum-tawed and often had a roughened surface. In ancient Europe tanned leather seems to have been mostly an imperial Roman thing. Dan D'Silva has talked about it in various place like https://xerxesmillion.blogspot.com/2023 ... arger.html

Image

Decided to give the third, smallest shield a bit of sanding. I am blocked on begging a ride to the nearest person who sells leather and rawhide.

Image

Removed more wood from the front of one of the edge planks on the big domed shield. The third time I will glue it with hide glue and save the cheese glue for projects without all the pounding at an angle (or until I have a workbench with a solid surface)
DIS MANIBUS GUILLELMI GENTIS MCLEANUM FAMILIARITER GALLERON DICTI
VIR OMNIBUS ARTIBUS PERITUS
Check out Age of Datini: European Material Culture 1360-1410
Sean M
Archive Member
Posts: 2392
Joined: Mon Oct 05, 2009 11:24 pm
Location: in exile in Canada

Re: Woodworking Project Diary

Post by Sean M »

Some chores. Bought a squared 4 sides plank of tilia Americana 'whitewood' with true dimensions 5.5" by 0.75" by 8 feet from Home Depot. Checked around and found a source for rawhide chew toys for scrap rawhide. Soaked and stretched two of the small toys to get rawhide for toggles. At 59 cents each it does not matter that the rawhide may not be the best.

Image

Jan Kohlmorgen said that the holes for the toggles in the heater shield were surprisingly wide, around 1 cm.

Looked into options for bosses. The commercially-available domed bosses tend to be either very narrow or very wide and often have very wide flanges. Some historical bucklers have narrower domes than Viking Age shields (example), and many have shallower domes. It seems like a typical Viking Age boss has a dome about 12-13 cm (5") wide and a total diameter around 14-15 cm (6").

Image

Removed some wood from the side plank of the large domed shield, and cut out two buckler blanks from the whitewood. I am going to try the type of buckler that has a hole with slanted sides and a handle that is curved away from the back of the shield in the middle, so that the hand does not need to fit in the small boss. In the past I have liked shields and bucklers with the grip close to the centre of gravity, but this is a simple project to practice rawhide-edged shields and make something that might be useful to someone other than me.

Most surviving bucklers are either steel or almost covered in steel like the Museum of London BWB83[287]<129> or the Oslo bucklers but art shows many which seem to be painted.

Checked the status of the drills. One of the two electric drills works, great-grandpa's brace and bit has seized up because my father stored it in an unheated shed while he was dying.
DIS MANIBUS GUILLELMI GENTIS MCLEANUM FAMILIARITER GALLERON DICTI
VIR OMNIBUS ARTIBUS PERITUS
Check out Age of Datini: European Material Culture 1360-1410
Sean M
Archive Member
Posts: 2392
Joined: Mon Oct 05, 2009 11:24 pm
Location: in exile in Canada

Re: Woodworking Project Diary

Post by Sean M »

Ordered some of the Indian bosses. There is a local Blacksmithing Association and I might be able to convince someone there to make batches of bosses if I continue with this.

Found and bought some Titebond II which is a water-resistant wood glue with a good reputation. Home Hardware carries it in my city in Canada.

Made a batch of cheese glue from 2% skim milk and glued up three planks of basswood 42 cm (three board-widths) long. This time it was hard to get the milk to curd, perhaps because the available vinegar was the dregs of a different batch.

Used the Titebond II to glue up to 28 cm basswood buckler blanks (two boards in diameter). The number two is because I only have two bar clamps. Mac recommends wiping off the nozzle of the glue bottle when I am done, the dealer recommends storing Titebond upside down so the air bubble and crust are at the bottom of the bottle.
DIS MANIBUS GUILLELMI GENTIS MCLEANUM FAMILIARITER GALLERON DICTI
VIR OMNIBUS ARTIBUS PERITUS
Check out Age of Datini: European Material Culture 1360-1410
Sean M
Archive Member
Posts: 2392
Joined: Mon Oct 05, 2009 11:24 pm
Location: in exile in Canada

Re: Woodworking Project Diary

Post by Sean M »

Image

Image

Traced the outline of the shield, crosscut and chiseled to remove wood from the sides of the boards, chiseled to create a rim and start curving the front of the shield to meet it. I use a mix of mallet strikes and pushing the chisels by hand. Sharpening the chisels helps!

Getting a consistent thickness in the curved walls of the bowl can be a challenge. So can dealing with the way that the carving is at all angles to the grain.

Image

Got two parallel cracks in the wood while removing wood from the front of the rim. Spread the wood, squirted in some PVA glue (Titebond II), spread it into thin areas with a toothpick, squeezed the wood closed, wiped away the excess glue with a wet paper towel, covered it with waxed paper and clamped it.

Looking Ahead to Covering the Shield

I will cover this on both sides with linen or hemp cloth in hide glue like Cennino.

Schilde des spätmittelalters und der frühen Neuzeits usually describes the canvas on shields as "coarse", Cennino says "fine" (panno lino sottile).

Mac posted about the concave surface problem in 2016.
You can pretty much count on the idea that shields are made of wood with a covering of some sort of raw hide and/or strong fabric. In my limited experience (more with saddles than shields) the tricky part is getting the raw hide or fabric to stick to the concave part.

There are two types of problems. The first is that a fabric like linen will shrink when wet. This means that if you put it on dry, it will suck water from your glue and pull away from the concavities. If you wet it first, it will dilute your glue. Perhaps there is a perfect balance that one finds with practice.

Using raw hide or parchment gives the other sort of trouble. As the hide dries, it shrinks. If the glue has not achieved a suitable level of adhesion at that time, the hide will pull away from the concavities.

Most of my experience has been with aliphatic resin glue (Titebond II). This is cheep, available, and water proof, but it has poor initial tack. I have not tried hot hide glue on a large scale. Theoretically, hide glue should work better because of its high initial tack. On the other hand I have seen pics of other guys' projects where hide glue has failed to adhere parchment on the concave surfaces. Perhaps that is the fault of their procedure, rather than their glue... I don't know. In any case, there is no getting around the idea that hide glue is water soluble. This may or may not be a problem in the long run.... I don't know. My suspicion is that cheese glue is a good candidate for this sort of project, but I have not yet experimented with it.
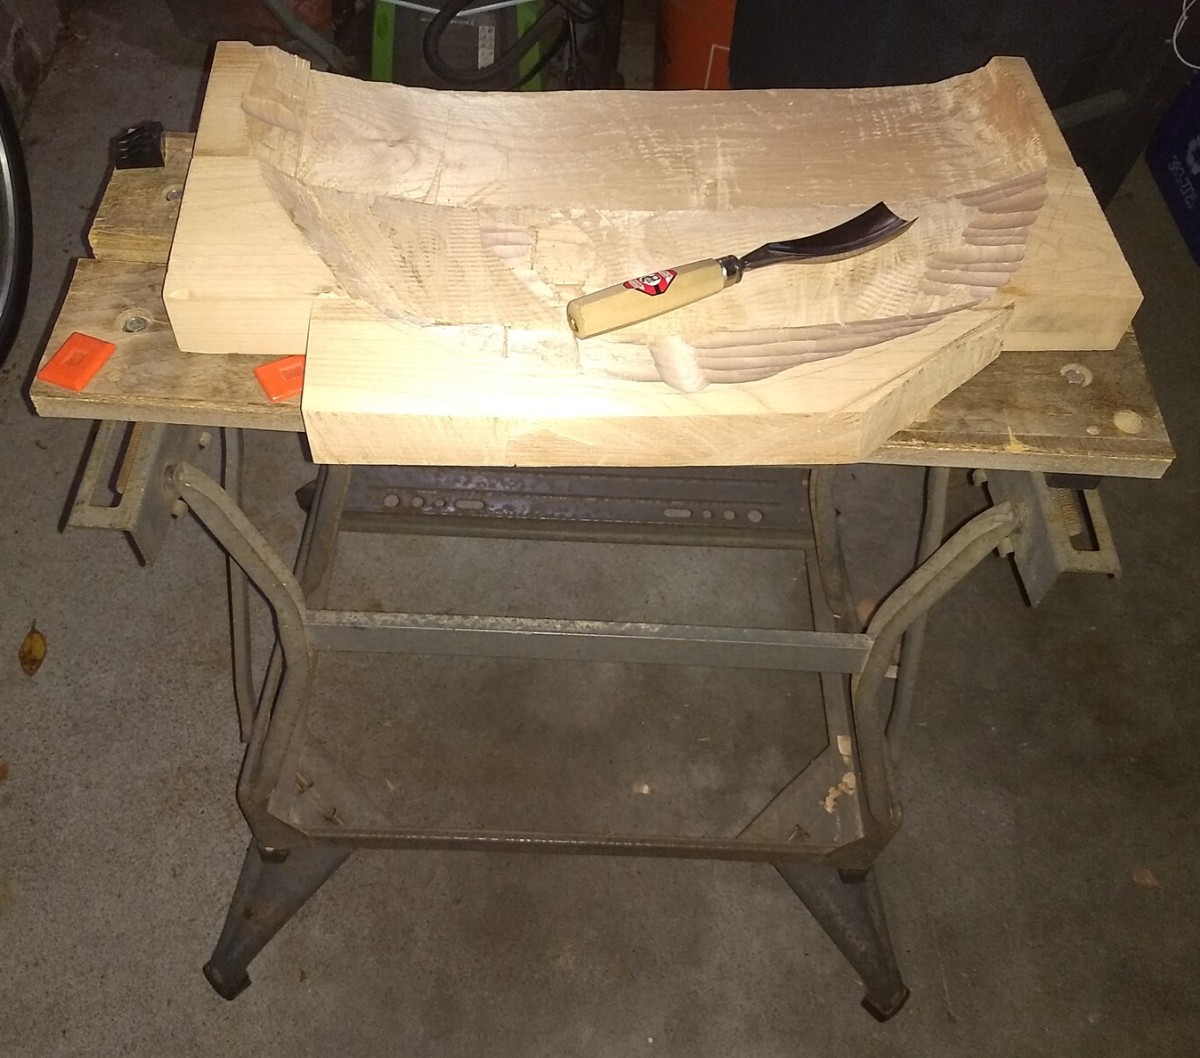
Another thread from 2016 points to JONATHAN THORNTON, "A BRIEF HISTORY AND REVIEW OF THE EARLY PRACTICE AND MATERIALS OF GAP-FILLING IN THE WEST," Journal of the American Institute for Conservation no. 1 (1998) pp. 3-22 https://cool.culturalheritage.org/jaic/ ... 002_2.html Cennino mentions filing gaps with a sawdust-and-hide-glue mix.

Notes

The surviving shield with the toggles is the shield of the Lords of Muschenheim in Marburg from around 1350 (kohlmorgen-mittelalterlicher-ritterschild p. 105)

This wood was labelled as "whitewood" on the receipt and "basswood" (tilia Americana) on the rack and (I think) the bar code stickers. It is very soft and fine-grained so I don't think it is yellow poplar / tulipwood (liriodendron tulipifera).

Image

The eight-pointed Star of Venus is something I could paint. I don't know what colour the ancients thought Venus was (Shamash the Sun with wavy rays wore white, red, and blue) but white with yellow highlights seems plausible. https://www.planetary-astronomy-and-ima ... -spectrum/
Last edited by Sean M on Sun Apr 14, 2024 10:14 pm, edited 3 times in total.
DIS MANIBUS GUILLELMI GENTIS MCLEANUM FAMILIARITER GALLERON DICTI
VIR OMNIBUS ARTIBUS PERITUS
Check out Age of Datini: European Material Culture 1360-1410
Sean M
Archive Member
Posts: 2392
Joined: Mon Oct 05, 2009 11:24 pm
Location: in exile in Canada

Re: Woodworking Project Diary

Post by Sean M »

Image

The major carving is done except along the glue lines. I want to keep the seams strong while I do the heavy hammering and I want to be able to lay the shield flat with either side up.

The fine carving and sanding will not take long.

Next weekend I will cover this on both sides with hide glue and canvas or linen cloth.

I am looking into varnishes that work with the binders I am likely to use. It might not be strictly necessary if I use egg yolk, but the rules of the painters of Venice from the 13th century say that no panel or shield may be sold before it has been varnished.
DIS MANIBUS GUILLELMI GENTIS MCLEANUM FAMILIARITER GALLERON DICTI
VIR OMNIBUS ARTIBUS PERITUS
Check out Age of Datini: European Material Culture 1360-1410
Sean M
Archive Member
Posts: 2392
Joined: Mon Oct 05, 2009 11:24 pm
Location: in exile in Canada

Re: Woodworking Project Diary

Post by Sean M »

Change of plans affected what I could do today and when. Soaked 30 grams of hide glue grains in 480 mL of water for 15 minutes, heated to 70 degrees C in a double boiler, added a bit more granules for strength, and brushed on the hide glue in 6 inch by 6 inch squares, brushing one way with the wet brush to lay down the blue and at right angles with the dry brush to smooth it out and cover any gaps. People today often use low ratios of water to glue like 2:1, D.V. Thompson liked 16:1 for weak size and 10:1 for strong. I wish I had posted what I did with the plywood panel.

Image

The initial hot, dilute coat of size soaks into the wood and prepares it to receive the layers to come. Cennino liked one coat of weak size, two coats of strong size, one layer of canvas strips dipped in size, and two or more coats of gesso.

Thompson liked to wait a day between coats, Cennino just said "let it dry." Neither really goes in to how to cover both sides since painters' panels are often one-sided.

Like a lot of industrial processes, this would be more efficient in batches (make two dozen panels and spend a week of mornings sizing them and gessoing them).

This shield is not as close to round as I would like. I need to work on my skills with a coping saw to keep the cuts perpendicular to the surface of the wood.
DIS MANIBUS GUILLELMI GENTIS MCLEANUM FAMILIARITER GALLERON DICTI
VIR OMNIBUS ARTIBUS PERITUS
Check out Age of Datini: European Material Culture 1360-1410
Post Reply