
Building a historical pavise
Moderator: Glen K
-
Kristoffer

- Archive Member
- Posts: 1697
- Joined: Sat Sep 09, 2000 1:01 am
- Location: Ostersund - Sweden
- Contact:
Building a historical pavise
How was a pavise constructed? Wooden core covered with rawhide? If so, how did they make the channel in the middle?
Kristoffer Metsälä
-
Karen Larsdatter

- Archive Member
- Posts: 3104
- Joined: Mon Dec 29, 2003 2:01 am
- Location: Ashburn, VA
- Contact:
Re: Building a historical pavise
http://www.larsdatter.com/painted-shields.htm has my links on pavises, although the page hasn't been updated in some time. (Might put that on my to-do list for the week, though.)
Materials are listed on pages for a few of the pavises, such as:
http://www.artic.edu/aic/collections/artwork/112136
http://www.artic.edu/aic/collections/artwork/106393
http://www.christies.com/LotFinder/lot_ ... ID=2015520
http://www.christies.com/LotFinder/lot_ ... ID=2015521
http://www.philamuseum.org/collections/ ... 71735.html
http://art.thewalters.org/detail/35179/archers-shield/
Re: Building a historical pavise
You can pretty much count on the idea that shields are made of wood with a covering of some sort of raw hide and/or strong fabric. In my limited experience (more with saddles than shields) the tricky part is getting the raw hide or fabric to stick to the concave part.
There are two types of problems. The first is that a fabric like linen will shrink when wet. This means that if you put it on dry, it will suck water from your glue and pull away from the concavities. If you wet it first, it will dilute your glue. Perhaps there is a perfect balance that one finds with practice.
Using raw hide or parchment gives the other sort of trouble. As the hide dries, it shrinks. If the glue has not achieved a suitable level of adhesion at that time, the hide will pull away from the concavities.
Most of my experience has been with aliphatic resin glue (Titebond II). This is cheep, available, and water proof, but it has poor initial tack. I have not tried hot hide glue on a large scale. Theoretically, hide glue should work better because of its high initial tack. On the other hand I have seen pics of other guys' projects where hide glue has failed to adhere parchment on the concave surfaces. Perhaps that is the fault of their procedure, rather than their glue... I don't know. In any case, there is no getting around the idea that hide glue is water soluble. This may or may not be a problem in the long run.... I don't know. My suspicion is that cheese glue is a good candidate for this sort of project, but I have not yet experimented with it. The problem is that one can either make it them selves by following Theophilus' recipe, or buy it in industrial quantities. It's has not been available in conveniently packaged quantities (at least here in the US) since the mid 20th C.
As far as construction is concerned..... I have seen a couple of examples of modern guys building up the shape of the pavise in layers. With good joinery, this should be pretty strong. My suspicion is that our ancestors would have just cut it out of one piece of wood, but I really don't know.
Mac
Robert MacPherson
The craftsmen of old had their secrets, and those secrets died with them. We are not the better for that, and neither are they.
http://www.lightlink.com/armory/
http://www.billyandcharlie.com
https://www.facebook.com/BillyAndCharlie
The craftsmen of old had their secrets, and those secrets died with them. We are not the better for that, and neither are they.
http://www.lightlink.com/armory/
http://www.billyandcharlie.com
https://www.facebook.com/BillyAndCharlie
Re: Building a historical pavise
Pavise...a subject near and dear to my - and my squire's - heart. I'll start with "good luck".
Historically they appear to be constructed out of a single piece of wood. There's a guy in Poland who built one this way:
http://dregowia.blogspot.com/2010/08/pa ... proba.html
I've built a couple for SCA use with limited success. I built my first one out of three pieces of wood for the channel, and then two more for the wings. An important thing to mention here is that you absolutely must construct a solid handle (unlike what you see in the picture) shaped as a capital I, spanning the channel, to give the wings support...or else a wing pops off.
I covered mine with canvas, using a fairly standard watered down wood-glue process you can find all over the internet.
I have one that was built out of aluminum by Niccolo who may, or may not, still be on the board. It is somewhat heavy, but it's "correct", and that's what I was looking for. According to the armors I've spoken to, including Master Cet, you can't really press it out of aluminum unless the aluminum is soft to begin with and then hardened.
There is someone in Trimeris offering them out of plastic that my squire picked up, which can then be covered with fabric, and those can't stand the beating - at least not in my part of the world. The aluminum hand-me-down he got from Niccolo is having it's edges slowly curl on him.
So, my advice:
- if you're building it out of wood, it's going to be a fine line between "light" and "strong"
- make sure you support the wings
Good luck! Can't wait to see your results.
"All it takes for evil to triumph is for good men to do nothing."
-
Kristoffer
- Archive Member
- Posts: 1697
- Joined: Sat Sep 09, 2000 1:01 am
- Location: Ostersund - Sweden
- Contact:
Re: Building a historical pavise
I have a friend who has put a lot of time and energy into researching period shield construction and he has made shields with wood, parchment rawhide, homemade glue, homemade paint, etc. The shields have been used in SCA combat with great results. His idea is that the shield is not a wood shield with rawhide cover, but a rawhide shield with a wooden "skeleton".
I have not researched the matter, I will consult him when it is time to build it.
For medevial shields (he has also done "viking" shields but they are constructed differently) he uses two layers of wood with different directions, sandwiched and glued together with parchment rawhide stretched and glued to it all the way around. This would be a problem with the pavise because of the middle section.
Best option right now is to use three wood pieces to make the middle section but that would remove the strength the crossed layers of wood give. Other option is to try to build a press and steam shape wood but that seems like a lot of work and it is questionable if this would be a period method.
It seems like a number of these shields have survived. Someone should hold the answer to how they are constructed..
Kristoffer Metsälä
Re: Building a historical pavise
Maybe yes, and maybe no. What you need to see is a pavise whose covering is in such bad shape that the woodwork is clearly exposed.Xtracted wrote:
It seems like a number of these shields have survived. Someone should hold the answer to how they are constructed..
Carlo P. collects pavises, and if anyone knows about a specimen in that condition, it will be he. You might drop him a note and see if he can shed some light on the matter.
Mac
Robert MacPherson
The craftsmen of old had their secrets, and those secrets died with them. We are not the better for that, and neither are they.
http://www.lightlink.com/armory/
http://www.billyandcharlie.com
https://www.facebook.com/BillyAndCharlie
The craftsmen of old had their secrets, and those secrets died with them. We are not the better for that, and neither are they.
http://www.lightlink.com/armory/
http://www.billyandcharlie.com
https://www.facebook.com/BillyAndCharlie
Re: Building a historical pavise
"Success consists of getting up just one more time than you fall."
-
Kel Rekuta
- Archive Member
- Posts: 1588
- Joined: Thu Apr 29, 2004 11:01 am
- Location: Toronto Canada
Re: Building a historical pavise
I wish Thomas Hayman published the mountain of research he did on existing pavises in the mid 2000's. He collected just about everything in print about them.
One thing I recall is the number of examples of pavise gutters hollowed from single poles using an adze. Much stronger than multi-piece construction when feasible. Also the majority of surviving pavises have coarse textile under multiple glue and gesso layers over linden wood.
One thing I recall is the number of examples of pavise gutters hollowed from single poles using an adze. Much stronger than multi-piece construction when feasible. Also the majority of surviving pavises have coarse textile under multiple glue and gesso layers over linden wood.
-
Christian Wiedner

- Archive Member
- Posts: 263
- Joined: Wed Mar 18, 2009 7:33 pm
- Location: Germany
- Contact:
Re: Building a historical pavise
This thread might be of interest. Especially the postings of Mike G. starting on the bottom of page 6...
http://myarmoury.com/talk/viewtopic.php ... se&start=0
http://myarmoury.com/talk/viewtopic.php ... se&start=0
-
Kristoffer
- Archive Member
- Posts: 1697
- Joined: Sat Sep 09, 2000 1:01 am
- Location: Ostersund - Sweden
- Contact:
-
Tom B.
- Archive Member
- Posts: 4532
- Joined: Mon Oct 17, 2005 4:15 am
- Location: Nicholasville, KY
- Contact:
Re: Building a historical pavise
Do you know Stefan Hanson?
He has done quite a bit of study and work on these.
First Photo in Flickr Documentation
Flickr Photostream with some extant examples


He has done quite a bit of study and work on these.
First Photo in Flickr Documentation
Flickr Photostream with some extant examples
Here are a couple of examples of his reconstructions:From Facebook post wrote:Hello ! I have finally finished writing a documentation of reconstructing a couple of crossbowmen´s pavises in authentic materials. Here is a a somewhat confused photostream
https://www.flickr.com/photos/23237388@N06/…
And the text :
Most paveses were constructed of ash, linden or poplar in a size around 60 cm wide and 130 cm tall. There were also smaller paveses for carrying on the back while turning and loading your crossbow and handheld smaller ones and even smaller ones attached to a mounted men at arms´ armour. Their origin seems to be from Slavic types. This reconstruction tries to be one for a central European crossbowman meant to be carried on his back. I certainly do not claim to have made a perfect reconstruction. I have used only authentic materials though.
The shield consists of three planks reinforced with dowels and glued with casein glue, the only known waterproof medieval glue. In the 12th century it was even called “shield glue”. Pavese carriers were paid the double of the crossbowmen, it was apparantly a very dangerous work to run forward in front of the line of soldiers and erect a protecting shieldwall. The pavisemakers themselves were quite well paid. The finishing of the pavises was made by another guild of craftsmen. The painters in Prague complained that the pavisemakers tried to paint the motifs themselves. One thing is important to stress. A shield must not be thought of as a wooden object covered with cloth or leather but instead a sandwich construction where the different materials support each other for strength and resilience. Naked wood will split without a tough skin. Shields like these were never clad in metal and had no metal rim. Coarse fabric, presumably hemp, is glued with hide glue on both front and back. Sometimes thin rawhide is used on the back for a more durable surface where the surface rubs against the wearers armour. There were no fixed method sometimes the paveses had two layers of fabric on the front or a layer of thin rawhide aswell then covered with fabric. On the front several layers (4-6 depending on the thickness ) were brushed on and sanded/scraped down to get an even surface. When even, this surface was painted in tempera colour (egg yolk, linseed oil ,water, pigment ). Sometimes this paint, which is very durable in itself, was protected with a layer of resin varnish made of damar. The back was very often painted dark brown with a black border. Riveted on the back there was a handle in a T-shape made from a strong sinew. As I could not get hold on one I had to resort to rawhide. There is no evidence of rope being used. There are also cramps for the carrying leatherstraps with their points bent down on the front and then covered with gesso.
In my reconstruction I used 1 part hide glue to 10 parts water heated to 50 degrees in a 500 ml pot swimming in a water bath in a separate cooking pot . Chalk was sifted into the smaller pot until the water did not soak up more chalk ( c:a 750 grams ) .Carefully stirred to avoid bubbles getting trapped. The gesso then has the consistency of cream and was to paint the 90 cm tall pavise on the back and front. As the gesso adds quite a lot of weight I would recommend a thickness of the wood not more than 12-14 mm. According to an Islandic manuscript about wooden sculptures the dry surface was then scraped with a tool to get rid of unevenness. Then it was sanded with sharkskin and sanding grass ( a grass with a lot of silica in )Then the parts that were supposed to be gilt or silvergilt were prepared with eggwhite. The silver could be brushed with virgin tar ( the first tar appearing from the production..thin and ambercolored ) to look like gold. Then those parts supposed to be painted would first get a layer of eggwhite then a layer of leadwhite pigment in linseedoil.
I have seen quite a few reconstructions of paveses on forums the last ten years. Even though some have good shapes most lack the medieval look in the decoration. I cannot stress this too much...the originals were painted by painters…not the pavise makers themselves ! Buy the service of someone with that skill like you would do with a sword or a helmet. Someone able to capture the medieval “hand”. Above all…study originals and copy the style of them. When doing the woodwork, try also to copy the subtle shapes and curvatures of the originals. Again, study the originals !
The beak of the tall ones,
the slightly thinned edges,
the convex curves in the top and sides and bottom,
the angle and curvature of the the central wooden panel,
the shape of the back of the central panel with the removed material,
the preserved handles.
Remember, the originals were made according to the demanding quality of Guilds and not by the local carpenter down the road.
Last but not least. Scale! Make pavese reconstructions 10-15 cm taller than the originals as normal people today are 10-15 cm taller. My guess is that the eagle beak was meant to rest the crossbow tiller on, therefore the height of the pavese must correspond with that of the shooter. In the future I hope to build also a couple of that kind of pavese. The system of how the straps for carrying were constructed is also something that must be reconstructed. Stefan Hansson 2015
Re: Building a historical pavise
Stef Hanson is Da' Man!
I had never heard that the handles should be tendon, but these pics certainly lend credence to that.

Ungulate leg tendons have a natural split that would work nicely here. This video shows how to prepare cattle tendon for bows, https://www.youtube.com/watch?v=RWKGaPnYZK4 but you can see the shape quite clearly. They should be available from your local butcher who serves ethnic markets.
Mac
I had never heard that the handles should be tendon, but these pics certainly lend credence to that.
Ungulate leg tendons have a natural split that would work nicely here. This video shows how to prepare cattle tendon for bows, https://www.youtube.com/watch?v=RWKGaPnYZK4 but you can see the shape quite clearly. They should be available from your local butcher who serves ethnic markets.
Mac
Robert MacPherson
The craftsmen of old had their secrets, and those secrets died with them. We are not the better for that, and neither are they.
http://www.lightlink.com/armory/
http://www.billyandcharlie.com
https://www.facebook.com/BillyAndCharlie
The craftsmen of old had their secrets, and those secrets died with them. We are not the better for that, and neither are they.
http://www.lightlink.com/armory/
http://www.billyandcharlie.com
https://www.facebook.com/BillyAndCharlie
-
tiredWeasel
- Archive Member
- Posts: 339
- Joined: Sun Mar 01, 2015 5:21 pm
- Location: the hills near Nuremberg, Germany
Re: Building a historical pavise
What about this one?

Found it via Larsdatters page (the link was defunct, I just searched the page I was directed to...).
Looks like a 4-board construction.
Found it via Larsdatters page (the link was defunct, I just searched the page I was directed to...).
Looks like a 4-board construction.
-
Jeff J
- Archive Member
- Posts: 9181
- Joined: Tue Aug 22, 2000 1:01 am
- Location: Adrift Just Off the Islets of Langerhans: Latitude N 39° 2' 55.3, Longitude W 104° 48' 50.4
Re: Building a historical pavise
Theeeeere we go. I suspect there were as many "valid" methods, but it's nice to have one refereanceable.
BONANZA!!!
-
Kristoffer
- Archive Member
- Posts: 1697
- Joined: Sat Sep 09, 2000 1:01 am
- Location: Ostersund - Sweden
- Contact:
Re: Building a historical pavise
Interesting!
Do we have any artwork showing pavise shields in use?
Do we have any artwork showing pavise shields in use?
Kristoffer Metsälä
Re: Building a historical pavise
Actually, from that picture you can't tell if it's 4 boards or really 3 with the middle piece split from age at its weakest point. I would consider 3 boards the more likely since I doubt they would build it with a joint at its thinnest point.tiredWeasel wrote: Looks like a 4-board construction.
-
tiredWeasel
- Archive Member
- Posts: 339
- Joined: Sun Mar 01, 2015 5:21 pm
- Location: the hills near Nuremberg, Germany
Re: Building a historical pavise
It looks like both parts of the rib where made from quartered logs.
This method would make a proper joint actually stronger than a single board.
It may be a single board but I find that improbable (though not impossible).
Xtracted:

(The Hague KB, 72 A 25 - Froissart, Chroniques - Folio 135r)

(ZBZ Rh. hist. 33b Kriegstechnik -Folio 81v)
€dit: Both manuscripts show more pavises ans are far from the only one I found.
This method would make a proper joint actually stronger than a single board.
It may be a single board but I find that improbable (though not impossible).
Xtracted:
(The Hague KB, 72 A 25 - Froissart, Chroniques - Folio 135r)
(ZBZ Rh. hist. 33b Kriegstechnik -Folio 81v)
€dit: Both manuscripts show more pavises ans are far from the only one I found.
-
Kristoffer
- Archive Member
- Posts: 1697
- Joined: Sat Sep 09, 2000 1:01 am
- Location: Ostersund - Sweden
- Contact:
Re: Building a historical pavise
That first picture is pretty interesting. Are they ramming the gate? Looks like the fellow in pink is helping with a ram. The guy in red is just holding att small pavise, no weapon. I assume he is protecting the fellow in pink. My favourite is the man in blue shooting with an invisible bow..or just showing off his bicep..
Or someone left him hanging for a fist bump before the battle..
It is nice to see that the crossbowman in blue brought his personal coach with him to the battle, giving him comfort and support while shooting..
[Edit] Holy crap, I just noticed that the defenders have a rock hurling armoured giant!
Or someone left him hanging for a fist bump before the battle..
It is nice to see that the crossbowman in blue brought his personal coach with him to the battle, giving him comfort and support while shooting..
[Edit] Holy crap, I just noticed that the defenders have a rock hurling armoured giant!
Last edited by Kristoffer on Tue Jan 19, 2016 6:12 pm, edited 2 times in total.
Kristoffer Metsälä
-
Jeff J
- Archive Member
- Posts: 9181
- Joined: Tue Aug 22, 2000 1:01 am
- Location: Adrift Just Off the Islets of Langerhans: Latitude N 39° 2' 55.3, Longitude W 104° 48' 50.4
Re: Building a historical pavise
It really doesn't matter much if that is a one-piece channel or two. A piece shaped like that, with grain running that way, made of linden or European poplar, is going to be very weak across that thin spot. But it doesn't matter! The strength of the shield isn't in the wood across it's width - it's in the covering materials. The wood provides the structure and the covering the strength. And really, the function of a pavaise isn't to absorb blows on the side and be durable over dozens or hundreds of fights, as is the case with SCA applications. It's to stand up, maybe support the weight of a crossbow, absorb arrows during a limited time, and if it gets beat up or busted, you get another.
BONANZA!!!
-
Jeff J
- Archive Member
- Posts: 9181
- Joined: Tue Aug 22, 2000 1:01 am
- Location: Adrift Just Off the Islets of Langerhans: Latitude N 39° 2' 55.3, Longitude W 104° 48' 50.4
Re: Building a historical pavise
Xtracted wrote:That first picture is pretty interesting. Are they ramming the gate? Looks like the fellow in pink is helping with a ram. The guy in red is just holding att small pavise, no weapon. I assume he is protecting the fellow in pink. My favourite is the man in blue shooting with an invisible bow..or just showing off his bicep..
Or someone left him hanging for a fist bump before the battle..
It is nice to see that the crossbowman in blue brought his personal coach with him to the battle, giving him comfort and support while shooting..
[Edit] Holy crap, I just noticed that the defenders have a rock hurling armoured giant!
The guy in the back is giving the xbowman in blue in front of him the Joe Biden treatment. Xbowman is uncomfortable....
BONANZA!!!
Re: Building a historical pavise
"Now, Henri, remember to keep your bow horizontal. It will help your accuracy immeasurably! Don't worry about how it looks, the artist will correct that."Xtracted wrote: It is nice to see that the crossbowman in blue brought his personal coach with him to the battle, giving him comfort and support while shooting..
Mac
Robert MacPherson
The craftsmen of old had their secrets, and those secrets died with them. We are not the better for that, and neither are they.
http://www.lightlink.com/armory/
http://www.billyandcharlie.com
https://www.facebook.com/BillyAndCharlie
The craftsmen of old had their secrets, and those secrets died with them. We are not the better for that, and neither are they.
http://www.lightlink.com/armory/
http://www.billyandcharlie.com
https://www.facebook.com/BillyAndCharlie
-
Kristoffer
- Archive Member
- Posts: 1697
- Joined: Sat Sep 09, 2000 1:01 am
- Location: Ostersund - Sweden
- Contact:
Re: Building a historical pavise
It is peculiar how they painted crossbows isn't it.
Looks like the red crossbowman behind him is a leftie.
Looks like the red crossbowman behind him is a leftie.
Kristoffer Metsälä
Re: Building a historical pavise
It's even weirder that that. When they depicted a crossbow from the top, they showed the trigger sticking out the side. Realistic perspective just wasn't a big concern for them. It was more important to be able to see the important parts and their characteristic shapes. Their art was more symbolic than representational, and that's what gives it its inimitable charm and simple power.Xtracted wrote:It is peculiar how they painted crossbows isn't it.
Sometimes I wish I could draw like that, but I just can't let myself do it. We are all products of our times.
Mac
Robert MacPherson
The craftsmen of old had their secrets, and those secrets died with them. We are not the better for that, and neither are they.
http://www.lightlink.com/armory/
http://www.billyandcharlie.com
https://www.facebook.com/BillyAndCharlie
The craftsmen of old had their secrets, and those secrets died with them. We are not the better for that, and neither are they.
http://www.lightlink.com/armory/
http://www.billyandcharlie.com
https://www.facebook.com/BillyAndCharlie
Re: Building a historical pavise
A splendid find, Mr. Weasel!tiredWeasel wrote:What about this one?
Found it via Larsdatters page (the link was defunct, I just searched the page I was directed to...).
Looks like a 4-board construction.
This is really tantalizing. It's pretty clear that the central channel is glued to the curved side pieces, but at this resolution we can't tell much more.
The line in the middle of the channel is suspiciously well centered and deliberate looking. It might be a seam that's letting go, or it might be a superficial mark that indicated the center line. Without a denser image, we can't really draw more conclusions.
If we had an image that showed the wood grain, we would know a lot more. I tried to find a bigger image, but had no success.
Mac
Robert MacPherson
The craftsmen of old had their secrets, and those secrets died with them. We are not the better for that, and neither are they.
http://www.lightlink.com/armory/
http://www.billyandcharlie.com
https://www.facebook.com/BillyAndCharlie
The craftsmen of old had their secrets, and those secrets died with them. We are not the better for that, and neither are they.
http://www.lightlink.com/armory/
http://www.billyandcharlie.com
https://www.facebook.com/BillyAndCharlie
-
Jeff J
- Archive Member
- Posts: 9181
- Joined: Tue Aug 22, 2000 1:01 am
- Location: Adrift Just Off the Islets of Langerhans: Latitude N 39° 2' 55.3, Longitude W 104° 48' 50.4
Re: Building a historical pavise
It may be glued, or nailed at an angle, or both - hard to tell.Mac wrote: It's pretty clear that the central channel is glued to the curved side pieces, but at this resolution we can't tell much more.
The line in the middle of the channel is suspiciously well centered and deliberate looking. It might be a seam that's letting go, or it might be a superficial mark that indicated the center line. Without a denser image, we can't really draw more conclusions.
If we had an image that showed the wood grain, we would know a lot more. I tried to find a bigger image, but had no success.
Mac
I THINK I see grain in the upper left of the left channel board, and it seems to be too small of an arc to be part of a tree that a single board that width came from.
Also, the flat board on the right COULD be more than one board, with a good join that isn't showing a joint. Again - higher rez imaged required to be certain.
BONANZA!!!
-
Jeff J
- Archive Member
- Posts: 9181
- Joined: Tue Aug 22, 2000 1:01 am
- Location: Adrift Just Off the Islets of Langerhans: Latitude N 39° 2' 55.3, Longitude W 104° 48' 50.4
Re: Building a historical pavise
Link says it's at the Cluny. The staff there has been helpful in the past, letting people look through their archives. Couldn't hurt for one of us to ask.
(wonders if I have a better photo of at least the face of this one at home.)
(wonders if I have a better photo of at least the face of this one at home.)
BONANZA!!!
-
Tom B.
- Archive Member
- Posts: 4532
- Joined: Mon Oct 17, 2005 4:15 am
- Location: Nicholasville, KY
- Contact:
Re: Building a historical pavise
The biggest image I have found is the one I linked to before from Stefan's Flickr PageMac wrote: If we had an image that showed the wood grain, we would know a lot more. I tried to find a bigger image, but had no success.
Mac
Original (1632 x 1224)
https://www.flickr.com/photos/23237388@ ... 9/sizes/o/
-
tiredWeasel
- Archive Member
- Posts: 339
- Joined: Sun Mar 01, 2015 5:21 pm
- Location: the hills near Nuremberg, Germany
Re: Building a historical pavise
Xtracted, I think they are holding weapons (in the first picture) but *someone* messed up while coloring :p
Behind the attackers are enough polearms for everybody but noone seems to hold them.
Behind the attackers are enough polearms for everybody but noone seems to hold them.
-
Len Parker
- Archive Member
- Posts: 624
- Joined: Sat Sep 25, 2010 7:47 pm
-
Tom B.
- Archive Member
- Posts: 4532
- Joined: Mon Oct 17, 2005 4:15 am
- Location: Nicholasville, KY
- Contact:
Re: Building a historical pavise
Here are various articles I have collected over the years on extant pavises.
Google Drive Folder - Pavise Articles
Google Drive Folder - Pavise Articles
-
Johann ColdIron

- Archive Member
- Posts: 7421
- Joined: Mon Mar 03, 2003 2:01 am
- Location: Raleigh, NC
Re: Building a historical pavise
The center boards may have also started life as a single stick of molding profile. Cut in half and fitted together at their respective thin edges. Looks to have some taper but that would be easy to accomplish by setting the two pieces together in mirror, IE- ][ and planing down one end of both simultaneously before the glue up.Jeff J wrote:It may be glued, or nailed at an angle, or both - hard to tell.Mac wrote: It's pretty clear that the central channel is glued to the curved side pieces, but at this resolution we can't tell much more.
The line in the middle of the channel is suspiciously well centered and deliberate looking. It might be a seam that's letting go, or it might be a superficial mark that indicated the center line. Without a denser image, we can't really draw more conclusions.
If we had an image that showed the wood grain, we would know a lot more. I tried to find a bigger image, but had no success.
Mac
I THINK I see grain in the upper left of the left channel board, and it seems to be too small of an arc to be part of a tree that a single board that width came from.
Also, the flat board on the right COULD be more than one board, with a good join that isn't showing a joint. Again - higher rez imaged required to be certain.
Seems a little tenuous of a joint but it may have reinforcements we cannot see and the covering would help support the joint.
John Cope/ Sir Johann ColdIron, Master- Order of the Laurel
I'm not dead yet!
I'm not dead yet!
Re: Building a historical pavise
Jan Kohlmorgen figured out a trick for bowed shields. He pins a layer of wet parchment to the front of the shield, hair-side-to-wood. After it dries, he transfers it to the back of the shield, flesh-side-to-wood. I imagine that it would still change shape a bit in the gluing, but probably not as violently as rawhide which has just come out of a tank of water.
He may skip the stage of gluing the parchment to the wood, I have to read further.
Cennini coats the panel in size (glue) before he brushes on the gesso. Theophilius does not mention this extra step. I don't know if it would help keep the gesso attached to shields when rude people strike them and thrust them. It feels intuitive that gesso would stick better to a linen-covered panel than a rawhide-covered panel, but I don't know if anyone has experimented.
DIS MANIBUS GUILLELMI GENTIS MCLEANUM FAMILIARITER GALLERON DICTI
VIR OMNIBUS ARTIBUS PERITUS
Check out Age of Datini: European Material Culture 1360-1410
VIR OMNIBUS ARTIBUS PERITUS
Check out Age of Datini: European Material Culture 1360-1410
Re: Building a historical pavise
I keep forgetting to post this stained glass window of a man making a jousting targe.
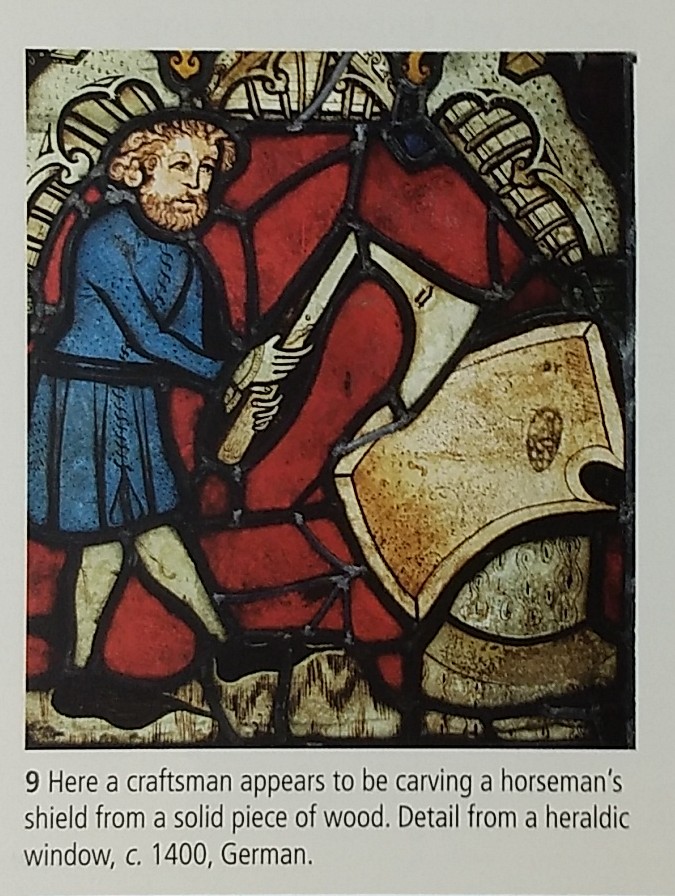
Glasgow Museums, inventory number e.1939.65.ai as printed in Toby Capwell, The Real Fighting Stuff (Glasgow 2007) p. 35. They think its German and from circa 1400.
He is shaping the shield with an axe after its roughly 'shield shaped' but that does not answer whether he started with a big block then removed a lot of material or glued several smaller timbers together then removed a little material. The Bronze Age Irish wooden shields are made by carving down a giant block of wood into a centergrip shield with an integral boss.
DIS MANIBUS GUILLELMI GENTIS MCLEANUM FAMILIARITER GALLERON DICTI
VIR OMNIBUS ARTIBUS PERITUS
Check out Age of Datini: European Material Culture 1360-1410
VIR OMNIBUS ARTIBUS PERITUS
Check out Age of Datini: European Material Culture 1360-1410
Re: Building a historical pavise
beuing-augustyn-eds-schilde has a chapter by Christian Kaiser, Ronja Emmerich, and Krista Profaniter called "Original oder Replik? Kunsttechnologische Untersuchung zur Authentifizierung von drei sogennanten Klausner Pavesen." There are at least 61 pavises said to belong to a group of 59 pavises with the red, white, and red arms of Austria sold by the town of Klausens in South Tirol before WW I. Clearly some are not authentic or not from this collection (especially since some of the pavises are probably in secretive private collections). Two pavises which they think are most likely authentic were made of two boards for the flat part of the shield and one for the 'trough' and 'beak' fastened together with dowels.Mac wrote: ↑Wed Jan 06, 2016 10:35 am As far as construction is concerned..... I have seen a couple of examples of modern guys building up the shape of the pavise in layers. With good joinery, this should be pretty strong. My suspicion is that our ancestors would have just cut it out of one piece of wood, but I really don't know.
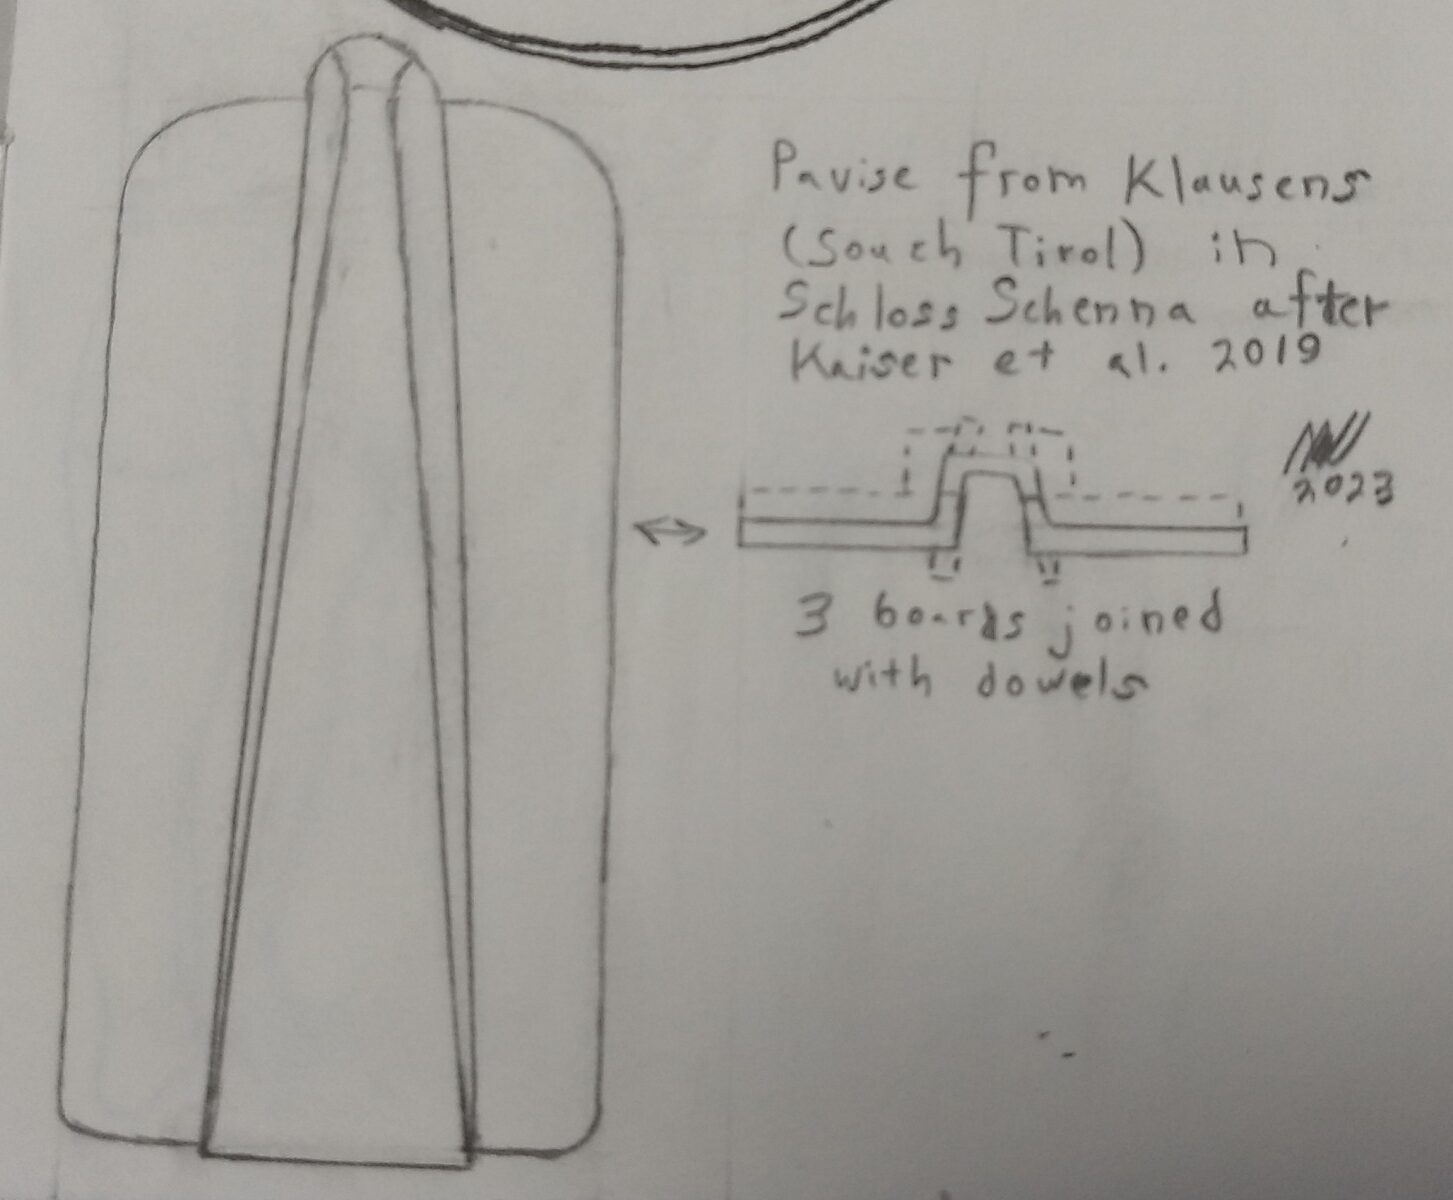
Just because these pavises were made this way does not mean that every pavise was made like this. I would expect that the 'dugout' approach was more common for small shields like jousting targets.
DIS MANIBUS GUILLELMI GENTIS MCLEANUM FAMILIARITER GALLERON DICTI
VIR OMNIBUS ARTIBUS PERITUS
Check out Age of Datini: European Material Culture 1360-1410
VIR OMNIBUS ARTIBUS PERITUS
Check out Age of Datini: European Material Culture 1360-1410