Page 1 of 1
My Birka (Viking) Purse Reconstruction
Posted: Mon Jan 31, 2005 11:59 pm
by T. Finkas
I powered through this project this afternoon & evening and I am very happy with it. It represents a rough prototype that I plan to render more carefully the second time.
See finished photos and in-progress photos farther down on this page.
Cheers,
Tim
Posted: Tue Feb 01, 2005 12:11 am
by D. Sebastian
Very nice.
It gives me some ideas for my auth-card holder project!
Posted: Tue Feb 01, 2005 12:18 am
by Gerhard von Liebau
Hey Timothy,
If you think that that might be useful for a Varangian personna, and you don't have anything to do with it after you make the second one, lemme' know! I really, really like that!
-Gregory-
Posted: Tue Feb 01, 2005 12:27 am
by T. Finkas
D. Sebastian wrote:Very nice.
It gives me some ideas for my auth-card holder project!
Yeah, it won't hold much more than that!

I think it will handle a driver's license, credit card, a car key, and some small change...that's about it!
Gregory J. Liebau wrote:Hey Timothy,
If you think that that might be useful for a Varangian personna, and you don't have anything to do with it after you make the second one, lemme' know! I really, really like that!
-Gregory-
Thanks, Gregory. It would probably be okay for your personna if you came from Sweden or traded with folks from there. You might be better off with the "Eastern" style instead. It is a more traditional rectangular shape with a long front flap. I'll try making one of those before too long.
------------------------
Cheers,
Tim
Posted: Tue Feb 01, 2005 12:30 am
by D. Sebastian
StudBuckle wrote:Yeah, it won't hoild much more than that! I think it will handle a driver's license, credit card, a car key, and some small change...that's about it!
That, a 6 pack, and a condom will get ya crashspace at Pennsic!

Posted: Tue Feb 01, 2005 12:42 am
by Gerhard von Liebau
That, a 6 pack, and a condom will get ya crashspace at Pennsic!
Why do I sometimes feel as though I'm getting into the wrong "Noble" sport, here? Haha...
Thanks, Gregory. It would probably be okay for your personna if you came from Sweden or traded with folks from there. You might be better off with the "Eastern" style instead. It is a more traditional rectangular shape with a long front flap. I'll try making one of those before too long.
Hey Tim, I'd probably be more Eastern based than this particular bag would make me seem... I've been meaning to talk to you about a couple of buckles and some other stuff for my Living History Personna (not goin' to use anything fancy on the SCA field, of course!). I'll drop you a PM sometime about it, as I'd be interested in having you do the castings for a buckle or two, as well as a couple of strap ends, a necklace pendant, and maybe a ring...
Also, I'll add a bag to that list, if you're willing to do any of it! Appropriate reimbursement would of course be made!
Cheers!
-Gregory-
Posted: Tue Feb 01, 2005 8:39 am
by T. Finkas
I based my purse on the info found at this site:
http://www.vikingsna.org/translations/moneybags/
(BTW, thanks again for the link Halvgrim!)
Let me take you through my process in making this thing:
[img]http://img.photobucket.com/albums/v87/finkas/BirkaPouchColor.jpg[/img]
My first rendering, based on elements of 2 different purses found at Birka (9th century?).
[img]http://img.photobucket.com/albums/v87/finkas/BirkaPurse-Plan.jpg[/img]
I took one of the archeologist's drawings into Macromedia Freehand and made a line drwing of what I wanted to accomplish, at size. I used this drawing as a series of patterns.
[img]http://img.photobucket.com/albums/v87/finkas/BirkaPurseA.jpg[/img]
First I used Spraymount to glue the patterns to some thin sheet brass. After cutting out the pieces with snips, I used a small punch to dimple in the dot pattern, working from the back side and using the dots on the paper pattern as a guide. I followed up with a flat wood chisel to define lines, borders and areas.
[img]http://img.photobucket.com/albums/v87/finkas/BirkaPurseB.jpg[/img]
Left: a better view of the "pearling" process; I'm working on the horizontal flap "keeper." Right: all the main pieces with the decoration work completed.
[img]http://img.photobucket.com/albums/v87/finkas/BirkaPurseC.jpg[/img]
Left: checking the brass pieces for fit against the pattern. Right: starting the leather body of the purse.
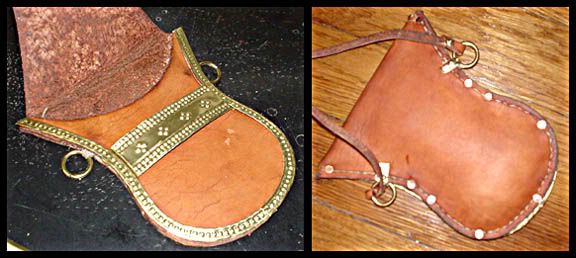
Left: the purse with the brass strips laid in position. Right: a finished view of the back.
Note that while the original purses use an undecorated strip of metal on the back to rivet through, I decided to save myself a little work on this protoype by using copper tacks as rivets, placing the tack head on the back side. I was too impatient to finish this project so I decided to leave off the tooling on the leather.
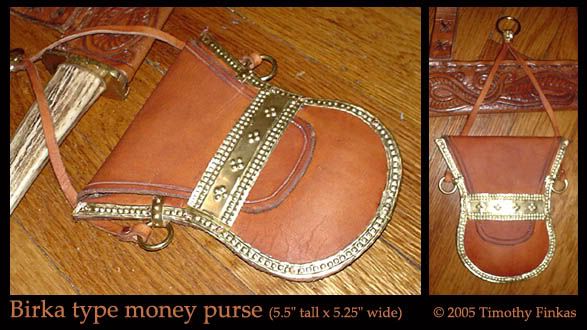
Once again, the finished piece. The original had the hanging loops as integral to the front brass side strips but I couldn't decide quite how to work that so I sewed rings on instead. When I was almost done, I thought the rings needed something more to look finished so I added a riveted-on band of "pearled" brass to secure the rings.
The last step was to oil the leather thoroughly, and construct a suspension. Typically I would sew the ends of the thongs around the rings or use knots, but since I was having so much fun riveting with the copper tacks, I used the latter method to hold them together. I added a further "pearled" brass strip around the top to secure the thongs to the upper ring.
Whew! I think it's done...maybe I'll buff the brass up a little and try and wax the sides of the leather a little smoother. But essentially, it is done. Perhaps the next project will be a matching scabbard for my scramseax?
Cheers,
Tim
Posted: Tue Feb 01, 2005 4:19 pm
by Akmatov
Thanks for sharing how you did this is such detail. It is really VERY nice.
Posted: Tue Feb 01, 2005 7:26 pm
by Haldan
Just out of curiosity, when you were using the punch on the metal, what surface were you working on? Additionally, what thickness of metal was the brass?
Thanks!!!
Haldan
Posted: Wed Feb 02, 2005 12:05 am
by Chris Gilman
Nice job.
Posted: Wed Feb 02, 2005 12:44 am
by T. Finkas
Haldan wrote:Just out of curiosity, when you were using the punch on the metal, what surface were you working on? Additionally, what thickness of metal was the brass?
Thanks!!!
Haldan
The work surface is a rubber "Poundo" board from Tandy Leathercraft. A lead block would probably be better, but I don't have one. A pitch pot would probably be overkill.
Thickness? Hmmm...lemme see if there's some sort of sticker or label on any of the remaining sheets (got 'em from the hobby store). It looks like it could be either a .008" or slightly thicker?
-------
Thanks for the kind words, folks. I appreciate the encouragement.
Cheers,
Tim
------
Tools:
online research article on Viking era pouches
paper patterns (Mac G4, Macromedia Freehand, laser printer)
tin snips, wood chisels (.25, .5, 1.0), punch (rod type---not hole type), nailset (for finishing nails), rawhide hammer, small jewelers hammer (flat pien/ball pien), small gage RR rail anvil, wood block, electric drill, rubber leatherworking board, leather-cutting scissors, lacing 4-hole punch, harness needle, leather edge trimmer, exacto knife, fine sandpaper,
pliers, diagonal cutters
Materials:
.125" thick veg-tan leather, waxed linen thread, neadsfoot oil, thin brass sheet, copper carpet tacks, paper, rubber cement, spray mount glue, beeswax
Posted: Wed Feb 02, 2005 12:56 am
by Gerhard von Liebau
If 16 gauge is .05", which I believe it is, wouldn't that be incredibly thin metal at .008"?
-Gregory-
Posted: Wed Feb 02, 2005 2:03 am
by T. Finkas
Yeah Gregory...it's thin stuff. I may be wrong but it is certainly no more than .015. By the way, wouldn't .05" be 20 ga (20 x .05 = 1.00)?
Tim
Posted: Wed Feb 02, 2005 9:24 am
by Gerhard von Liebau
Look here... Can't find a better page, at the moment.
http://www.onlinemetals.com/merchant.cfm?id=86&step=2
20 gauge is .032"
-Gregory-
Posted: Wed Feb 02, 2005 9:45 am
by T. Finkas
I guess I don't understand how gauge measure relates to inches---I thought I did.

Posted: Wed Feb 02, 2005 9:57 am
by Russ Mitchell
Nice work, Tim.
Posted: Wed Feb 02, 2005 12:11 pm
by adric
StudBuckle wrote:I guess I don't understand how gauge measure relates to inches---I thought I did.
Make a pile one inch tall and count the number it took to make the pile. 16ga takes 16 pieces to make one inch. 22ga takes 22 pieces. 2ga is a half inch thick. so in 16 ga is .0625 in (.0625=1/16) Ain't math fun, if only i could freaking spell...

NICE pouch!
Posted: Wed Feb 02, 2005 2:51 pm
by Chris G.
It depends on if you are talking ferrous metals and nonferrous metals, as they each use a different gauge system.
This explains the gauge history for ferrous metal.
http://yarchive.net/metal/sheet_metal_gauge.html
Posted: Wed Feb 02, 2005 9:12 pm
by Gerhard von Liebau
It depends on if you are talking ferrous metals and nonferrous metals, as they each use a different gauge system.
Okay, that makes sense. Timothy has it right, just, well, not for Bronze or Brass...
Meaning I also had it wrong, just, well, for stuff other than that type of metal! Heh...
-Gregory-
Posted: Wed Feb 02, 2005 9:59 pm
by Talbot
Bravo Tim!
Both on the work and on showing people how it was done!
Way to go!
Re: My Birka (Viking) Purse Reconstruction
Posted: Mon Apr 30, 2012 8:10 am
by Kallimakh
GOod Day
I am doing a Russ persona and looking for ideas in either how to aquire a tarsoly or how to make one.
suggestions.
kallimakh casek