In Progress - 15th C Scabbard & Hilt Work (lots of pics)

An area for discussing methods for achieving or approximating a more authentic re-creation, for armour, soft kit, equipment, ...

Moderator: Glen K

User avatar
Aaron Schnatterly
Archive Member
Posts: 1141
Joined: Fri Jan 04, 2008 10:54 pm
Location: New Glarus, WI

In Progress - 15th C Scabbard & Hilt Work (lots of pics)

Post by Aaron Schnatterly »

Upon occasion, I take on a personal commission. In this case, I have the honour of working on a project with/for Chef de Chambre. It is at his suggestion that we share the progress with the Archive. I'm hoping it will be a fun journey for everyone! I should note, many of the pictures were on-the-fly quick-and-dirty because I thought it would be fun to keep Chef up to date on progress. While none of these pictures are staged, well-framed, well-lit "glamour shots", I think perhaps the candid look is actually better.

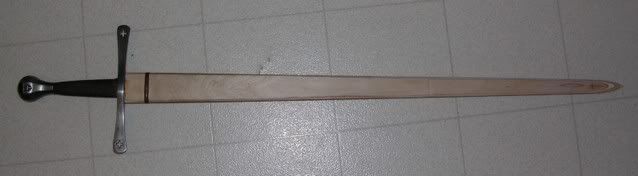
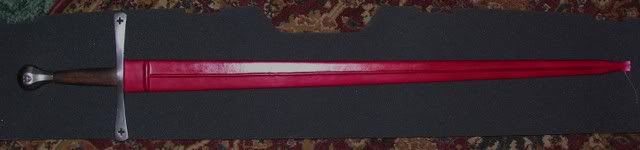
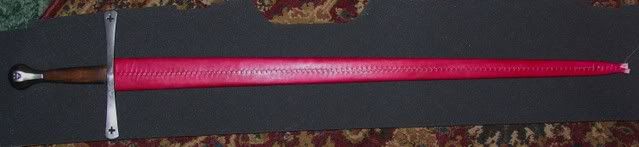
A little background information - the sword is a Del Tin longsword which has been used by Chef for a number of years as a reliable reenactment and educational piece. The blade needed some minor touch-up, the grip had most definitely seen better days, and a new, proper scabbard and suspension was desired. I was given more or less free reign, with a couple of minor requests, such as "dark red", and "a suspension like the one you did for...". With that much latitude in design work, the head runs rampant, and the creative juices flow. We have exchanged lots of thoughts along the way for design elements, picking what we thought would be best.

As of today ( 11 February '08 ), the status of the project is:
Regrip: Finished.
Blade touchup: In progress.
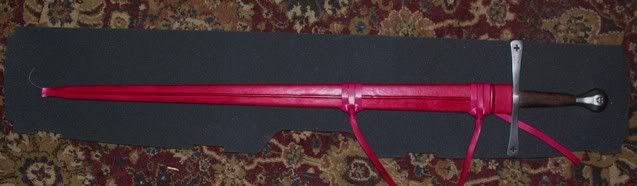
Scabbard: Pending metal bits, final polish and assembly.
Hilt work: In design.

I will post photos in stages over the next few days, allowing time between installments for comments, questions, discussion, and input from Chef along the way, should he wish to add anything.

For the record, this has been one of the most enjoyable personal projects I have had the pleasure to work on. As has been mentioned elsewhere by a number of other folks, Chef de Chambre is both a gentleman of the highest calibre, and a passionate scholar/practitioner. Thanks a ton, my friend!


So... on to some photos and commentary!

________________


First up is the photo series of the new grip project. Unfortunately, I had taken the old leather grip cover off (which took minimal effort... it was totally worn out) before photos.

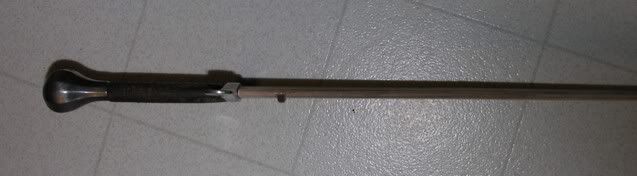
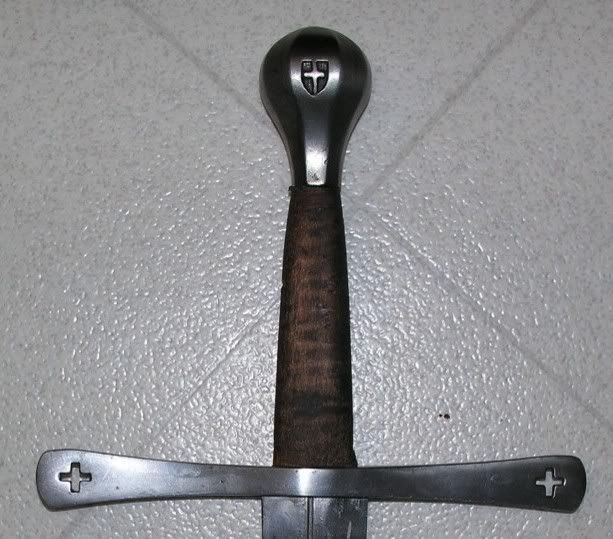
Here's a shot with just the bare wood core. Shreds of the old leather are still evident pinched between the grip core and the hilt components. Also, the spiral cord wrap is still ghosted on the core as well. With the amount of service use the sword has seen, it was due for some TLC.
Image

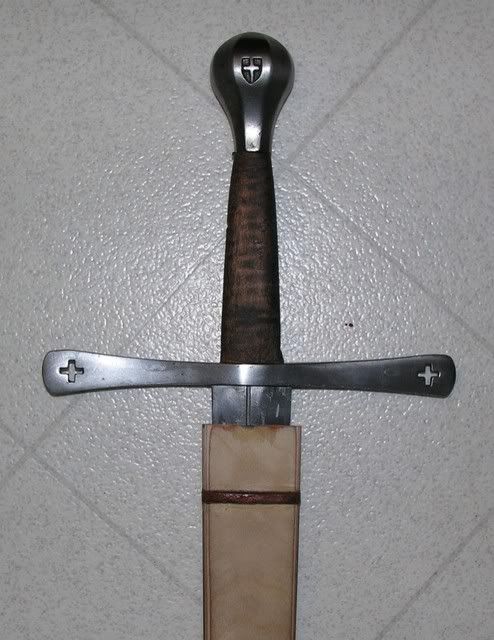
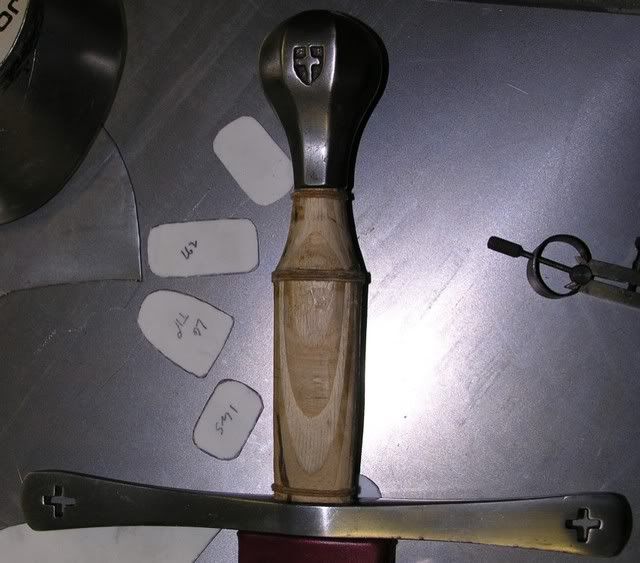
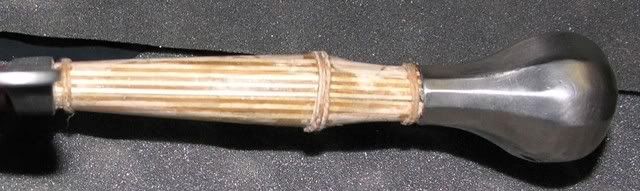
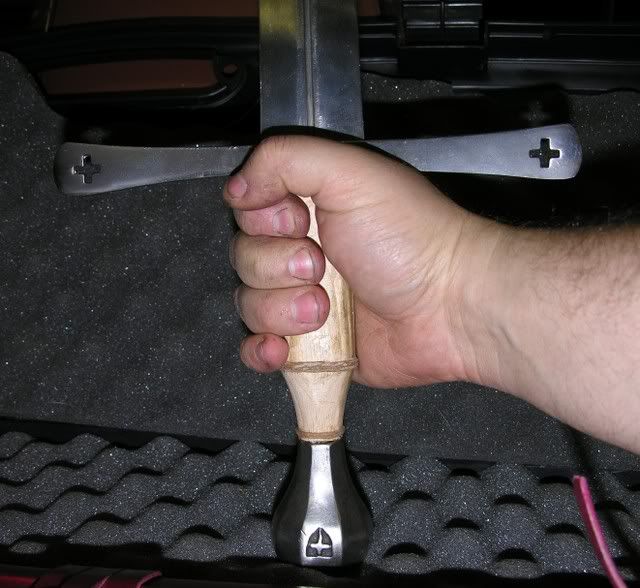
Once the leather was off, I took a close look at the wood core. It had actually started to crack. Rather than patch it back together, we decided it might be prime time for a new look altogether. Chef, Shan-Aan (my lovely bride), and I put our heads and practical WMA/reenactment experience together, and decided to go with a nice waisted grip. I split the old core off, and discovered the cause of the impending failure of the core... the guard had become unseated! While I can do cutlery work, my wife is more skilled and experienced in the craft, so I turned the sword over to her. She re-seated the guard, and peened it in place to soundly secure it, and then fashioned a new grip core. We affixed it to the tang, and I added cord risers. Here are three pics... front, profile, and in-hand.
Image
Image
Image


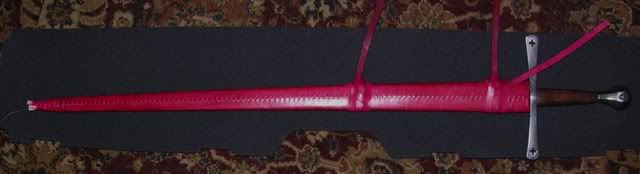
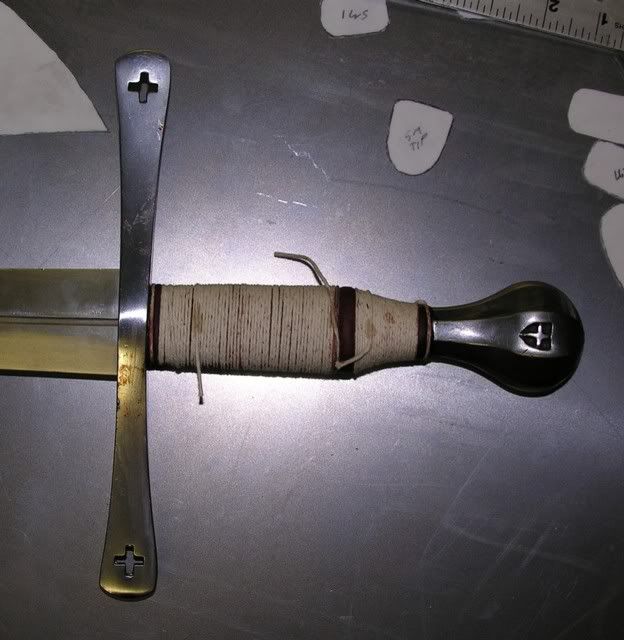
I re-wrapped the grip in leather, and bound it in cord until it dried. Here it is looking all mummy-like:
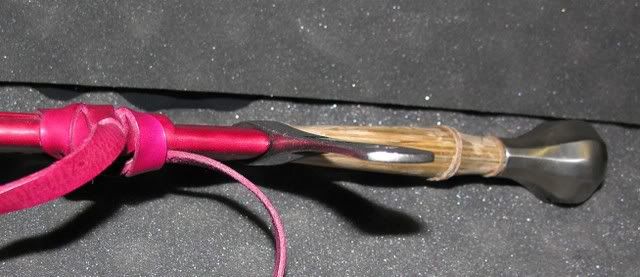
Image

Unveiled:
Image

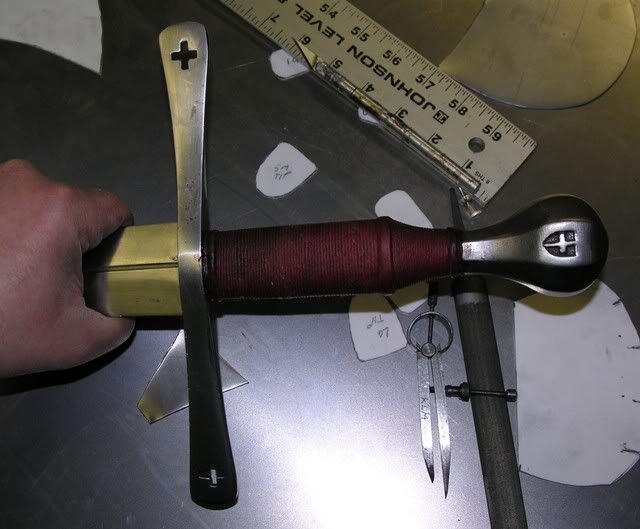
And finally cleaned up and treated:
Image


While the sword handled nicely with the old grip, the new one really makes it feel fantastic. I also believe it looks much more elegant now. I particularly like the way the grip's waisted curves compliment so wonderfully the curvature of the pommel, and how it relaxes back into the grip, filling the hand nicely, and allowing the repositioning of the hands quickly and easily as is so prevalent in Liechtenauer's tradition. (Yeah, it was really tough, but I had to play with it for a while... you know... just to make sure it was going to be suitable and all... :P )
MJBlazek
Archive Member
Posts: 8179
Joined: Mon Feb 07, 2005 3:28 pm
Location: Union Maine
Contact:

Post by MJBlazek »

Aaron, Aaron, Aaron....
What's this waisting of time working on swords... wheres my belt? :wink:
Just kidding man. :D

That is beautiful man...seriously beautiful. You are extremely talented!
You are right about how it matches the sweep on the pommel, it looks like the hilt has always belonged to that sword!

Matt
Fire Stryker
Archive Member
Posts: 851
Joined: Tue Sep 26, 2000 1:01 am
Location: South Carolinian living abroad in NH
Contact:

Post by Fire Stryker »

This sword is going to be a serious work of art by the time it's finished. I've already told Bob that when his time comes to shed this mortal coil, that he'll most likely be buried with it. ;)
User avatar
Strongbow
Archive Member
Posts: 6393
Joined: Mon Aug 02, 2004 10:21 am

Post by Strongbow »

That's just lovely! I can;t wait to see how the project turns out. And I see SOMEBODY is making a pair of gauntlets!
Michael de Bernay

aka

Strongbow
User avatar
Aaron Schnatterly
Archive Member
Posts: 1141
Joined: Fri Jan 04, 2008 10:54 pm
Location: New Glarus, WI

Post by Aaron Schnatterly »

MJBlazek wrote:That is beautiful man...seriously beautiful. You are extremely talented! You are right about how it matches the sweep on the pommel, it looks like the hilt has always belonged to that sword!
Props for the shaping has to go to Shan-Aan. I might be orchestrating this whole thing, but there are three of us who are working on it (plus, of course, Chef), and I'll definitely give credit where it's due. The third guy is Dan, who is a jeweler friend of mine. Yes... this is going to be wicked.

Shan-Aan is very talented in her own right, both as an artist and cutler, and as an historical fencer. She well knows her way around a sword, both technical and practical.
Fire Stryker wrote:This sword is going to be a serious work of art by the time it's finished.
I sincerely hope so. Knowing what a personal connection he has with this particular piece, it is our goal to enhance and expand, but not make it something totally different.

Also, I assume you've been privy to some of the behind-the-scenes stuff? You going to get in line? :wink:


Either later today or tomorrow sometime, I will likely start with the process pics of the scabbard itself.
User avatar
Oswyn_de_Wulferton
Archive Member
Posts: 2861
Joined: Tue Jan 11, 2005 5:15 pm
Contact:

Post by Oswyn_de_Wulferton »

So, I am confused. I thought the layering went wood, cord, leather. Is that right, or is this wood, leather, cord, and then the cord was removed? Do you build the riser into the wood grip, or do you layer it before the leather goes on?
Westerners, we have forgotten our origins. We speak all the diverse languages of the country in turn. Indeed the man who was poor at home attains opulence here; he who had no more than a few deiners, finds himself master of a fourtune.
User avatar
Aaron Schnatterly
Archive Member
Posts: 1141
Joined: Fri Jan 04, 2008 10:54 pm
Location: New Glarus, WI

Post by Aaron Schnatterly »

Strongbow wrote:That's just lovely! I can't wait to see how the project turns out.
Neither can I, brother... but in my mind's eye, it's pretty sweet. So far, it's turned out how it's been envisioned. Buckle up... the ride will get a lot better from here. The regrip project was just a small portion of this project. We've barely scratched the surface of "sweet" yet.

Note: I don't mean to come off as cocky here... it's turning out to be pretty stunning, to the point where I'll honestly miss it when it goes home. I'll be doing something similar on a scabbard to one of my sharps... probably the Fiore.
Strongbow wrote:And I see SOMEBODY is making a pair of gauntlets!
Three pair, actually... though they are more as a metal-shaping exercise and a palate cleanser. One is a set of Wisby #3 (what the metacarpal plate you saw is for), one is a set of hourglass gaunts (what all those small pattern pieces for fingertips and plates are for), and one is a plain pair of gothic ones (no filework or fluting - I want to use them for everyday practice with steel)... but that's a totally different project. :wink:
User avatar
Aaron Schnatterly
Archive Member
Posts: 1141
Joined: Fri Jan 04, 2008 10:54 pm
Location: New Glarus, WI

Post by Aaron Schnatterly »

Oswyn_de_Wulferton wrote:So, I am confused. I thought the layering went wood, cord, leather. Is that right, or is this wood, leather, cord, and then the cord was removed? Do you build the riser into the wood grip, or do you layer it before the leather goes on?
Good question - the type of stuff I was hoping this thread would bring up.

The process goes like this...
  • 1) Wood core.
    2) Risers are added with thin cord. Sometimes they are done with leather, too. (I added a riser to the scabbard with shaped leather, as you will see here a little later. The roped riser on Albion's Brescia is shaped leather.)
    3) Leather is skived (the edge is beveled to "almost transparent" thin), wet, dyed, glue-soaked, and put in place.
    4) Cord is wrapped around the grip in order to hold it securely and give it texture while it dries. This outer layer of cord is removed once dry.
Some historical examples went just this way. Sometimes the wood core was bound with linen or a very thin cord (think sewing thread) and then covered. Neither of these add anything appreciable to the finished grip. Since we have stupid-strong epoxy to hold the core securely rather than pitch or casein or hide glue, the extra binding wasn't really necessary.
Fire Stryker
Archive Member
Posts: 851
Joined: Tue Sep 26, 2000 1:01 am
Location: South Carolinian living abroad in NH
Contact:

Post by Fire Stryker »

Fire Stryker wrote:This sword is going to be a serious work of art by the time it's finished.
I sincerely hope so. Knowing what a personal connection he has with this particular piece, it is our goal to enhance and expand, but not make it something totally different.

Also, I assume you've been privy to some of the behind-the-scenes stuff? You going to get in line? :wink:
You know it. :twisted:
User avatar
Aaron Schnatterly
Archive Member
Posts: 1141
Joined: Fri Jan 04, 2008 10:54 pm
Location: New Glarus, WI

Post by Aaron Schnatterly »

Fire Stryker wrote:You know it. :twisted:
To quote the immortal words of Eric Cartman...

"sweeeeeeet!"
Fire Stryker
Archive Member
Posts: 851
Joined: Tue Sep 26, 2000 1:01 am
Location: South Carolinian living abroad in NH
Contact:

Post by Fire Stryker »

Shouting the battle cry...

"THOSE ARE MY CHEESY POOFS!"

Sorry, couldn't resist. But absolutely, when my critter is ready for the finishing touches, it will definitely be heading your way. :D
User avatar
Aaron Schnatterly
Archive Member
Posts: 1141
Joined: Fri Jan 04, 2008 10:54 pm
Location: New Glarus, WI

Post by Aaron Schnatterly »

Fire Stryker wrote:But absolutely, when my critter is ready for the finishing touches, it will definitely be heading your way. :D
Looking forward to it.
chef de chambre
Archive Member
Posts: 28806
Joined: Thu Aug 10, 2000 1:01 am
Location: Nashua, N.H. U.S.
Contact:

Post by chef de chambre »

Well, I've got to say I have enjoyed this entire experience thus far.

So, why re-vamp, and 'dyght' and well scabbard an old Del Tin, you might be wondering? Well, the sword has a history for me. I got it from Museum Replicas, at the very tail end of the time when they were actually carrying decent blades, from sources other than Windlass Steel - it was probably literally the last Del Tin sold out of that source, and I got it in the Spring of 1997, for all of $175.

Jeff Hedgecock made the first scabbard it had, in a bit of a hurry for the first 15th century event I ever attended, in November of 1997, and while the scabbard is still serviceable it has seen a lot of wear in the last 11 years.

First off, it is a *good sword*, I think it is one of the best of Del Tins offerings. It closely matches the original it is modeled after, which resides in the Wallace collection in London, in excavated condition. The original mis first half of the 15th century, and likely English in origin, or in the hilting, at least (Del Tin currently has the model listed in the 14th century section, which is in error). It is well balanced, and suited to me in length of blade and length of grip.

It has the older style Krupp steel blade, which is an excellent one - this sword has seen extensive use in its life. It has been used in full speed rebated sparring, and has received hard enough blows to the cross, to unseat it, and crack the guard (it bears slight scars on the cross from this use.

It has been carried by me in every reenactment I have been to in the last 11 years, it has been used at the Higgins for every presentation I have made, and used in HWMA practice, as well as sparring - it has been used often enough, and hard enough to wear out the original grip, as Aaron mentions. It has been handled and used by other HWMA practitioners, some of the famous, some of the interpretors, or former interpretors at the Royal Armouries, and they thought it a good blade.

Basically, it is my sword, as Norm is my horse (and I his person), or Evie is my dog - we belong together.

Every year I strive to improve my kit, and I have been painfully aware of the shortcomings of my favorite sword. Firstly, Del Tin makes a good sword, but I think the grip often leaves something to be desired - not in functionality, but in the accuracy of its styling, very often, and in the one basic style of covering offered.

Secondly, the swords scabbard, and carriage is perhaps the greatest weakness seen in most kits, especially in the US (Co St. George, and 1476 are exceptions in Europe, but iffy scabbards and carriage systems seem to be commonplace in Late Medieval reenactment). People will spend $1000 or more on a sword, and then throw it in a ... less than adequate, to be polite, scabbard. My personal kit was no exception to this sad rule of thumb, while the scabbard was rugged and passable, the carriage was completely inadequate, and absolutely laughable in comparison to the rest of my persona kit.

I have an Armart arming sword, which is a very good blade, in what was one of a precious few accurate scabbards , with a home-made belt carriage that is passable, but not as good as the scabbard itself, but it isn't my primary reenactment combat carry weapon.

I believe what you see with what Aaron and Shan-Aan have designed and done with the waisted grip is much more likely to have been the mid 15th century solution, and it probably more closely resembles the original grip. The sword would be between 20-40 years old in my portrayal, and would probably have been re-gripped once in its working life to that date.

If you think the grip is great (which it is, I can hardly wait to handle it), it will be complemented and enhanced by the scabbard and belt rig,, and the final detailing done to the hilt will make it seem like a truly unique piece, and make it the closest sword I own to a Medieval original.
User avatar
Aaron Schnatterly
Archive Member
Posts: 1141
Joined: Fri Jan 04, 2008 10:54 pm
Location: New Glarus, WI

Post by Aaron Schnatterly »

chef de chambre wrote:First off, it is a *good sword*, I think it is one of the best of Del Tins offerings.
This sword surprised me, actually... I'm very, very picky about edged weapons. I won't comment on the rest of the Del Tin line, but no doubt, this particular piece handles really well. For 11 years of use, it's in fantastic shape. That there is a connection with this piece isn't really surprising.

chef de chambre wrote:Firstly, Del Tin makes a good sword, but I think the grip often leaves something to be desired - not in functionality, but in the accuracy of its styling, very often, and in the one basic style of covering offered.

...

I believe what you see with what Aaron and Shan-Aan have designed and done with the waisted grip is much more likely to have been the mid 15th century solution, and it probably more closely resembles the original grip. The sword would be between 20-40 years old in my portrayal, and would probably have been re-gripped once in its working life to that date.
That is what we were aiming for, based upon extant pieces, effigies, and artwork. We're pleased that you feel it's hit the mark. Swords are service weapons, not unlike modern firearms in some regards - they were taken care of as if one's life depended upon it (as it most certainly did!), and parts did need occasional maintenance and repair or replacement. Grips most certainly would have seen wear and tear, or aren't that hard to redo to fit a personal preference. The sword's grip makes a significant difference in the handling (if in nothing else but edge reference and gripping style), and styles do change. She's a bit dressier now... and in our opinion (both Shan-Aan and myself) handles wonderfully now. She's still the same girl, just a little grown up, if that makes sense.
chef de chambre wrote:Secondly, the swords scabbard, and carriage is perhaps the greatest weakness seen in most kits, especially in the US (Co St. George, and 1476 are exceptions in Europe, but iffy scabbards and carriage systems seem to be commonplace in Late Medieval reenactment). People will spend $1000 or more on a sword, and then throw it in a ... less than adequate, to be polite, scabbard. My personal kit was no exception to this sad rule of thumb, while the scabbard was rugged and passable, the carriage was completely inadequate, and absolutely laughable in comparison to the rest of my persona kit.
... and this is something I hope to eventually be able to help change. Scabbards today are often an afterthought, or a taken-for-granted assumed accessory. It's certainly true that the lifespan of most swords was longer than most scabbards, but to dismiss them as anything other than a valid, well-crafted piece in their own right is a disservice to the masters of old who made them.
chef de chambre wrote:If you think the grip is great (which it is, I can hardly wait to handle it), it will be complemented and enhanced by the scabbard and belt rig, and the final detailing done to the hilt will make it seem like a truly unique piece, and make it the closest sword I own to a Medieval original.
It's something quite nice... and it should serve you well for years to come.
Cedri
Archive Member
Posts: 252
Joined: Tue Aug 09, 2005 9:55 am

Post by Cedri »

Aaron question on the grip construction / assembly. Is the pommel peened as the permanent attachment method? If so, was the grip built in two pieces then glued back in place? From your comment on epoxies, I am assuming that the grip was epoxied in place. Have I got this correct?
Cedri
Good journeys, walk in no man's shadow
chef de chambre
Archive Member
Posts: 28806
Joined: Thu Aug 10, 2000 1:01 am
Location: Nashua, N.H. U.S.
Contact:

Post by chef de chambre »

I can telll you the pommel is peened for a fact, and it was from the first it was made. Aaron will answer the other questions.
User avatar
Aaron Schnatterly
Archive Member
Posts: 1141
Joined: Fri Jan 04, 2008 10:54 pm
Location: New Glarus, WI

Post by Aaron Schnatterly »

Cedri wrote:Aaron question on the grip construction / assembly. Is the pommel peened as the permanent attachment method? If so, was the grip built in two pieces then glued back in place? From your comment on epoxies, I am assuming that the grip was epoxied in place. Have I got this correct?
Another good question!

There are a lot of different historical solutions to fashioning and affixing a grip. The original grip on this sword was built as one piece, covered, and then the guard, grip (with some epoxy in the tang slot) and pommel were put on, with the pommel peened in place. This is called the "compression" method.

It obviously worked - 11 years of active service. While it would have been possible to remove the pommel and do the same thing again, it was certainly quite soundly affixed, and there was no reason to go through the effort. Affixing the guard in a more secure manner isn't hard, so in order to help the sword make it through whatever else Chef might wish to put it through, Shan-Aan did so. The grip was, as Cedi figured, made in two parts, with a close profile to the tang cut out, shaped, and then affixed with 2-ton (!) epoxy. This is the "sandwich" method of assembly. If you look at the grip picture from the side, you can make out a seam line if you look carefully.

Other possible solutions for other pieces would include "slab" - like is common on modern kitchen knives, and "integral" where the grip and other hilt fittings are actually cast or forged out of the same piece as the blade - like early bronze-age pieces.

Probably more of a drawn-out answer than a simple "yeah, you got it", but one of the thoughts behind this thread was to share some information along the way.


Also, some time later today, I'll post the first of a series of scabbard photos.
chef de chambre
Archive Member
Posts: 28806
Joined: Thu Aug 10, 2000 1:01 am
Location: Nashua, N.H. U.S.
Contact:

Post by chef de chambre »

I spend a lot of time pointing out that by the 15th century, the swrod was not a soldiers primary weapon, if it ever was, anywhere in Europe, during the Middle Ages. There is a lot of bias toward the default assumption that sword and shield is the default norm for Medieval combat in some quarters.

I hardly ever get to the point of being able to point out that the sword was an incredibly important object to the nobility, and to the professional soldier, even at this late date. It was a symbol of his status, and of his profession, and it was the one weapon he might be sure to have on him at any given time, or close to him, while on campaign.

As not only a ready weapon, but as an important indicator of status, swords, and the scabbards and belts that held them were the objects most likely to have decoration lavished on them, underling the bearers status.

A look at effigies, brasses, and paintings and other sculpture readily documents the practice, which sadly is almost unheard of in reenactment and reconstructions, with few exceptions. Many sword collectors have finer scabbards and rigs than most reenactors, though even that audience rarely bothers with proper scabbards and belts for their treasured swords.
User avatar
Aaron Schnatterly
Archive Member
Posts: 1141
Joined: Fri Jan 04, 2008 10:54 pm
Location: New Glarus, WI

Post by Aaron Schnatterly »

chef de chambre wrote:I spend a lot of time pointing out that by the 15th century, the sword was not a soldiers primary weapon, if it ever was, anywhere in Europe, during the Middle Ages. There is a lot of bias toward the default assumption that sword and shield is the default norm for Medieval combat in some quarters.
I know that the image of a "Knight" that I had in my head was quite romanticized, with the wonderful full 16th C harness (complete with plumes), and a 13th C single-hander cruciform sword paired with a heraldic heater shield, arms displayed in concert with his surcoat. Yeah... I had it all figured out then. Hey... I was like 6... dragons were real, and the girl (7 or 8 and very cute) from across the street probably really needed saving.
chef de chambre wrote:... the sword was an incredibly important object to the nobility, and to the professional soldier, even at this late date. It was a symbol of his status, and of his profession, and it was the one weapon he might be sure to have on him at any given time, or close to him, while on campaign.

As not only a ready weapon, but as an important indicator of status, swords, and the scabbards and belts that held them were the objects most likely to have decoration lavished on them, underling the bearers status.
Scabbards and belts were often amazingly decorated pieces, sometimes even encrusted with pretty things, and fittings of precious metals. They most certainly were a way to show off, at least to some. I know I have heard of some swords that actually had more than one scabbard, for different occasions.
User avatar
Aaron Schnatterly
Archive Member
Posts: 1141
Joined: Fri Jan 04, 2008 10:54 pm
Location: New Glarus, WI

Scabbard construction, part 1

Post by Aaron Schnatterly »

As promised, here's the first installment on the scabbard itself.

One of the things we are striving for here with this project is to try to get as close as reasonably possible to historical with construction. One of the major elements I am working on in all of my scabbard work (both with work at Albion and in my personal work) is to move to laminated wood for the cores whenever appropriate. For a 15th C longsword, this is definitely appropriate. It is also a very stable and strong construction method.

Sorry... I won't share my process for forming the cores...

Here is a front view picture of the core after forming and shaping. Note that it follows the contours of the blade, both in profile and in distal taper. It's actually pretty form-fitting. I have also added the wing riser - that's where the upper cinch belt rests. It has both aesthetic and security purposes.
Image

And one from the side. It is quite thin, as well. Almost all modern reproduction scabbards are way, way too bulky. This one is approximately 2.5 mm thick. Again, notice the wing riser...
Image

Again, of the upper portion of the scabbard core, with the blade slightly drawn, to give some perspective on the shaping:
Image

The design was nowhere near finalized at this point. I felt the scabbard would benefit aesthetically by a central riser that ran from the wing riser to the tip (or close to it, anyway). I discussed this with Chef, and he thought it would add a nice feature to it, so here we are, with a cord riser added:
Image

The next step, then, was to cover it with leather. Thin veg-tanned leather works well both for tooling and for "terrain features" like the wing and central risers.
Image


I'll leave this at this point in the construction for a couple of days...
Cedri
Archive Member
Posts: 252
Joined: Tue Aug 09, 2005 9:55 am

Post by Cedri »

Nice! I for one appreciate the construction blog here :-)

Chef thanks for the info on the pommel construction.

Aaron Lets take a further look at the grip construction if you don't mind, from your scabbard post on laminated construction it also
appears from the pics that the grip is also laminated. This is I assume another response to help prevent another grip failure.
Because we know Chef is going to go out and wail the hell out of it (j/k Chef!)to the original grip failure. I would think that the laminated
construction would help to minimize shrinkage, thus maintaining a tighter cross guard / grip / pommel connection. That your thinking on this?

Can we pursue the scabbard lamination construction a bit further, no not asking about your technique. What historical period and actual
item do we have that has laminated scabbard construction? Can you (Chef you chime in here anytime also) point us in a direction here?
Cedri
Good journeys, walk in no man's shadow
chef de chambre
Archive Member
Posts: 28806
Joined: Thu Aug 10, 2000 1:01 am
Location: Nashua, N.H. U.S.
Contact:

Post by chef de chambre »

Composite scabbards seem to have been commonplace in the late 15th century, (seems to have come into vogue in the 14th century) into the mid 16th century. Mac has seen some that were linen wrap with thin lathes of wood (I believe one he saw actually had linen paper strips, cast off from a printed book).

Composite technology seems to have been done to give a flexibility and toughness to what might otherwise be a brittle object, and the technique (and remains of evidence) can be found in the cantles ant trees of saddles, to give an example.
User avatar
Chris - GSMBristol
Archive Member
Posts: 475
Joined: Fri Mar 04, 2005 12:08 pm
Location: Janesville WI
Contact:

Post by Chris - GSMBristol »

Looking really nice Aaron! Thanks to you and Chef for the pictorial. I'm thinking I'm going to have to come out this weekend and play a bit. If nothing else to see this in person!
User avatar
Thorgrimr
Archive Member
Posts: 2522
Joined: Fri May 04, 2001 1:01 am
Location: near Canton, Ohio

Post by Thorgrimr »

Aaron Schnatterly wrote:
  • 1) Wood core.
    2) Risers are added with thin cord. Sometimes they are done with leather, too. (I added a riser to the scabbard with shaped leather, as you will see here a little later. The roped riser on Albion's Brescia is shaped leather.)
    3) Leather is skived (the edge is beveled to "almost transparent" thin), wet, dyed, glue-soaked, and put in place.
    4) Cord is wrapped around the grip in order to hold it securely and give it texture while it dries. This outer layer of cord is removed once dry.
What kind of glue was used to soak the leather of the grip cover?
Thorgrimr Thorgrimsson
Squire to Sir Diglach mac Cein

My YouTube channel, Budget Guns and Gear Reviews:
https://m.youtube.com/channel/UCqfbTQt46azek8baT_zBLGw
audax
Dark Overlord Chick of the Universe
Posts: 8416
Joined: Mon Mar 20, 2006 8:44 am

Post by audax »

This is going to be so amazing when it's done.

Cannot wait....
Martel le Hardi
black for the darkness of the path
red for a fiery passion
white for the blinding illumination
--------------------------------------
Ursus, verily thou rocketh.
User avatar
Oswyn_de_Wulferton
Archive Member
Posts: 2861
Joined: Tue Jan 11, 2005 5:15 pm
Contact:

Re: Scabbard construction, part 1

Post by Oswyn_de_Wulferton »

Aaron Schnatterly wrote:Sorry... I won't share my process for forming the cores...
How about where we can get wood that thin? Or did you rip it yourself from thicker stock? If this hits on a trade secret or too close to the above, then please ignore.
Westerners, we have forgotten our origins. We speak all the diverse languages of the country in turn. Indeed the man who was poor at home attains opulence here; he who had no more than a few deiners, finds himself master of a fourtune.
audax
Dark Overlord Chick of the Universe
Posts: 8416
Joined: Mon Mar 20, 2006 8:44 am

Re: Scabbard construction, part 1

Post by audax »

Oswyn_de_Wulferton wrote:
Aaron Schnatterly wrote:Sorry... I won't share my process for forming the cores...
How about where we can get wood that thin? Or did you rip it yourself from thicker stock? If this hits on a trade secret or too close to the above, then please ignore.
You can find 1/8th in thick wood in the project wood areas at places like Lowes, Home Despot, etc. Then use what ever stock removal method you like to get the final shape and thickness.

If you go to www.myarmoury.com you'll find alot of info on scabbard making.
Martel le Hardi
black for the darkness of the path
red for a fiery passion
white for the blinding illumination
--------------------------------------
Ursus, verily thou rocketh.
User avatar
Aaron Schnatterly
Archive Member
Posts: 1141
Joined: Fri Jan 04, 2008 10:54 pm
Location: New Glarus, WI

Post by Aaron Schnatterly »

Cedri wrote:Aaron Lets take a further look at the grip construction if you don't mind, from your scabbard post on laminated construction it also
appears from the pics that the grip is also laminated. This is I assume another response to help prevent another grip failure.
Because we know Chef is going to go out and wail the hell out of it (j/k Chef!)to the original grip failure. I would think that the laminated
construction would help to minimize shrinkage, thus maintaining a tighter cross guard / grip / pommel connection. That your thinking on this?
I thought perhaps that solid-core plywood would be stronger overall, holding up to more "punishment" (by which I mean heavy use, not misuse or abuse - I know Chef better...). It is more stable to climate changes and shock. There are a couple of modern allowances in this project, such as the use of ply and high-strength epoxy rather than solid wood and pitch for the grip.

Also, since Shan-Aan peened the guard independently, it isn't reliant on the grip to hold it in place anymore (though it is, of course, a backup in case that method of affixing should ever fail, which is exceedingly doubtful). With the sandwich method of construction, the grip, pommel, and guard are all effectively independently stable, unlike the compression method, where the pommel's peen holds all three components on.
Cedri wrote:Can we pursue the scabbard lamination construction a bit further, no not asking about your technique. What historical period and actual
item do we have that has laminated scabbard construction? Can you (Chef you chime in here anytime also) point us in a direction here?
Chef covered this pretty well. There are references earlier, but I don't have them at hand. A lot of what we might think of as modern technology really has been around for ages and ages. (The Vikings had fine, sharp files, for example.)
User avatar
Aaron Schnatterly
Archive Member
Posts: 1141
Joined: Fri Jan 04, 2008 10:54 pm
Location: New Glarus, WI

Post by Aaron Schnatterly »

Chris - GSMBristol wrote:Looking really nice Aaron! Thanks to you and Chef for the pictorial. I'm thinking I'm going to have to come out this weekend and play a bit. If nothing else to see this in person!
As always, brother, you're always welcome. I'll be in all weekend... if you don't have Shan-Aan's cell, let me know and I'll get it to you. Mine's KIA from the forge and grinding.

Oh... and bring your bucket... we have a visor to finish, yes? :wink:
User avatar
Aaron Schnatterly
Archive Member
Posts: 1141
Joined: Fri Jan 04, 2008 10:54 pm
Location: New Glarus, WI

Post by Aaron Schnatterly »

Michael de Buslingthorpe wrote:What kind of glue was used to soak the leather of the grip cover?
I'm not at liberty to say, but if you searched the forums on regrip projects on MyArmoury.com, you'd find hide glue works really well. :wink:

It's available at most hardware stores and maybe even Wally-World - I think I've seen it there... dark brown bottle.
User avatar
Aaron Schnatterly
Archive Member
Posts: 1141
Joined: Fri Jan 04, 2008 10:54 pm
Location: New Glarus, WI

Re: Scabbard construction, part 1

Post by Aaron Schnatterly »

Oswyn_de_Wulferton wrote:How about where we can get wood that thin? Or did you rip it yourself from thicker stock?
Ugh... resawing stuff that thin... no thanks.

Wood working suppliers have it. You can find extremely thin wood laminate sheets readily available.
User avatar
Aaron Schnatterly
Archive Member
Posts: 1141
Joined: Fri Jan 04, 2008 10:54 pm
Location: New Glarus, WI

Re: Scabbard construction, part 1

Post by Aaron Schnatterly »

audax wrote: This is going to be so amazing when it's done.

Cannot wait....
This thing is going to rock harder than Woodstock. I'm diggin' it!
audax wrote:You can find 1/8th in thick wood in the project wood areas at places like Lowes, Home Despot, etc. Then use what ever stock removal method you like to get the final shape and thickness.
The combined thickness of the wood in this piece is only around 1/8 thick. I use 1/8 to make shields from... :wink:
audax wrote:If you go to www.myarmoury.com you'll find alot of info on scabbard making.
Lots. Some of it I posted a couple of years back. There should be a fairly decent how-to on building a slat core for an Albion Knight. If your search-fu is lacking, try "albion knight scabbard" and pick through. I use the same "cryptic login" over there, so that might help further...
audax
Dark Overlord Chick of the Universe
Posts: 8416
Joined: Mon Mar 20, 2006 8:44 am

Re: Scabbard construction, part 1

Post by audax »

[quote="Aaron Schnatterly"][quote="audax"] The combined thickness of the wood in this piece is only around 1/8 thick. I use 1/8 to make shields from... :wink:

[quote]

1/8th combined? Dude, you're a god.
Martel le Hardi
black for the darkness of the path
red for a fiery passion
white for the blinding illumination
--------------------------------------
Ursus, verily thou rocketh.
User avatar
Aaron Schnatterly
Archive Member
Posts: 1141
Joined: Fri Jan 04, 2008 10:54 pm
Location: New Glarus, WI

Re: Scabbard construction, part 1

Post by Aaron Schnatterly »

audax wrote:1/8th combined? Dude, you're a god.
That might be a little misleading... the walls of the piece are well under 1/8 thick (0.125 inches) - mine mic out at 0.0945 inches / 2.4 mm, at least on the one I had sitting beside me. It isn't a lot more where the edges come together...
User avatar
Aaron Schnatterly
Archive Member
Posts: 1141
Joined: Fri Jan 04, 2008 10:54 pm
Location: New Glarus, WI

Scabbard construction, part 2

Post by Aaron Schnatterly »

Moving forward in our project here....

No doubt, there will be moments of "dang... should have taken a picture of..." along the way. The first one was before anything was done, before taking the old grip off. Now, the second one was when the stitching was done, before the dye was applied. It wouldn't look much different than it does after the dye, of course... just red instead of cream. At any rate, here are pictures of the piece after dye was applied:

Image
Image

Once that was done, the piece was heavily burnished. Burnishing is a process of rubbing the leather down with a smooth, hard object. I use a bone knife, which is literally a piece of long bone, probably beef, that has been shaped and polished. I've also used glass or polished steel rod, but the bone knife is the most comfortable, I think, and with all the different shapes and contours, it works well for tooling and molding work, too.

Here's a shot of one of my bone knives...
Image


Next, the piece got a nice leather treatment - I use a commercially available product called Lexol, but there are a lot of other ones, too.

After all that was dry, the next effort was to add the cinch belts. One rests right at the wing riser, and supports most of the weight of the sword/scabbard. The lower one is more a stabilizer, keeping the set stable and close to the leg when worn.

Image
Image

Here is a shot from an oblique, underside photo, to show how thin this piece still is in comparison to the sword's guard:
Image

... and no, Chef isn't getting a pink scabbard. Stupid flash... :x

As before, we'll leave it here for a few days for comments, questions, and the sweet anticipation of seeing something even cooler... 8)
Post Reply