Dusting off the cobwebs
-
John Vernier
- Archive Member
- Posts: 232
- Joined: Mon Mar 14, 2011 5:57 pm
- Location: south central Indiana
Re: Dusting off the cobwebs
It seems to me that dyeing the lining strips of the gauntlet fingers to match the blackened steel, would have the effect of making the fingers look fatter and less crisply defined. The lighter color of the leather allows the finger lames to appear as slender and refined as they can, since the leather will become neutral background color from any distance.
-
Kristoffer

- Archive Member
- Posts: 1697
- Joined: Sat Sep 09, 2000 1:01 am
- Location: Ostersund - Sweden
- Contact:
Re: Dusting off the cobwebs
To dye buff is a crime! It is grand as it is, no point in messing with is.
The contrast also brings out the craftmanship. A lesser armourer might benefit from hiding things but Macs work is better the more it can be seen.
The contrast also brings out the craftmanship. A lesser armourer might benefit from hiding things but Macs work is better the more it can be seen.
Kristoffer Metsälä
-
RandallMoffett

- Archive Member
- Posts: 4613
- Joined: Wed May 01, 2002 1:01 am
- Location: SE Iowa
Re: Dusting off the cobwebs
Inspiring as usual. Really wish I had 1% of your skill and experience. Just fantastic. Those fingers looks amazing.
RPM
RPM
Re: Dusting off the cobwebs
Just to be clear... There's no buff leather involved here. I'm not sure what the tannage is on the gloves, but all the rest of the leather is some sort of chrome tan or another.Xtracted wrote:To dye buff is a crime! It is grand as it is, no point in messing with is.
Mac
Robert MacPherson
The craftsmen of old had their secrets, and those secrets died with them. We are not the better for that, and neither are they.
http://www.lightlink.com/armory/
http://www.billyandcharlie.com
https://www.facebook.com/BillyAndCharlie
The craftsmen of old had their secrets, and those secrets died with them. We are not the better for that, and neither are they.
http://www.lightlink.com/armory/
http://www.billyandcharlie.com
https://www.facebook.com/BillyAndCharlie
Re: Dusting off the cobwebs
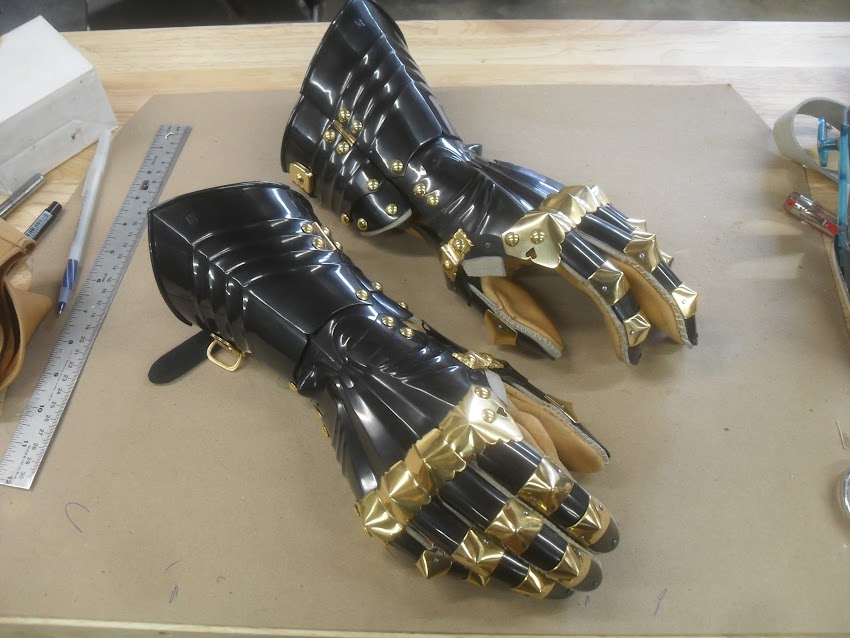
It was finally time to trim the glove cuffs to length and hem them. It would have been nice to have done this earlier, before they had fingers sewn on, but I did not know how much to trim till the lengths were established. This is one of those things that would not be a problem if one made the same style of gauntlet all the time.
In the end, I decided that I would remove 1 3/4" and then sew in a narrow hem like the one that the manufacturer had used.

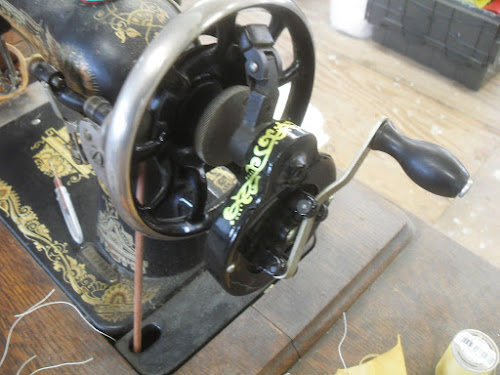
My antique Singer is set up to sew with heavy thread, and the modern Chinese crank made the job easy. It's hard to get enough "omph" with the treadle to sew leather, and it's tedious to pull the balance wheel over by hand. I'd like to get an antique crank to replace this one, but they are a bit expensive.

That done, it was time to finally rivet the gauntlets together. I did the thumbs first...
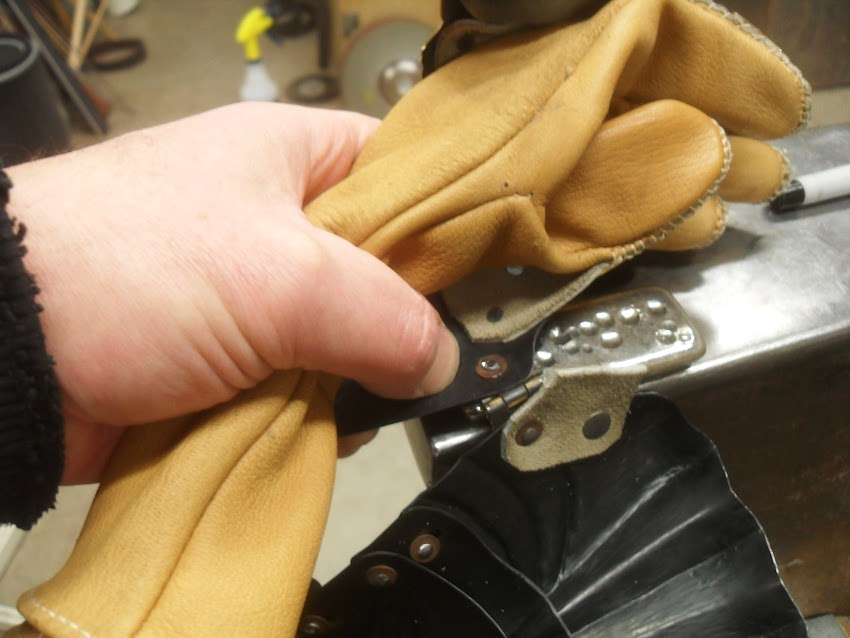
... then the thumb side of the knuckle plate....
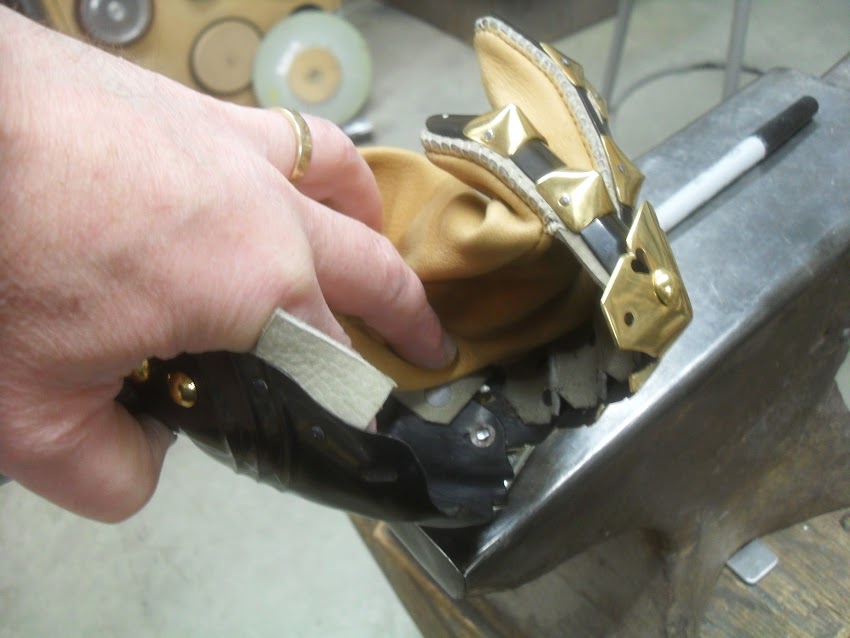
... and finally the little finger side of the knuckle.

Now I can sew the rest of the lining leathers to the gloves.
Mac
In the end, I decided that I would remove 1 3/4" and then sew in a narrow hem like the one that the manufacturer had used.
My antique Singer is set up to sew with heavy thread, and the modern Chinese crank made the job easy. It's hard to get enough "omph" with the treadle to sew leather, and it's tedious to pull the balance wheel over by hand. I'd like to get an antique crank to replace this one, but they are a bit expensive.
That done, it was time to finally rivet the gauntlets together. I did the thumbs first...
... then the thumb side of the knuckle plate....
... and finally the little finger side of the knuckle.
Now I can sew the rest of the lining leathers to the gloves.
Mac
Robert MacPherson
The craftsmen of old had their secrets, and those secrets died with them. We are not the better for that, and neither are they.
http://www.lightlink.com/armory/
http://www.billyandcharlie.com
https://www.facebook.com/BillyAndCharlie
The craftsmen of old had their secrets, and those secrets died with them. We are not the better for that, and neither are they.
http://www.lightlink.com/armory/
http://www.billyandcharlie.com
https://www.facebook.com/BillyAndCharlie
-
Keegan Ingrassia

- Archive Member
- Posts: 6426
- Joined: Thu Jul 16, 2009 4:07 pm
- Location: College Station, Texas (Shadowlands)
Re: Dusting off the cobwebs
Man oh man, are those beautiful! Just looking at them made my pulse jump. I very much like the use of leather tabs to secure the palm, rather than a leather strap across it.
"There is a tremendous amount of information in a picture, but getting at it is not a purely passive process. You have to work at it, but the more you work at it the easier it becomes." - Mac
-
Kristoffer
- Archive Member
- Posts: 1697
- Joined: Sat Sep 09, 2000 1:01 am
- Location: Ostersund - Sweden
- Contact:
Re: Dusting off the cobwebs
It sure looked buffish i color Mac.
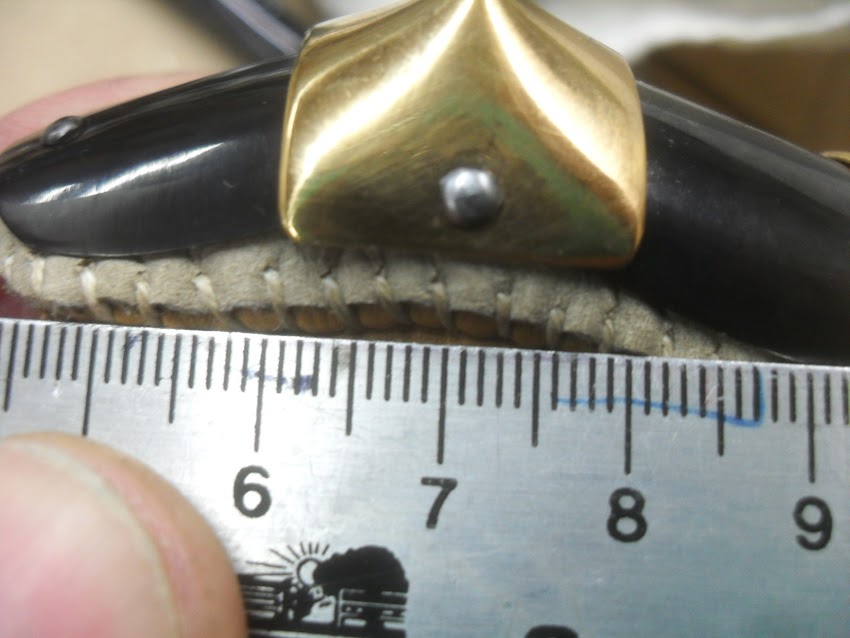
Could you please show some close ups of how it was stitched to the gloves? I am curious how you run the stitches to make it look and work smoothly.
Could you please show some close ups of how it was stitched to the gloves? I am curious how you run the stitches to make it look and work smoothly.
Kristoffer Metsälä
Re: Dusting off the cobwebs
Tabs like that are pretty much the normal thing with gauntlets. The rule of thumb seems to be that if the glove is a fixed part of the gauntlet, it's sewn to tabs or strips and there are no straps across the palm. The earlier sorts of gauntlets may have had the gloves riveted directly... it's hare to tell sometimes.Keegan Ingrassia wrote: I very much like the use of leather tabs to secure the palm, rather than a leather strap across it.
The exceptions to the rule are the mid 15th C. mittens that appear not to have had any gloves. These appear in (usually) German art, and are sometimes worn over bare hands.
Like everybody... I put palm straps on my gauntlets when I first started out. In a bit I noticed that real gauntlets pretty much did without them. I tried that, and found that it not only worked, but it was more comfortable than straps ever were. I have not looked back.
Mac
Robert MacPherson
The craftsmen of old had their secrets, and those secrets died with them. We are not the better for that, and neither are they.
http://www.lightlink.com/armory/
http://www.billyandcharlie.com
https://www.facebook.com/BillyAndCharlie
The craftsmen of old had their secrets, and those secrets died with them. We are not the better for that, and neither are they.
http://www.lightlink.com/armory/
http://www.billyandcharlie.com
https://www.facebook.com/BillyAndCharlie
Re: Dusting off the cobwebs
I chose it for its "buffish" qualities, but it's a chrome tan.Xtracted wrote:It sure looked buffish i color Mac.
I'll try to get some useful closeups later today.Xtracted wrote:Could you please show some close ups of how it was stitched to the gloves? I am curious how you run the stitches to make it look and work smoothly.
Mac
Robert MacPherson
The craftsmen of old had their secrets, and those secrets died with them. We are not the better for that, and neither are they.
http://www.lightlink.com/armory/
http://www.billyandcharlie.com
https://www.facebook.com/BillyAndCharlie
The craftsmen of old had their secrets, and those secrets died with them. We are not the better for that, and neither are they.
http://www.lightlink.com/armory/
http://www.billyandcharlie.com
https://www.facebook.com/BillyAndCharlie
Re: Dusting off the cobwebs
I thought that a diagram might help to show how the lining leathers of the fingers were stitched to the glove.
This is a cross section through the finger showing the plate, a rivet, the finger leather, and the two pieces of leather that make up the finger. Note that the original seams in the glove leather are on the inside, and their stitching is represented by short straight lines through the two layers.
The left side shows how the glove leather is manipulated to give the needle a straight path in and out of the upper glove leather and through the finger lining leather. The right side shows what the final sewing thread path looks like. I have represented it as a loop, but it is really a spiral that passes through the plane of the drawing.

Mac
This is a cross section through the finger showing the plate, a rivet, the finger leather, and the two pieces of leather that make up the finger. Note that the original seams in the glove leather are on the inside, and their stitching is represented by short straight lines through the two layers.
The left side shows how the glove leather is manipulated to give the needle a straight path in and out of the upper glove leather and through the finger lining leather. The right side shows what the final sewing thread path looks like. I have represented it as a loop, but it is really a spiral that passes through the plane of the drawing.
Mac
Robert MacPherson
The craftsmen of old had their secrets, and those secrets died with them. We are not the better for that, and neither are they.
http://www.lightlink.com/armory/
http://www.billyandcharlie.com
https://www.facebook.com/BillyAndCharlie
The craftsmen of old had their secrets, and those secrets died with them. We are not the better for that, and neither are they.
http://www.lightlink.com/armory/
http://www.billyandcharlie.com
https://www.facebook.com/BillyAndCharlie
-
Tom B.
- Archive Member
- Posts: 4533
- Joined: Mon Oct 17, 2005 4:15 am
- Location: Nicholasville, KY
- Contact:
Re: Dusting off the cobwebs
Mac,
I had meant to ask about the various internal leathers you used but my post seems to have been lost in the ether.
If possible could you tell us a bit about the particular properties you look for in the leather used for each of the different applications?
I had meant to ask about the various internal leathers you used but my post seems to have been lost in the ether.
If possible could you tell us a bit about the particular properties you look for in the leather used for each of the different applications?
Re: Dusting off the cobwebs
Doh! My bad.Tom B. wrote:Mac,
I had meant to ask about the various internal leathers you used but my post seems to have been lost in the ether.
Historically, the "go to" for internal leathers would have been buff. The epidermis will have been removed, and both sides will look about the same.Tom B. wrote:If possible could you tell us a bit about the particular properties you look for in the leather used for each of the different applications?
The thing you want is suppleness without stretchyness. I am using a heavy chrome tanned split. It's basically like those "craft" splits that one can get from Tandy's, but much thicker... about 10oz or so. I bought a lifetime supply of it at a leather store in Syracuse NY about 20 years ago. I have no idea where to get any more. The store is long closed and the brothers who owned it long dead.
Lining strips seem to have been thinner versions of a similar thing... probably an oil tanned (but possibly tawed) calf or perhaps some other ungulate. Sometimes they had the epidermis intact, but often it had been removed.
What you need most here is a relatively thin (4-5 0z) leather that will sew well without tearing out. Deer skin would do OK, but it is a bit too "glovey" and prone to stretching. Chamois ("shammy" from the local auto parts house) has pretty good properties but is a bit thin. I'm using a "nubuck" chrome tanned leather. When I run out, I'm not at all sure where my next side is coming from. One of those "craft splits" of a suitable color might work OK. Perhaps a rule or thumb for lining strip leather might be to ask the question "would I buy work gloves made of this?" If the answer is "no, they'd be too stiff" leave it. If the answer is "no, they'd be too stretchy" leave it. If the answer is " no, they'd wear out in no time", leave it. Lining strip leather is one of those things you have to actually handle (and stick an awl through the edge of) before you buy. If you can stick an awl through it about one thickness from the edge and have trouble tearing it out sideways, that's a good sign. If the awl splits the leather out to the edge, don't even consider it further.
Warning! Mini-rant ahead.
In either of these cases, one has to be wary of falling into the classic reenactor's trap of "pedigree vs. properties". Vegetable tanned leathers will not give you the characteristics you need. If you can't get what they actually did use, you have to substitute something behaves similarly, and not something else that they would have had but didn't use.
Mac
Robert MacPherson
The craftsmen of old had their secrets, and those secrets died with them. We are not the better for that, and neither are they.
http://www.lightlink.com/armory/
http://www.billyandcharlie.com
https://www.facebook.com/BillyAndCharlie
The craftsmen of old had their secrets, and those secrets died with them. We are not the better for that, and neither are they.
http://www.lightlink.com/armory/
http://www.billyandcharlie.com
https://www.facebook.com/BillyAndCharlie
-
Kristoffer
- Archive Member
- Posts: 1697
- Joined: Sat Sep 09, 2000 1:01 am
- Location: Ostersund - Sweden
- Contact:
Re: Dusting off the cobwebs
Great sketch! So you fold the side of the glove while pushing the needle through, then stretch it to make the thread long enough to not fold the glove leather again. How long would you say the stitches are?Mac wrote:
Kristoffer Metsälä
-
James Arlen Gillaspie
- Archive Member
- Posts: 2098
- Joined: Mon Jan 13, 2003 2:01 am
- Location: NY
- Contact:
Re: Dusting off the cobwebs
In my experience, elk is the best gauntlet leather. I am interested in kangaroo, however. Has anyone tried American bison? The elk hide has far less stretch than deer, far tougher, and still supple. I gloved the old 'gothic gauntlet #1' over a decade ago with an elk glove, have worn it often, and it shows little sign of wear. Goat skin gloves require frequent replacement, in my experience. I can get a business card out of my wallet while wearing my gauntlets, so they definitely pass Mac's test.
Last edited by James Arlen Gillaspie on Mon Mar 13, 2017 1:01 pm, edited 1 time in total.
-
Tom B.
- Archive Member
- Posts: 4533
- Joined: Mon Oct 17, 2005 4:15 am
- Location: Nicholasville, KY
- Contact:
Re: Dusting off the cobwebs
I too have been very happy with elk gloves for my current gauntlets.James Arlen Gillaspie wrote:In my experience, elk is the best gauntlet leather. I am interested in kangaroo, however. The elk hide has far less stretch than deer, far tougher, and still supple. I gloved the old 'gothic gauntlet #1' over a decade ago with an elk glove, have worn it often, and it shows little sign of wear. I can get a business card out of my wallet while wearing my gauntlets, so they definitely pass Mac's test.
I bought a sample pack of of kangaroo a few years ago and it did look promising for applications such as the lining for fingers.
The same place that I bought the kangaroo sample pack from also sold gloves but I have never handled a pair.
Re: Dusting off the cobwebs
I'm partial to goatskin, myself, but it wears out rapidly.
If I'm not mistaken, in the custom and use of the leather industry, "elk" is frequently (usually ?) cow hide that has been tanned to resemble deer. The inherent difference between the skins of the Bovidae and the Cervidae may well account for the reduction in stretchyness in the gloves that one buys as "elk" vs "deer", "buck" etc.
That said, a quick search on the web did not confirm what I think I know. I could not get past the guys who were hyping elkskin, and into the technical details and or truth.
Perhaps Kel Rekuta can weigh in and give us the low down.
Mac
Robert MacPherson
The craftsmen of old had their secrets, and those secrets died with them. We are not the better for that, and neither are they.
http://www.lightlink.com/armory/
http://www.billyandcharlie.com
https://www.facebook.com/BillyAndCharlie
The craftsmen of old had their secrets, and those secrets died with them. We are not the better for that, and neither are they.
http://www.lightlink.com/armory/
http://www.billyandcharlie.com
https://www.facebook.com/BillyAndCharlie
Re: Dusting off the cobwebs
That's basically it, but simpler. There's no need to worry about the thread length. You just pull the stitches up snug, and the leather adjusts its self when you put your fingers in the glove.Xtracted wrote: So you fold the side of the glove while pushing the needle through, then stretch it to make the thread long enough to not fold the glove leather again.
I'm assuming that you want to know distance between stitches. It's about 3mm.... sometimes a bit closer to 4. I used the stitches that were already in the glove as a sort of guide, and mostly tried to match that stitch for stitch.Xtracted wrote:How long would you say the stitches are?
Mac
Robert MacPherson
The craftsmen of old had their secrets, and those secrets died with them. We are not the better for that, and neither are they.
http://www.lightlink.com/armory/
http://www.billyandcharlie.com
https://www.facebook.com/BillyAndCharlie
The craftsmen of old had their secrets, and those secrets died with them. We are not the better for that, and neither are they.
http://www.lightlink.com/armory/
http://www.billyandcharlie.com
https://www.facebook.com/BillyAndCharlie
Re: Dusting off the cobwebs
I promised folks at Metlab that I would get them a pic of the armor as soon as I could so they could put a little article in their newsletter. The helmet is not really done yet, and the two chinstrap rivets are just plugged into the holes for now.... but here is pic I took this evening to see how the backdrop and camera angles were working.


Tomorrow I will start in on the helmet padding as soon as I have shoveled the snow that they are predicting for tonight.
Mac
Edit--- I changed the pic for one that was shot from a bit lower to more closely match the statue.
Tomorrow I will start in on the helmet padding as soon as I have shoveled the snow that they are predicting for tonight.
Mac
Edit--- I changed the pic for one that was shot from a bit lower to more closely match the statue.
Last edited by Mac on Wed Mar 15, 2017 8:57 pm, edited 1 time in total.
Robert MacPherson
The craftsmen of old had their secrets, and those secrets died with them. We are not the better for that, and neither are they.
http://www.lightlink.com/armory/
http://www.billyandcharlie.com
https://www.facebook.com/BillyAndCharlie
The craftsmen of old had their secrets, and those secrets died with them. We are not the better for that, and neither are they.
http://www.lightlink.com/armory/
http://www.billyandcharlie.com
https://www.facebook.com/BillyAndCharlie
Re: Dusting off the cobwebs
Fantastic.
-
wcallen
- Archive Member
- Posts: 4777
- Joined: Mon Oct 29, 2001 2:01 am
- Location: North Carolina, USA
- Contact:
Re: Dusting off the cobwebs
A very nice piece of work.
I look forward to seeing whatever bit I can in person.
Wade
I look forward to seeing whatever bit I can in person.
Wade
Re: Dusting off the cobwebs
It's quite amazing how you have been able to recreate this artwork (art representing art) but at the same time adapting it to a real person to be not just art but a working piece of equipment. This is like a double backflip.
-
Chris Gilman

- Archive Member
- Posts: 2467
- Joined: Fri Oct 18, 2002 1:01 am
- Location: Sylmar CA.
- Contact:
Re: Dusting off the cobwebs
Top shelf, as always.
Re: Dusting off the cobwebs
Thanks, Guys!
The beautiful backdrop is 3 yards of quilt lining from Joann's fabrics that rolls onto a 1 1/2 pvc pipe hanging from the I beam in the middle of the shop. The overhead lights are on two circuits, and I have turned off the ones in the back of the room. It's not very professional photographic set up, but it does keep the camera from seeing the shop clutter.
It's still snowing here, but we did not get anything like the terrible depths that the fear mongers predicted. There's about 4" of ice pellets mixed with real snow. It's not deep, but it's heavier than a M F.
Mac
Robert MacPherson
The craftsmen of old had their secrets, and those secrets died with them. We are not the better for that, and neither are they.
http://www.lightlink.com/armory/
http://www.billyandcharlie.com
https://www.facebook.com/BillyAndCharlie
The craftsmen of old had their secrets, and those secrets died with them. We are not the better for that, and neither are they.
http://www.lightlink.com/armory/
http://www.billyandcharlie.com
https://www.facebook.com/BillyAndCharlie
-
Zubeydah

- Dark Overlord Chick of the Universe
- Posts: 104573
- Joined: Thu Aug 18, 2005 7:51 pm
- Location: Oklahoma
- Contact:
Re: Dusting off the cobwebs
Just... stunning.
-
Jason Grimes

- Archive Member
- Posts: 2387
- Joined: Wed Jul 25, 2001 1:01 am
- Location: Fairbanks, AK, USA
- Contact:
-
August Patron
- New Member
- Posts: 10
- Joined: Wed Jan 04, 2017 3:08 pm
Re: Dusting off the cobwebs
I am quite impressed.*
*aka 'stunned'
*aka 'stunned'
Re: Dusting off the cobwebs
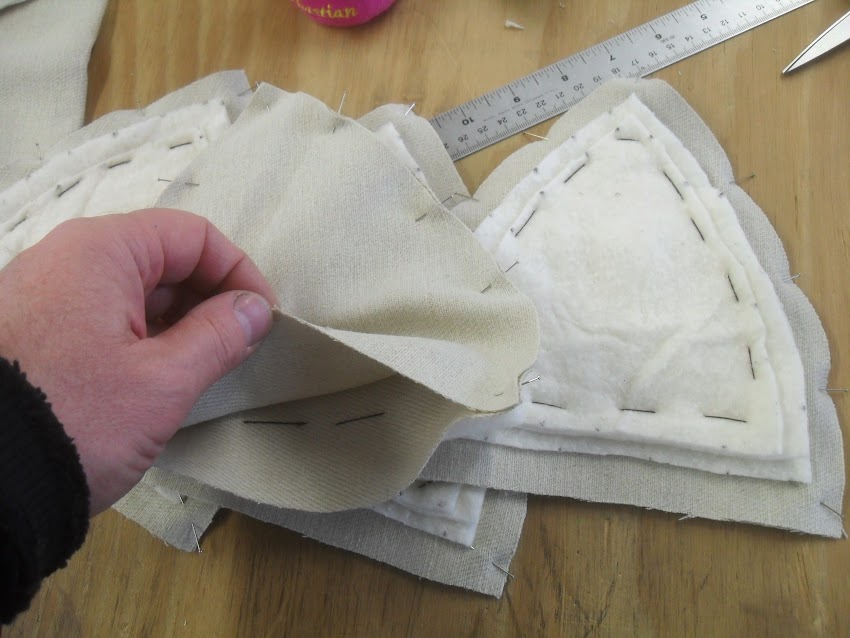
I got a start on the helmet lining today, and will be getting back to it presently.
The early stages of templating are not represented here. It started with a foam liner that fit, and I cut that apart and made some changes. From there it was the cardboard templates that appear in the pic. Paper patterns were made from these, with the addition of hem and seam allowances.

I pinned three layers of cotton batting in place and then basted them in place. It seems like I never use the same procedure twice on helmet linings. This is the first time I have tried basting the batting this way. So far it has been easy, and I am excited to see how this works out.

The pinning..... .... the basting.


Then I trimmed the layers of batting according to a cunning plan. In general, I want some of the batting to go all the way to the seam, and some to be trimmed away enough to make room for the seam allowances. I marked the batting with a ruler and a felt tip pen and cut it with scissors.

When that was done, I pinned the second layer of lining fabric to the patted layer. The next step will be to sew them at 1/2".
Mac
The early stages of templating are not represented here. It started with a foam liner that fit, and I cut that apart and made some changes. From there it was the cardboard templates that appear in the pic. Paper patterns were made from these, with the addition of hem and seam allowances.
I pinned three layers of cotton batting in place and then basted them in place. It seems like I never use the same procedure twice on helmet linings. This is the first time I have tried basting the batting this way. So far it has been easy, and I am excited to see how this works out.
The pinning..... .... the basting.
Then I trimmed the layers of batting according to a cunning plan. In general, I want some of the batting to go all the way to the seam, and some to be trimmed away enough to make room for the seam allowances. I marked the batting with a ruler and a felt tip pen and cut it with scissors.
When that was done, I pinned the second layer of lining fabric to the patted layer. The next step will be to sew them at 1/2".
Mac
Robert MacPherson
The craftsmen of old had their secrets, and those secrets died with them. We are not the better for that, and neither are they.
http://www.lightlink.com/armory/
http://www.billyandcharlie.com
https://www.facebook.com/BillyAndCharlie
The craftsmen of old had their secrets, and those secrets died with them. We are not the better for that, and neither are they.
http://www.lightlink.com/armory/
http://www.billyandcharlie.com
https://www.facebook.com/BillyAndCharlie
Re: Dusting off the cobwebs
Bravo! Very glad you're documenting the lining construction as well. . .
Re: Dusting off the cobwebs
Thank you!August Patron wrote:I am quite impressed.*
*aka 'stunned'
Mac
Robert MacPherson
The craftsmen of old had their secrets, and those secrets died with them. We are not the better for that, and neither are they.
http://www.lightlink.com/armory/
http://www.billyandcharlie.com
https://www.facebook.com/BillyAndCharlie
The craftsmen of old had their secrets, and those secrets died with them. We are not the better for that, and neither are they.
http://www.lightlink.com/armory/
http://www.billyandcharlie.com
https://www.facebook.com/BillyAndCharlie
-
Tom B.
- Archive Member
- Posts: 4533
- Joined: Mon Oct 17, 2005 4:15 am
- Location: Nicholasville, KY
- Contact:
Re: Dusting off the cobwebs
It looks as if St Sebastian is pleased with the helmet liner construction 
Re: Dusting off the cobwebs
Tom B. wrote:It looks as if St Sebastian is pleased with the helmet liner construction
ferrum ferro acuitur et homo exacuit faciem amici sui
Re: Dusting off the cobwebs
St Sebastian was a Christmas present from my wife. As pincushions go, he's a bit top heavy, but I like him.
Mac
Mac
Robert MacPherson
The craftsmen of old had their secrets, and those secrets died with them. We are not the better for that, and neither are they.
http://www.lightlink.com/armory/
http://www.billyandcharlie.com
https://www.facebook.com/BillyAndCharlie
The craftsmen of old had their secrets, and those secrets died with them. We are not the better for that, and neither are they.
http://www.lightlink.com/armory/
http://www.billyandcharlie.com
https://www.facebook.com/BillyAndCharlie
Re: Dusting off the cobwebs
Having sewn the parts together, I trimmed the corners and the seam allowances.

Turning the pads right side in worked very smoothly with the batting basted on. The batting stayed where it was supposed to and there was no need for strong language. I will definitely use that technique again.

The next step is a reality check. I put the pads in the helmet to see if they take up about as much room at they should. If they had somehow ended up too long of short in either dimension I would want to know it now. These look OK.

I usually just start quilting and try to keep the pattern regular. Today, I thought I'd try laying out a 1/2" grid on the backs of the pads to keep me honest.
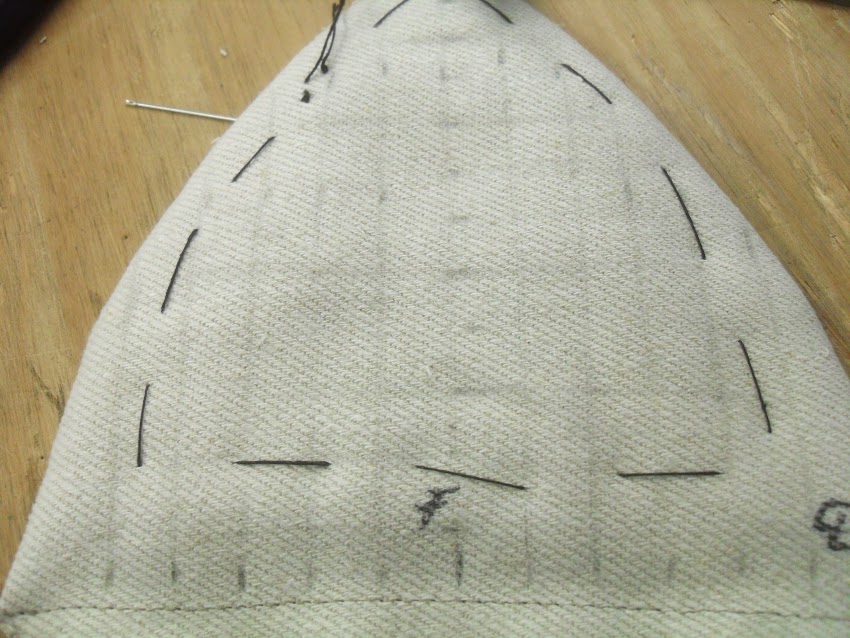
I left the basting in until the quilting was finished.

Here is what the front and back of a pad end up looking like. I'm torn about whether I think it's worth while to lay out a grid. Putting the grid on the back forces one to work from the back. The pattern ends up more regular but the lengths of the "picks" on the front are less regular than if the work had been done from that side. The authentic answer is probably to work form the front and substitute experience for layout.


I started sewing in the eyelets for the drawstring, but only got three of them done before it was time to quit for the night. I'll get pics of them tomorrow.
Mac
Turning the pads right side in worked very smoothly with the batting basted on. The batting stayed where it was supposed to and there was no need for strong language. I will definitely use that technique again.
The next step is a reality check. I put the pads in the helmet to see if they take up about as much room at they should. If they had somehow ended up too long of short in either dimension I would want to know it now. These look OK.
I usually just start quilting and try to keep the pattern regular. Today, I thought I'd try laying out a 1/2" grid on the backs of the pads to keep me honest.
I left the basting in until the quilting was finished.
Here is what the front and back of a pad end up looking like. I'm torn about whether I think it's worth while to lay out a grid. Putting the grid on the back forces one to work from the back. The pattern ends up more regular but the lengths of the "picks" on the front are less regular than if the work had been done from that side. The authentic answer is probably to work form the front and substitute experience for layout.
I started sewing in the eyelets for the drawstring, but only got three of them done before it was time to quit for the night. I'll get pics of them tomorrow.
Mac
Robert MacPherson
The craftsmen of old had their secrets, and those secrets died with them. We are not the better for that, and neither are they.
http://www.lightlink.com/armory/
http://www.billyandcharlie.com
https://www.facebook.com/BillyAndCharlie
The craftsmen of old had their secrets, and those secrets died with them. We are not the better for that, and neither are they.
http://www.lightlink.com/armory/
http://www.billyandcharlie.com
https://www.facebook.com/BillyAndCharlie
-
Gerhard von Liebau
- Archive Member
- Posts: 4942
- Joined: Tue Nov 23, 2004 2:34 pm
- Location: Dinuba, CA
Re: Dusting off the cobwebs
I recently used the same technique to quilt a helmet liner but I had already assembled the four sections into the cap... Methinks you have chosen a wiser path!
-Gerhard
-Gerhard
Re: Dusting off the cobwebs
I try to keep things in manageable units as much as I can.Gerhard von Liebau wrote:I recently used the same technique to quilt a helmet liner but I had already assembled the four sections into the cap... Methinks you have chosen a wiser path!
-Gerhard
Mac
Robert MacPherson
The craftsmen of old had their secrets, and those secrets died with them. We are not the better for that, and neither are they.
http://www.lightlink.com/armory/
http://www.billyandcharlie.com
https://www.facebook.com/BillyAndCharlie
The craftsmen of old had their secrets, and those secrets died with them. We are not the better for that, and neither are they.
http://www.lightlink.com/armory/
http://www.billyandcharlie.com
https://www.facebook.com/BillyAndCharlie