Thank you, Randall!
Mac
Dusting off the cobwebs
Re: Dusting off the cobwebs
Robert MacPherson
The craftsmen of old had their secrets, and those secrets died with them. We are not the better for that, and neither are they.
http://www.lightlink.com/armory/
http://www.billyandcharlie.com
https://www.facebook.com/BillyAndCharlie
The craftsmen of old had their secrets, and those secrets died with them. We are not the better for that, and neither are they.
http://www.lightlink.com/armory/
http://www.billyandcharlie.com
https://www.facebook.com/BillyAndCharlie
Re: Dusting off the cobwebs
I spent a few more hours filing today, but there's not a lot to show for it. That's the thing about spurs... or maybe it just about spurs made by guys who don't do it all the time. Perhaps a pro would be less tentative earlier on, and that would speed the whole process. I guess it's like that with everything, but you'd think spurs would go faster. I mean, hey, they're small... right?
Anyway, the rings are starting to look OK. I made another little design change. I had originally planned to run the profile of the arms right up to the rings, but today I thought I'd like to put a different sort of "stop" in there.
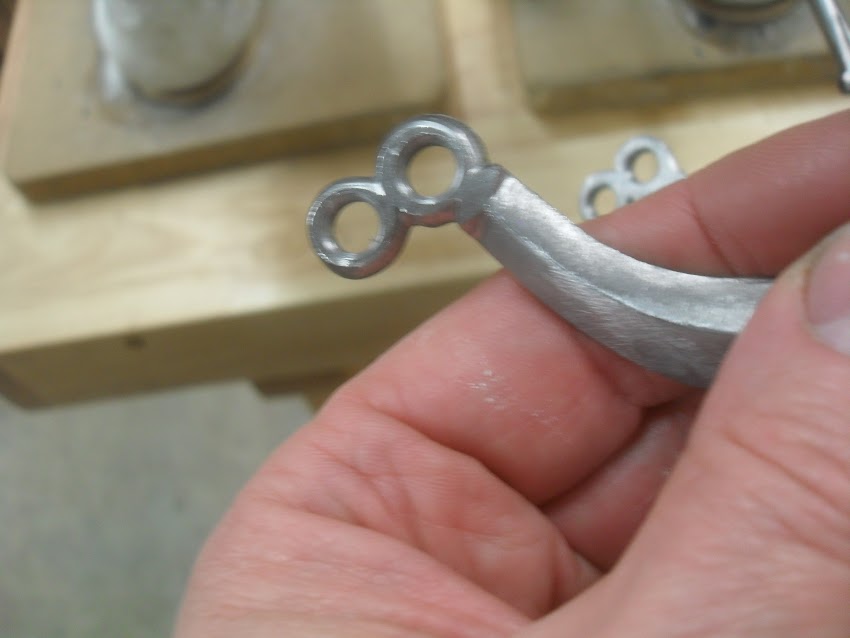
I took these pics to try to show what I meant the other day about why I shortened the comb. I suppose I misspoke really, when I said that it was the abrupt termination of the comb that I needed. It's really just that it needed to be shorter. I could have kept it sinusoidal, but it would have been a different sort of comb.

So, here the deal. With the comb short, I can get the file all the way to the end without any trouble....

...but if it were longer (like I planned them), the file runs afoul of the arm. This is one of those things that the inexperienced guy can't guess until it happens. Perhaps this is my punishment for having mixed and matched elements from several spurs, rather than making a copy of one. Then again, maybe the spur maker just accepts the idea that he has to bend the arms out of the way while he files the comb, and bend them back again later. That would be no big deal if I had not struggled to get the right shape earlier.

Tomorrow I will bend open the crotches where the rowels will go and re-profile the ends. Perhaps I'll even get a start on the rowels.
Mac
Anyway, the rings are starting to look OK. I made another little design change. I had originally planned to run the profile of the arms right up to the rings, but today I thought I'd like to put a different sort of "stop" in there.
I took these pics to try to show what I meant the other day about why I shortened the comb. I suppose I misspoke really, when I said that it was the abrupt termination of the comb that I needed. It's really just that it needed to be shorter. I could have kept it sinusoidal, but it would have been a different sort of comb.
So, here the deal. With the comb short, I can get the file all the way to the end without any trouble....
...but if it were longer (like I planned them), the file runs afoul of the arm. This is one of those things that the inexperienced guy can't guess until it happens. Perhaps this is my punishment for having mixed and matched elements from several spurs, rather than making a copy of one. Then again, maybe the spur maker just accepts the idea that he has to bend the arms out of the way while he files the comb, and bend them back again later. That would be no big deal if I had not struggled to get the right shape earlier.
Tomorrow I will bend open the crotches where the rowels will go and re-profile the ends. Perhaps I'll even get a start on the rowels.
Mac
Robert MacPherson
The craftsmen of old had their secrets, and those secrets died with them. We are not the better for that, and neither are they.
http://www.lightlink.com/armory/
http://www.billyandcharlie.com
https://www.facebook.com/BillyAndCharlie
The craftsmen of old had their secrets, and those secrets died with them. We are not the better for that, and neither are they.
http://www.lightlink.com/armory/
http://www.billyandcharlie.com
https://www.facebook.com/BillyAndCharlie
Re: Dusting off the cobwebs
Mac, I am just amazed at your artistic versatility (and willingness to keep doing things which must not make the best business sense to make the project as right as you know how to make it). Plate armouring and locksmithing and sketching are three things, but gilding and tailoring and spur-making and carpentry too ...
DIS MANIBUS GUILLELMI GENTIS MCLEANUM FAMILIARITER GALLERON DICTI
VIR OMNIBUS ARTIBUS PERITUS
Check out Age of Datini: European Material Culture 1360-1410
VIR OMNIBUS ARTIBUS PERITUS
Check out Age of Datini: European Material Culture 1360-1410
Re: Dusting off the cobwebs
I agree with Sean, I hope at least you don't know how to cook 
Re: Dusting off the cobwebs
Thanks, Sean!Sean M wrote:Mac, I am just amazed at your artistic versatility (and willingness to keep doing things which must not make the best business sense to make the project as right as you know how to make it). Plate armouring and locksmithing and sketching are three things, but gilding and tailoring and spur-making and carpentry too ...
I don't like to use the "A word" about what I do; preferring to think in terms of "Craft". Whenever I allow myself to do something expressive, I get into trouble. I'm at my best when I express someone else's Art.
The problem with being all-sorts-o-Craftsman at once is the old adage "jack of all trades, master of none".
Mac
Robert MacPherson
The craftsmen of old had their secrets, and those secrets died with them. We are not the better for that, and neither are they.
http://www.lightlink.com/armory/
http://www.billyandcharlie.com
https://www.facebook.com/BillyAndCharlie
The craftsmen of old had their secrets, and those secrets died with them. We are not the better for that, and neither are they.
http://www.lightlink.com/armory/
http://www.billyandcharlie.com
https://www.facebook.com/BillyAndCharlie
Re: Dusting off the cobwebs
Filing is easy. Cooking is hard. I watch cooking videos with my wife sometimes, but the whole idea never really sinks in.Signo wrote:I agree with Sean, I hope at least you don't know how to cook
Mac
Robert MacPherson
The craftsmen of old had their secrets, and those secrets died with them. We are not the better for that, and neither are they.
http://www.lightlink.com/armory/
http://www.billyandcharlie.com
https://www.facebook.com/BillyAndCharlie
The craftsmen of old had their secrets, and those secrets died with them. We are not the better for that, and neither are they.
http://www.lightlink.com/armory/
http://www.billyandcharlie.com
https://www.facebook.com/BillyAndCharlie
Re: Dusting off the cobwebs
This morning I came to my senses, and realized that it's absurd to work on the rowel boxes without having the rowels to hand. To that end...
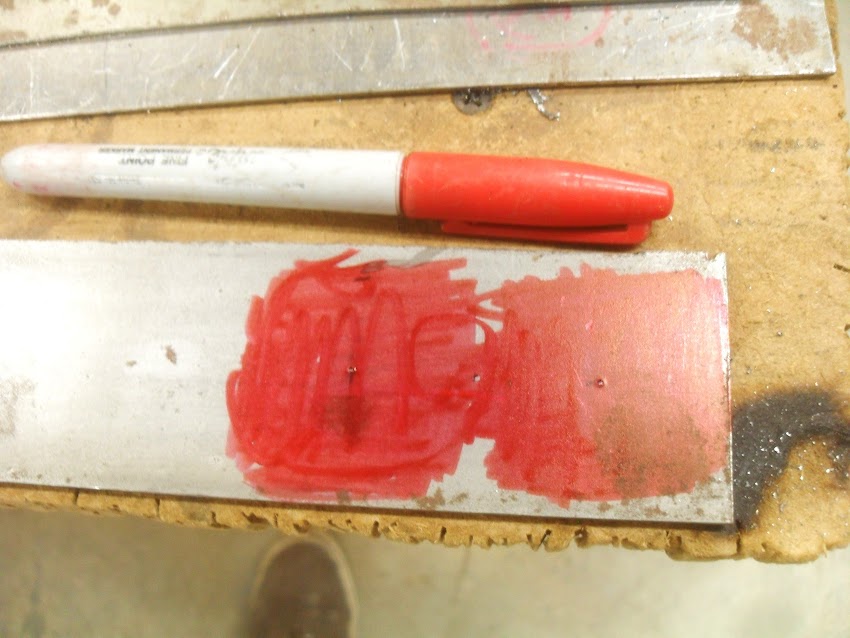
This is 1/8"x 2" cold rolled mild, with the centers of the rowels marked out with a center punch.

Some of the U-tube home machinists use sharpy marker as poor man's layout dye, so I thought I'd give that a try.
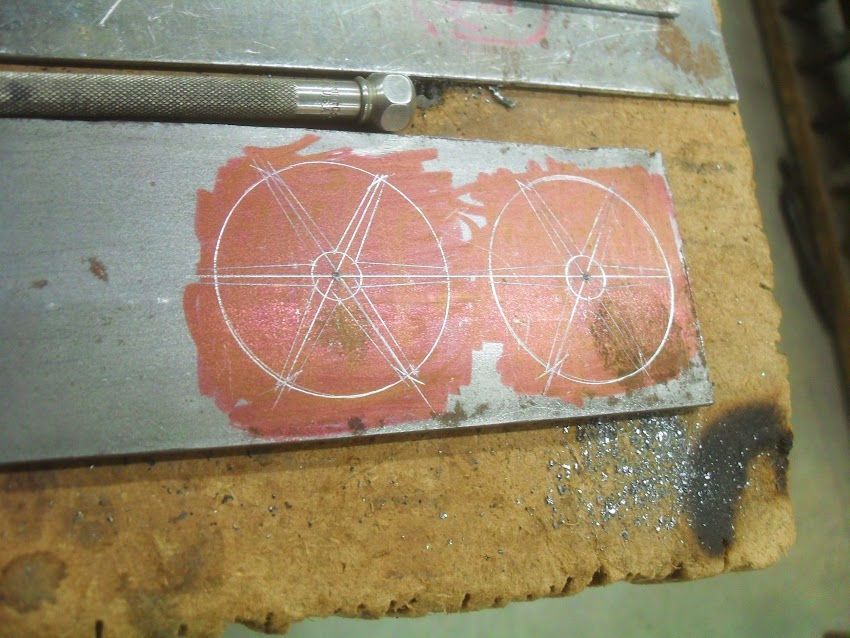
In addition to being very common, six pointed rowels are the easiest thing to lay out. You probably already know the the same compass setting that laid out the diameter will also divide that circle into six.... but just in case you don't.... it's true.

Here are the rest of the layout lines, ready to be cut with....
...you guesses it. The jigsaw. This is not by any means "best practice". A metal cutting bandsaw would be better. If you made spurs all the time, it would be nice to have them laser or water jet cut.
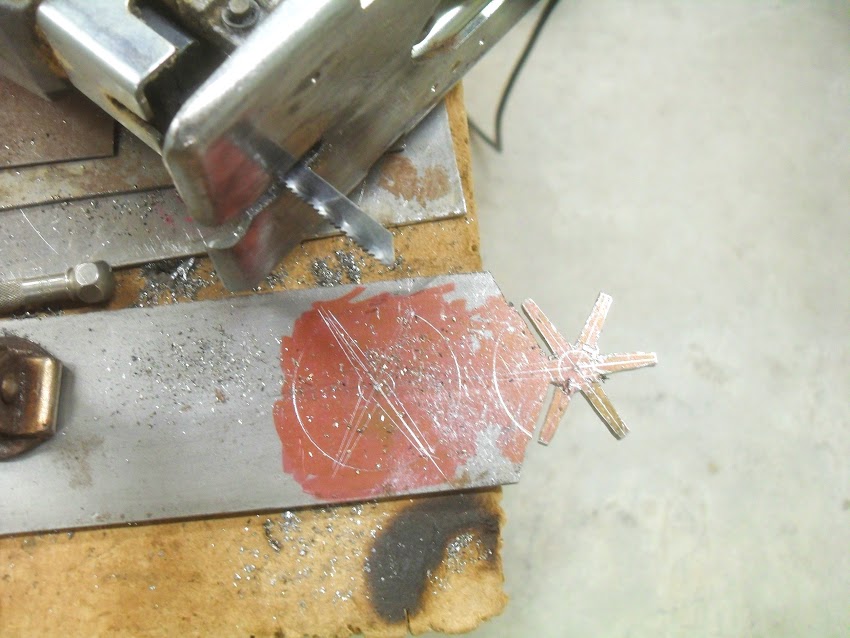
This is as far as I could get with the barbarous instrument before running into the clamp that held the work to the bench. I had to finish off the cuts the vise and hacksaw.

All in all, it worked OK. There's only one or two points where I strayed across the lines a bit, and that will file out without much trouble.

It's time to get the holes drilled before things get too far along. I didn't want to tax my RW #5 by trying to punch them, so I used the drill press. The vise is not very tight and it's not clamped down. It's really only there to keep them from spinning like shurikens of maiming and destruction.

Here's what they looked like after about a half hour of work with a barrette file. I spent some more time later getting them to look even to the eye, and making all the points be the same length and width. No measurements involved with that. I used a divider for the lengths and a caliper for the widths. The shortest and the narrowest served as the models for all.

I did a bit of tapering of the points on the belt sander, and then broke off the arrises with the barrette file.

They are starting to take shape, and I have the ends down to regular octagons... more or less.


I'm not sure where I am going from here, so I will look at some pics before doing anything else.
Mac
This is 1/8"x 2" cold rolled mild, with the centers of the rowels marked out with a center punch.
Some of the U-tube home machinists use sharpy marker as poor man's layout dye, so I thought I'd give that a try.
In addition to being very common, six pointed rowels are the easiest thing to lay out. You probably already know the the same compass setting that laid out the diameter will also divide that circle into six.... but just in case you don't.... it's true.
Here are the rest of the layout lines, ready to be cut with....
...you guesses it. The jigsaw. This is not by any means "best practice". A metal cutting bandsaw would be better. If you made spurs all the time, it would be nice to have them laser or water jet cut.
This is as far as I could get with the barbarous instrument before running into the clamp that held the work to the bench. I had to finish off the cuts the vise and hacksaw.
All in all, it worked OK. There's only one or two points where I strayed across the lines a bit, and that will file out without much trouble.
It's time to get the holes drilled before things get too far along. I didn't want to tax my RW #5 by trying to punch them, so I used the drill press. The vise is not very tight and it's not clamped down. It's really only there to keep them from spinning like shurikens of maiming and destruction.
Here's what they looked like after about a half hour of work with a barrette file. I spent some more time later getting them to look even to the eye, and making all the points be the same length and width. No measurements involved with that. I used a divider for the lengths and a caliper for the widths. The shortest and the narrowest served as the models for all.
I did a bit of tapering of the points on the belt sander, and then broke off the arrises with the barrette file.
They are starting to take shape, and I have the ends down to regular octagons... more or less.
I'm not sure where I am going from here, so I will look at some pics before doing anything else.
Mac
Robert MacPherson
The craftsmen of old had their secrets, and those secrets died with them. We are not the better for that, and neither are they.
http://www.lightlink.com/armory/
http://www.billyandcharlie.com
https://www.facebook.com/BillyAndCharlie
The craftsmen of old had their secrets, and those secrets died with them. We are not the better for that, and neither are they.
http://www.lightlink.com/armory/
http://www.billyandcharlie.com
https://www.facebook.com/BillyAndCharlie
Re: Dusting off the cobwebs
I looked at some pics, and it seemed like the obvious thing to do was just make them a bit thinner and pointier. So, that's what I did.

Mac
Mac
Robert MacPherson
The craftsmen of old had their secrets, and those secrets died with them. We are not the better for that, and neither are they.
http://www.lightlink.com/armory/
http://www.billyandcharlie.com
https://www.facebook.com/BillyAndCharlie
The craftsmen of old had their secrets, and those secrets died with them. We are not the better for that, and neither are they.
http://www.lightlink.com/armory/
http://www.billyandcharlie.com
https://www.facebook.com/BillyAndCharlie
Re: Dusting off the cobwebs
The first thing I did this morning was spread open the legs of the rowel boxes. I applied heat with a torch and pried them apart with a chisel. With a bit of care directing the flame and by prying in different directions, they opened up symmetrically.

Then I pinched them closed around a mandrel made of the same stuff as the rowels. The mandrel was tapered like the rowel tines, but just a bit thicker for clearance. The area was heated with a torch to relax the metal around the mandrel.

That did not quite get the result I wanted, so I temporarily riveted the assemblies and coaxed them down to the mandrel with the torch and hammer. This pic is from just before the heating and tapping, and you can see the gap I'm trying to close.
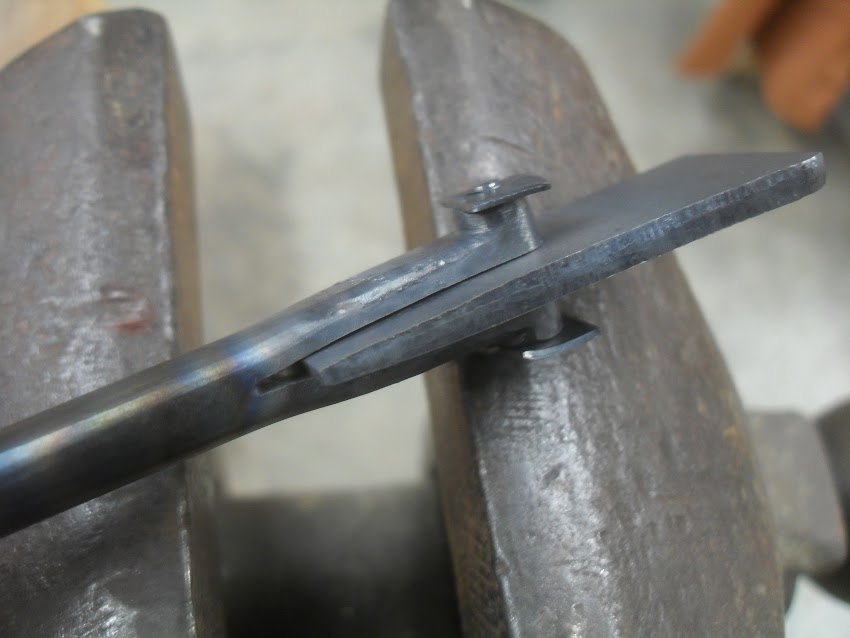
That worked OK. The rowels fit a bit tightly at the centers, but a bit of filing of the insides of the boxes fixed that.

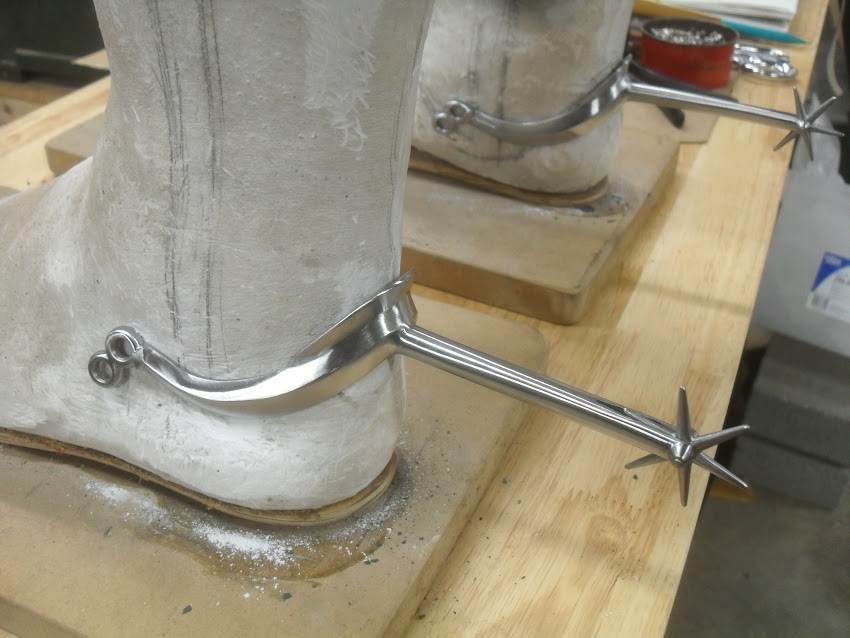
The next step was to reduce the thickness of the legs of the rowel boxes so that the spur necks were graceful. This had the added and anticipated benefit of making the bosses for the rowel pivot longer.

Than came the part I had sort of been looking forward to from the start. A bit of grinding and filing brought the bosses to a conical shape. I may carry this a bit further yet, but I have to check my picture references to see if that's what I should do. At the very least, I will probably round off the edge a bit.

Definitely looking more like spurs.

Mac
Then I pinched them closed around a mandrel made of the same stuff as the rowels. The mandrel was tapered like the rowel tines, but just a bit thicker for clearance. The area was heated with a torch to relax the metal around the mandrel.
That did not quite get the result I wanted, so I temporarily riveted the assemblies and coaxed them down to the mandrel with the torch and hammer. This pic is from just before the heating and tapping, and you can see the gap I'm trying to close.
That worked OK. The rowels fit a bit tightly at the centers, but a bit of filing of the insides of the boxes fixed that.
The next step was to reduce the thickness of the legs of the rowel boxes so that the spur necks were graceful. This had the added and anticipated benefit of making the bosses for the rowel pivot longer.
Than came the part I had sort of been looking forward to from the start. A bit of grinding and filing brought the bosses to a conical shape. I may carry this a bit further yet, but I have to check my picture references to see if that's what I should do. At the very least, I will probably round off the edge a bit.
Definitely looking more like spurs.
Mac
Robert MacPherson
The craftsmen of old had their secrets, and those secrets died with them. We are not the better for that, and neither are they.
http://www.lightlink.com/armory/
http://www.billyandcharlie.com
https://www.facebook.com/BillyAndCharlie
The craftsmen of old had their secrets, and those secrets died with them. We are not the better for that, and neither are they.
http://www.lightlink.com/armory/
http://www.billyandcharlie.com
https://www.facebook.com/BillyAndCharlie
-
Aussie Yeoman
- Archive Member
- Posts: 919
- Joined: Tue Apr 11, 2006 10:16 pm
- Location: Canberra, Australia
Re: Dusting off the cobwebs
They look tremendous, of course. Will they get washers of brass or something between the rowels and boxes?
-
Cet

- Archive Member
- Posts: 2985
- Joined: Thu Apr 18, 2002 1:01 am
- Location: jobstown, nj. usa
- Contact:
Re: Dusting off the cobwebs
will these be plated?
Re: Dusting off the cobwebs
Thank you!Aussie Yeoman wrote:They look tremendous, of course. Will they get washers of brass or something between the rowels and boxes?
So far as I can tell, no one uses any sort of washers. The rowels fit with a fair amount of slop, and spin freely.
Mac
Robert MacPherson
The craftsmen of old had their secrets, and those secrets died with them. We are not the better for that, and neither are they.
http://www.lightlink.com/armory/
http://www.billyandcharlie.com
https://www.facebook.com/BillyAndCharlie
The craftsmen of old had their secrets, and those secrets died with them. We are not the better for that, and neither are they.
http://www.lightlink.com/armory/
http://www.billyandcharlie.com
https://www.facebook.com/BillyAndCharlie
Re: Dusting off the cobwebs
We haven't discussed it, but gold seems like the only option. White steel would look out of place with the rest of the armor.Cet wrote:will these be plated?
Mac
Robert MacPherson
The craftsmen of old had their secrets, and those secrets died with them. We are not the better for that, and neither are they.
http://www.lightlink.com/armory/
http://www.billyandcharlie.com
https://www.facebook.com/BillyAndCharlie
The craftsmen of old had their secrets, and those secrets died with them. We are not the better for that, and neither are they.
http://www.lightlink.com/armory/
http://www.billyandcharlie.com
https://www.facebook.com/BillyAndCharlie
Re: Dusting off the cobwebs
I spent most of the afternoon furthering the finish. I also went back and made those conical bosses a bit pointier. They look better for it.
Mac
Mac
Robert MacPherson
The craftsmen of old had their secrets, and those secrets died with them. We are not the better for that, and neither are they.
http://www.lightlink.com/armory/
http://www.billyandcharlie.com
https://www.facebook.com/BillyAndCharlie
The craftsmen of old had their secrets, and those secrets died with them. We are not the better for that, and neither are they.
http://www.lightlink.com/armory/
http://www.billyandcharlie.com
https://www.facebook.com/BillyAndCharlie
-
Chris Gilman

- Archive Member
- Posts: 2467
- Joined: Fri Oct 18, 2002 1:01 am
- Location: Sylmar CA.
- Contact:
Re: Dusting off the cobwebs
Couldn't be more handsome.
Now that you're all "roweled up", perhaps you will be spurred on to do another armour.
Now that you're all "roweled up", perhaps you will be spurred on to do another armour.
-
Chris Gilman
- Archive Member
- Posts: 2467
- Joined: Fri Oct 18, 2002 1:01 am
- Location: Sylmar CA.
- Contact:
Re: Dusting off the cobwebs
I hope I didn't come across as a prick.
-
Tom B.
- Archive Member
- Posts: 4533
- Joined: Mon Oct 17, 2005 4:15 am
- Location: Nicholasville, KY
- Contact:
Re: Dusting off the cobwebs
These are looking great!
I am very interested in seeing how these interact with the sabatons & greaves.
I have found a few images that may shed a bit of light on how spurs of the straight sort were worn.
A spin off thread may be warranted.
When I have a few more images I will create the thread and post the link here.
I am very interested in seeing how these interact with the sabatons & greaves.
I have found a few images that may shed a bit of light on how spurs of the straight sort were worn.
A spin off thread may be warranted.
When I have a few more images I will create the thread and post the link here.
Re: Dusting off the cobwebs
I've got a tentative design for the fittings now. This is not the way to do it, really. The fittings should have been included in the initial sketches for the spurs.
It seems like some variant of the triangle-fan-arrowhead thing is pretty common, so that's what I'm going to do. My initial thought was a width of about 1/2" or 5/8" (12mm 15mm), but when I looked at images that I could scale up or down on my screen, 3/4" (19mm) seemed to be the typical size. That's nice, because it will let me use the same buckle frames I have been using. I should probably check how the widths of the excavated spur leathers from London compare.

I'm still conflicted about what thickness to start with. I've spec'ed 3/32" (2.4mm) in my sketch, but I need to make one up and see how I like it before I commit.
Mac
It seems like some variant of the triangle-fan-arrowhead thing is pretty common, so that's what I'm going to do. My initial thought was a width of about 1/2" or 5/8" (12mm 15mm), but when I looked at images that I could scale up or down on my screen, 3/4" (19mm) seemed to be the typical size. That's nice, because it will let me use the same buckle frames I have been using. I should probably check how the widths of the excavated spur leathers from London compare.
I'm still conflicted about what thickness to start with. I've spec'ed 3/32" (2.4mm) in my sketch, but I need to make one up and see how I like it before I commit.
Mac
Robert MacPherson
The craftsmen of old had their secrets, and those secrets died with them. We are not the better for that, and neither are they.
http://www.lightlink.com/armory/
http://www.billyandcharlie.com
https://www.facebook.com/BillyAndCharlie
The craftsmen of old had their secrets, and those secrets died with them. We are not the better for that, and neither are they.
http://www.lightlink.com/armory/
http://www.billyandcharlie.com
https://www.facebook.com/BillyAndCharlie
-
wcallen
- Archive Member
- Posts: 4777
- Joined: Mon Oct 29, 2001 2:01 am
- Location: North Carolina, USA
- Contact:
Re: Dusting off the cobwebs
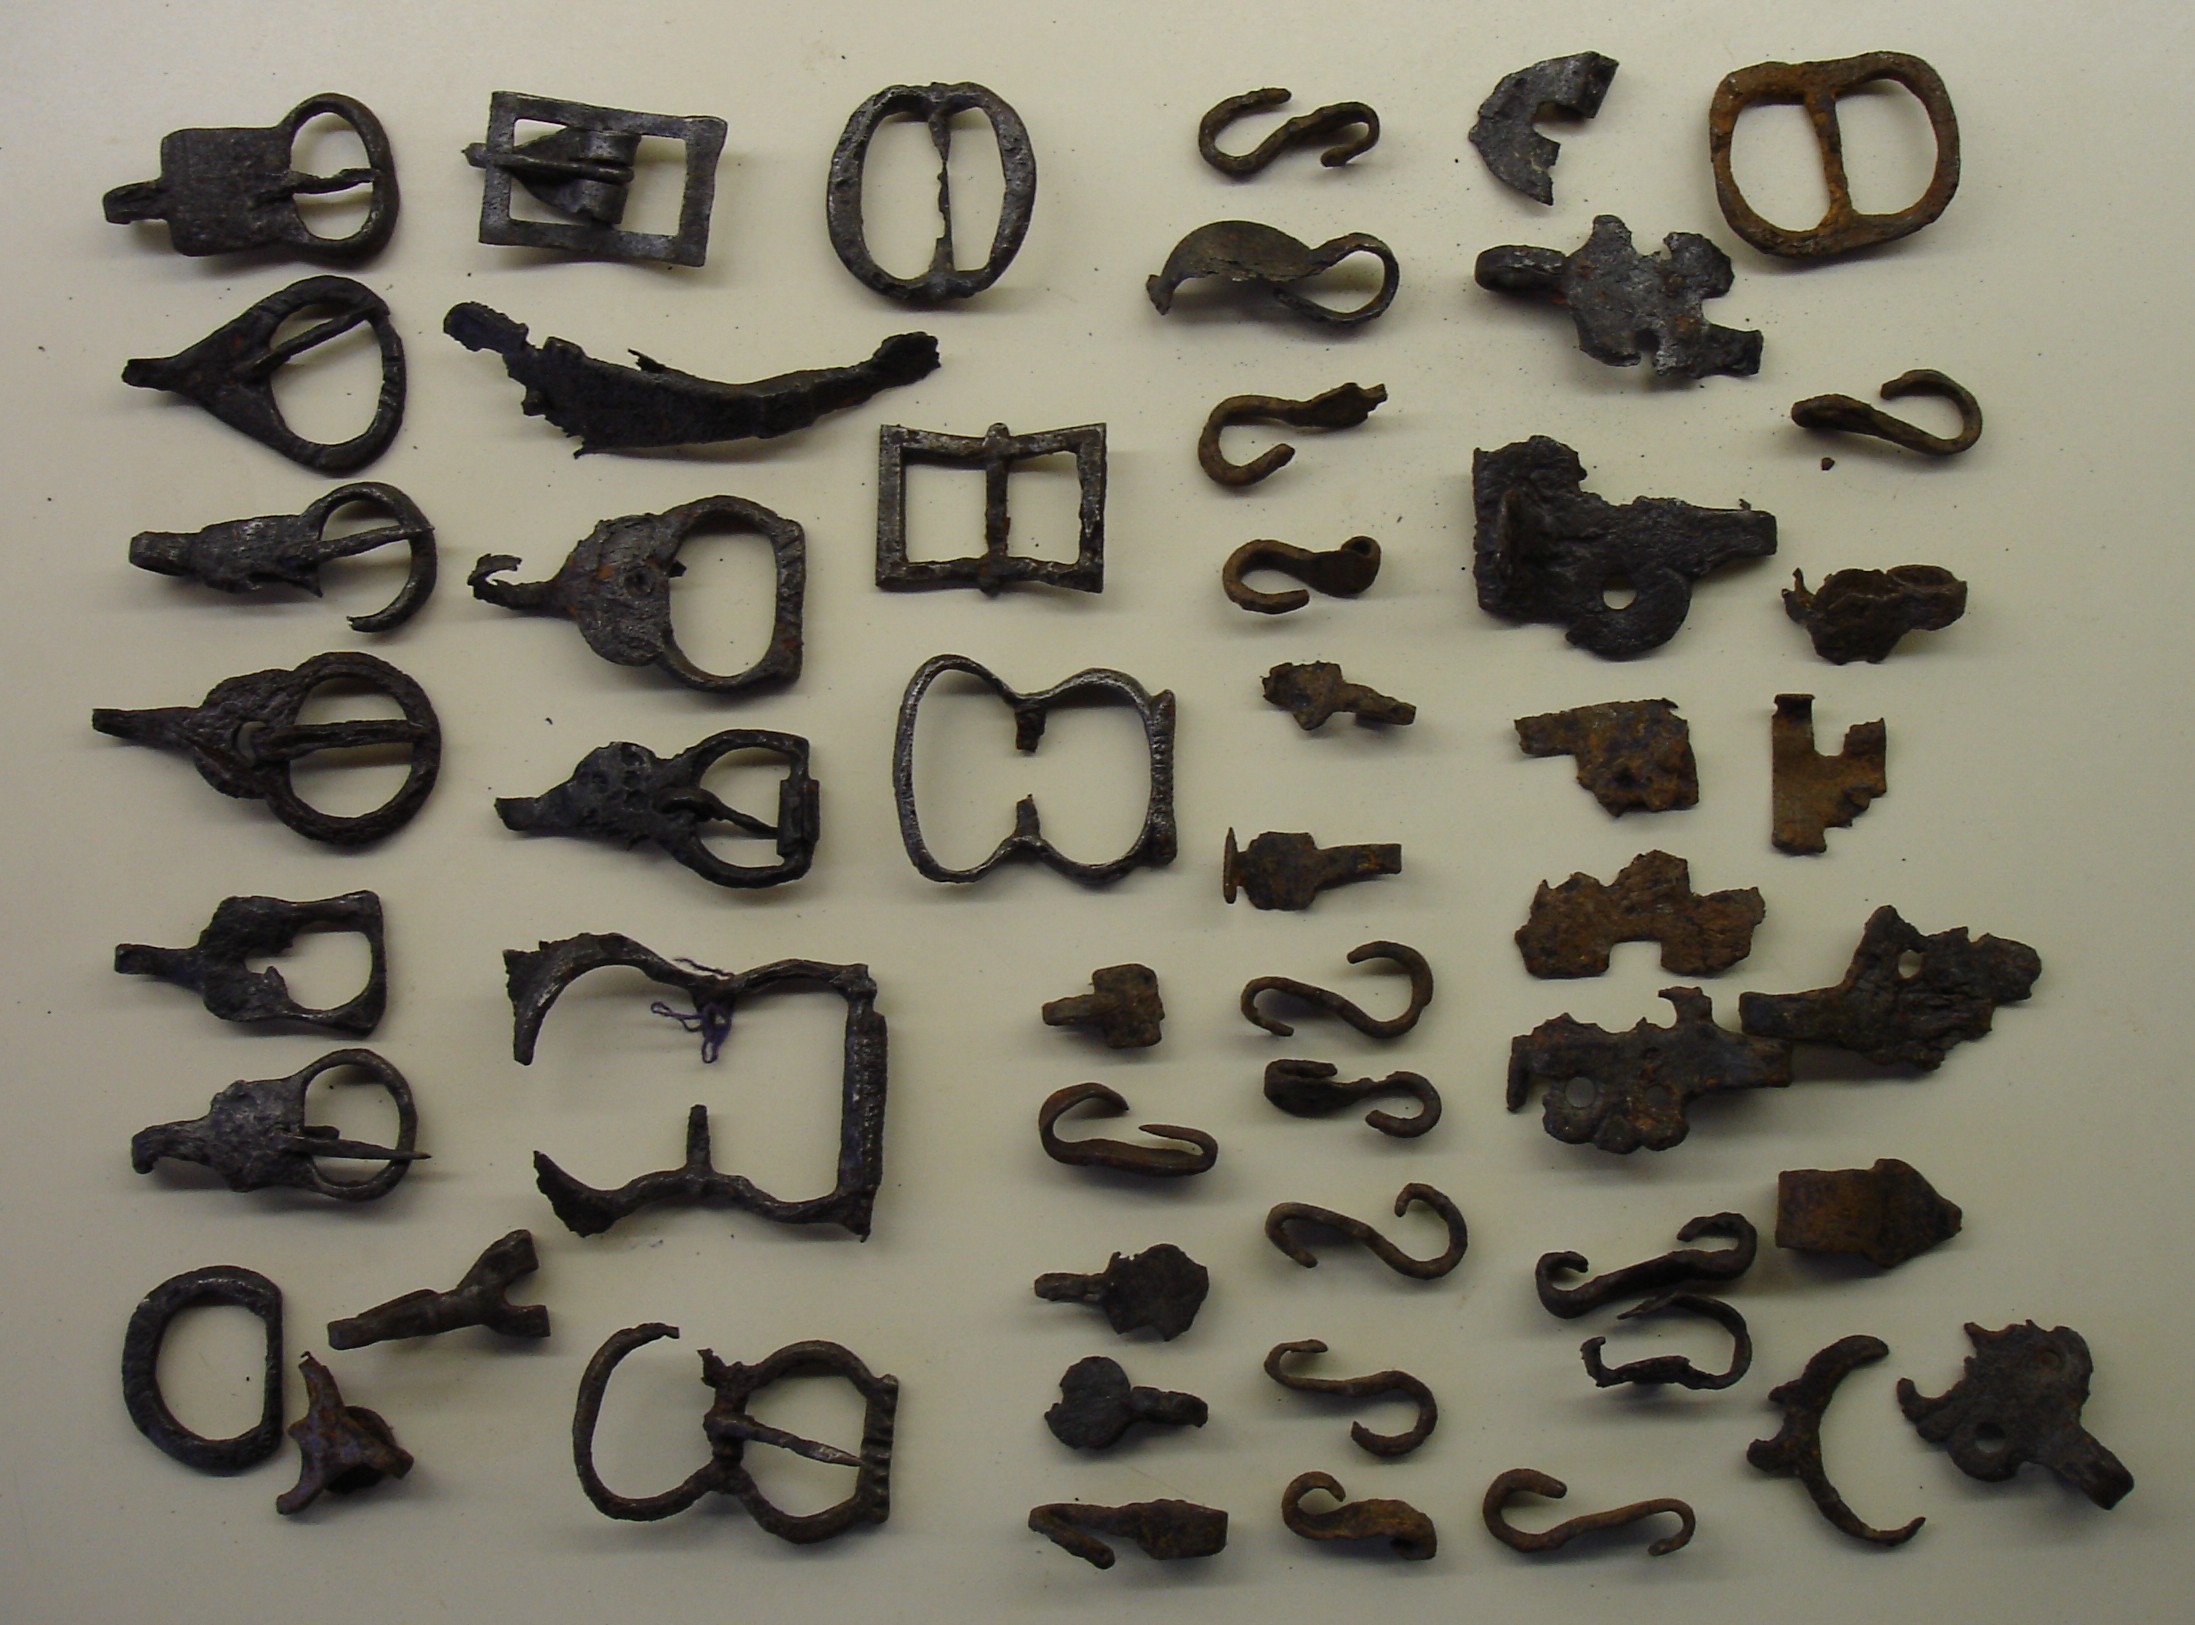
I have a random pile of spur bits that aren't associated with actual spurs anymore.
http://www.allenantiques.com/images/Dec ... rParts.jpg
Several of them happen to be sitting on their sides. That could help with thickness. The bits on a few spurs I can reach seem to be pretty variable at this point after years in the ground. .050-095 happens. .065-.075 is probably more common. Sometimes the bent parts are the same thickness, often it is thicker. Sometimes the ends are actually formed into shapes. I expect that they were thickening parts and thinning other parts, not just cutting them from sheet normally.
Wade
Re: Dusting off the cobwebs
My Metal Supermarket guys' phone was busy all afternoon, and I didn't want to just drive down there to find that they had taken the day off.... so I'm behind schedule on the spur fittings. I did get a couple of buckle frames profiled, though.
Mac
Mac
Robert MacPherson
The craftsmen of old had their secrets, and those secrets died with them. We are not the better for that, and neither are they.
http://www.lightlink.com/armory/
http://www.billyandcharlie.com
https://www.facebook.com/BillyAndCharlie
The craftsmen of old had their secrets, and those secrets died with them. We are not the better for that, and neither are they.
http://www.lightlink.com/armory/
http://www.billyandcharlie.com
https://www.facebook.com/BillyAndCharlie
Re: Dusting off the cobwebs
Wade,
I see from some of the other stuff I've looked at that (as you say) the bent parts are sometimes thicker than the flat parts. In the past I've thinned out the flat parts, mostly. It's easier to thin the one than to thicken the other.
What do you find the thickness of the loops and hooks to be? Am I about right with 3/32"?... or is that too heavy?
Mac
Robert MacPherson
The craftsmen of old had their secrets, and those secrets died with them. We are not the better for that, and neither are they.
http://www.lightlink.com/armory/
http://www.billyandcharlie.com
https://www.facebook.com/BillyAndCharlie
The craftsmen of old had their secrets, and those secrets died with them. We are not the better for that, and neither are they.
http://www.lightlink.com/armory/
http://www.billyandcharlie.com
https://www.facebook.com/BillyAndCharlie
Re: Dusting off the cobwebs
I've got a pile similar to Wade's. This one looks closest to your drawing. What measurements would you like? I can also take better photos:)
- Attachments
-
- IMG_1533.JPG (59.12 KiB) Viewed 18879 times
Gaukler Medieval Wares
http://www.medievalwares.com
http://www.medievalwares.com
-
wcallen
- Archive Member
- Posts: 4777
- Joined: Mon Oct 29, 2001 2:01 am
- Location: North Carolina, USA
- Contact:
Re: Dusting off the cobwebs
Thickness of the loops is hard for me to get reliably.
The ones that are thicker can be narrower. The thinner ones tend to be wider. One appears to be .15 x .08 or a little less. Some other pieces seem to be around .11...
If you are aiming for the flatter form of loop, 3/32 was a bit thick. If you want the more even shape hit it from the sides a couple of times and it will thicken just a bit, and be perfect.
So, you can go either way.
And all of this is very variable. I wouldn't want to start with thinner than .06, and I wouldn't want to start with much over .125, but I expect anything in there could be made to work depending on how you work the material. 3/32, 12g... probably reasonable.
Wade
Re: Dusting off the cobwebs
Thank you Wade, and Gaukler!
I made up a test in .073" this evening, and that seems to be plenty of thickness for the loops.

Once I had a prototype in hand, I could compare it to what I was seeing in pics on the web etc. I could see what I needed to change...
--the hook is too long
--the body is too long
--the loop is too short
--the loop should be bent the other way

That last one was a bit of a surprise, but there seems to be no question about it. I'm pretty sure that every one I looked at has the loop closing on the outside. I'm not sure I understand why, but that's the way I will make them.
I've made some changes to the dimensions in my notebook, and will try another prototype tomorrow. The body will be shorter by 1/8", the loop longer by the same, and the hook shorter by 3/16"

Mac
I made up a test in .073" this evening, and that seems to be plenty of thickness for the loops.
Once I had a prototype in hand, I could compare it to what I was seeing in pics on the web etc. I could see what I needed to change...
--the hook is too long
--the body is too long
--the loop is too short
--the loop should be bent the other way
That last one was a bit of a surprise, but there seems to be no question about it. I'm pretty sure that every one I looked at has the loop closing on the outside. I'm not sure I understand why, but that's the way I will make them.
I've made some changes to the dimensions in my notebook, and will try another prototype tomorrow. The body will be shorter by 1/8", the loop longer by the same, and the hook shorter by 3/16"
Mac
Robert MacPherson
The craftsmen of old had their secrets, and those secrets died with them. We are not the better for that, and neither are they.
http://www.lightlink.com/armory/
http://www.billyandcharlie.com
https://www.facebook.com/BillyAndCharlie
The craftsmen of old had their secrets, and those secrets died with them. We are not the better for that, and neither are they.
http://www.lightlink.com/armory/
http://www.billyandcharlie.com
https://www.facebook.com/BillyAndCharlie
-
wcallen
- Archive Member
- Posts: 4777
- Joined: Mon Oct 29, 2001 2:01 am
- Location: North Carolina, USA
- Contact:
Re: Dusting off the cobwebs
Yes, their design approaches are counter to the way we think things should be done in interesting ways.
I did my loops (before I owned the spurs) the way you did. It just seemed right. But... that doesn't seem to be how they thought.
Some of the ends just die out in a boring way. Some of them are thickened and this allows them to decorate them a little bit. It is hard to tell exactly how in my examples, rot has set in. But there do seem to be lots of choices.
I expect that you will thin out the tail for the strap some, esp. after the bend. There shouldn't be any reason for a lot of thickness there and it will likely wear on the shoe.
There is certainly a lot of fiddling in these little tiny pieces hanging off of the spur. I expect that is why modern spurs use slots and pass the strap through them. Less work. There was a time when they did that on one side on medieval spurs too, but it is to early for your project.
Wade
Re: Dusting off the cobwebs
[quote="wcallen"
I expect that you will thin out the tail for the strap some, esp. after the bend. There shouldn't be any reason for a lot of thickness there and it will likely wear on the shoe.
[/quote]
I didn't thin the hooks on the test, but I expect to on the final ones.
The hooks are a bit of a puzzle for me. It's not clear just how much space to leave under them for the leather. If you make them with very little space, they sit down nicely into the leather, and don't protrude much against the shoes. The down side of that is that it's difficult to get the leather onto the hooks.
The length of the hooks is an issue as well. Long ones are obviously more secure, but again, they make it difficult to install the leather.
It's pretty obvious that I'm overthinking this, and I just need to do the most common and normal thing and it will work fine.
Mac
Robert MacPherson
The craftsmen of old had their secrets, and those secrets died with them. We are not the better for that, and neither are they.
http://www.lightlink.com/armory/
http://www.billyandcharlie.com
https://www.facebook.com/BillyAndCharlie
The craftsmen of old had their secrets, and those secrets died with them. We are not the better for that, and neither are they.
http://www.lightlink.com/armory/
http://www.billyandcharlie.com
https://www.facebook.com/BillyAndCharlie
-
Scott Martin

- Archive Member
- Posts: 1074
- Joined: Wed May 23, 2012 3:34 pm
- Location: Calgary AB, Canada
- Contact:
Re: Dusting off the cobwebs
But first you need to figure out the most common and normal thing, which as Wade has pointed out is not always obvious to us hundreds of years later.
Scott
Scott
-
Alex Baird

- Archive Member
- Posts: 16809
- Joined: Wed Feb 27, 2008 2:55 pm
- Location: Santa Clarita, CA
Re: Dusting off the cobwebs
I'm sure this is a complete tyro question, but why wouldn't you punch a hole in the leather, make the first bend and insert the hook while at 90º angle, and then bend the back up, rather than preform a complete U shape?Mac wrote: The hooks are a bit of a puzzle for me. It's not clear just how much space to leave under them for the leather. If you make them with very little space, they sit down nicely into the leather, and don't protrude much against the shoes. The down side of that is that it's difficult to get the leather onto the hooks.
No, really, I'm serious. Look at my face. 
Re: Dusting off the cobwebs
Here's MK II, next to MK I.

Shorter hook, longer loop, "S" shaped side view.

The leather hooks on nicely.


I'm a bit concerned with how much real estate it's going to take up under the sabatons, though. Perhaps I need to tighten the hooks a bit more, and use thinner leather.

I guess there's nothing to it but to make six of these. This is another part that would benefit from laser of water jet cutting.
Mac
Shorter hook, longer loop, "S" shaped side view.
The leather hooks on nicely.
I'm a bit concerned with how much real estate it's going to take up under the sabatons, though. Perhaps I need to tighten the hooks a bit more, and use thinner leather.
I guess there's nothing to it but to make six of these. This is another part that would benefit from laser of water jet cutting.
Mac
Robert MacPherson
The craftsmen of old had their secrets, and those secrets died with them. We are not the better for that, and neither are they.
http://www.lightlink.com/armory/
http://www.billyandcharlie.com
https://www.facebook.com/BillyAndCharlie
The craftsmen of old had their secrets, and those secrets died with them. We are not the better for that, and neither are they.
http://www.lightlink.com/armory/
http://www.billyandcharlie.com
https://www.facebook.com/BillyAndCharlie
Re: Dusting off the cobwebs
I'm pretty sure that these are designed so that the leathers are easy to change out. The one under the foot is going to wear out rapidly, and if you had to re-bent the hook every time, the fittings would fatigue. As further evidence, some styles of fitting have "T" shaped hooks. These must take a leather with a lengthwise slot which then gets turned 90°. There's one in Wade's collection, about half way down the column of hooks. This fancy Polish pair has them as well.... for the tread leather, anyway. It's hard to see is the instep leather fitting has something going on in the shadows or whether it riveted on(!)Alex Baird wrote:I'm sure this is a complete tyro question, but why wouldn't you punch a hole in the leather, make the first bend and insert the hook while at 90º angle, and then bend the back up, rather than preform a complete U shape?Mac wrote: The hooks are a bit of a puzzle for me. It's not clear just how much space to leave under them for the leather. If you make them with very little space, they sit down nicely into the leather, and don't protrude much against the shoes. The down side of that is that it's difficult to get the leather onto the hooks.

Mac
Robert MacPherson
The craftsmen of old had their secrets, and those secrets died with them. We are not the better for that, and neither are they.
http://www.lightlink.com/armory/
http://www.billyandcharlie.com
https://www.facebook.com/BillyAndCharlie
The craftsmen of old had their secrets, and those secrets died with them. We are not the better for that, and neither are they.
http://www.lightlink.com/armory/
http://www.billyandcharlie.com
https://www.facebook.com/BillyAndCharlie
Re: Dusting off the cobwebs
It's true. The best we can do is to examine as much evidence as we can and see what patterns emerge.Scott Martin wrote:But first you need to figure out the most common and normal thing, which as Wade has pointed out is not always obvious to us hundreds of years later.
Scott
Some of the extant archeological fittings look a bit cheesy, but it's hard to say how much they might have lost to oxidation. The ones in old collections (the which have never been in the ground) tend to look a bit more robust.
It's clear that the fittings have to be strong enough not to fail in normal use. It's also clear that something (either the fittings of the leather) will fail under extreme circumstances. That's probably not a bad thing, really.

Mac
Robert MacPherson
The craftsmen of old had their secrets, and those secrets died with them. We are not the better for that, and neither are they.
http://www.lightlink.com/armory/
http://www.billyandcharlie.com
https://www.facebook.com/BillyAndCharlie
The craftsmen of old had their secrets, and those secrets died with them. We are not the better for that, and neither are they.
http://www.lightlink.com/armory/
http://www.billyandcharlie.com
https://www.facebook.com/BillyAndCharlie
-
Johann ColdIron

- Archive Member
- Posts: 7421
- Joined: Mon Mar 03, 2003 2:01 am
- Location: Raleigh, NC
Re: Dusting off the cobwebs
As someone who has gone for a ride when my spurs caught on something I can admit that a breakaway feature would come in handy in an extreme circumstance!Mac wrote:
It's clear that the fittings have to be strong enough not to fail in normal use. It's also clear that something (either the fittings of the leather) will fail under extreme circumstances. That's probably not a bad thing, really.
Mac
John Cope/ Sir Johann ColdIron, Master- Order of the Laurel
I'm not dead yet!
I'm not dead yet!
-
Jason Grimes

- Archive Member
- Posts: 2387
- Joined: Wed Jul 25, 2001 1:01 am
- Location: Fairbanks, AK, USA
- Contact:
Re: Dusting off the cobwebs
Also most of the force on the spur when in use is just going to be down the arm and into the heel. The straps just have to keep them on, not take any other forces.
Jason
Re: Dusting off the cobwebs
The frame of the buckle in the photo varies between .078 and .118".The buckle plate is between .016 and .039". The hook averages .078 in thickness.
Gaukler Medieval Wares
http://www.medievalwares.com
http://www.medievalwares.com