Bascinet prototype and "can" or "house" construction

This forum is designed to help us spread the knowledge of armouring.
Mac
Archive Member
Posts: 9953
Joined: Thu Jan 04, 2001 2:01 am
Location: Jeffersonville, PA

Bascinet prototype and "can" or "house" construction

Post by Mac »

This is a project I started back in 2002, and never finished. The idea was to come up with a procedure and template set that would produce a bascinet with the least possible work. Unfortunately, I do not have any process pictures; only the sketches, the templates, and the first prototype.

Here is the sketchbook page. You can see by the straight lines and funny angles that this is a "can" or "house" construction. The locations of the seams have been chosen so as to make all the work compressional. This will thicken the metal, rather than thinning it.

Image

Whenever I design a helmet to be made as a "can", I make up a three dimensional construct (the "core") in cardboard that represents the volume and shape of the starting pieces.

Image

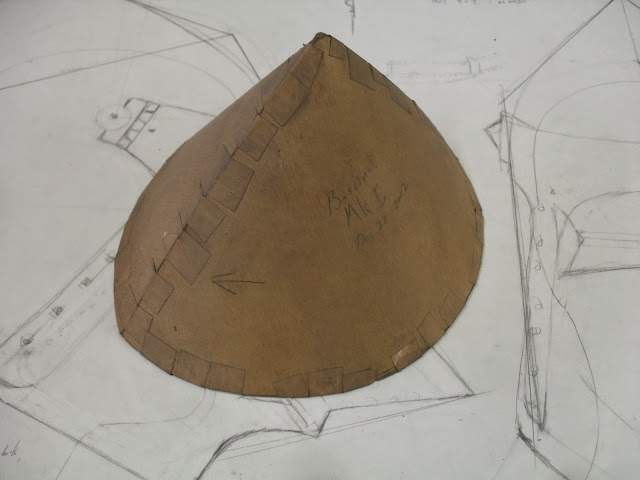
This "core" has three purposes. First, I use it to generate the starting templates. Note that the template is labeled to avoid confusion. The arrow always points forward. If a template has two arrows, one points forward, and the other points up. In this case, we only need one arrow, because "up" is obvious.

Image

The second purpose of the "core" is as a checking template. The starting pieces are cut out and hammered to shape so that they fit nicely against the core. Only then are they welded up.

The third purpose of the core is to help generate the other template, or templates. In this case, there is only one other piece, which wraps around, and is welded up the back.

Image

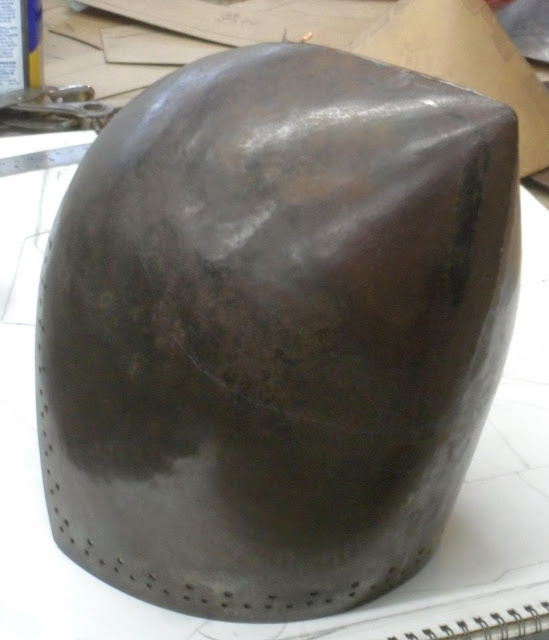
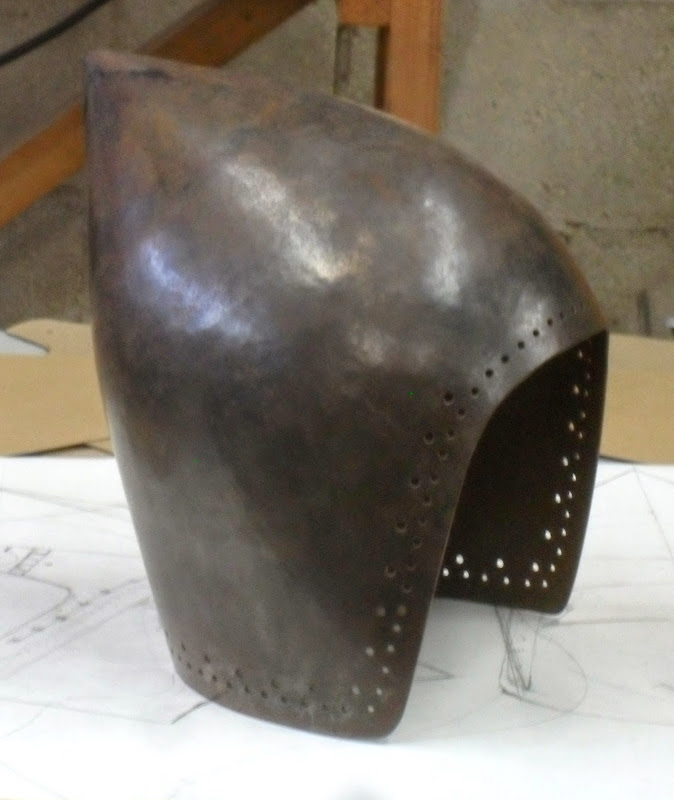
This is the MK I prototype. It's not at all a bad shape, and I expected to finish it up and move it along. It's importance to the project was to serve a physical proof of the templates, and help to direct further modifications.

Image

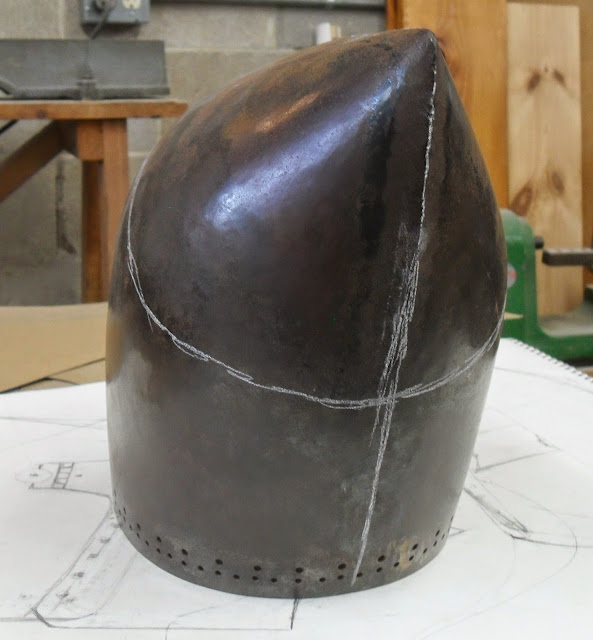
Here, I have chalked up the seams to better show their locations.

ImageImage

I don't have any notes about how long this took, but my recollection is that it went from flat stock to the state you see it here in an afternoon. (OK, not exactly this state... It has developed a nice patina in the intervening eleven and a half years) By contrast, there is probably more than a day's work in the templating.

Looking at it earlier today, I see that the prototype fell short of the width I specified in my sketch. The result is a helmet that is not quit as "round" in cross section as a bascinet should be. The problem is in the shape of the "core". If I were to move forward with this project someday, I would begin by building a new core, and work from there.

Mac
Last edited by Mac on Tue Apr 29, 2014 9:30 am, edited 2 times in total.
Robert MacPherson

The craftsmen of old had their secrets, and those secrets died with them. We are not the better for that, and neither are they.

http://www.lightlink.com/armory/
http://www.billyandcharlie.com
https://www.facebook.com/BillyAndCharlie
Konstantin the Red
Archive Member
Posts: 26725
Joined: Sun Oct 21, 2001 1:01 am
Location: Port Hueneme CA USA

Re: Bascinet prototype

Post by Konstantin the Red »

Mac, thanks for this explanation of the "can" or "house" method; now I see exactly what it comes from.

Fun to see. And once one gets experience with the method, likely fun to do too. Seems the metal doesn't move very far to get to where you want it.

What do you remember of what hammers you used? -- I'm looking to understand what fraction of the work may be done with heavy helve-hammers and other grand thumpers of all descriptions, so as not to afflict armourers with arthritis and rotator cuff tears in later years -- spreading the wear around, so to speak. I suppose choosing to work the piece cold or hot is something easy to decide.
"The Minstrel Boy to the war is gone..."
Konstantin the Red
Archive Member
Posts: 26725
Joined: Sun Oct 21, 2001 1:01 am
Location: Port Hueneme CA USA

Re: Bascinet prototype

Post by Konstantin the Red »

The visor drawn there merits its own post.

We've seen a (Brian Price-style? I forget) fab-up for a hounskull if it is not raised start to finish, welded sights boxes and things like that, but I suppose something like a cone works for making a visor too. Brian Price's visor subchapter stresses forming it by raising techniques, sightboxes and mouthbox, done hot. Would a cone want to be broad and somewhat concave to start out, or would you try and arrange compressional hammering to achieve the chin coverage, the cheeks, and the brow/temple-hinge portion, where the overall cone flares out to meet the helmet skull? Or should it instead not be concave anywhere, starting out?
"The Minstrel Boy to the war is gone..."
Konstantin the Red
Archive Member
Posts: 26725
Joined: Sun Oct 21, 2001 1:01 am
Location: Port Hueneme CA USA

Re: Bascinet prototype

Post by Konstantin the Red »

Thirdly, by how much diameter did your piece fall short of spec? Can't read a number on your design paper -- I can see places where you jotted notes, but don't know what they say.

You'd fix that by making a larger, deeper from hem to apex, core-cone, correct? Want to be sure my visualization is right.
User avatar
Halberds
Archive Member
Posts: 20444
Joined: Sat Oct 13, 2001 1:01 am
Location: Republic of Texas

Re: Bascinet prototype

Post by Halberds »

Those are some cool progress pics, thanks for sharing.
Did you weld the pieces together?
Happy Metal Pounding
Signo
Archive Member
Posts: 4963
Joined: Thu Jul 25, 2002 1:01 am
Location: Italy
Contact:

Re: Bascinet prototype

Post by Signo »

Spiffy! The problem is that you can probably make a decent armour out of toilet paper. :)
This doesn't mean we could too.
Mac
Archive Member
Posts: 9953
Joined: Thu Jan 04, 2001 2:01 am
Location: Jeffersonville, PA

Re: Bascinet prototype

Post by Mac »

Konstantin the Red wrote:Mac, thanks for this explanation of the "can" or "house" method; now I see exactly what it comes from.
My pleasure, K.

Konstantin the Red wrote: Seems the metal doesn't move very far to get to where you want it.
That's the crux of it. The ideal "can" is the shape that gets you the closest to the shape you need.

Konstantin the Red wrote:What do you remember of what hammers you used?
Most everything was done with a medium weight hammer with a gently curved face. I'll post a pis of it later today.
Konstantin the Red wrote:I suppose choosing to work the piece cold or hot is something easy to decide.
It must all be hot work, really. I am spot-heating with a torch, but there's nothing sacred about that.

Mac
Robert MacPherson

The craftsmen of old had their secrets, and those secrets died with them. We are not the better for that, and neither are they.

http://www.lightlink.com/armory/
http://www.billyandcharlie.com
https://www.facebook.com/BillyAndCharlie
Mac
Archive Member
Posts: 9953
Joined: Thu Jan 04, 2001 2:01 am
Location: Jeffersonville, PA

Re: Bascinet prototype

Post by Mac »

Konstantin the Red wrote:The visor drawn there merits its own post.
I'll talk about the visor in the next couple of days. Yer' in for a treat!

Mac
Robert MacPherson

The craftsmen of old had their secrets, and those secrets died with them. We are not the better for that, and neither are they.

http://www.lightlink.com/armory/
http://www.billyandcharlie.com
https://www.facebook.com/BillyAndCharlie
Mac
Archive Member
Posts: 9953
Joined: Thu Jan 04, 2001 2:01 am
Location: Jeffersonville, PA

Re: Bascinet prototype

Post by Mac »

Konstantin the Red wrote:Thirdly, by how much diameter did your piece fall short of spec? Can't read a number on your design paper -- I can see places where you jotted notes, but don't know what they say.
I would have to measure it, but my guess is that it ended up about 1/2" (13mm) or so narrower than I drew it. I'll get back on that.
Konstantin the Red wrote:You'd fix that by making a larger, deeper from hem to apex, core-cone, correct? Want to be sure my visualization is right.
I would start be building another "core" that was a bit wider from side to side but probably the same length from front to back. That would change the circumference at the juncture with the lower piece; so that would have to be altered accordingly. A day's work might get all the way to a second prototype.

Mac
Robert MacPherson

The craftsmen of old had their secrets, and those secrets died with them. We are not the better for that, and neither are they.

http://www.lightlink.com/armory/
http://www.billyandcharlie.com
https://www.facebook.com/BillyAndCharlie
Mac
Archive Member
Posts: 9953
Joined: Thu Jan 04, 2001 2:01 am
Location: Jeffersonville, PA

Re: Bascinet prototype

Post by Mac »

Halberds wrote:Those are some cool progress pics, thanks for sharing.
Did you weld the pieces together?
Thank you, Hall. All the welds are Oxi-Acetylene.

Mac
Robert MacPherson

The craftsmen of old had their secrets, and those secrets died with them. We are not the better for that, and neither are they.

http://www.lightlink.com/armory/
http://www.billyandcharlie.com
https://www.facebook.com/BillyAndCharlie
wcallen
Archive Member
Posts: 4777
Joined: Mon Oct 29, 2001 2:01 am
Location: North Carolina, USA
Contact:

Re: Bascinet prototype

Post by wcallen »

I don't have a permanent sketch book, so my preliminary sketches went the way of all things, but this helmet was built the same way:

http://www.allenantiques.com/R-23.html

In this case the "top" was a welded "football" shape that defined the top of the crest. I made the "can" much more vertical for this shape of helmet. Then the neck had to be raised and flaired and cleaned up. But the basic form was very quick as well.

Wade
Mac
Archive Member
Posts: 9953
Joined: Thu Jan 04, 2001 2:01 am
Location: Jeffersonville, PA

Re: Bascinet prototype

Post by Mac »

Signo wrote:Spiffy! The problem is that you can probably make a decent armour out of toilet paper. :)
This doesn't mean we could too.


There's nothing difficult about this, Marco. It's just a different way to think about the problem.

You can do this!

Mac
Robert MacPherson

The craftsmen of old had their secrets, and those secrets died with them. We are not the better for that, and neither are they.

http://www.lightlink.com/armory/
http://www.billyandcharlie.com
https://www.facebook.com/BillyAndCharlie
wcallen
Archive Member
Posts: 4777
Joined: Mon Oct 29, 2001 2:01 am
Location: North Carolina, USA
Contact:

Re: Bascinet prototype

Post by wcallen »

Mac wrote:
Signo wrote:Spiffy! The problem is that you can probably make a decent armour out of toilet paper. :)
This doesn't mean we could too.


There's nothing difficult about this, Marco. It's just a different way to think about the problem.

You can do this!

Mac
In this case, Mac is right. In fact (if you can weld, and have some heat), this way is probably easier to actually get to work. You don't need to know as much about how metal moves when you raise or sink it. You can fully define the volume beforehand. Then you just push in the stuff that isn't helmet. It really is pretty easy to do.

Mac talked about both the "can" and the "house" method. They are different ways of doing the same thing. One utilizes a ring of metal that you push in (the edge of the can), the other uses a series of points that you push in (the corners of the house). We did a lot of "house" bascinets back in the day. The result wasn't bad (not quite right, but not bad) and it was rock solid. You accidentally thicken the metal. And if you put your points or edge in the right places (which are naturally the right places for the shape anyway), you end up with that thickening in some very convenient spots if you are going to get hit with sticks.

Wade
Mac
Archive Member
Posts: 9953
Joined: Thu Jan 04, 2001 2:01 am
Location: Jeffersonville, PA

Re: Bascinet prototype

Post by Mac »

wcallen wrote:
In this case, Mac is right.
In most other cases, Mac is in La La Land. :wink:

Mac
Robert MacPherson

The craftsmen of old had their secrets, and those secrets died with them. We are not the better for that, and neither are they.

http://www.lightlink.com/armory/
http://www.billyandcharlie.com
https://www.facebook.com/BillyAndCharlie
wcallen
Archive Member
Posts: 4777
Joined: Mon Oct 29, 2001 2:01 am
Location: North Carolina, USA
Contact:

Re: Bascinet prototype

Post by wcallen »

Mac wrote:
wcallen wrote:
In this case, Mac is right.
In most other cases, Mac is in La La Land. :wink:

Mac
Well......

No more than the rest of us.

Anyway, the comment wasn't originally intended as any kind of dig. I think that there are a lot of times where people who have been doing things for a long time think of things as "easy" where newer people just can't do it. Or at least think they can't.

This particular technique really requires less ability to "understand the metal" or "have a feel" than many of those that we use. I think that it is particularly well suited to people who are still getting into this stuff.

But back to the point - yea, you are in La La Land. As am I. Where would we be without a little La La Land? Such a boring place.

Wade
Signo
Archive Member
Posts: 4963
Joined: Thu Jul 25, 2002 1:01 am
Location: Italy
Contact:

Re: Bascinet prototype

Post by Signo »

This is very interesting, I often try to "think out of the box" with stuff like that, but I've never seen this concept applied this way.
I know there are several ways to unwrap a 3D volume in a flat surface, it is a very fascinating mental exercise.
Mac
Archive Member
Posts: 9953
Joined: Thu Jan 04, 2001 2:01 am
Location: Jeffersonville, PA

Re: Bascinet prototype and "can" or "house" construction

Post by Mac »

I have altered the title of the thread a bit so that we can expand the topic to include building other sorts of helmets the same way.

Wade has already brought up the use of this method for barbutes, for which it is admirably suited. I will post some of my barbute stuff later this week.

Mac
Robert MacPherson

The craftsmen of old had their secrets, and those secrets died with them. We are not the better for that, and neither are they.

http://www.lightlink.com/armory/
http://www.billyandcharlie.com
https://www.facebook.com/BillyAndCharlie
Mac
Archive Member
Posts: 9953
Joined: Thu Jan 04, 2001 2:01 am
Location: Jeffersonville, PA

Re: Bascinet prototype

Post by Mac »

Mac wrote:
Konstantin the Red wrote:Thirdly, by how much diameter did your piece fall short of spec? Can't read a number on your design paper -- I can see places where you jotted notes, but don't know what they say.
I would have to measure it, but my guess is that it ended up about 1/2" (13mm) or so narrower than I drew it. I'll get back on that.
Well.... It turns out that the prototype is bang-on my specs.

Yet it still looks a bit too oblong for a bascinet.....

Image

.....and there is one view where it looks a bit "forced". (It's difficult to catch it with the camera, but when I see it out of the corner of my eye, it makes me scowl.)

Image

It looks like I would need to alter my sketches to make the temples a bit wider, while keeping the lower edge about the same.

Mac
Robert MacPherson

The craftsmen of old had their secrets, and those secrets died with them. We are not the better for that, and neither are they.

http://www.lightlink.com/armory/
http://www.billyandcharlie.com
https://www.facebook.com/BillyAndCharlie
lorenzo2
Archive Member
Posts: 1573
Joined: Thu Sep 26, 2002 1:01 am

Re: Bascinet prototype and "can" or "house" construction

Post by lorenzo2 »

Mac,

Interesting thread that goes with the similar one on greaves. I have a question, when you work on the area where the cone top connects to the cylindrical bottom section do you start at the weld and work outward in the up and down directions or start on one side and work all the way across? Also, what are you using for support, a small ball stake followed by a larger one on latter passes?

Thanks
Mac
Archive Member
Posts: 9953
Joined: Thu Jan 04, 2001 2:01 am
Location: Jeffersonville, PA

Re: Bascinet prototype

Post by Mac »

Mac wrote:
Konstantin the Red wrote:What do you remember of what hammers you used?
Most everything was done with a medium weight hammer with a gently curved face. I'll post a pis of it later today.
Most of the work was done with this hammer. It is the beutifull "Bellota". A most excellent hammer. I bought it from Kenneth Lynch himself back in the early '80s. Cost me $40 bucks, it did. They went a lot cheaper in the liquidation sales. One of my apprentices bought one for $5 if I recall correctly. I probably should have bought another one then.

ImageImage

I just did a search. Bellota is still making hammers, but not apparently this model. I also see that they are a Spanish firm in a Basque speaking region.... I have been mispronouncing the name form decades. (Oh! My ignorance... My shame... I must learn how say it in Euskara.)

Mac
Robert MacPherson

The craftsmen of old had their secrets, and those secrets died with them. We are not the better for that, and neither are they.

http://www.lightlink.com/armory/
http://www.billyandcharlie.com
https://www.facebook.com/BillyAndCharlie
James Arlen Gillaspie
Archive Member
Posts: 2098
Joined: Mon Jan 13, 2003 2:01 am
Location: NY
Contact:

Re: Bascinet prototype and "can" or "house" construction

Post by James Arlen Gillaspie »

Mac, your overhead shot of your bacinet reminds me once again of why I want a point-on shot of the Black Prince's. Or to find mine. :oops: Then the difference would be apparent.
User avatar
schreiber
Archive Member
Posts: 3449
Joined: Fri Nov 17, 2000 2:01 am
Location: woodbridge, va, usa

Re: Bascinet prototype and "can" or "house" construction

Post by schreiber »

So, Bey-yoh-ta? :D

I'm resolved to do one of these in the next year. I've done plenty of elbows and knees, and for those of you who have raised a pair of knees from flat, this seems like it's probably a similar total amount of hammerwork.
I think even after you've done just a couple of concentric circle courses on a knee or elbow, you'd probably have most of the skills necessary to actually hammer out a bascinet like this.

It actually looks even easier than raising flat, since you already have two points of the curve to set on an appropriately sized stake, and if you have the right ball it'd be little more than just pounding it down until you connect with the ball. Well, for the gross shaping, that is.
Stuff I will trade for: PWM controllers, steel sheet/rod/bar (4130/410/1050/toolsteel), ITC, casting supplies, wood tools, silver, oxpho blue, gun stuff (9luger/357mag/12g/7.62x54R/22LR), hammers, stakes, or pitch me!
User avatar
Pitbull Armory
Archive Member
Posts: 5312
Joined: Wed Dec 17, 2008 10:28 pm
Location: Out in the woods
Contact:

Re: Bascinet prototype and "can" or "house" construction

Post by Pitbull Armory »

Thanks for posting this stuff Mac,

Bless your heart,


Ty

Pb
Hi, Please visit https://www.facebook.com/PITBULL-ARMORY-264094743168/ if you get time. Or contact me at leiderandy@yahoo.com if you have any questions. Take care, Andy @ Pitbull Armory
wcallen
Archive Member
Posts: 4777
Joined: Mon Oct 29, 2001 2:01 am
Location: North Carolina, USA
Contact:

Re: Bascinet prototype and "can" or "house" construction

Post by wcallen »

lorenzo2 wrote:Mac,

Interesting thread that goes with the similar one on greaves. I have a question, when you work on the area where the cone top connects to the cylindrical bottom section do you start at the weld and work outward in the up and down directions or start on one side and work all the way across? Also, what are you using for support, a small ball stake followed by a larger one on latter passes?

Thanks
Mac will say what he does. We started at the center. When we were doing aggressive points would start with a smaller ball (say 2") and then move to a larger one. For subtle stuff you can also work over air. I am pretty sure I started in the middle on the can for G's helmet and worked out. Since I have a bunch of stakes, I probably used a couple during the process, but I don't actually remember. I just work all the way around. It would probably be better to do things symmetrically, but I always get enticed by the existing heat. I have regretted that several times.

Wade
wcallen
Archive Member
Posts: 4777
Joined: Mon Oct 29, 2001 2:01 am
Location: North Carolina, USA
Contact:

Re: Bascinet prototype and "can" or "house" construction

Post by wcallen »

schreiber wrote:
It actually looks even easier than raising flat, since you already have two points of the curve to set on an appropriately sized stake, and if you have the right ball it'd be little more than just pounding it down until you connect with the ball. Well, for the gross shaping, that is.
In my experience. Yes. It is a lot easier to do the gross shaping. No edges to wrinkle and you really aren't moving the metal that far.

Well, unless you get silly and push the whole top point in to make something with a round skull. But that is more a degenerate from of the "house" than the "can".

Wade
User avatar
Ernst
Archive Member
Posts: 8824
Joined: Sat Aug 12, 2000 1:01 am
Location: Jackson,MS USA

Re: Bascinet prototype and "can" or "house" construction

Post by Ernst »

From what I've found online, Euskara pronounces the double L as IPA Lambda, a palatal L. Put the bottom of your tongue on the roof of your mouth and say L while rolling your tongue forward.
http://www.omniglot.com/writing/basque.htm
ferrum ferro acuitur et homo exacuit faciem amici sui
Alec
Archive Member
Posts: 380
Joined: Tue Oct 24, 2000 1:01 am
Location: Spreckels, CA, USA

Re: Bascinet prototype and "can" or "house" construction

Post by Alec »

Mac, thank you for this thread and the rest of you for your insights!!

I suppose I am in the middle of the reaction continuum -- I have never tried anything like this but I have done enough raising to imagine this not being too difficult.

A couple questions:

Welds: Both sides then ground flush before starting the forming work?

Circumference: In visualizing your template's translation into the helmet's final shape, it seems to me that if the template fits the head circumference of the wearer, then the final helmet should too -- that the shaping process will not dramatically alter that dimension. Is that correct?

Stakes: What shapes did you form this over

Hammer: Was most of your hammer work done wit the flat face of that Basque beauty? It seems that the face would be best suited to the push the corner in step as your not trying to push the metal in just one direction. BTW, thanks for the hammer porn. Now I want one too.
PartsAndTechnical
Archive Member
Posts: 745
Joined: Thu Apr 09, 2009 7:38 pm
Location: DC area
Contact:

Re: Bascinet prototype and "can" or "house" construction

Post by PartsAndTechnical »

..hope you dont mind Mac....thought these might be worthy to kick around also.

I have used some pattern with reasonable success. Forth both approaches, one must posses a decent straight and cross pein as well as dishing apparati to do it.

For the second sketch, I dish very deeply...overly deep to be sure. I am careful not to avoid overly thinning, and the red contours show a rough idea of where I work the most. I then use the cross/straight peins to spread out the bottom edge ...which "straightens" the sides of the helmet to a point Im happy with. I dont go flat of course, just blend it with the bulb in the helmet side. The dark thick lines are where I stretch the metal to open up the bulb shape....ie, "flatten" up the sides.

I like this method because again, with some heat, it goes very fast. With a depth template in thin plywood or cardboard or even metal, I can be sure my bucket is deep enough to begin the push, tuck and weld. Takes some finesse like all this stuff, but it goes pretty fast.

And ...Ive also done it where the weld is perpendicular to where youd expect it (see first sketch)....its not the faux welded crease, rather along the sides. This approach is frankly even more ideal because it allows the armouer to create a natural crease in the bascinet. And ignore the need to crease on the sides....just blend it smooth and homogenous with the parent metal. This method allow necessitates a ""profile""" match template but again, its a relatively simple approach.

Both of these sketches are not 1:1 true to form or scale...just to offer a sense of what I do. I dont usually rely on patterns anymore, eyeballing mostly. So they need personal shop refinement if someone wanted to use them.
Attachments
Screen Shot 2014-04-29 at 4.24.56 PM.png
Screen Shot 2014-04-29 at 4.24.56 PM.png (19.21 KiB) Viewed 8811 times
Screen Shot 2014-04-29 at 3.59.42 PM.png
Screen Shot 2014-04-29 at 3.59.42 PM.png (23.16 KiB) Viewed 8818 times
Munitions and Fine Armours ~&~ Historical Furniture and Feastware
http://www.partsandtechnical.com
wcallen
Archive Member
Posts: 4777
Joined: Mon Oct 29, 2001 2:01 am
Location: North Carolina, USA
Contact:

Re: Bascinet prototype and "can" or "house" construction

Post by wcallen »

PartsAndTechnical wrote:..hope you dont mind Mac....thought these might be worthy to kick around also.

I have used this pattern with reasonable success. One must posess a decent straight and cross pein as well as dishing apparati to do it. Once I dish very deeply...overly deep to be sure. I am careful not to avoid overly thinning, and the red contours show a rough idea of where I work the most.

I then use the cross/straight peins to spread out the bottom edge ...which "straightens" the sides of the helmet to a point Im happy with. I dont go flat of course, just blend it with the bulb in the helmet side. The dark thick lines are where I stretch the metal to open up the bulb shape....ie, "flatten" up the sides.

I like this method because again, with some heat, it goes very fast. With a depth template in thin plywood or cardboard or even metal, I can be sure my bucket is deep enough to begin the push, tuck and weld. Takes some finesse like all this stuff, but it goes pretty fast.

And...Ive also done it where the weld is perpendicular to where youd expect it....its not the faux welded crease, rather along the sides. This approach is frankly even more ideal because it allows the armouer to create a natural crease in the bascinet. And ignore the need to crease on the sides....just blend it smooth and homogenous with the parent metal. This method allow necessitates a ""profile""" match template but again, its a relatively simple approach.
I made the helmet on this suit that way:

http://www.allenantiques.com/R-31.html

It is more similar to the standard "3 piece" that is so ubiquitous in the SCA. If we are discussing it, that method works very differently. Assuming you dish the way we did in the past, the outer edges get shorter, the face curve tightens up and the long curves flatten out. The center stretches. If done well, you can keep the thickness relatively even, but if you aren't careful you can pretty seriously thin the middle. The longer you make the bottom (to get rid of the "third" piece) the more you tend to stretch and thin the center. Since none of the final measurements match any of the initial measurements, it is actually pretty difficult to predict what size the result will be from the initial flat template. (not that I haven't made a lot that way too).

Frankly, the "can" or "house" is less hammer work. And less moving of metal in 3D. And (not a consideration that is necessary, but it is interesting) you can try the thing on in cardboard before you start making it. The edges stay where they start. The fit won't be exact before you push in, but you can start getting a real idea of how things will work even before you approach the steel.

I am not trying to say that one way is right and one is wrong. I am trying to help people understand the differences in the approaches.

Wade
Aussie Yeoman
Archive Member
Posts: 919
Joined: Tue Apr 11, 2006 10:16 pm
Location: Canberra, Australia

Re: Bascinet prototype and "can" or "house" construction

Post by Aussie Yeoman »

Mac, Wade, other veterans:

How much more or less work do you think the can/house method would be compared to, say, the darted rectanguloid from the other thread?

It looks difficult, but I remember at least two first timers last year made most creditable sallets using this technique.
wcallen
Archive Member
Posts: 4777
Joined: Mon Oct 29, 2001 2:01 am
Location: North Carolina, USA
Contact:

Re: Bascinet prototype and "can" or "house" construction

Post by wcallen »

Aussie Yeoman wrote:Mac, Wade, other veterans:

How much more or less work do you think the can/house method would be compared to, say, the darted rectanguloid from the other thread?

It looks difficult, but I remember at least two first timers last year made most creditable sallets using this technique.
I haven't actually tried to work out exactly how they would differ. Thinking about it a little - either way could be used to build anything that the other could build. I think that the darted thing (that is what we are calling "house" construction in this thread) would generally require that the points be pushed in farther than the can edge. But they would be more localized. So you push in things that are logically circles instead of a band of the helmet. The circles end up meeting if you want a decent shape in the final result. With the "can" you are pushing in a band of the helmet - mostly all the way around, but there can be parts of the helmet where "pushing in" is really just evening things up. It depends how you designed the can. I bet Mac could come up with the theoretical drawing that would prove what I am saying, but I haven't bothered. The difference is that with the "house" method, there are usually spots between the points where the full volume of the final helmet is already defiined in the bent form. With the "can" method the edge of the can is always outside the desired final volume of the piece (with the noted exception that there may be parts which are only barely outside).

Showing the precise difference would be a fun set of drawings. I wonder if Mac is tempted....

Wade
Aussie Yeoman
Archive Member
Posts: 919
Joined: Tue Apr 11, 2006 10:16 pm
Location: Canberra, Australia

Re: Bascinet prototype and "can" or "house" construction

Post by Aussie Yeoman »

Depends how his elbow is feeling, I suppose. Between this and 'dusting off the cobwebs', I think we have him well utilised.
PartsAndTechnical
Archive Member
Posts: 745
Joined: Thu Apr 09, 2009 7:38 pm
Location: DC area
Contact:

Re: Bascinet prototype and "can" or "house" construction

Post by PartsAndTechnical »

It might be. Never tried it.

I think a lot of this stuff boils down the pros or cons we all have in terms of endurance, strength, dishing, heat and thickness. ...and repetitive single minded tooling. If we all had predished helm halves just waiting around, then a few adjusted whacks, a welded wrapper, grind and go is pretty fast too. Some guys dont use or have much access to heat beyond a mapp gas torch. Others have torches and small arms. And others have giant machines to do the work of seven dwarves....so it all depends on how industrial we want our production to be, I suppose.
Munitions and Fine Armours ~&~ Historical Furniture and Feastware
http://www.partsandtechnical.com
Mac
Archive Member
Posts: 9953
Joined: Thu Jan 04, 2001 2:01 am
Location: Jeffersonville, PA

Re: Bascinet prototype and "can" or "house" construction

Post by Mac »

lorenzo2 wrote:Mac,

Interesting thread that goes with the similar one on greaves. I have a question, when you work on the area where the cone top connects to the cylindrical bottom section do you start at the weld and work outward in the up and down directions or start on one side and work all the way across? Also, what are you using for support, a small ball stake followed by a larger one on latter passes?

Thanks
Lorenzo,

I will try to snap a pic of the stake I use for this type of work. It is a modified RR track.

In Classic Raising, we chase a wave of compressed metal toward the edge of the work. When compressing the juncture between the cone and the sides, there is no need to be that organized. Start with whatever sticks out the most, heat it up and smack it down. Do the same to the high spots to either side of where you just worked, and repeat the process as needed. You can leave that "raising hammer" in the rack, a round faced hammer what you need here because the process is not directional. So long as you don't actually form any wrinkles, you can proceed as rapidly as you like.

I can see that I am going to have to figure out an excuse to take some pics of this process....

Mac
Robert MacPherson

The craftsmen of old had their secrets, and those secrets died with them. We are not the better for that, and neither are they.

http://www.lightlink.com/armory/
http://www.billyandcharlie.com
https://www.facebook.com/BillyAndCharlie
Mac
Archive Member
Posts: 9953
Joined: Thu Jan 04, 2001 2:01 am
Location: Jeffersonville, PA

Re: Bascinet prototype and "can" or "house" construction

Post by Mac »

James Arlen Gillaspie wrote:Mac, your overhead shot of your bacinet reminds me once again of why I want a point-on shot of the Black Prince's. Or to find mine. :oops: Then the difference would be apparent.
What do you think, James?.... Is that prototype too oblong for a bascinet, or do you think it's OK?

Mac
Robert MacPherson

The craftsmen of old had their secrets, and those secrets died with them. We are not the better for that, and neither are they.

http://www.lightlink.com/armory/
http://www.billyandcharlie.com
https://www.facebook.com/BillyAndCharlie
Post Reply