raising greaves
-
Icepocca
- Archive Member
- Posts: 180
- Joined: Tue Dec 10, 2013 10:23 pm
- Location: Vancouver, B.C Canada
raising greaves
How do you guys shape the calf area near the top of the back greaves? Do you raise it down in concentric circles over a ball stake? Do you dome it from the back?
-
Icepocca
- Archive Member
- Posts: 180
- Joined: Tue Dec 10, 2013 10:23 pm
- Location: Vancouver, B.C Canada
Re: raising greaves
more specifically, i mean the upper part of this piece, the part that cants in towards the back of the knee
- Attachments
-
- IMG_20150404_172741.jpg (79.16 KiB) Viewed 2117 times
-
wcallen
- Archive Member
- Posts: 4777
- Joined: Mon Oct 29, 2001 2:01 am
- Location: North Carolina, USA
- Contact:
Re: raising greaves
there are lots of different ways to attack the same problem. Somewhere there some previous greave threads where I talk about several odd ways to do things. I have generally played with the odd parts of the process to get the shape in the harder parts of the greave lower down. For the calf I tend to just dish the thing. Final tweaking happens with almost every technique, usually involving heat. Since you are likely to get some of the overall shape of the piece through raising or otherwise moving the metal a lot in the center and lower portion of the greave, dishing the upper area is pretty easy. You don't need to move a lot of metal. Since I tended to do it into a steel dish, I get a little bit of "raising" at the edge as part of the process, so I am not thinning as much as you might think.
Wade
Wade
-
Icepocca
- Archive Member
- Posts: 180
- Joined: Tue Dec 10, 2013 10:23 pm
- Location: Vancouver, B.C Canada
Re: raising greaves
Thanks wade, there are several ways to form the calves I see.
One question, what kind of shaping is done on the upper front greave?
One question, what kind of shaping is done on the upper front greave?
-
wcallen
- Archive Member
- Posts: 4777
- Joined: Mon Oct 29, 2001 2:01 am
- Location: North Carolina, USA
- Contact:
Re: raising greaves
Upper front greave?
Short answer, lots. More than you would imagine. There are bones up there that really need to be properly fitted. No matter how you choose to achieve the shape, you definitely need it.
I tend to do a lot of "raising" in the middle which lets the top stick out some, and then flair out the center of the top, and the inside.... generally I don't raise the outside, I hit from the inside against a flat anvil.
The center bumps out over that bump in the top of the bone, the outside tends to curl up and in, the inside curls out. Look at real greaves carefully. Get some detailed pictures of your lower legs. a cast of the legs is probably best. You will find a lot more shape than you imagined.
There are some various theories about exactly how greaves need to fit. But I think that we all agree that the top part really should fit well. That allows the greave to hang from the leg instead of sitting on the foot. Sitting on the foot is asking for pain.
The last "greaves" I made for myself were just fronts, but they did the same thing.... They hang from the calf. I can actually wear them without bothering to secure the lower strap and there is no contact with the foot.
Wade
P.S.
These greaves have relatively subtle shape at the top.
http://www.allenantiques.com/A-124.html
They are later than you are probably trying to recreate, 15th c. ones seem to be more shaped up there. I expect that they go just a bit higher.
Wade
-
Graham Ashford

- Archive Member
- Posts: 531
- Joined: Thu Nov 23, 2006 3:56 am
- Location: Hampshire, UK
- Contact:
Re: raising greaves
Wade, would you mind if I pinch a couple of your pictures referenced in this thread? I'll give full credit if I use them on twitter, but also they are just such a nice reference to have.
-
Icepocca
- Archive Member
- Posts: 180
- Joined: Tue Dec 10, 2013 10:23 pm
- Location: Vancouver, B.C Canada
Re: raising greaves
I see, so there is shaping in the middle of the greave, I always thought just the very top was shaped to flare out,
Thanks Wade
Thanks Wade
-
wcallen
- Archive Member
- Posts: 4777
- Joined: Mon Oct 29, 2001 2:01 am
- Location: North Carolina, USA
- Contact:
Re: raising greaves
As long as you point to my pictures, have fun.Graham Ashford wrote:Wade, would you mind if I pinch a couple of your pictures referenced in this thread? I'll give full credit if I use them on twitter, but also they are just such a nice reference to have.
Anyone can reference my pictures any way they want. I do prefer that they not copy them off to other locations. I am not making any money or trying to drive traffic, it just seems reasonable. Any links will be good for years. I have pre-paid for my site for longer than we can count on any business staying in business.
Wade
Re: raising greaves
Wade- let me just add my "Thanks!!!" as well. Your collection is enviable, and your willingness to share both photos and details has been a great help to us new guys. Much appreciated!
-
wcallen
- Archive Member
- Posts: 4777
- Joined: Mon Oct 29, 2001 2:01 am
- Location: North Carolina, USA
- Contact:
Re: raising greaves
I am happy to oblige. I know how much I wanted to see things when I was starting out. There is no need for the next generations to have to live with the limitations we had.Jeremy.G wrote:Wade- let me just add my "Thanks!!!" as well. Your collection is enviable, and your willingness to share both photos and details has been a great help to us new guys. Much appreciated!
Wade
-
Icepocca
- Archive Member
- Posts: 180
- Joined: Tue Dec 10, 2013 10:23 pm
- Location: Vancouver, B.C Canada
Re: raising greaves
How do you go about fitting the two halves together? I'm having trouble getting the ankle areas to fit nicely
I'll post some pics tomorrow of what I mean tomorrow
I'll post some pics tomorrow of what I mean tomorrow
-
Icepocca
- Archive Member
- Posts: 180
- Joined: Tue Dec 10, 2013 10:23 pm
- Location: Vancouver, B.C Canada
Re: raising greaves
I attached some pictures showing how badly the ankles fit and how the two halves dont fit together. I have no idea how to fit two halves together.
I also attached a photo of the back greave. Is it snug enough?
I also attached a photo of the back greave. Is it snug enough?
- Attachments
-
- IMG_20150407_232905.jpg (87.21 KiB) Viewed 1797 times
-
- IMG_20150408_003909.jpg (62.76 KiB) Viewed 1797 times
-
- IMG_20150408_003847.jpg (57.84 KiB) Viewed 1797 times
-
wcallen
- Archive Member
- Posts: 4777
- Joined: Mon Oct 29, 2001 2:01 am
- Location: North Carolina, USA
- Contact:
Re: raising greaves
I think that there will be lots of different possible answers to how to get them to fit together based on how you like to work, what equipment you have and how confident you are.
Starting with "is the back snug enough"...
There is some variability in this, and I don't think that we all agree on the exact fit, but there was a nice thread that showed some drawings of where it needs to fit and where it doesn't.
My short answer without trying to go find that thread is:
- if you put the parts together with tape or something and run around a little, does it hang on your calf and not place weight on your ankle or foot?
- does it make your leg look elegant and stylish?
if the answer to both of those is yes, then you have the right shape. You will likely also care about how it will interact with your sabaton, but that is mainly an issue for the front and how the back then needs to be shaped to fit with the front.
Now.. how to get the parts to fit together nicely.
- Really first you want to make sure that they fit in a "gross" way. Often when they don't one of them really doesn't have the right shape. For example your front and back don't seem to agree on the location of the widest part of your calf. One may be more correct than the other. Generally greaves are not symmetrical - the inside and outside follow different curves.
- once you are positive you have all of the material you need everywhere you need it (don't skip that part) trim away excess.
- Put the parts together and bash on them. Heat can help this. Temporary rivets can help make this work better too.
-
I would probably start putting a crease in the front (and if the style merits it the back) pretty soon (if not earlier) because that is going to totally mess your shape up and you will just have to fix it anyway.
Wade
-
Icepocca
- Archive Member
- Posts: 180
- Joined: Tue Dec 10, 2013 10:23 pm
- Location: Vancouver, B.C Canada
Re: raising greaves
This greave is going to be copied from the chartres greave so there will be no rolls.
How much over lap should there be between the hinge side?
should i finish my sabatons first before finishing the greaves?
And generally where should the lower hinge be?, near the ankle bump?
How much over lap should there be between the hinge side?
should i finish my sabatons first before finishing the greaves?
And generally where should the lower hinge be?, near the ankle bump?

Re: raising greaves
Above the ankle bump but close to it and yes, if your greaves are to be worn over sabs, definitely finish the sabs first.
Re: raising greaves
I think this is the thread Wade mentioned.
-
Tom B.
- Archive Member
- Posts: 4533
- Joined: Mon Oct 17, 2005 4:15 am
- Location: Nicholasville, KY
- Contact:
Re: raising greaves
I think the sketches are in Mac's Dusting off the Cobwebs thread page 8.wcallen wrote: Starting with "is the back snug enough"...
There is some variability in this, and I don't think that we all agree on the exact fit, but there was a nice thread that showed some drawings of where it needs to fit and where it doesn't.
It really would be best to go back and read the entire greave part starting on page 6.
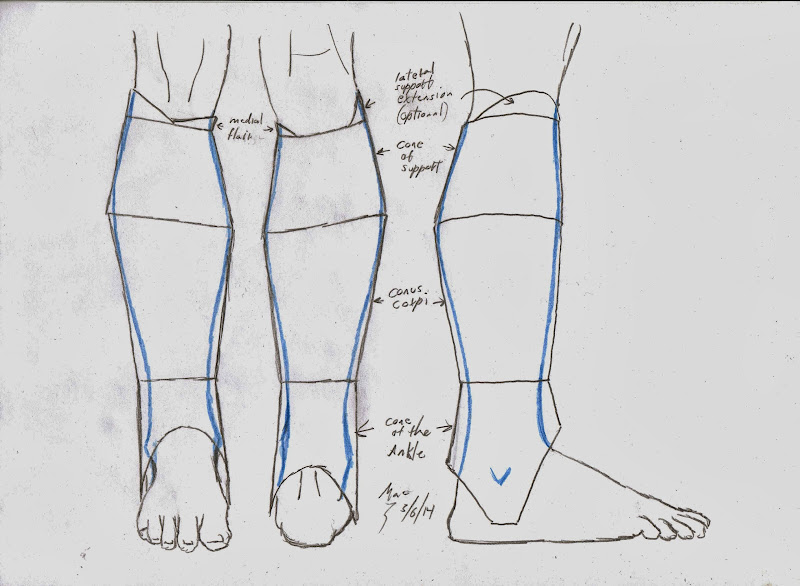
Mac wrote:To explain that feature, we have to step back a bit.
We can think of greaves in many ways. One way is to reduce it in our minds to a collection of cones, or perhaps more strictly speaking, "conoids" (because they are not circular) . In the diagram below, I have done just that.
The basic greave may be considered as consisting of three cones; the "cone of the ankle", the body (which I have labeled the "conus corpi"), and the "cone of support" Starting from the bottom, the ankle cone provides the clearance for the ankle movement. this is an oversimplification of its function, but I hope to address that on some other occasion.
Above that we have the body of the greave. In in some sense, it just goes along for the ride, connecting the other two major cones together. In another sense, however, it is the cause of much trouble. It tapers downward to match the shape of the anatomy. This puts a limit on how high the greave may be worn. If you try to pull the greave up, and body cone is too small or the wrong shape, it won't go. Further, when the foot is flexed up, the broad triangular shape of the Achilles tendon below its origin with the gastrocnemius will try to shove the greave down if there is not enough room for it. This all combines with the forces of gravity and the centripetal acceleration that walking imparts, to make greaves always want to slide down.
If we try to counter this by letting the greave sit on the top of the foot, there is likely to be trouble. If the top of the foot is well armored, this can work to a greater of lesser degree, but for the most part it will create a very painful and restrictive situation. Remember, the upper surface of the foot is all tendon and bone right under the skin. There no meat and little fat to cushion a load there.
This is where the third major cone of the greave comes to our rescue. It is this upper cone, or as I have termed it, "cone of support" which must bear the weight of the greave. Given how small this cone is relative to the body cone and considering how much influence the body cone has, we have to make the most of the support cone. It's fit must be of primary importance. It should be shaped so that it truly bears on as much surface as the anatomy allows. This means careful shaping over the entire surface, and not just a at the top of the greave where it is easy to see.
This brings up to the optional "lateral extension". By adding this feature, we get to increase the size of the support cone. If carefully done this additional bearing surface spreads the weight of the greave still further, and makes it more comfortable to bear and less likely to slip down.
These "lateral extensions" are found on mid to late 15th c Italian greaves. Frankly, I don't know if the Germans used them or not. I took to using them years ago, and found them useful. I suppose they are just part of my "style" now. I figure that geaves are such a vexing part of the armor, that I can use all the help I can get....
The last feature in the diagram is a piece of a conoid which I am terming the "medial flair". The upper medial edge of the support cone can not be left the way it is. There is nothing but subcutaneous bone under there, and the abrupt edge will be unwelcome and injurious. To counter this, the upper edge of this part of the greave must be flared out a bit. In real life, the transition must be more subtle and smooth than what I have represented here. Strictly speaking, though, this is the only place where the "conist" interpretation of the greave would not work. If you "softened" the transition into the medial flair, you could make a greave that looked like this diagram, and it would function. It would, of course be butt ugly...unless you are making some sort of modern "power suit" armor...in which case it might be kind of cool.
-
Tom B.
- Archive Member
- Posts: 4533
- Joined: Mon Oct 17, 2005 4:15 am
- Location: Nicholasville, KY
- Contact:
Re: raising greaves
Here is some additional wisdom from Jeff Wasson...
What makes a pair of greaves good?
What makes a pair of greaves good?
Geoffrey the Younger wrote:Here's a drawing that better describes what I am talking about.
Once again, tight around the top like a cone gripping the calf so it can't slide down into the ankle. Once it is past the thickest part of the leg it can start to pull away from the leg in a very subtle way. At the ankle it forms a ball and socket joint of sorts -- that's how it should interact with the foot and the sabaton. The sabaton should fit under the greave.
If you are looking at greaves to buy -- look at the back plate -- does it have an S curve? --It should and it should fit really nicely over the back of the calf just under the back of the knee joint. If it doesn't fit secure there or lacks the S curve than it is probably not formed correctly. Around the ankles the greave should be cut out to allow the foot to move; mount your horse, run, jump ect. A properly made greave should be comfortable and allow you these motions with out hurting or causing pain.
Greave fronts and backs should overlap, not meet edge to edge. The front plate should overlap the back plate. Hinges can be on outside or inside depending on style/ time period. The edge at the ankle should be rolled or hemmed -- but very fine--not bulky. The greave backplate should be hemmed at the top as well.
I hope this is helpful-- properly fitted armour is important! It will work, look and feel better.
-
Icepocca
- Archive Member
- Posts: 180
- Joined: Tue Dec 10, 2013 10:23 pm
- Location: Vancouver, B.C Canada
Re: raising greaves
Damn, I can't get the ankle area to look right, especially after I added in the twist, I guess it'll go in the box of shame
Re: raising greaves
Don't pitch 'em yet. The ankles are probably the hardest part of greaves. Post some pics, and perhaps we can sort out the trouble. As long as you have enough material, it will yield to localized hot work.Icepocca wrote:Damn, I can't get the ankle area to look right, especially after I added in the twist, I guess it'll go in the box of shame
Mac
Robert MacPherson
The craftsmen of old had their secrets, and those secrets died with them. We are not the better for that, and neither are they.
http://www.lightlink.com/armory/
http://www.billyandcharlie.com
https://www.facebook.com/BillyAndCharlie
The craftsmen of old had their secrets, and those secrets died with them. We are not the better for that, and neither are they.
http://www.lightlink.com/armory/
http://www.billyandcharlie.com
https://www.facebook.com/BillyAndCharlie
-
Icepocca
- Archive Member
- Posts: 180
- Joined: Tue Dec 10, 2013 10:23 pm
- Location: Vancouver, B.C Canada
Re: raising greaves
well if mac says so, i guess it cant hurt to post some pics
i doubt the greaves are salvageable though, ive never made greaves before, and it really shows
i doubt the greaves are salvageable though, ive never made greaves before, and it really shows
- Attachments
-
- IMG_20150408_192809.jpg (90.63 KiB) Viewed 1724 times
-
- IMG_20150408_192857.jpg (95.84 KiB) Viewed 1724 times
Re: raising greaves
Icepocca,
This is no where near ready for the trash. Before I say anything about the shape, let me say something about perfectionism. It's something we all posses to a greater or lesser degree. Those of us with very little of it never get better at our craft. Those of us with too much of it never get anything done. Sometimes you have to press on with a project, even if it will never be perfect.
You have an excellent start here, and you need to keep working on it. I don't see anything here that will keep this from being a geave. If if has a fatal flaw that I am missing, it will still provide you with a place to learn a lot more about greave fitting before you give up on it.
There are two things that strike me intermediately about the shape. The first is the there is quite a bit of twist. That might just be how much your leg needs, but I suspect that you have overdone it.
The second is the shape of the area to either side of the foot. The important thing is that the foot is wider than the ankle. Sure, that's obvious, but the shape of the greave has to reflect that idea. Think of it this way... As soon as you get below the instep arch of the greave, everything changes. You are no longer fitting the leg. You are fitting the foot. If you were to take a cross section of the greave in that region, it should be a sort of "U" shape, with the arms of the "U" diverging to follow the shape of the foot.
I recommend that do the following things.....
---Start getting the crest line built up in the upper part of the greave. This has a profound effect on how the greave sits on your shin and will help you to put it on exactly the same way each time.
--- Reduce the twit until the center line is running so that a projection of that line runs down your foot to your second toe. That's where a sabaton crest will go, and the greave's crest should run smoothly into it.
---Find the places along the edges of the foot opening that are touching your foot, and start flaring them out. Ultimately, you want all of that area to run more or less parallel to your foot.
If you can contrive to get us better pics of the greave and how it fits your leg that will help. Find that old camera tripod in the attic and put it to use. One of the great beauties of the digital camera is that we can keep shooting with that 10 second shutter delay thing until we get a pic that works.
Mac
Robert MacPherson
The craftsmen of old had their secrets, and those secrets died with them. We are not the better for that, and neither are they.
http://www.lightlink.com/armory/
http://www.billyandcharlie.com
https://www.facebook.com/BillyAndCharlie
The craftsmen of old had their secrets, and those secrets died with them. We are not the better for that, and neither are they.
http://www.lightlink.com/armory/
http://www.billyandcharlie.com
https://www.facebook.com/BillyAndCharlie
Re: raising greaves
Here are a couple of images from Goll's thesis that may be useful.
ref_arm_2356

ref_arm_2356
Robert MacPherson
The craftsmen of old had their secrets, and those secrets died with them. We are not the better for that, and neither are they.
http://www.lightlink.com/armory/
http://www.billyandcharlie.com
https://www.facebook.com/BillyAndCharlie
The craftsmen of old had their secrets, and those secrets died with them. We are not the better for that, and neither are they.
http://www.lightlink.com/armory/
http://www.billyandcharlie.com
https://www.facebook.com/BillyAndCharlie
Re: raising greaves
Notice the asymmetry in the foot opening. The lateral (little toe) side flares out more than the medial (big toe) side. This is to accommodate the shape of the foot. Note that the manikin's feet are not very nationalistically shaped.
ref_arm_2801
Mac
ref_arm_2801
Mac
Robert MacPherson
The craftsmen of old had their secrets, and those secrets died with them. We are not the better for that, and neither are they.
http://www.lightlink.com/armory/
http://www.billyandcharlie.com
https://www.facebook.com/BillyAndCharlie
The craftsmen of old had their secrets, and those secrets died with them. We are not the better for that, and neither are they.
http://www.lightlink.com/armory/
http://www.billyandcharlie.com
https://www.facebook.com/BillyAndCharlie
Re: raising greaves
These view show us a lot about the shape of the ankle area. Note that from the front, we can not see the overlaps at the ankle. From the back, however, they are easily seen. This speaks of the overall widening of the front which allows room for the foot.
An important consecration is that the overlaps are no longer fundamentally parallel once we get to the ankle.


 ref_arm_2942
Mac
An important consecration is that the overlaps are no longer fundamentally parallel once we get to the ankle.
ref_arm_2942Mac
Robert MacPherson
The craftsmen of old had their secrets, and those secrets died with them. We are not the better for that, and neither are they.
http://www.lightlink.com/armory/
http://www.billyandcharlie.com
https://www.facebook.com/BillyAndCharlie
The craftsmen of old had their secrets, and those secrets died with them. We are not the better for that, and neither are they.
http://www.lightlink.com/armory/
http://www.billyandcharlie.com
https://www.facebook.com/BillyAndCharlie
Re: raising greaves
Another good front view of the foot opening. Note how we can look right in and see the overlaps.
 ref_arm_3013
Mac
ref_arm_3013Mac
Robert MacPherson
The craftsmen of old had their secrets, and those secrets died with them. We are not the better for that, and neither are they.
http://www.lightlink.com/armory/
http://www.billyandcharlie.com
https://www.facebook.com/BillyAndCharlie
The craftsmen of old had their secrets, and those secrets died with them. We are not the better for that, and neither are they.
http://www.lightlink.com/armory/
http://www.billyandcharlie.com
https://www.facebook.com/BillyAndCharlie
Re: raising greaves
Here, again, we can see how the overlaps are and are not visible from the back. At the ankle, we can see both overlaps, but by the time we get to the top, we can only see one. This is about the twist, but also the change in overlap placement. That is to say, at the top, and over most of the greave, the overlaps are more or less parallel and at the widest places. Getting the back into the front requires only a slight squeeze to get the edges past one another. At the ankle, the overlaps are no longer parallel and the overlaps are behind the widest point. Here, the back must be squeezed significantly in order to snap it into the front.
 ref_arm_5133
Mac
ref_arm_5133Mac
Robert MacPherson
The craftsmen of old had their secrets, and those secrets died with them. We are not the better for that, and neither are they.
http://www.lightlink.com/armory/
http://www.billyandcharlie.com
https://www.facebook.com/BillyAndCharlie
The craftsmen of old had their secrets, and those secrets died with them. We are not the better for that, and neither are they.
http://www.lightlink.com/armory/
http://www.billyandcharlie.com
https://www.facebook.com/BillyAndCharlie
-
Icepocca
- Archive Member
- Posts: 180
- Joined: Tue Dec 10, 2013 10:23 pm
- Location: Vancouver, B.C Canada
Re: raising greaves
"Until it runs more or less parralel with the foot"
Gawd its so simple, yet I couldn't wrap my head around it for some reason.
I'm also surprised at how little overlap there is. I've been leaving about an inch of overlap
Gawd its so simple, yet I couldn't wrap my head around it for some reason.
I'm also surprised at how little overlap there is. I've been leaving about an inch of overlap
Re: raising greaves
It's a "funny" shape, and not at all what one expects.
I try to keep the overlaps at about 3/4" or so while I am working. On the hinge side I trim them down to about 5/16", and on the fastening side I trim the upper stuff to around 1/2", and the ankles to a 1/2" or a bit less. There is need for more overlap at the top for adjustment and convenience. The ankles don't need as much overlap because, in a sense, they are either open or closed.
Mac
Robert MacPherson
The craftsmen of old had their secrets, and those secrets died with them. We are not the better for that, and neither are they.
http://www.lightlink.com/armory/
http://www.billyandcharlie.com
https://www.facebook.com/BillyAndCharlie
The craftsmen of old had their secrets, and those secrets died with them. We are not the better for that, and neither are they.
http://www.lightlink.com/armory/
http://www.billyandcharlie.com
https://www.facebook.com/BillyAndCharlie
-
Icepocca
- Archive Member
- Posts: 180
- Joined: Tue Dec 10, 2013 10:23 pm
- Location: Vancouver, B.C Canada
Re: raising greaves
I put in the upper crest and now the greaves don't slide down at all!
Also, should I be able to rotate my foot in all directions with the greaves on?
Also, should I be able to rotate my foot in all directions with the greaves on?
Re: raising greaves
The crest makes a world of difference. What is just decoration at the bottom of the greave is an ergonomic necessity at the top.
You should have a "reasonable" amount of motion in the greave. That is to say the flexion and extension of the foot should be sufficient to let you walk up and down stairs comfortably, but you won't be able to dance en pointe. There should be enough motion that your feet can comfortable pronate and supinate sufficiently to stand and walk on uneven ground, but you will run out of these motions in the greave before you run out in bare feet.
Too many modern armorers try to make the foot openings of greaves large enough for a biologically full range of motion. When you couple that with oversized and ill fitted sabatons, the results look like bell bottoms. The armor will restrict you some, but no more than a pair of stiff boots. If you make your greaves to look like real ones they will work like they should.
Mac
Robert MacPherson
The craftsmen of old had their secrets, and those secrets died with them. We are not the better for that, and neither are they.
http://www.lightlink.com/armory/
http://www.billyandcharlie.com
https://www.facebook.com/BillyAndCharlie
The craftsmen of old had their secrets, and those secrets died with them. We are not the better for that, and neither are they.
http://www.lightlink.com/armory/
http://www.billyandcharlie.com
https://www.facebook.com/BillyAndCharlie
-
Icepocca
- Archive Member
- Posts: 180
- Joined: Tue Dec 10, 2013 10:23 pm
- Location: Vancouver, B.C Canada
Re: raising greaves
Well I have to get ready for my finals now so armouring will have to be put on hold, after I'm finished though I'll finish my sabatons and start a new pair of greaves, hopefully I can document the process
-
Icepocca
- Archive Member
- Posts: 180
- Joined: Tue Dec 10, 2013 10:23 pm
- Location: Vancouver, B.C Canada
Re: raising greaves
For trimming, do you guys trim both sides so they lay flat or do you only trim the back so that the overlap isn't too much?
Re: raising greaves
There is no rule of thumb except that you must trim from wherever you have too much. You just have to decide on a case by case basis.
When you are done, neither part will lay flat on a table. The twist would make sure of that if nothing else did.
Mac
When you are done, neither part will lay flat on a table. The twist would make sure of that if nothing else did.
Mac
Robert MacPherson
The craftsmen of old had their secrets, and those secrets died with them. We are not the better for that, and neither are they.
http://www.lightlink.com/armory/
http://www.billyandcharlie.com
https://www.facebook.com/BillyAndCharlie
The craftsmen of old had their secrets, and those secrets died with them. We are not the better for that, and neither are they.
http://www.lightlink.com/armory/
http://www.billyandcharlie.com
https://www.facebook.com/BillyAndCharlie
-
Kristoffer

- Archive Member
- Posts: 1697
- Joined: Sat Sep 09, 2000 1:01 am
- Location: Ostersund - Sweden
- Contact:
Re: raising greaves
So there is a curve to the edge of greaves? How does that work with the hinges?
Edit: Looking at Wades greaves I see the line. It kinda follow some sort of line along the leg that makes sense but it is not straight. It will be interesting to study greaves once I reach that part of my current projects.
Edit: Looking at Wades greaves I see the line. It kinda follow some sort of line along the leg that makes sense but it is not straight. It will be interesting to study greaves once I reach that part of my current projects.
Kristoffer Metsälä