Greenwich Buckhurst armour

This forum is designed to help us spread the knowledge of armouring.
User avatar
Chris Gilman
Archive Member
Posts: 2467
Joined: Fri Oct 18, 2002 1:01 am
Location: Sylmar CA.
Contact:

Greenwich Buckhurst armour

Post by Chris Gilman »

I posted in another thread a bit about this armour, but I thought I would start a specific thread on it, now that I'm working on it again (I took time off the restore my dad;'s race car for it's 40th anniversary)
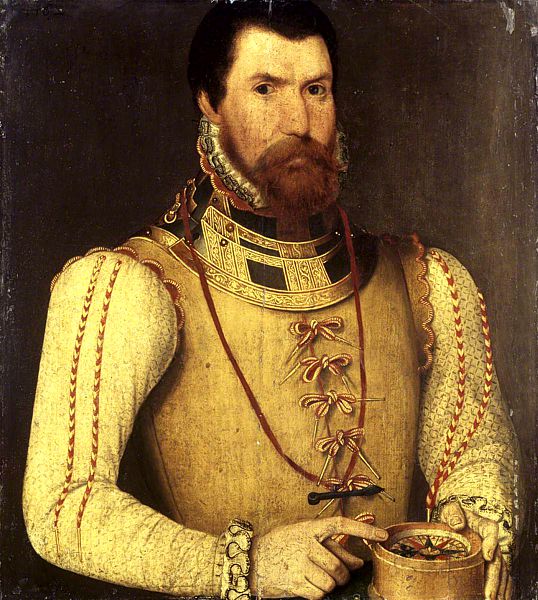
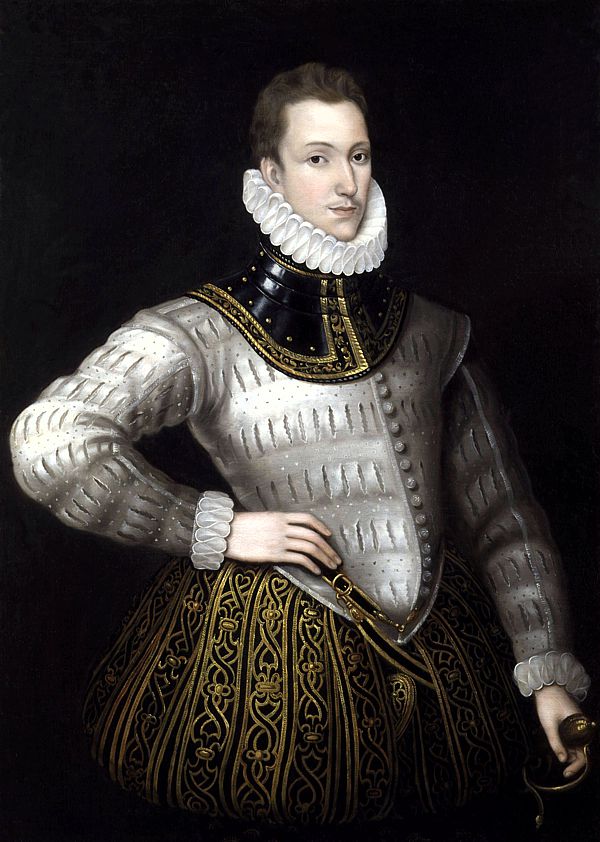
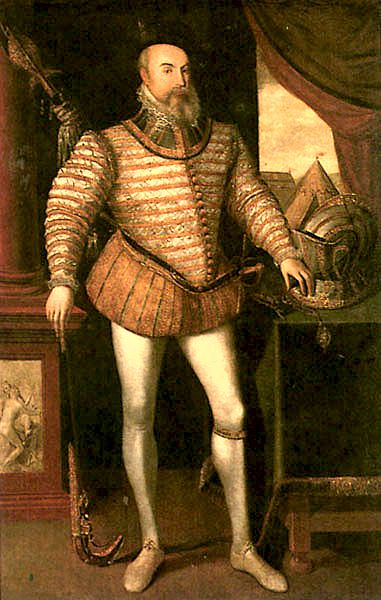
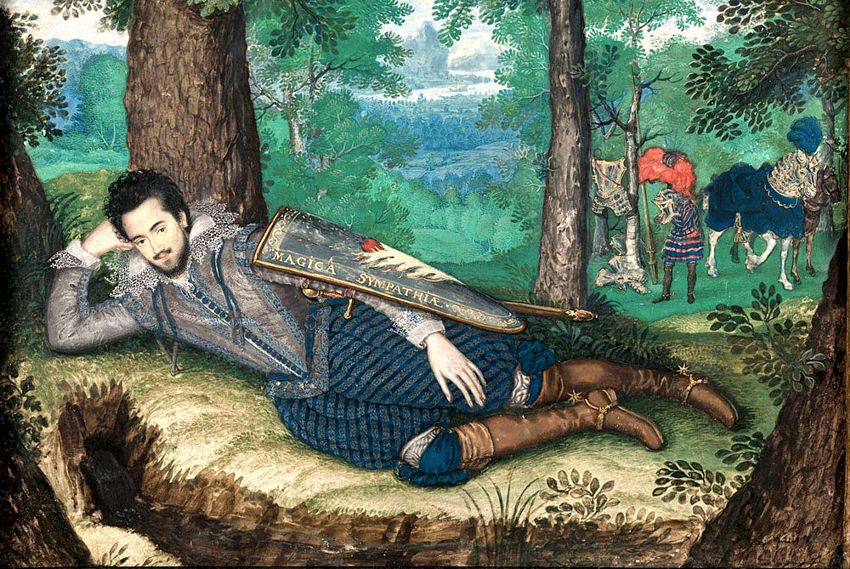
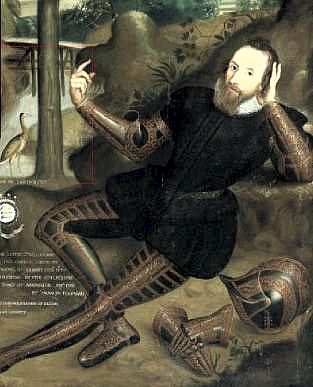
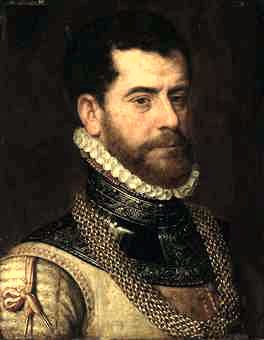
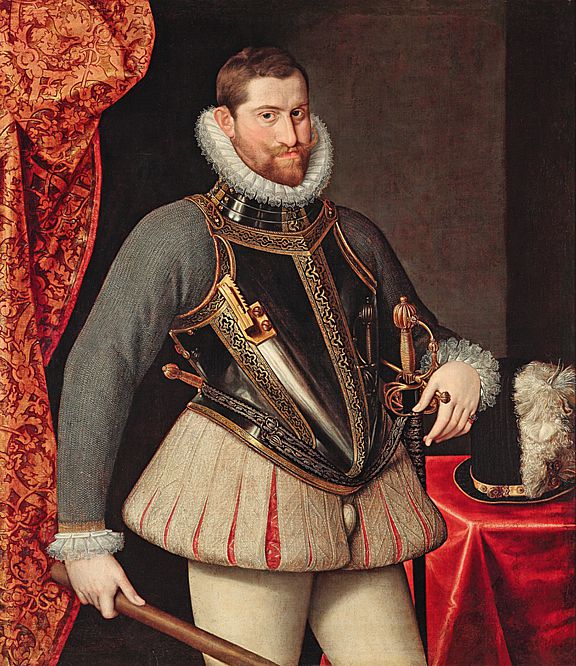
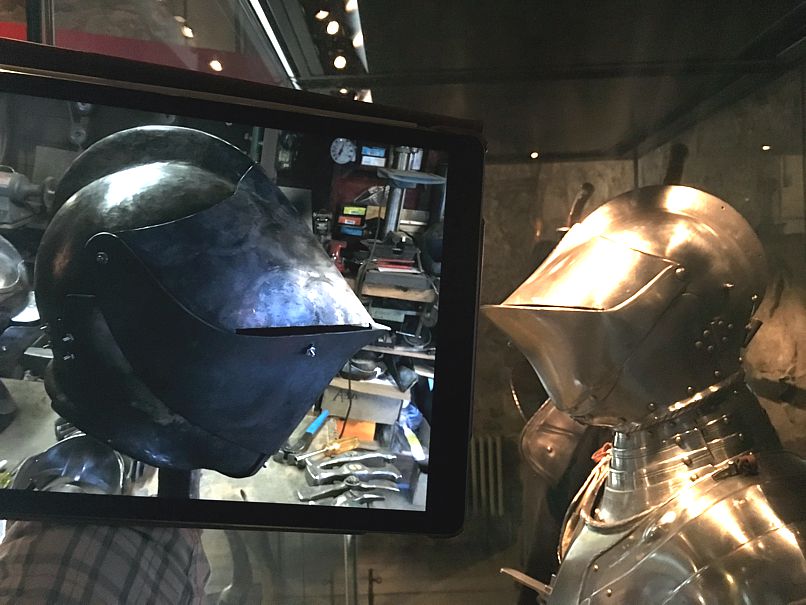
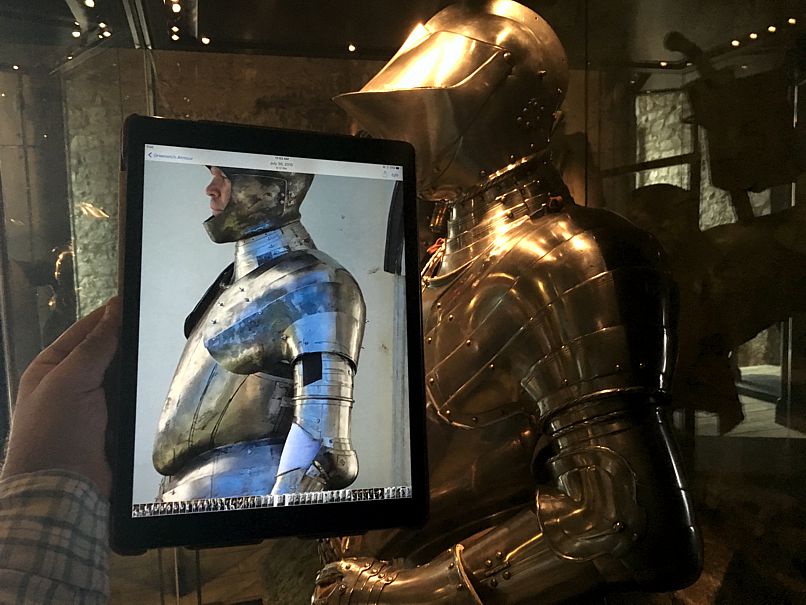
It is a copy of a Greenwich armour with medium decoration. Most closely styled after the armour of Sir Thomas Sackville, Lord Buckhurst. The "Buckhurst" armour that is currently in the Wallace collection. (A62)
Image

There is a nearly identical armour at the Metropolitan museum in NYC,
Image

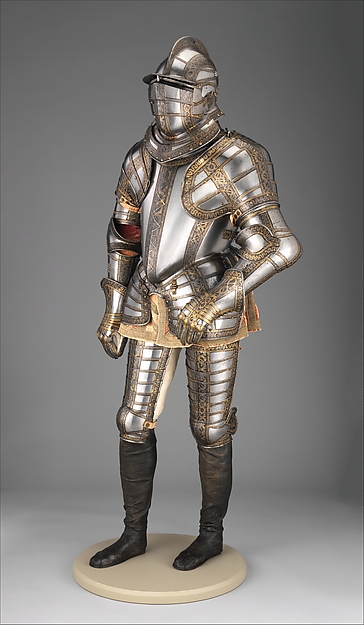
Also a half armour in Art institute of Chicago. (this was recently featured in the NOVA special)
Image

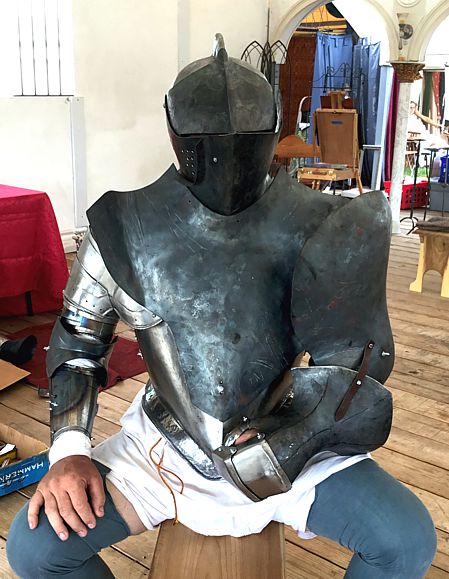
I commissioned Mac in 1999? for this armour, but during it's construction Mac injured his elbow. So it sat for awhile. About 3 or 4 years ago I approached Jeff Wasson about finishing it. At the time, approximately 70% of the main suit was complete, but I really wanted a full garniture so there was quite a few pieces left to make.
The suit is being made from 1050 and will be fully heat-treated, acid etched and either gold plated or fire-gilded, then salt blued.
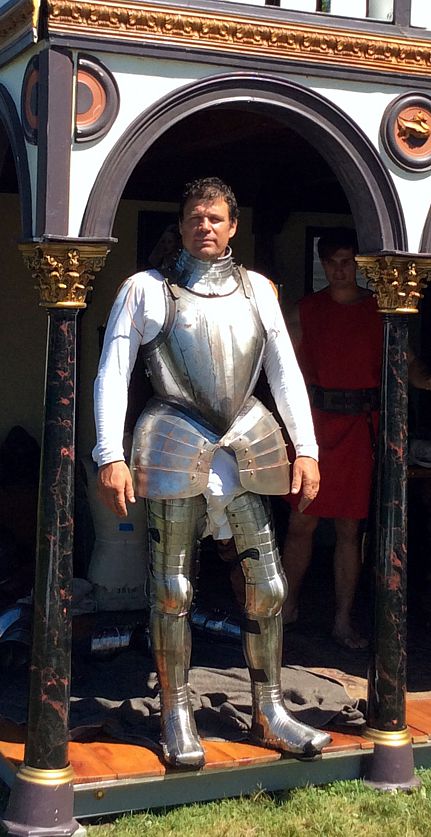
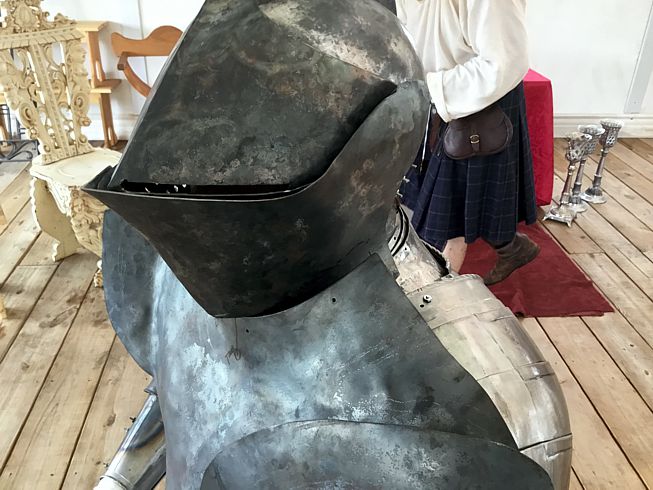
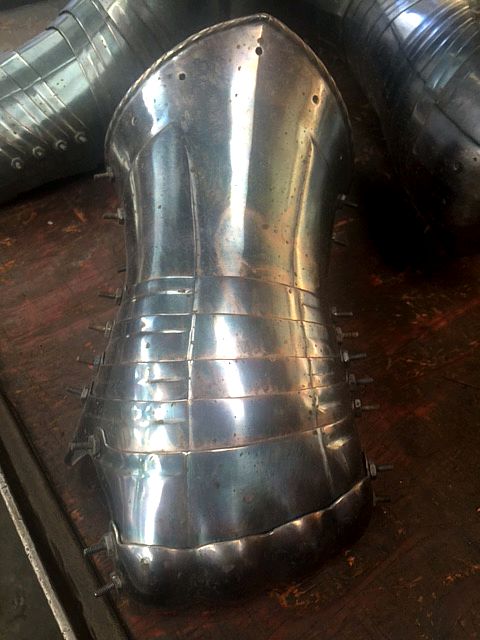
It will consist of: the full suit, with burgonet and falling buff, like the two complete extant suits. In addition, there will be a close helm with interchangeable field & joust visors, reinforce breast, grand guard, couter, manifar, & Locking gauntlet.
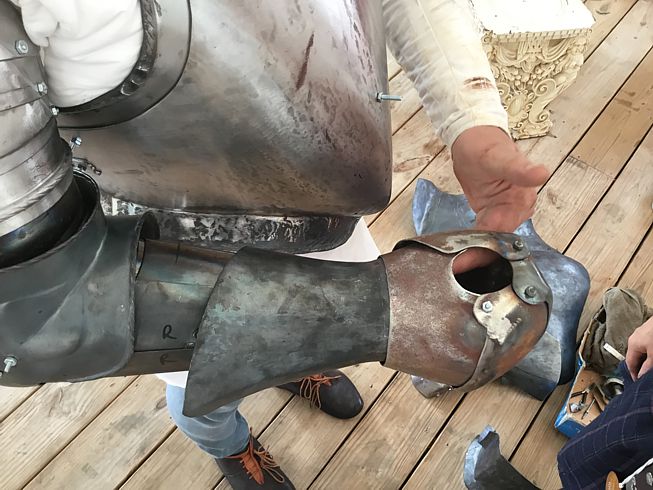
As of now, all the pieces are formed and about 70% are ready for heat-treat. Last year, Jeff has delivered the the cuisses, greaves & gauntlets, which I have already heat- treated.

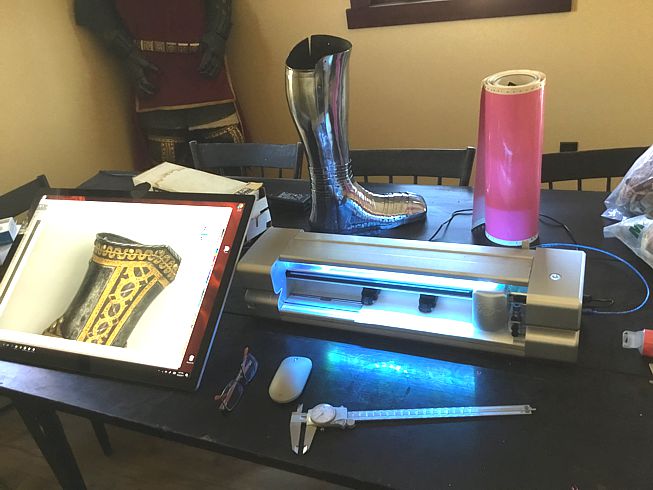
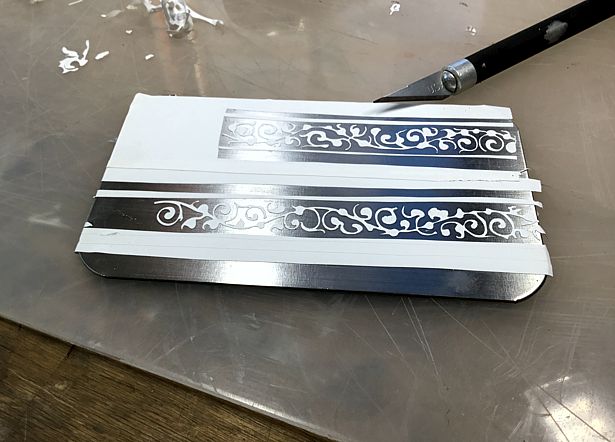
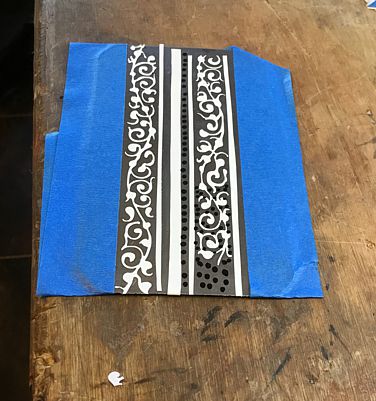
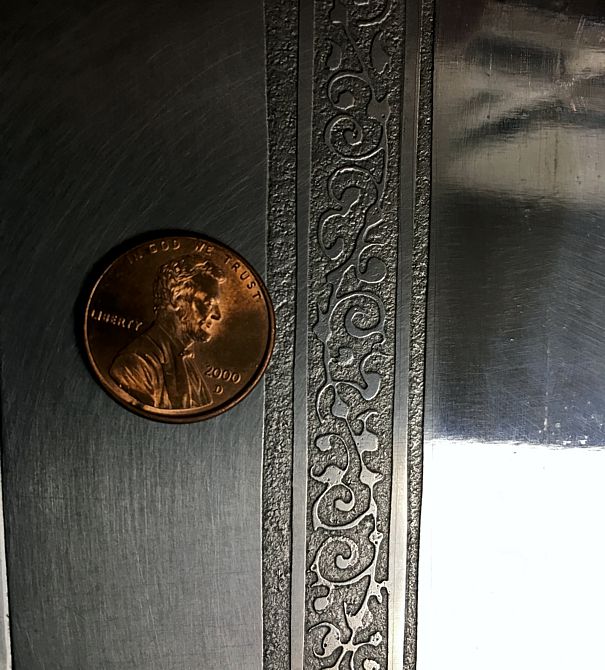
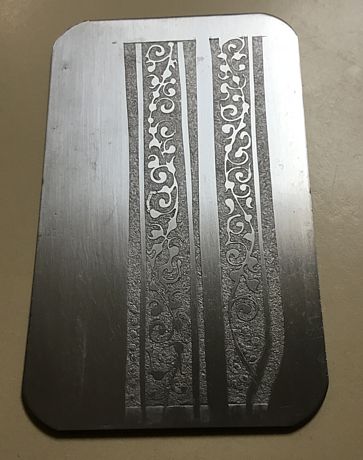
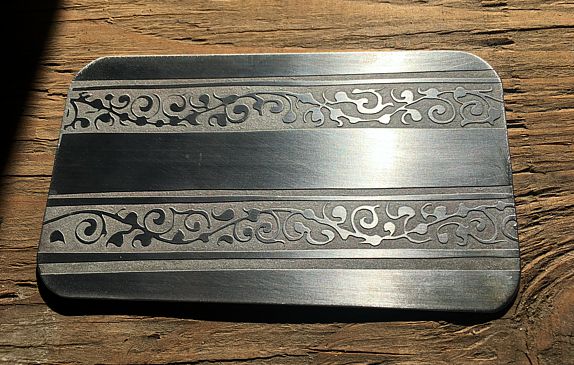
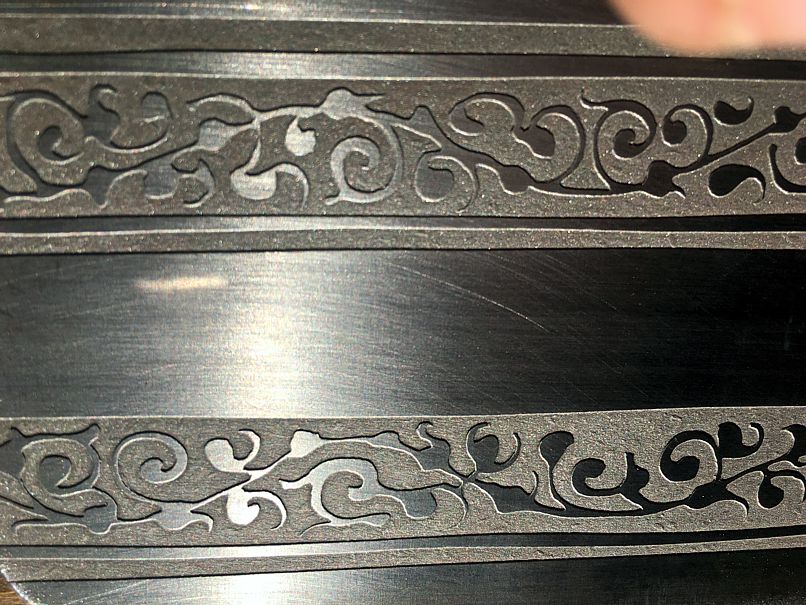
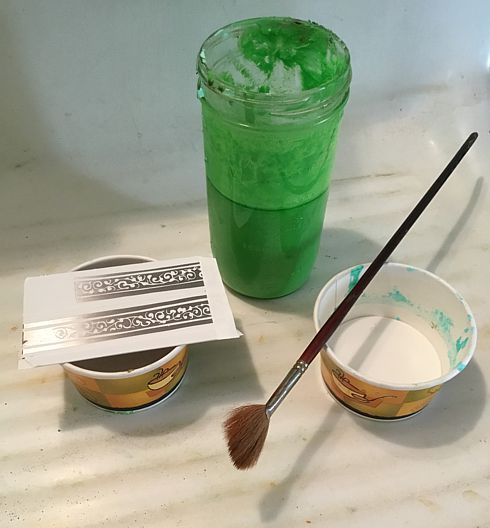
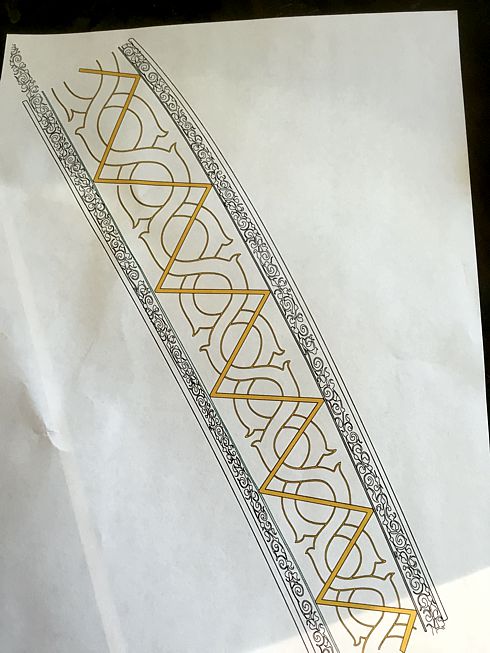
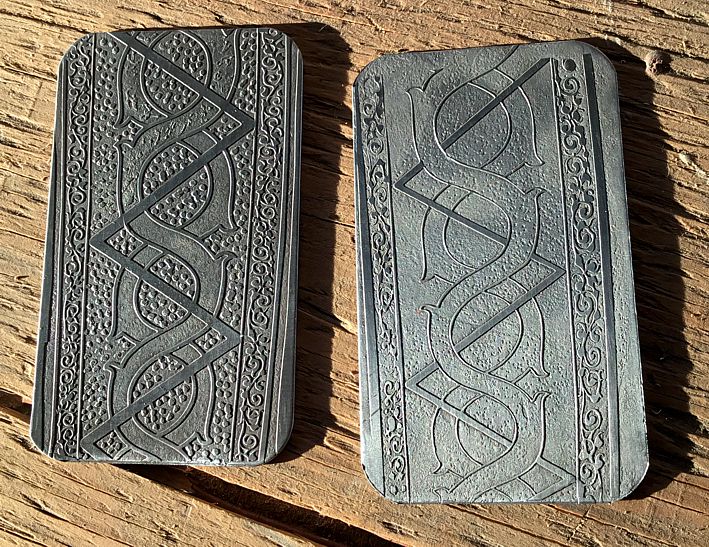
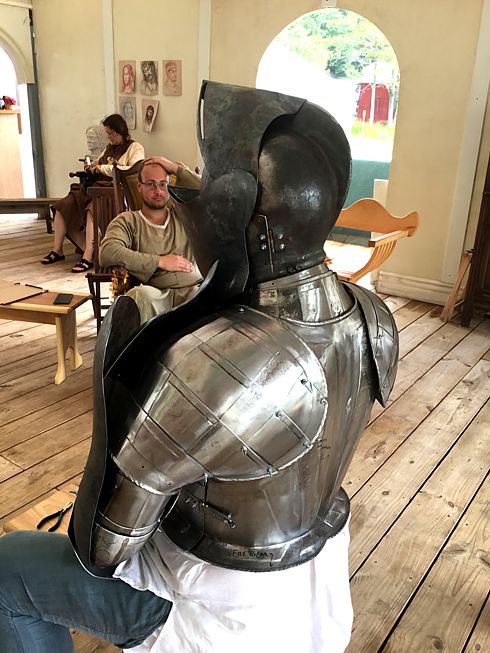
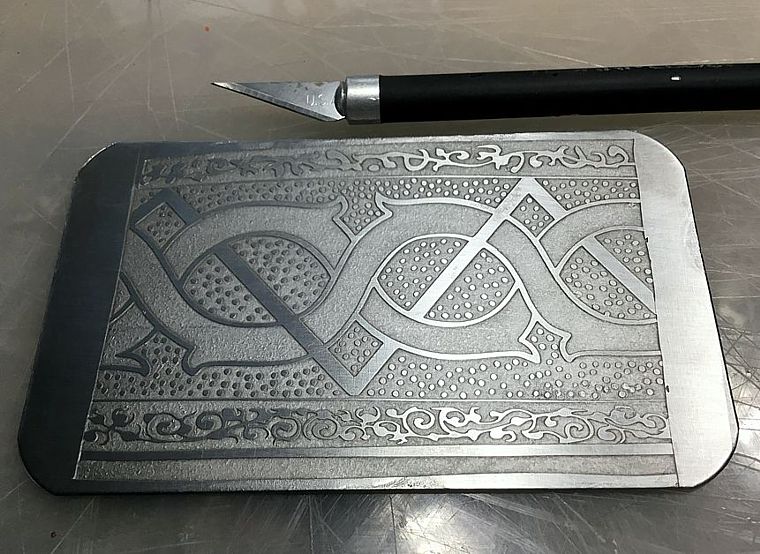
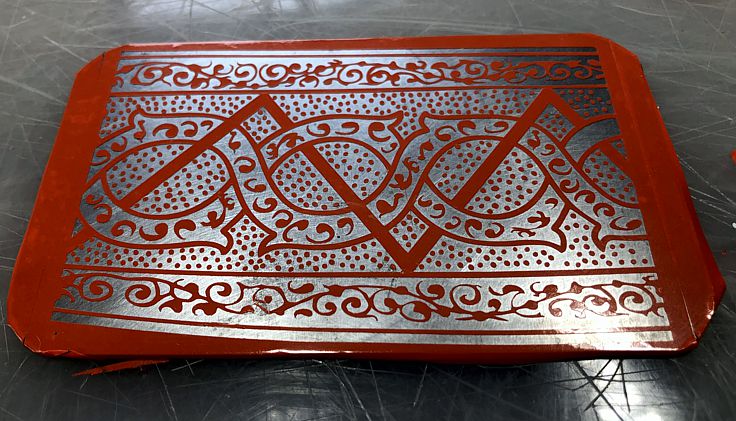
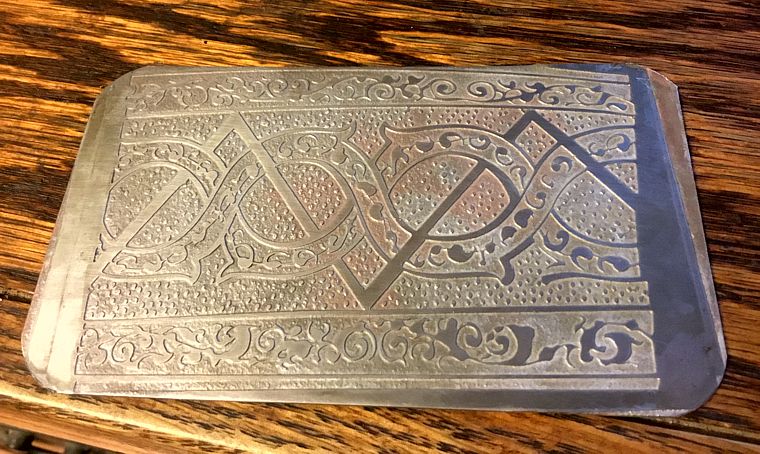
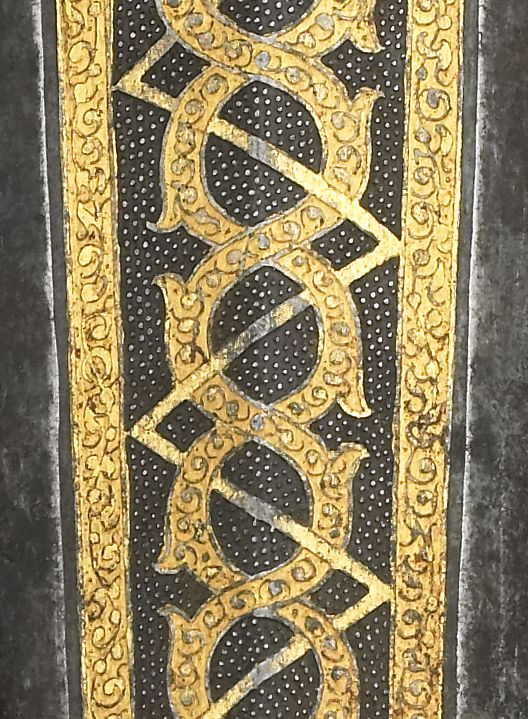
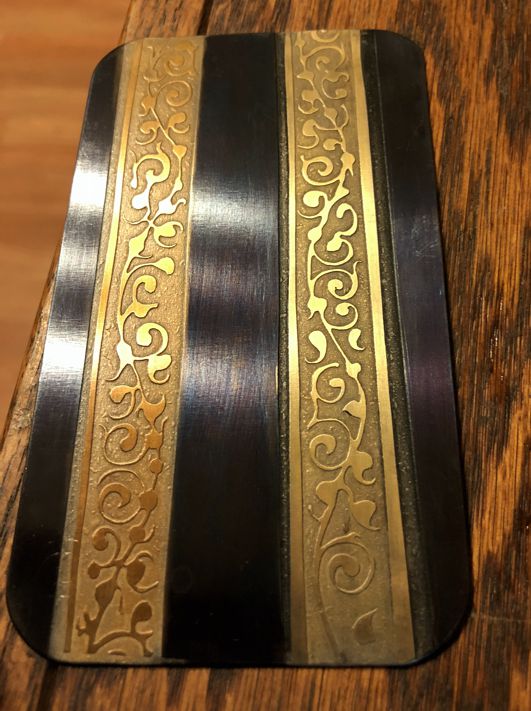
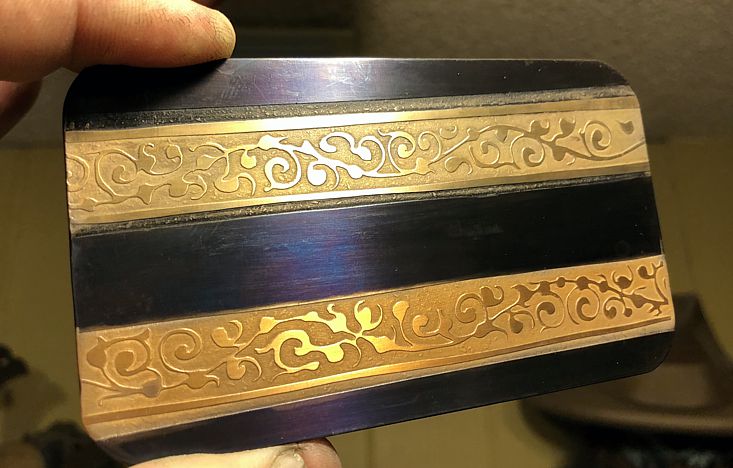
I am currently working on the etching process. Due to my lack of drawing skill, and the massive amount of etching on this suit, I decided to use a computer to generate the artwork. To start, I trace the etched patterns from closeup images of the extant armour and then use a plotter/cutter to cut vinyls as a mask/ resist. This is working very well and I can maintain the very fine hand drawn look, but pretty quickly make the hundreds of inches I'll need for all the boarders. In some places, I have made masking tape patterns of the sunken boarders where the patterns need to match specific curves or tapers, I scanned those patterns and using Corel Draw have adjusted the artwork accordingly.
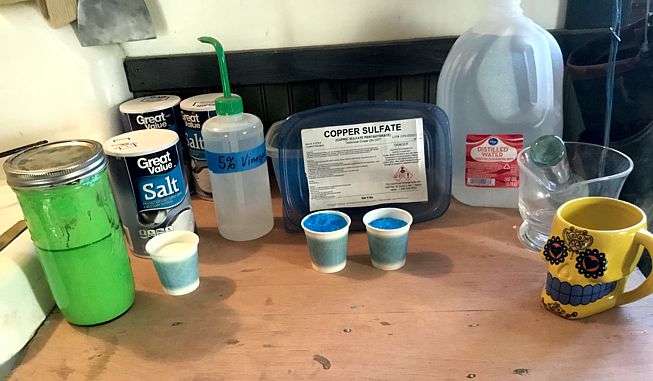
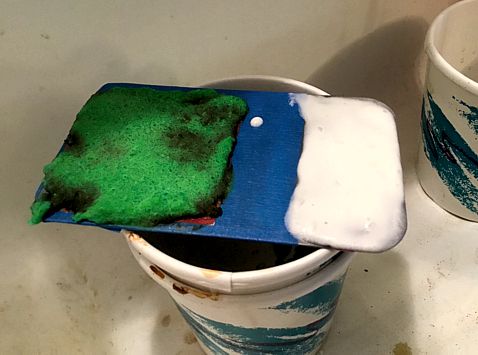
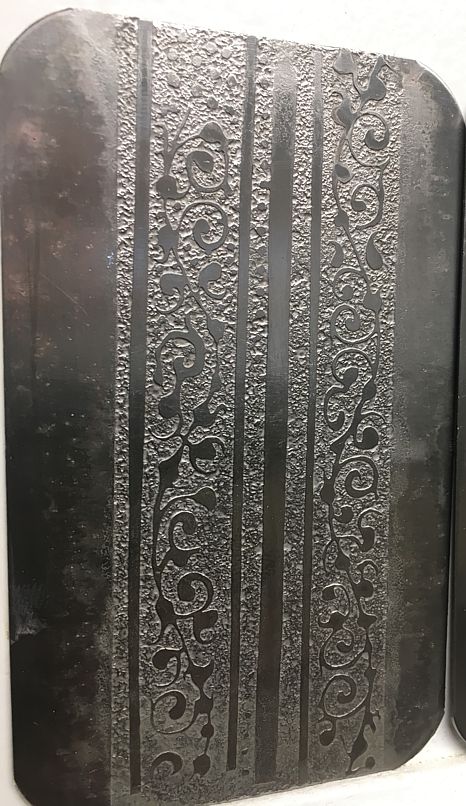
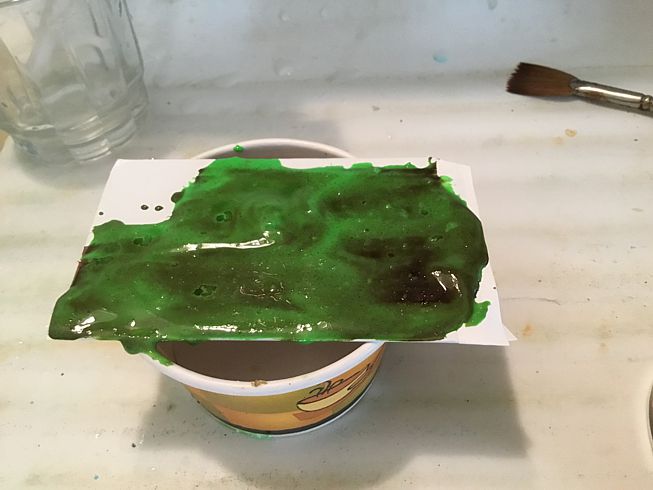
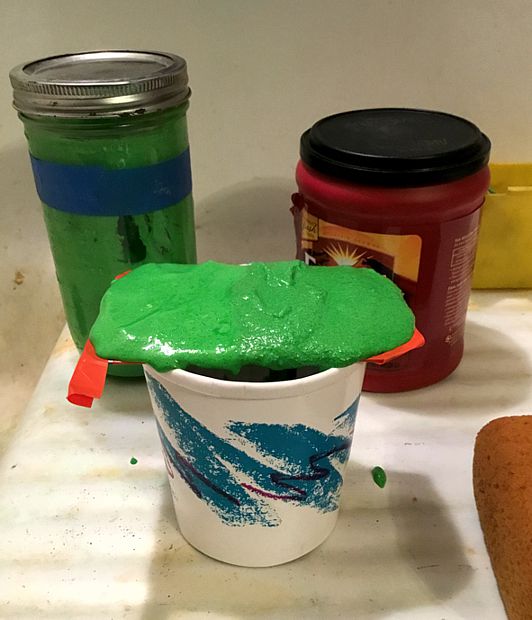
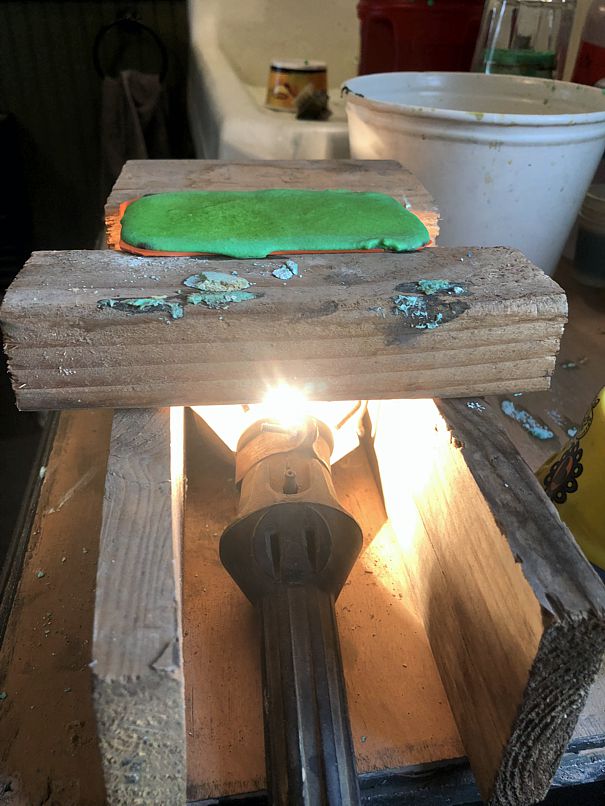
For the etching, I'm using the same etch paste recipe that was used on the replica breast & back that Jeff built for the NOVA special, copper sulfate, salt & vinegar. This recipe I understand was derived from a period source and translated into modern chemicals by a scholar who specializes in medieval chemistry. Perhaps Jeff will chime in with additional info here.
I'll get the test images set up on our server later today and post some images of the tests.
Mac
Archive Member
Posts: 9953
Joined: Thu Jan 04, 2001 2:01 am
Location: Jeffersonville, PA

Re: Greenwich Buckhurst armour

Post by Mac »

I've seen some pics of Chris' test etchings, and they're looking good.

This whole idea of etching with a paste (rather than a liquid) is really a game changer. Imagine the problems associated with having a vat of nitric acid big enough for a breastplate. Now, consider the different environments the work experiences in such a vat. The vertical surfaces will etch differently than the horizontal ones. In addition, things toward the top of the vat will experience higher temperatures than things toward the bottom of the vat, and this will greatly affect the etch rates. Consider also that with a liquid etch, the back of the work must be stopped off with resist as well. A paste etching process avoids all of this.

Mac
Robert MacPherson

The craftsmen of old had their secrets, and those secrets died with them. We are not the better for that, and neither are they.

http://www.lightlink.com/armory/
http://www.billyandcharlie.com
https://www.facebook.com/BillyAndCharlie
User avatar
Johann ColdIron
Archive Member
Posts: 7421
Joined: Mon Mar 03, 2003 2:01 am
Location: Raleigh, NC

Re: Greenwich Buckhurst armour

Post by Johann ColdIron »

Mac wrote:I've seen some pics of Chris' test etchings, and they're looking good.

This whole idea of etching with a paste (rather than a liquid) is really a game changer. Imagine the problems associated with having a vat of nitric acid big enough for a breastplate. Now, consider the different environments the work experiences in such a vat. The vertical surfaces will etch differently than the horizontal ones. In addition, things toward the top of the vat will experience higher temperatures than things toward the bottom of the vat, and this will greatly affect the etch rates. Consider also that with a liquid etch, the back of the work must be stopped off with resist as well. A paste etching process avoids all of this.

Mac

Hadn't thought about the temperature concern with acid. Yeah, that is a pretty big technological leap all the way around!
John Cope/ Sir Johann ColdIron, Master- Order of the Laurel

I'm not dead yet!
raito
Archive Member
Posts: 4961
Joined: Wed Jun 02, 2004 9:48 am
Location: Madison, WI

Re: Greenwich Buckhurst armour

Post by raito »

I figured that they just applied more labor to the problem. I've etched (in a non-armour context) with liquids using a brush or similar. Very controllable (which was good for my projects) but took a very long time.
Sean M
Archive Member
Posts: 2394
Joined: Mon Oct 05, 2009 11:24 pm
Location: in exile in Canada

Re: Greenwich Buckhurst armour

Post by Sean M »

What are you going to do for the arming clothes? Making a really good Elizabethan doublet must be a crazy amount of work.
DIS MANIBUS GUILLELMI GENTIS MCLEANUM FAMILIARITER GALLERON DICTI
VIR OMNIBUS ARTIBUS PERITUS
Check out Age of Datini: European Material Culture 1360-1410
User avatar
Chris Gilman
Archive Member
Posts: 2467
Joined: Fri Oct 18, 2002 1:01 am
Location: Sylmar CA.
Contact:

Re: Greenwich Buckhurst armour

Post by Chris Gilman »

To create the artwork, I am using a Microsoft "Surface" so I can draw on the screen over hi-res images of the real armour. I figured, for me, this would be the best way to capture the correct style. I'm creating the artwork in Corel Draw, a program I've been using for nearly 30 years. (I highly recommend it) Then I'm using a "Zing Orbit" desktop vinyl cutter to cut the masks.

Image

I had some old vinyl left over from "Power Rangers", (Pink-PR) but it was too hard to "weed" (remove unwanted vinyl after cutting) so I bought some from Michel's art supply and this is working very well. I'm going to order some higher quality stuff and try that, but at the moment I have been tackling the etch process and how well the artwork translate to the final etched metal. I am very impressed at how small this cutter can cut and it's accuracy. Here is the cut mask on the metal:
Image

I'm also using an oil-based paint pen for dots. This still needs some experimenting.

Image

So, as I said, I'm using an etch paste made of 2 parts - Copper Sulfate, 1 part -Salt, and enough Vinegar to make a paste.

Image

When I did the first test, I was using the old vinyl and it was easier to "weed" the "vine" part and leave the background. So I used the vinyl as a paint mask and used Krylon spray paint as the etch resist. When mixing the etching compound, I just wet the "sand" textured salt and CS with enough vinegar to make a grainy paste. I used 2 applications of paste for 60 minutes each. Test one:

Image

Image


The graininess is an issue as the real suits etch has a nice smooth background, no real texture. Because the background was so "pebbly" I figured I would need to grind the salt and CS finer. I had a nice mortar & pestle from Master Ali so I gave that a try. After considerable work, the mixture was not significantly finer. But, while at Micheal's for the new vinyl, I picked up some "Armor etch" acid paste. That's gotta work Right?! Here is that test. You can see the graininess of the green past, the "armor etch" is the white material.
Image

This test was over an all paint pen artwork and the Armor Etch was not very effective. So I have relabeled the bottle "Not, Armor Etch" This test was not useful as the paint had not dried sufficiently and was mostly obliterated while washing off the first application of paste. But I did notice how much crisper the etch was where I had masked the plate with a piece of vinyl. It also turned out, the new vinyl was easy to weed once the cut vinyl had been adhered to the metals surface. So the next test, with the finer ground material, the paste was applied over the cut vinyl. Test two:

Image

I also thought the etch needed to be almost twice as deep, since in the close up images of the Buckhurst, you could see a significant shadow caused by the etch depth. My etching didn't seem to be nearly this deep. So, I'd try 2 things; First, leave the paste on much longer. Second, get some stronger vinegar. Household vinegar is 5% acetic acid and I found 30% concentrate on Amazon, but I also found some 99% acetic acid, so I ordered that. Now as the strength goes up, so does the dangers with acid, so my plan is to cut it to 50% as soon as I get it.
I also did another test, this time leaving the second application of paste overnight. It cut deeper, but the texture got worse. Test Three:

Image


This was going in the right direction, but I had solve this textured background issue. Chemistry was not a subject I was excited about in High school, so I had to look up if water was a solvent for Copper Sulfate. It is of course and I realized my error; I needed to fully dissolve the crystals into solution before using them. I mixed the salt and CS with disstilled water and after 5 minutes of mixing, I had a creamy green paste. I had also distilled some vinegar by boiling it on the stove, in an attempt to increase the strength. I added this to my paste, so I figure I was likely back to 5%+ concentration. This worked very well. No serious texture and it was starting to look like the real thing. Test Four:

Image

Image

In the closeup, you can see how fine a line the vinyl will "protect" from the etching paste. I may try heating the paste a little.

I found I could make up a batch of the paste and let is sit over night and the crystals would dissolve into a smooth paste. I store it in a glass jar, but I need to find something with a non metallic top for long term storage. Here is the paste:

Image

I had been using a tongue depressor to apply the paste, but this batch was a little thin, so I tried a brush. It turns dark brown upon contact with the steel. I added another batch of salt & CS to thicken the paste.
Image


Next, I'm testing the bigger patterns down the center of the greave.
Last edited by Chris Gilman on Wed Jan 20, 2021 12:32 pm, edited 3 times in total.
User avatar
Chris Gilman
Archive Member
Posts: 2467
Joined: Fri Oct 18, 2002 1:01 am
Location: Sylmar CA.
Contact:

Re: Greenwich Buckhurst armour

Post by Chris Gilman »

Sean M wrote:What are you going to do for the arming clothes? Making a really good Elizabethan doublet must be a crazy amount of work.
My plan is to have Mathew Gnagy make them. http://themodernmaker.net/
I have some tailored mail sleeves from Tom Biliter for this project as well.
User avatar
Roland Ansbacher
Archive Member
Posts: 466
Joined: Mon Aug 14, 2000 1:01 am
Location: Coeur d'Alene
Contact:

Re: Greenwich Buckhurst armour

Post by Roland Ansbacher »

The grain on that last one looks fantastic! How long did you leave the paste on for?
cak4
New Member
Posts: 5
Joined: Sun Jun 15, 2008 8:14 pm
Location: Cleveland OH

Re: Greenwich Buckhurst armour

Post by cak4 »

There are plastic lids that will fit standard or wide-mouth canning jars available that would probably work to close up your etching paste. Also, a lot of choices in jar size from 4 fluid ounce to 1 quart. http://www.freshpreserving.com/ball-reg ... 037VM.html for the lids, probably available cheaper than from the manufactured if you do a web search. As for their use with vinegar/acetic acid, they are used for pickles!
Charley Knox/Sir Karl Ulfson KSCA
User avatar
Otto von Teich
Archive Member
Posts: 17440
Joined: Thu Nov 09, 2000 2:01 am
Location: The Great State of Texas.

Re: Greenwich Buckhurst armour

Post by Otto von Teich »

Thanks for sharing this Chris. You're getting fantastic results! The finished armour will be magnificent I'm sure. Looking forward to seeing it completed. Hopefully you will post some more progress pics :wink:
People sleep peaceably in their beds at night only because rough men stand ready to do violence on their behalf.
User avatar
Alex Baird
Archive Member
Posts: 16809
Joined: Wed Feb 27, 2008 2:55 pm
Location: Santa Clarita, CA

Re: Greenwich Buckhurst armour

Post by Alex Baird »

Chris Gilman wrote: I had some old vinyl left over from "Power Rangers", (Pink-PR) but it was too hard to "weed" (remove unwanted vinyl after cutting) so I bought some from Michel's art supply and this is working very well. I'm going to order some higher quality stuff and try that, but at the moment I have been tackling the etch process and how well the artwork translate to the final etched metal. I am very impressed at how small this cutter can cut and it's accuracy.
Two local vendors for 3M brand vinyl would be Ordway sign supply and Gavrielli, both in the San Fernando valley.
No, really, I'm serious. Look at my face. :|
User avatar
Marco-borromei
Archive Member
Posts: 1740
Joined: Mon Jul 14, 2008 1:34 pm
Contact:

Re: Greenwich Buckhurst armour

Post by Marco-borromei »

Interesting, I'm currently using a Cricut with fairly generic vinyl to make the same sort of stencils and paint gold onto armor borders. I hadn't considered yet trying to acid etch with the vinyl... but now I'm more inspired.
Instead of a PM, please reply via email directly to baronmarcoborromei@gmail.com. I rarely get to log on here and read PM's.
Mac
Archive Member
Posts: 9953
Joined: Thu Jan 04, 2001 2:01 am
Location: Jeffersonville, PA

Re: Greenwich Buckhurst armour

Post by Mac »

Post moved..
Last edited by Mac on Fri Oct 27, 2017 7:06 am, edited 2 times in total.
Robert MacPherson

The craftsmen of old had their secrets, and those secrets died with them. We are not the better for that, and neither are they.

http://www.lightlink.com/armory/
http://www.billyandcharlie.com
https://www.facebook.com/BillyAndCharlie
Mac
Archive Member
Posts: 9953
Joined: Thu Jan 04, 2001 2:01 am
Location: Jeffersonville, PA

Re: Greenwich Buckhurst armour

Post by Mac »

Post moved
Last edited by Mac on Fri Oct 27, 2017 7:07 am, edited 1 time in total.
Robert MacPherson

The craftsmen of old had their secrets, and those secrets died with them. We are not the better for that, and neither are they.

http://www.lightlink.com/armory/
http://www.billyandcharlie.com
https://www.facebook.com/BillyAndCharlie
Mac
Archive Member
Posts: 9953
Joined: Thu Jan 04, 2001 2:01 am
Location: Jeffersonville, PA

Re: Greenwich Buckhurst armour

Post by Mac »

I am moving my last three posts here so as not to hijack Chris's thread.


Mac
Last edited by Mac on Fri Oct 27, 2017 7:29 am, edited 2 times in total.
Robert MacPherson

The craftsmen of old had their secrets, and those secrets died with them. We are not the better for that, and neither are they.

http://www.lightlink.com/armory/
http://www.billyandcharlie.com
https://www.facebook.com/BillyAndCharlie
User avatar
Otto von Teich
Archive Member
Posts: 17440
Joined: Thu Nov 09, 2000 2:01 am
Location: The Great State of Texas.

Re: Greenwich Buckhurst armour

Post by Otto von Teich »

Did you just lay the vinyl on the steel and rely on the natural stickiness to seal it? Or use some type of adhesive?
People sleep peaceably in their beds at night only because rough men stand ready to do violence on their behalf.
User avatar
Johann ColdIron
Archive Member
Posts: 7421
Joined: Mon Mar 03, 2003 2:01 am
Location: Raleigh, NC

Re: Greenwich Buckhurst armour

Post by Johann ColdIron »

Otto von Teich wrote:Did you just lay the vinyl on the steel and rely on the natural stickiness to seal it? Or use some type of adhesive?
That type of sign vinyl is self adhesive.


Really nice results Chris. It would be great if a Renaissance of etching come from these developments. Some armour just looks wrong with out it!
John Cope/ Sir Johann ColdIron, Master- Order of the Laurel

I'm not dead yet!
Mac
Archive Member
Posts: 9953
Joined: Thu Jan 04, 2001 2:01 am
Location: Jeffersonville, PA

Re: Greenwich Buckhurst armour

Post by Mac »

Johann ColdIron wrote: It would be great if a Renaissance of etching come from these developments. Some armour just looks wrong with out it!
And some armor just looks wrong with it :wink: This is a double edged sword.

Mac
Robert MacPherson

The craftsmen of old had their secrets, and those secrets died with them. We are not the better for that, and neither are they.

http://www.lightlink.com/armory/
http://www.billyandcharlie.com
https://www.facebook.com/BillyAndCharlie
User avatar
Johann ColdIron
Archive Member
Posts: 7421
Joined: Mon Mar 03, 2003 2:01 am
Location: Raleigh, NC

Re: Greenwich Buckhurst armour

Post by Johann ColdIron »

Mac wrote:
Johann ColdIron wrote: It would be great if a Renaissance of etching come from these developments. Some armour just looks wrong with out it!
And some armor just looks wrong with it :wink: This is a double edged sword.

Mac

Absolutely!
John Cope/ Sir Johann ColdIron, Master- Order of the Laurel

I'm not dead yet!
wcallen
Archive Member
Posts: 4777
Joined: Mon Oct 29, 2001 2:01 am
Location: North Carolina, USA
Contact:

Re: Greenwich Buckhurst armour

Post by wcallen »

Johann ColdIron wrote:
Mac wrote:
Johann ColdIron wrote: It would be great if a Renaissance of etching come from these developments. Some armour just looks wrong with out it!
And some armor just looks wrong with it :wink: This is a double edged sword.

Mac

Absolutely!
Me too!!!! examples are easy to find. They just grate.....

Wade
Sean M
Archive Member
Posts: 2394
Joined: Mon Oct 05, 2009 11:24 pm
Location: in exile in Canada

Re: Greenwich Buckhurst armour

Post by Sean M »

Chris Gilman wrote:
Sean M wrote:What are you going to do for the arming clothes? Making a really good Elizabethan doublet must be a crazy amount of work.
My plan is to have Mathew Gnagy make them. http://themodernmaker.net/
I have some tailored mail sleeves from Tom Biliter for this project as well.
He really cares about the details of his clothing! Don't forget to show him that passage by Sir John Smythe.

I wish that he stepped one level back and started The Modern Maker with a page or three on how he thinks an early 17th century Spanish doublet fits relative to the skeleton. I have a feeling that his doublets are significantly wider in the shoulder than the ones I am used to, but without making one up I can't know, and there would not be much point in just having a 1610s doublet but no hat or cloak or shirt or whatever those things they wore on their legs are called.
DIS MANIBUS GUILLELMI GENTIS MCLEANUM FAMILIARITER GALLERON DICTI
VIR OMNIBUS ARTIBUS PERITUS
Check out Age of Datini: European Material Culture 1360-1410
User avatar
Chris Gilman
Archive Member
Posts: 2467
Joined: Fri Oct 18, 2002 1:01 am
Location: Sylmar CA.
Contact:

Re: Greenwich Buckhurst armour

Post by Chris Gilman »

Ok, so the new area on our server to store files does not seem to keep links active beyond a set number of hours/days. So I restored the images with my old tried and true method.

The larger pattern tests worked pretty well. The vine boarder needed to be shrunk and slightly curved. Using Corel Draw's "envelope" tool, I can manipulate the drawing as a whole drawing, by bending it using control handles. Once I have the artwork drawn, I print it on paper to check fit and scale. (for scale, this is an 8.5 x 11 sheet of paper)

Image

Because you can zoom in on the computer screen to such an extent, it is easy to loose a sense of actual size of the artwork. Elements you think are "big" turn out to be far too small. So the first test (on the right) resulted in the lines being too thin. The second test yielded a much better result.

Image

I still have to draw the vine pattern down the center of the figure eights, as this amount of curve change using the envelope tool will distort the pattern to greatly. The result I fear, would look too "computerized". Also on this test, I added the dots with paint pen and they are too sloppy. Part of this was my not taking enough care when applying them, the other issue is the pen does not deposit enough paint in a small dot. Mac has suggested a tube style applicator and a guy at my shop suggested a "stop out" pen used in the silk screening trade. I also plan on altering the nib shape on the paint pen to see if this improves the dot density and shape.

I received the 99% acid yesterday, so I'll make up a new batch of cream with a 50% "vinegar" and see how this affects the etch. I also opened my 20lbs bag of copper sulfate and the grains are much smaller than the sample material I had purchased from McMaster Carr. This should help in the material going into solution quicker. They also sell salt flour or popcorn salt, which is also finer grind. At some point I'll try this. I chose to buy "raw" copper sulfate and not to use "root killer" CS just in case there were other additives or some type of dilution.
I may increase the ratio of salt, in a separate test, since my first test (test 1) I had not had the recipe in front of me and I mixed the CS and salt 1 to 1 and the etch seemed a bit more aggressive.
Last edited by Chris Gilman on Wed Jan 20, 2021 8:53 am, edited 1 time in total.
User avatar
Chris Gilman
Archive Member
Posts: 2467
Joined: Fri Oct 18, 2002 1:01 am
Location: Sylmar CA.
Contact:

Re: Greenwich Buckhurst armour

Post by Chris Gilman »

Sean,
Here are some of the images I've collected for the arming clothes.
Image

Image

Image

Image

Image

Image

Image
Last edited by Chris Gilman on Wed Jan 20, 2021 8:54 am, edited 1 time in total.
Mac
Archive Member
Posts: 9953
Joined: Thu Jan 04, 2001 2:01 am
Location: Jeffersonville, PA

Re: Greenwich Buckhurst armour

Post by Mac »

It's interesting to see how adding dots (even oversized dots) to the background takes the eye away from the texture of the etched areas.

Mac
Robert MacPherson

The craftsmen of old had their secrets, and those secrets died with them. We are not the better for that, and neither are they.

http://www.lightlink.com/armory/
http://www.billyandcharlie.com
https://www.facebook.com/BillyAndCharlie
User avatar
Chris Gilman
Archive Member
Posts: 2467
Joined: Fri Oct 18, 2002 1:01 am
Location: Sylmar CA.
Contact:

Re: Greenwich Buckhurst armour

Post by Chris Gilman »

Here are some fittings that were done at Pennsic in 2015.

Image

Image


And some from 2016 fitting the jousting pieces.

Image

Image

Image

Image

In early 2016 I was in London, so I took the opportunity to go photograph the Greenwich harness they have in the Tower, with my iPad in the shot as a comparison of my suit. I was trying not to be in the way of other visitors, so some of these were a bit rushed. In looking at them later, I wish I was able to get the comparative angle closer to the fitting shots from Pennsic.

Image

Image

Currently the legs and gauntlets have been heat treated and cleaned up for etching. Here is one of the gauntlets (sabatons in the background) just back from Heat treat, before removing the heat blue.

Image
Last edited by Chris Gilman on Wed Jan 20, 2021 8:54 am, edited 1 time in total.
Sean M
Archive Member
Posts: 2394
Joined: Mon Oct 05, 2009 11:24 pm
Location: in exile in Canada

Re: Greenwich Buckhurst armour

Post by Sean M »

Chris Gilman wrote:Sean,
Here are some of the images I've collected for the arming clothes.
Yeah, I am sure that he knows as much about artwork as he knows about surviving clothing (which is a lot), but Sir John Smythe tells us different things, and they are very important things to know and specifically phrased as instructions for tailors.
DIS MANIBUS GUILLELMI GENTIS MCLEANUM FAMILIARITER GALLERON DICTI
VIR OMNIBUS ARTIBUS PERITUS
Check out Age of Datini: European Material Culture 1360-1410
Mark Griffin
Archive Member
Posts: 274
Joined: Mon Feb 10, 2014 8:36 am
Contact:

Re: Greenwich Buckhurst armour

Post by Mark Griffin »

How have I missed this thread? Fantastic stuff. I'm lucky enough to have worked in a harness based on the Buckhurst made for me by Master M/Emrys over here in the UK.
Attachments
Portrait small.jpg
Portrait small.jpg (41.38 KiB) Viewed 19557 times
front small.jpg
front small.jpg (39.73 KiB) Viewed 19557 times
side small.jpg
side small.jpg (78.85 KiB) Viewed 19557 times
'I didn't say that' Mark Twain
User avatar
Chris Gilman
Archive Member
Posts: 2467
Joined: Fri Oct 18, 2002 1:01 am
Location: Sylmar CA.
Contact:

Re: Greenwich Buckhurst armour

Post by Chris Gilman »

Mark, Nice looking suit.

Did some new tests. I have made a few different batches of paste with the 5% and 50% vinegar and there is not a noticeable difference. I have tried 60, 90 & 120 minutes etches, as well as a few in the 4-6 hours range. It seems multiple 60 minute sessions are better than fewer longer sessions. The issue is the copper build up on the etched surface, which needs to be cleaned off between applications of the paste. If this copper deposit gets too thick, it seems to get under the vinyl masking easier and lift the mask off. I have also tried a new, thinner vinyl and a special paint masking vinyl. As suspected, the masking vinyl does not have aggressive enough adhesive and weeding it on the steel is unsatisfactory. This masking vinyl is very expensive and luckly the shop gave me a sample to test.
The thinner vinyl is an inexpensive product from China and works well. It's adhesive seems very good, although I suspect a name brand material may be a bit better. This test was 4 applications at 60 minutes each. Perhaps 3 applications at 90 minutes may also work. The dots are, I think, as small as the vinyl will tolerate, without being pulled up while weeding the background. They are about 1 mm (.040") in diameter.
I also tried a simpler vine pattern, but I don't like it.
Test 8:

Image

Mac said he read in a period source, that the paste was applied about the thickness of one's little finger. That seems to be what I'm getting.

Image

I'm pretty happy with this recent test and it seems I'm back on track with a technique that works consistently.
I have ordered some pen plating supplies with guidance from Mac. So when it arrives, I start plating tests. Then the bluing salt.
In the meantime, I'm finishing up the artwork for the front of the greave and will start etching the sabatons.
Last edited by Chris Gilman on Wed Jan 20, 2021 8:55 am, edited 1 time in total.
User avatar
Kristoffer
Archive Member
Posts: 1697
Joined: Sat Sep 09, 2000 1:01 am
Location: Ostersund - Sweden
Contact:

Re: Greenwich Buckhurst armour

Post by Kristoffer »

Good luck Chris!


Don't screw up!
Kristoffer Metsälä
Indianer
Archive Member
Posts: 598
Joined: Fri Nov 06, 2015 8:07 am
Location: Northern Germany

Re: Greenwich Buckhurst armour

Post by Indianer »

Xtracted wrote:Don't screw up!
We don´t want to build up any pressure...just...well... :P
Mac
Archive Member
Posts: 9953
Joined: Thu Jan 04, 2001 2:01 am
Location: Jeffersonville, PA

Re: Greenwich Buckhurst armour

Post by Mac »

Chris Gilman wrote:
Image
That's looking nice!
Chris Gilman wrote: I'm finishing up the artwork for the front of the greave and will start etching the sabatons.
Don't start etching anything for real till you are 100% sure of your procedure. There's no deadline here.

Mac
Robert MacPherson

The craftsmen of old had their secrets, and those secrets died with them. We are not the better for that, and neither are they.

http://www.lightlink.com/armory/
http://www.billyandcharlie.com
https://www.facebook.com/BillyAndCharlie
User avatar
Chris Gilman
Archive Member
Posts: 2467
Joined: Fri Oct 18, 2002 1:01 am
Location: Sylmar CA.
Contact:

Re: Greenwich Buckhurst armour

Post by Chris Gilman »

Mac,
No, no rushing, but I think I have a good handle on what is working.

I have been finishing the figure eight/ lighting bolt design and testing different mixtures of paste and different etch duration's.

Notes:
1: Ratio- 1 parts salt / 2 parts Copper Sulfate / 1/2 part Vinegar.
Mix well and add more vinegar as needed when solids start to dissolve.
As the solids dissolve, the mixture changes color from aqua green to lime green and gets creamier. To aid in liquefying the solids, I ordered Copper Sulfate on Amazon that was a finer grind than the "root killer". I have been using regular table salt, but I think if you use popcorn salt or "salt flour", (finer grinds of salt) this may be beneficial. I did a side by side test with too pastes, one with table vinegar, 5% and the other with 50% Vinegar. There seemed to be little difference in the etch depth over the same amount of time. However, the 50% paste did more damage too the vinyl material, causing more tiny elements (dots) to come off. I also tried 1 part CS to 1 part salt, but this did not seem to increase the etch much, if at all. Temperature; My first tests were during some hotter days here in LA, so I though this may be affecting the etch depth. I tried heating the plate during the etching with a light bulb and just at the cooler room temp. (70 f). I observed no significant effect.

Image


2: Fresh etching paste seems to be key.
I'm not 100% sure on this (I'm testing fresh verses old material now), but recently I had a number of tests that were not as deep as my early tests. When I compared them, in date order, it seems the older the paste, the less aggressive it became. I was getting frustrated since it seemed, as I advanced in developing the artwork and masking techniques, I was going backwards in the effectiveness of the etching. It does seem like 4 to 5 day old paste is the culprit. If there are any chemists out there, I'd be curious to hear why this may be.

3: Etch times 1 hour to 3 hours each application.
In my first tests, I had been etching 60 to 90 minutes per application. Being careful not to destroy the resist during the cleaning. The etch process leaves a copper build up on the surface. This layer seems to either get under, or stick to the vinyl masking. If it gets too heavy, it pulls more vinyl off.
I have found 3 to 4 applications at 90 minutes each worked very well. However, last night, I left one test plate overnight for the 4th and last application of paste, and it came out perfect. So I'm testing two & three, 3 hour applications to see if I can leave it this long and still preserve the masking. I think the paste can be left on until it all turns brown / black. Over 90 minutes, only about have the material has blackened. The uppermost surface is still green. Mac mentioned a period source saying the paste was applied at a pinky fingers thickness. I believe this may be to facilitate longer etch times, since once the paste is black it seems no longer effective. The most recent test over night (about 7 hours) most of the paste was black and much of the masking lifted during surface cleaning.

Masking, Better vinyl works better and lasts longer. I have the cutter now effectively cutting background dots at less than a mm and adhering to the metal sufficiently to arrive at an acceptable etch depth. The new vinyl can be mostly weeded on the backing paper, which is much faster than pealing the excess material off the metal. It's only the areas with the dots that have to be removed from the steel now. Because if this is done on the backing paper very few of the dots stay.
I still have not picked up the name brand vinyl sample from my graphics guy, but this generic material seems to work pretty well. If you get the cutting knife depth dialed in along with the cutting pressure, the machine cuts the vinyl without lifting up too many dots.
Still do not have an effective paint type mask that lasts. Testors model paint, fingernail polish, enamel spray paint, paint pens, sharpies, work for perhaps one etch application, but come off fairly easily. The fingernail polish is the most effective of the materials I've tried. I have ordered some asphaltum to try.

Image

I'm sure if I had the drawing skills, this would be a faster process with the proper masking medium and a pen or brush. But I'm forced to use the tools I have the skills with when faced with this much artwork.

Here is the latest test: 3 applications of fresh paste for 90 minutes each and a 4th application for 7 hours. (You will notice a misalignment on this vinyl mask cut)

Image

The etch depth is the best I have gotten so far. It's about .008" deep. This is now looking like the etch depth of the real armour.

Image
Last edited by Chris Gilman on Wed Jan 20, 2021 8:56 am, edited 1 time in total.
User avatar
Jason Grimes
Archive Member
Posts: 2387
Joined: Wed Jul 25, 2001 1:01 am
Location: Fairbanks, AK, USA
Contact:

Re: Greenwich Buckhurst armour

Post by Jason Grimes »

This is really cool, thanks for sharing. :D Are you going to try painting the resist with encaustic paint like beeswax?
Jason
User avatar
Chris Gilman
Archive Member
Posts: 2467
Joined: Fri Oct 18, 2002 1:01 am
Location: Sylmar CA.
Contact:

Re: Greenwich Buckhurst armour

Post by Chris Gilman »

Jason,
Yes, I had considered bees wax as a way to get specific dots. I'm not sure the best way to apply them. It may be as easy as a large straight pin.

Ok, the test today did show that the older the paste, the less aggressive it is. For the test, I used fresh, 1 day old and 2 or 3 day old. They were nearly a factor better than each other, the newer the paste cutting at least 10 times the depth of the 3 day old paste.
I also received the pen plating supplies and at first I thought my rectifier was not working, but it was just a loose connection. So I plated a couple of the earlier test etchings.
I also got out the bluing salts.
It's hard to see in the photo, but the blue is electric when the light hits it just right. The gold also yellows considerably with the 600 degree heat. Again, it is hard to tell in the images, but I went over one band of gold with fresh plating to bring it back to a lighter, less orange gold.

Image

Image

Controlling the color on the big pieces will be difficult, but on this first try, one piece went through blue, to a grey color. The piece pictured above was a shorter duration and the salt had cooled down some. It turns out the salt wants to be at 550 f, not 650f as suggested. So if I find the sweet spot as far as temperature goes, the color may be easier to control.
Last edited by Chris Gilman on Wed Jan 20, 2021 8:56 am, edited 1 time in total.
Post Reply