You are totally correct in making the panels narrower, I think the max I've had work well without too much stretch and sag is 30".
I made several tents in my early days, but the last big rectangular marquee, we found barely any additional cost over materials to order it custom from Panther. We custime ordered to make a more period profile (taller roof line, proportional walls, and walls that sloped more than their standard). It is about 14 years old and we have a partial interior frame.
The frame has required modification several times due to canvas shrinkage. We we didn't modify the ropes to crows feet, and just used their rope and hook sidewall attachment system. All the hooks had to be changed to steel due to others bending in high winds.
Rectangular tent...a work in progress.
Moderator: Glen K
-
FrauHirsch1

- Archive Member
- Posts: 1422
- Joined: Tue Mar 22, 2011 4:49 pm
Re: Rectangular tent...a work in progress.
Jan,Jan van Nyenrode wrote:Hi Mac,
Do you happen to have a drawing of how you knotted the crow feet's? The knot is still alluding me.
Thank you in advance for your time and effort.
Cheers,
Jan
It could not be simpler.


You were probably over-thinking it.
Mac
Robert MacPherson
The craftsmen of old had their secrets, and those secrets died with them. We are not the better for that, and neither are they.
http://www.lightlink.com/armory/
http://www.billyandcharlie.com
https://www.facebook.com/BillyAndCharlie
The craftsmen of old had their secrets, and those secrets died with them. We are not the better for that, and neither are they.
http://www.lightlink.com/armory/
http://www.billyandcharlie.com
https://www.facebook.com/BillyAndCharlie
Re: Rectangular tent...a work in progress.
Frau H,FrauHirsch1 wrote:.
The frame has required modification several times due to canvas shrinkage. We we didn't modify the ropes to crows feet, and just used their rope and hook sidewall attachment system. All the hooks had to be changed to steel due to others bending in high winds.
Could you show us any pictures of your frame?
Mac
Robert MacPherson
The craftsmen of old had their secrets, and those secrets died with them. We are not the better for that, and neither are they.
http://www.lightlink.com/armory/
http://www.billyandcharlie.com
https://www.facebook.com/BillyAndCharlie
The craftsmen of old had their secrets, and those secrets died with them. We are not the better for that, and neither are they.
http://www.lightlink.com/armory/
http://www.billyandcharlie.com
https://www.facebook.com/BillyAndCharlie
-
FrauHirsch1
- Archive Member
- Posts: 1422
- Joined: Tue Mar 22, 2011 4:49 pm
Re: Rectangular tent...a work in progress.
Its only a partial frame that cuts about 1/3 of the poles out.
https://www.facebook.com/photo.php?fbid ... =3&theater
You can kind of see the frame in the center of the long side here from the outside:
http://www.gerryadamsconstruction.com/s ... s/Camp.jpg
We have a 12' roof beam, and I think it is 12' tall. The top is 12'x24', it has 7' walls with 3' slope - total 20x30 footprint. We had Panther make the roof taller by a foot or two. The normal sloped wall was 1.5', where ours is 3' - this has made an extremely noticeable difference in bad weather with wind gusts.
We do hang ropes to create curtain dividers if needed.
Current camp: https://www.facebook.com/media/set/?set ... =3&theater
Camp 10 yrs ago:
http://www.gerryadamsconstruction.com/s ... hields.jpg
-
FrauHirsch1
- Archive Member
- Posts: 1422
- Joined: Tue Mar 22, 2011 4:49 pm
Re: Rectangular tent...a work in progress.
I think what occasionally has done some shrinking is the decorative bands and flaps covering where the walls are hung around the base of the roof.
-
Sean Powell

- Archive Member
- Posts: 9908
- Joined: Sat Jul 13, 2002 1:01 am
- Location: Holden MA
Re: Rectangular tent...a work in progress.
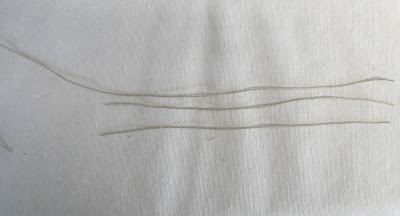
I'm prone to over-thinking it (Duh!) and wanted my knots to look like the Basel tent. This may not be the exact knot used but it matches the function with 3 tails in one direct and 1 in another without extra ends to fray. The knot-book I got it from said it was used by sailors to drag lines and not have the 3 trailing lines get caught on anything. The surgical tube is the left and right fork and the piece with blue tape would become the middle. This could have a 2nd rope passed through alongside the surgical tube to get 5 branches.Mac wrote:Jan,Jan van Nyenrode wrote:Hi Mac,
Do you happen to have a drawing of how you knotted the crow feet's? The knot is still alluding me.
Thank you in advance for your time and effort.
Cheers,
Jan
It could not be simpler.
You were probably over-thinking it.
Mac
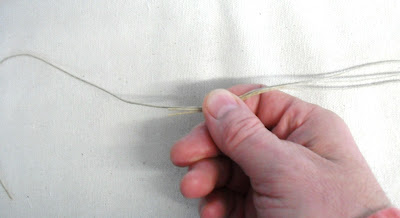
Step 1
http://i161.photobucket.com/albums/t239 ... 181942.jpg
Step 2
http://i161.photobucket.com/albums/t239 ... 182035.jpg
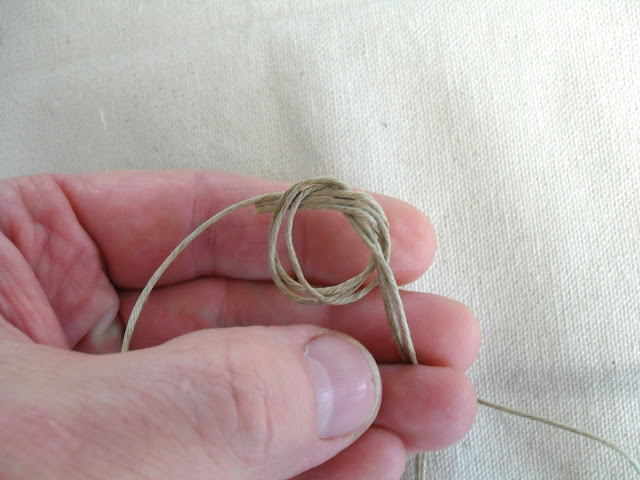
Tightened
http://i161.photobucket.com/albums/t239 ... 182140.jpg
Final for the tent:
http://i161.photobucket.com/albums/t239 ... 181935.jpg
Now, anyone have a good way of keeping ropes with hooks from tangling up while in storage and transport?
Sean
-
Tracy Justus
- Archive Member
- Posts: 478
- Joined: Fri Oct 24, 2003 1:01 am
- Location: Burlington. NC
Re: Rectangular tent...a work in progress.
Yes. This is how we do it. You need two people. Take all your ropes of about the same length and put them in a bundle. One person holds one end of the bundle and one person holds the other. Both twist the bundle the same way (clockwise or counter, doesn't matter) until the bundle is twisted tightly and wants to kink up on itself. Start a kink in the center of your bundle and let the ropes twist up on themselves. You'll have a hank of ropes that can be stored neatly.Now, anyone have a good way of keeping ropes with hooks from tangling up while in storage and transport?
Tracy
-
FrauHirsch1
- Archive Member
- Posts: 1422
- Joined: Tue Mar 22, 2011 4:49 pm
Re: Rectangular tent...a work in progress.
On our round topped tent with crows feet, the ropes are twisted together and put in a big trash bag. Not sophisticated, but it seems to work (we just go this tent used and it has only been up 3x).
It seriously needs a hoop or spokes.
It seriously needs a hoop or spokes.
-
Grigorii
- Archive Member
- Posts: 53
- Joined: Mon Jun 22, 2009 9:00 pm
- Location: Mobile, Al. / Osprey, Meridies
Re: Rectangular tent...a work in progress.
1 or 2 gallon ziploc bags, or get some cheap pillow cases and make some bags for each rope. Or if you know someone who buys sheets at walmart, there is a brand that all the pieces come in a small snap-closure bag, you may get enough of those over time and use them, the colors may be pretty bad tho.Now, anyone have a good way of keeping ropes with hooks from tangling up while in storage and transport?
Gregg
(From another time and place.) Learn from other peoples mistakes, you do not have time to make them all yourself.
(From another time and place.) Learn from other peoples mistakes, you do not have time to make them all yourself.
Re: Rectangular tent...a work in progress.
Thank you! As I understand it, you have some horizontal members standing on perimeter poles (?). Does that drain well?FrauHirsch1 wrote:Its only a partial frame that cuts about 1/3 of the poles out.
https://www.facebook.com/photo.php?fbid ... =3&theater
You can kind of see the frame in the center of the long side here from the outside:
http://www.gerryadamsconstruction.com/s ... s/Camp.jpg
We have a 12' roof beam, and I think it is 12' tall. The top is 12'x24', it has 7' walls with 3' slope - total 20x30 footprint. We had Panther make the roof taller by a foot or two. The normal sloped wall was 1.5', where ours is 3' - this has made an extremely noticeable difference in bad weather with wind gusts.
We do hang ropes to create curtain dividers if needed.
Current camp: https://www.facebook.com/media/set/?set ... =3&theater
Camp 10 yrs ago:
http://www.gerryadamsconstruction.com/s ... hields.jpg
Mac
Robert MacPherson
The craftsmen of old had their secrets, and those secrets died with them. We are not the better for that, and neither are they.
http://www.lightlink.com/armory/
http://www.billyandcharlie.com
https://www.facebook.com/BillyAndCharlie
The craftsmen of old had their secrets, and those secrets died with them. We are not the better for that, and neither are they.
http://www.lightlink.com/armory/
http://www.billyandcharlie.com
https://www.facebook.com/BillyAndCharlie
Re: Rectangular tent...a work in progress.
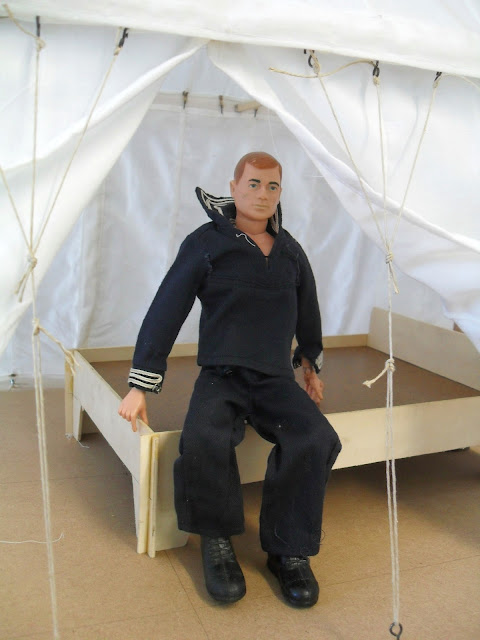
Here are a couple of quick pics for scale.
Sailor Joe is courtesy of Jonathon Janusz. Thank you Jon!
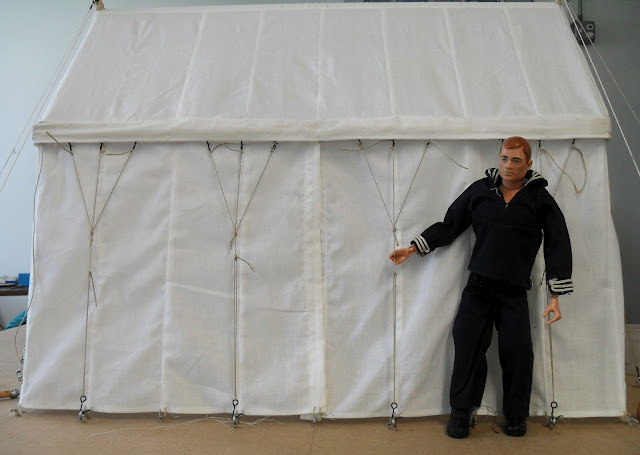
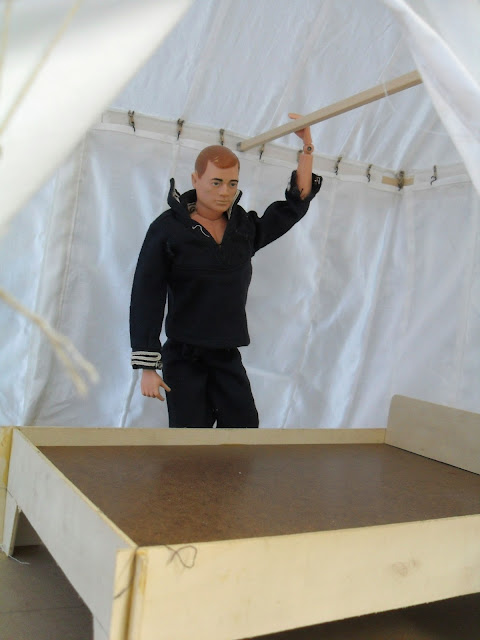 Joe wonders why the hell he forgot to pack the futon.

Mac
Sailor Joe is courtesy of Jonathon Janusz. Thank you Jon!
Joe wonders why the hell he forgot to pack the futon.Mac
Robert MacPherson
The craftsmen of old had their secrets, and those secrets died with them. We are not the better for that, and neither are they.
http://www.lightlink.com/armory/
http://www.billyandcharlie.com
https://www.facebook.com/BillyAndCharlie
The craftsmen of old had their secrets, and those secrets died with them. We are not the better for that, and neither are they.
http://www.lightlink.com/armory/
http://www.billyandcharlie.com
https://www.facebook.com/BillyAndCharlie
Re: Rectangular tent...a work in progress.
I am re-thinking the framework. Last night I sewed a new canopy, and today I am building the new frame. I hope to get it set up to a point where I can evaluate it later today. Pics by tomorrow for sure.....
Mac
Mac
Robert MacPherson
The craftsmen of old had their secrets, and those secrets died with them. We are not the better for that, and neither are they.
http://www.lightlink.com/armory/
http://www.billyandcharlie.com
https://www.facebook.com/BillyAndCharlie
The craftsmen of old had their secrets, and those secrets died with them. We are not the better for that, and neither are they.
http://www.lightlink.com/armory/
http://www.billyandcharlie.com
https://www.facebook.com/BillyAndCharlie
-
Jan van Nyenrode
- Archive Member
- Posts: 781
- Joined: Sat May 17, 2003 1:01 am
- Location: Polderslot, Drachenwald, Netherlands
Re: Rectangular tent...a work in progress.
Hi Mac and Sean,
Thank you both for the pictures. It was a really duh! moment for me.
Cheers,
Jan
Thank you both for the pictures. It was a really duh! moment for me.
Cheers,
Jan
-
Jonathon Janusz
- Archive Member
- Posts: 232
- Joined: Tue Feb 26, 2008 8:03 pm
Re: Rectangular tent...a work in progress.
Any time, Mac!
The glamour shots aside (although entertaining), I can see how Joe should come in very handy for working on these scale model size projects. The scale bed is nice, but it really helps (me at least) visualize the project with a scale sized person for reference.
Glad to help!
Re: Rectangular tent...a work in progress.
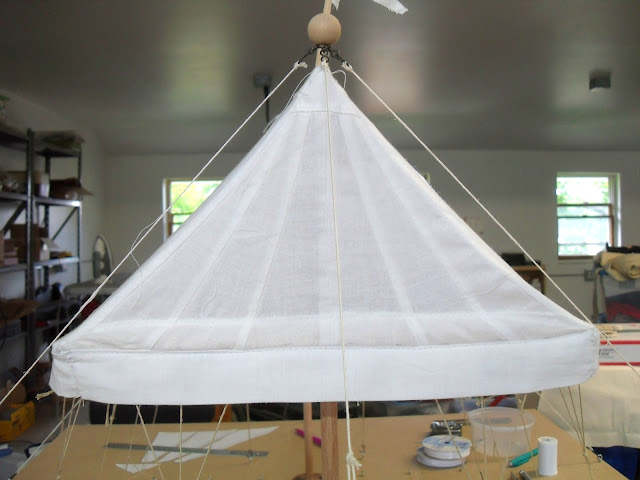
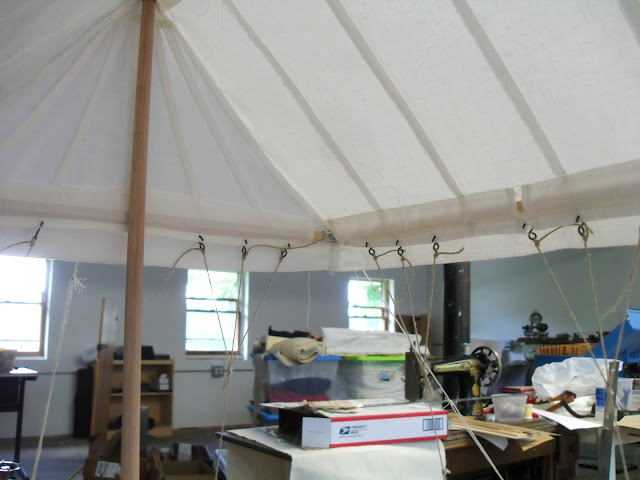
I got the new canopy up this evening. Here's what's different. The stiffeners are now above the "shoulder" rather than below. This is more like my earlier models. (q.v. http://billyandcharlie.com/tents/armingnoguys.JPG http://billyandcharlie.com/tents/tent_m ... losed2.JPG )I feel as though this arrangement stretches the fabric better. The down side is that the frame is visible above the valence.
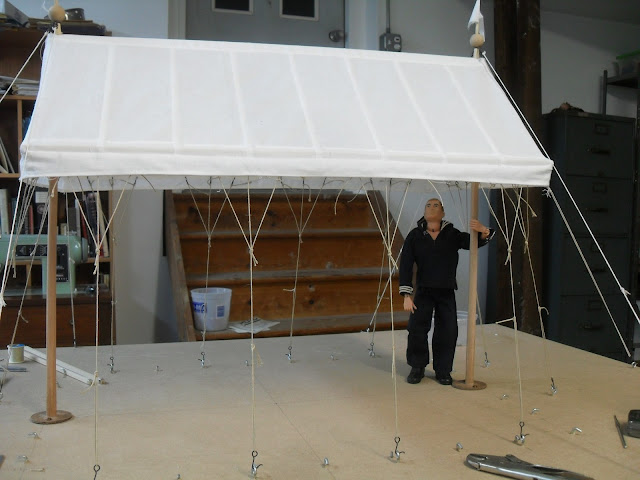
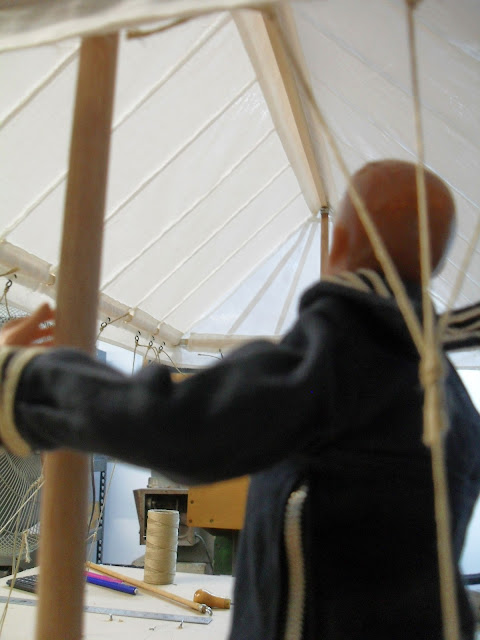 For the new ridge beam, I backed off from a 2x6 to a 2x4. Joe is a bit skeptical, but I think it might be OK.
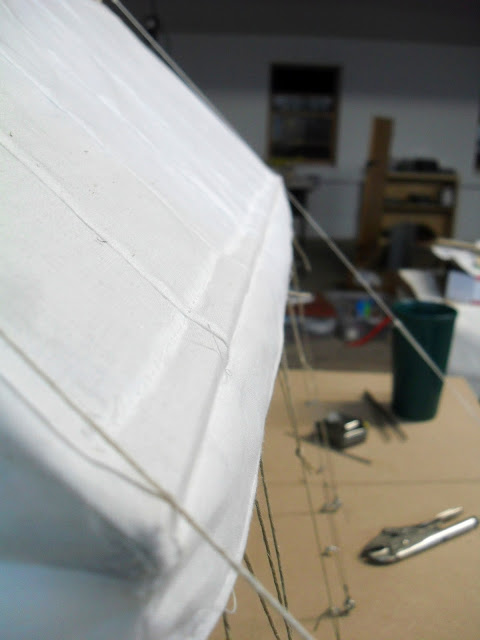
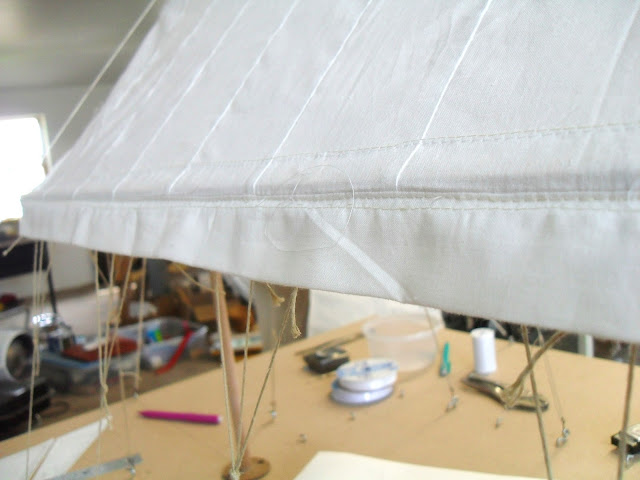
 This is what the corners look like with the canopy and valence turned back. The stiffeners are 2/2s this time. There is a ferule on each end to keep the finger joints from splitting. The old system put a torsional load on the long-wall stiffeners. This system has no such problem since the "pocket" in the canopy is free to rotate around the stiffener until the tensions are in equilibrium.
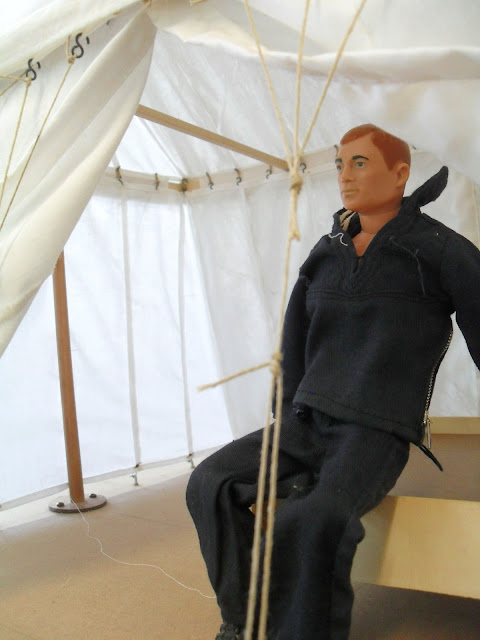
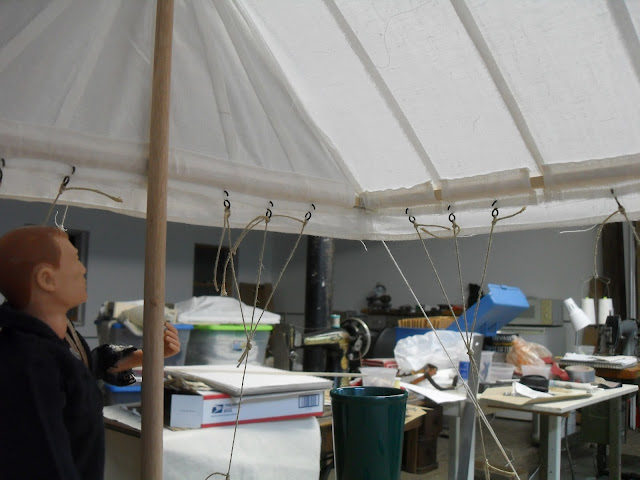 This is what the inside looks like now. I hope to add loops for the walls tomorrow.
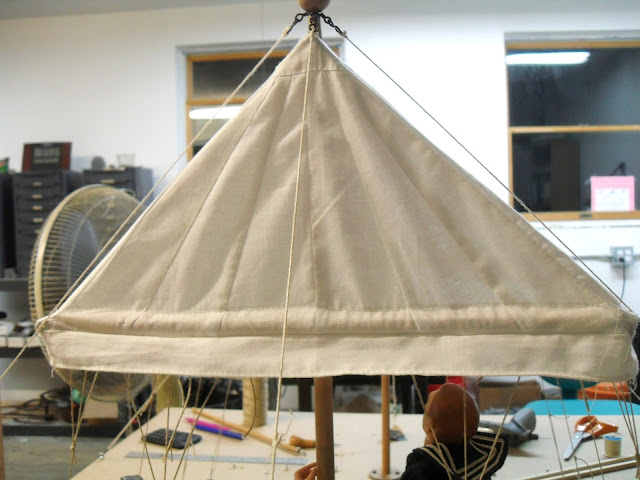 I made the new gables have more gores than the previous ones. There is a bit of trouble getting the gable into proper tension. All that bias grain wants to sag. I think that putting a slight concave curve on each of the bias edges will take up the slack. I should probably take those seams apart and try resewing them that way.
 The 2x2s are stiffer laterally than the 1x4s. I may not need the cross braces. We'll see what it looks like with the walls on tomorrow ( I hope).
Mac
 For the new ridge beam, I backed off from a 2x6 to a 2x4. Joe is a bit skeptical, but I think it might be OK. This is what the corners look like with the canopy and valence turned back. The stiffeners are 2/2s this time. There is a ferule on each end to keep the finger joints from splitting. The old system put a torsional load on the long-wall stiffeners. This system has no such problem since the "pocket" in the canopy is free to rotate around the stiffener until the tensions are in equilibrium. This is what the inside looks like now. I hope to add loops for the walls tomorrow. I made the new gables have more gores than the previous ones. There is a bit of trouble getting the gable into proper tension. All that bias grain wants to sag. I think that putting a slight concave curve on each of the bias edges will take up the slack. I should probably take those seams apart and try resewing them that way. The 2x2s are stiffer laterally than the 1x4s. I may not need the cross braces. We'll see what it looks like with the walls on tomorrow ( I hope).
Mac
Robert MacPherson
The craftsmen of old had their secrets, and those secrets died with them. We are not the better for that, and neither are they.
http://www.lightlink.com/armory/
http://www.billyandcharlie.com
https://www.facebook.com/BillyAndCharlie
The craftsmen of old had their secrets, and those secrets died with them. We are not the better for that, and neither are they.
http://www.lightlink.com/armory/
http://www.billyandcharlie.com
https://www.facebook.com/BillyAndCharlie
-
Chris Gilman

- Archive Member
- Posts: 2467
- Joined: Fri Oct 18, 2002 1:01 am
- Location: Sylmar CA.
- Contact:
Re: Rectangular tent...a work in progress.
Mac,
This is an interesting approch. If you made the pocket out of the canopy fabric, just rolled back on itself to form the pocked, leaving enough th make a flap for rope attachments, the amount of sewing is reduced slightly. I feel You will also get a stronger pocket. You could add an extra layer over the rope attachment flap. Then, if you attached the valence to the seam above the pocket, you would hide the frame without changing the line of tension.
This is an interesting approch. If you made the pocket out of the canopy fabric, just rolled back on itself to form the pocked, leaving enough th make a flap for rope attachments, the amount of sewing is reduced slightly. I feel You will also get a stronger pocket. You could add an extra layer over the rope attachment flap. Then, if you attached the valence to the seam above the pocket, you would hide the frame without changing the line of tension.
-
Gregoire de Lyon

- Archive Member
- Posts: 1839
- Joined: Fri Jun 11, 2004 9:13 am
- Location: Barony of Cynnabar
Re: Rectangular tent...a work in progress.
*sigh* even GI Joe has nicer stuff than I do.... 
I'm loving this thread - thanks Mac for showing us your process!
I'm loving this thread - thanks Mac for showing us your process!
Gregoire de Lyon
----
"I am going to go out to the shop to taste some leathers. I'll report back later." -- Mac
----
"I am going to go out to the shop to taste some leathers. I'll report back later." -- Mac
-
Kenwrec Wulfe

- Archive Member
- Posts: 4260
- Joined: Thu May 22, 2003 1:01 am
- Location: Orlando, FL
- Contact:
Re: Rectangular tent...a work in progress.
This is a most excellent thread.
Excellence is an art won by training and habituation. We do not act rightly because we have virtue or excellence, but we rather have those because we have acted rightly. We are what we repeatedly do. Excellence, then, is not an act but a habit. -Aristotle
-
Sean Powell
- Archive Member
- Posts: 9908
- Joined: Sat Jul 13, 2002 1:01 am
- Location: Holden MA
Re: Rectangular tent...a work in progress.
Mac,
Random thought as I am prone to do. You might want to include a gap in the sleeves at both ends next to the masts. Even with the ropes splayed out, in a wind the tent may flutter and the end frame will smack noisily into the mast. That would be disturbing at 3am and eventually damage the fabric at the pinch point. You could add a tie to the fabric but that wouldn't accomodate uneven terrain or shifting during setup very well. A gap and X-shaped lashing might be more effective.
Or I could be overthinking things again.
Sean
Re: Rectangular tent...a work in progress.
The arming pavilion model doesn't seem to have the same visible frame above the valance. What's different on that one?
Galleron
http://willscommonplacebook.blogspot.com: My Blog
http://www.cafepress.com/Commonplacegood: My CafePress store for medieval recreation and the Middle Ages
http://willscommonplacebook.blogspot.com: My Blog
http://www.cafepress.com/Commonplacegood: My CafePress store for medieval recreation and the Middle Ages
Re: Rectangular tent...a work in progress.
Chris,Chris Gilman wrote:Mac,
This is an interesting approch. If you made the pocket out of the canopy fabric, just rolled back on itself to form the pocked, leaving enough th make a flap for rope attachments, the amount of sewing is reduced slightly. I feel You will also get a stronger pocket. You could add an extra layer over the rope attachment flap. Then, if you attached the valence to the seam above the pocket, you would hide the frame without changing the line of tension.
Making the pocket by turning back an extension of the canopy would certainly work on the rectangular panels. I am used to thinking of the pocket as a separate piece because my earlier models have been round.
I am thinking that whatever I do, the fabric below the pocket (to which the walls and ropes attach) will get reenforced.
On my round model http://billyandcharlie.com/tents/armingnoguys.JPG I attached the valence a bit higher. I am leery of it, though, because it is not consistent with what I think I am seeing on the Carlos V tent.
Mac
Robert MacPherson
The craftsmen of old had their secrets, and those secrets died with them. We are not the better for that, and neither are they.
http://www.lightlink.com/armory/
http://www.billyandcharlie.com
https://www.facebook.com/BillyAndCharlie
The craftsmen of old had their secrets, and those secrets died with them. We are not the better for that, and neither are they.
http://www.lightlink.com/armory/
http://www.billyandcharlie.com
https://www.facebook.com/BillyAndCharlie
Re: Rectangular tent...a work in progress.
Thank you, Gregoire et Kenwrec!
Mac
Mac
Robert MacPherson
The craftsmen of old had their secrets, and those secrets died with them. We are not the better for that, and neither are they.
http://www.lightlink.com/armory/
http://www.billyandcharlie.com
https://www.facebook.com/BillyAndCharlie
The craftsmen of old had their secrets, and those secrets died with them. We are not the better for that, and neither are they.
http://www.lightlink.com/armory/
http://www.billyandcharlie.com
https://www.facebook.com/BillyAndCharlie
Re: Rectangular tent...a work in progress.
Sean,Sean Powell wrote:Mac,
Random thought as I am prone to do. You might want to include a gap in the sleeves at both ends next to the masts. Even with the ropes splayed out, in a wind the tent may flutter and the end frame will smack noisily into the mast. That would be disturbing at 3am and eventually damage the fabric at the pinch point. You could add a tie to the fabric but that wouldn't accomodate uneven terrain or shifting during setup very well. A gap and X-shaped lashing might be more effective.
Or I could be overthinking things again.
Sean
The masts are snug up against the short-side stiffeners. Perhaps I should be ready to put some sort of pads on the masts if needed.
It's a fine line between thinking enough and over thinking.... If you can walk on that line with your eyes closed, while touching your nose, the "engineer police" will let you go with a warning.
Mac
Robert MacPherson
The craftsmen of old had their secrets, and those secrets died with them. We are not the better for that, and neither are they.
http://www.lightlink.com/armory/
http://www.billyandcharlie.com
https://www.facebook.com/BillyAndCharlie
The craftsmen of old had their secrets, and those secrets died with them. We are not the better for that, and neither are they.
http://www.lightlink.com/armory/
http://www.billyandcharlie.com
https://www.facebook.com/BillyAndCharlie
Re: Rectangular tent...a work in progress.
G,Galleron wrote:The arming pavilion model doesn't seem to have the same visible frame above the valance. What's different on that one?
I sewed the valence on a bit higher on that model. I am not perfectly comfortable with it though. As far as I can tell the inner and outer valences of the Carlos V pavilion are sewn on right at the seam that defines the lower edge of the pockets. (Oh!... For better pictures of that....)
Mac
Robert MacPherson
The craftsmen of old had their secrets, and those secrets died with them. We are not the better for that, and neither are they.
http://www.lightlink.com/armory/
http://www.billyandcharlie.com
https://www.facebook.com/BillyAndCharlie
The craftsmen of old had their secrets, and those secrets died with them. We are not the better for that, and neither are they.
http://www.lightlink.com/armory/
http://www.billyandcharlie.com
https://www.facebook.com/BillyAndCharlie
Re: Rectangular tent...a work in progress.
I think that's clearly true of the inner valance (as originally displayed). I can't tell where the outer valance attaches.Mac wrote:G,Galleron wrote:The arming pavilion model doesn't seem to have the same visible frame above the valance. What's different on that one?
I sewed the valence on a bit higher on that model. I am not perfectly comfortable with it though. As far as I can tell the inner and outer valences of the Carlos V pavilion are sewn on right at the seam that defines the lower edge of the pockets. (Oh!... For better pictures of that....)
Mac
Galleron
http://willscommonplacebook.blogspot.com: My Blog
http://www.cafepress.com/Commonplacegood: My CafePress store for medieval recreation and the Middle Ages
http://willscommonplacebook.blogspot.com: My Blog
http://www.cafepress.com/Commonplacegood: My CafePress store for medieval recreation and the Middle Ages
Re: Rectangular tent...a work in progress.
Or on the stiffener sleeve.Mac wrote:Sean,Sean Powell wrote:Mac,
Random thought as I am prone to do. You might want to include a gap in the sleeves at both ends next to the masts. Even with the ropes splayed out, in a wind the tent may flutter and the end frame will smack noisily into the mast. That would be disturbing at 3am and eventually damage the fabric at the pinch point. You could add a tie to the fabric but that wouldn't accomodate uneven terrain or shifting during setup very well. A gap and X-shaped lashing might be more effective.
Or I could be overthinking things again.
Sean
The masts are snug up against the short-side stiffeners. Perhaps I should be ready to put some sort of pads on the masts if needed.
Galleron
http://willscommonplacebook.blogspot.com: My Blog
http://www.cafepress.com/Commonplacegood: My CafePress store for medieval recreation and the Middle Ages
http://willscommonplacebook.blogspot.com: My Blog
http://www.cafepress.com/Commonplacegood: My CafePress store for medieval recreation and the Middle Ages
-
FrauHirsch1
- Archive Member
- Posts: 1422
- Joined: Tue Mar 22, 2011 4:49 pm
Re: Rectangular tent...a work in progress.
Yes - but I'm not sure it would have if we had left it the original roof height - raising it a foot or two made a huge difference in angles.Mac wrote:
Thank you! As I understand it, you have some horizontal members standing on perimeter poles (?). Does that drain well?
Mac
Also it can be made really taught, moreso than in the pictures.
I also think the crossbar style roof helps change the angles at the corners not to sag and hold water (which is a common problem in the single peaked squares).
-
FrauHirsch1
- Archive Member
- Posts: 1422
- Joined: Tue Mar 22, 2011 4:49 pm
Re: Rectangular tent...a work in progress.
For any frame, I just suggest bringing a saw and a drill if you have to change the location of fittings due to shrinkage, and make sure your frame is not too complex to modify on the spot.
Edited for typos...
Also, our inner and outer valences are what I think have shrunk over the years.
If I end up making a hoop for the round, I will make it like a casing hung from the seam inside the valence. But we are still discussing whether to do a hoop or spoke. In our camp picture, the red and blue is a spoke set up and looks very sharp.
-
William of Stonebridge

- Archive Member
- Posts: 1009
- Joined: Sat May 27, 2006 11:36 pm
- Location: South Central Kansas
Re: Rectangular tent...a work in progress.
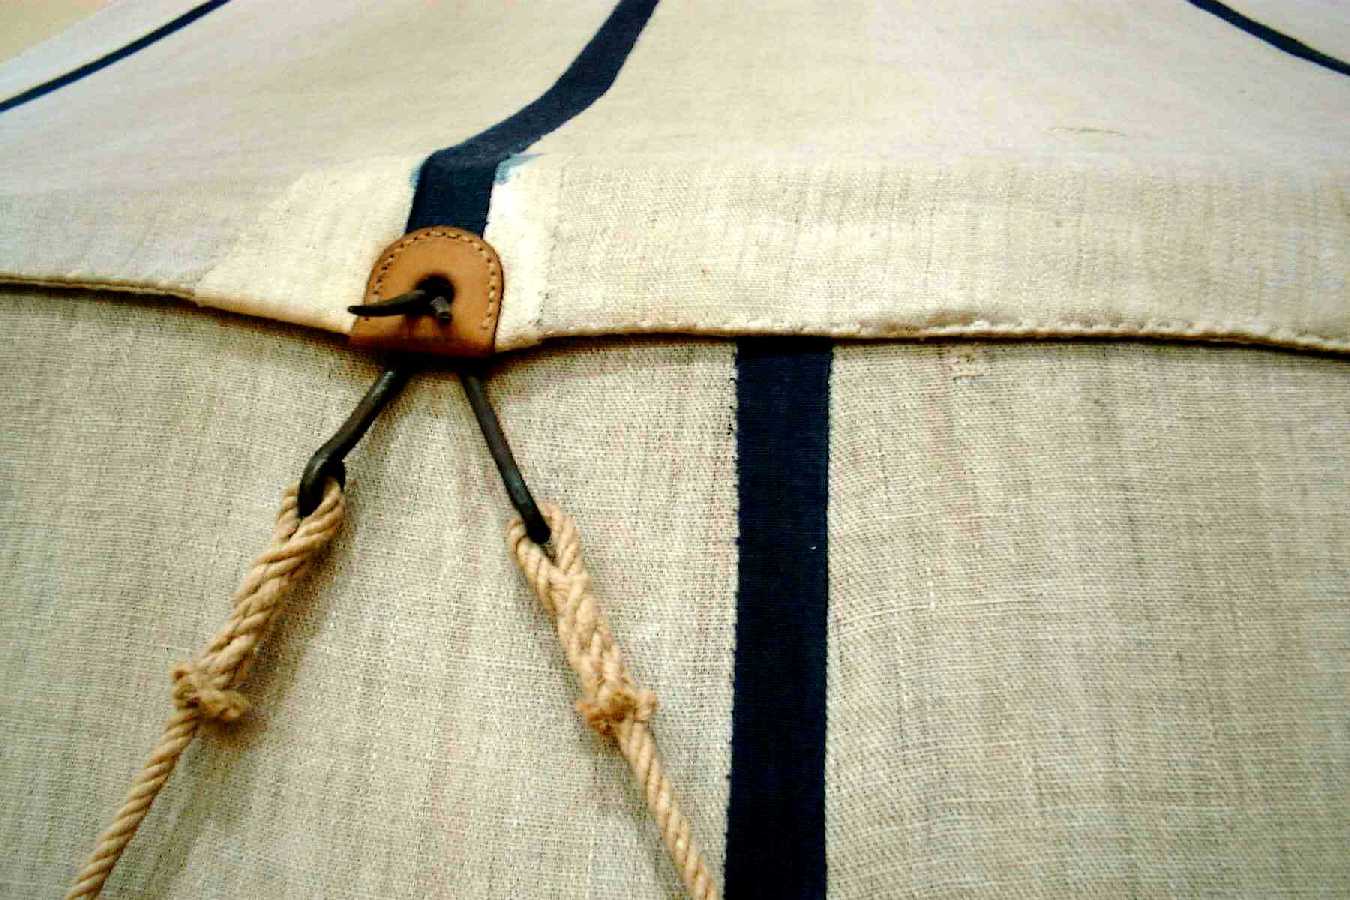
I just wanted to share this link to the House Greydragon site where he posted pictures of an extant round pavilion in Basel, Switzterland from the first half of the 17th century.
http://www.greydragon.org/pavilions/basel.html
I'm sure many have seen the site before and I was looking at it again and noticed the original hooks and thought they were strong and functional, and appeared simple and seemed fairly easy to reproduce.
http://www.greydragon.org/images/tentpics/tent26.jpg
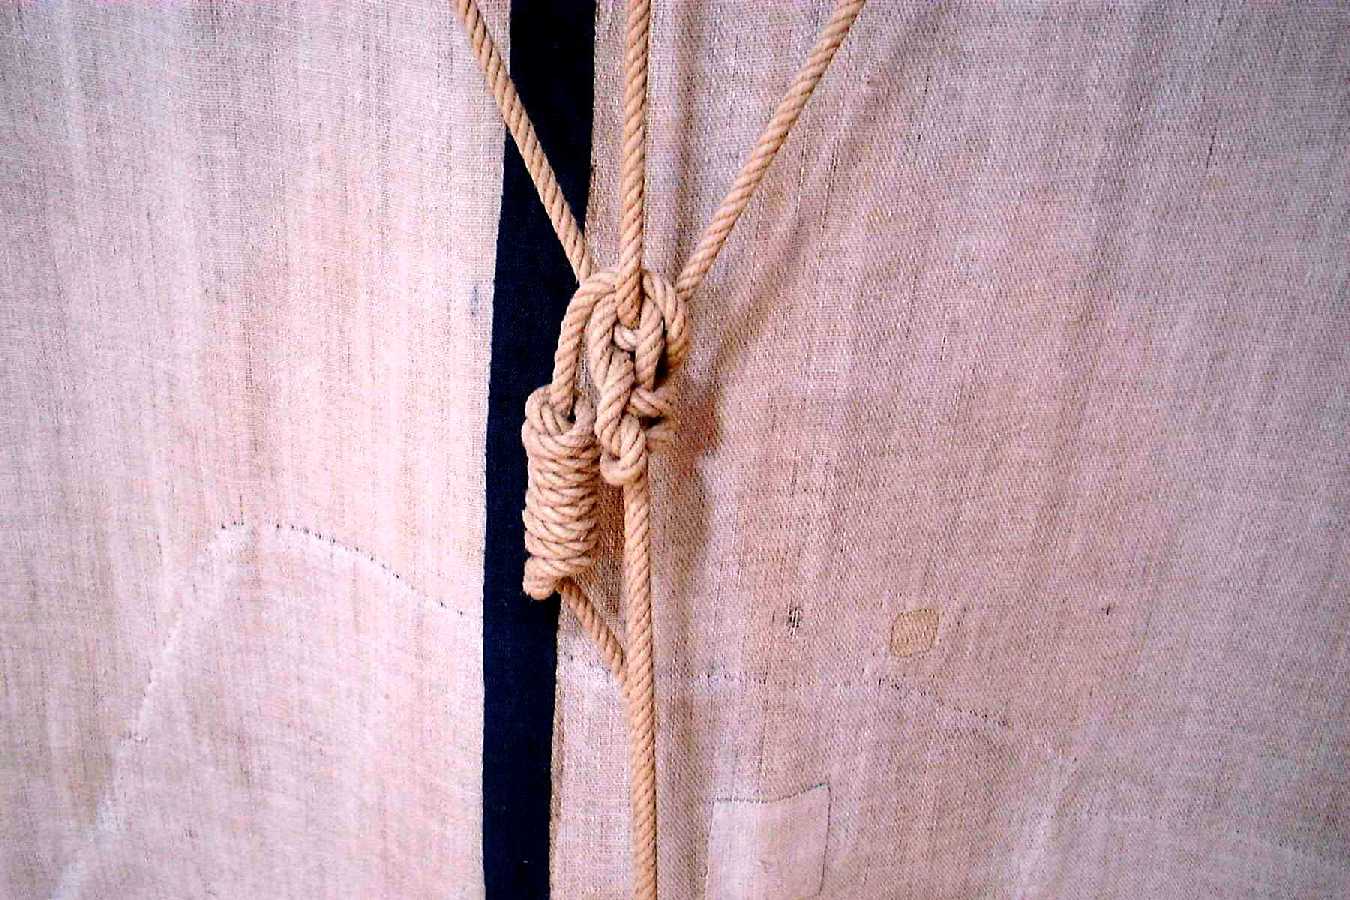
Also close up of the crows foot knot.
http://www.greydragon.org/images/tentpics/tent28.jpg
Mac, thanks for sharing your progress. I never fail to learn something from your posts.
http://www.greydragon.org/pavilions/basel.html
I'm sure many have seen the site before and I was looking at it again and noticed the original hooks and thought they were strong and functional, and appeared simple and seemed fairly easy to reproduce.
http://www.greydragon.org/images/tentpics/tent26.jpg
Also close up of the crows foot knot.
http://www.greydragon.org/images/tentpics/tent28.jpg
Mac, thanks for sharing your progress. I never fail to learn something from your posts.
Respectfully,
William
William
Re: Rectangular tent...a work in progress.
Frau H,FrauHirsch1 wrote:For any frame, I just suggest bringing a saw and a drill if you have to change the location of fittings due to shrinkage, and make sure your frame is not too complex to modify on the spot.
This is a fine piece of advice, and I am taking it to heart. I have rejected any configurations where the frame members have any holes, loops, brackets, etc which have to line up with things on the canopy. I imagine that as the canvas shrinks, those things will come to be in the wrong places. In my latest design, the frame members are featureless, except for the finger joints at the ends. I think that these can be deepened and trimmed "in the field" with minimal tools. The only thing that worries me are the ferrules. Perhaps I need to hold them in place with a screw or two, so that they can be slid farther onto the frame members and refastened in the event that it is necessary to shorten frame.
FrauHirsch1 wrote:Also, our inner and outer valences are what I think have shrunk over the years.
Do you think that this is the result of a different orientation of the fabric?
Take care to imagine how the seam between the valence and the canopy will end up once the tension is on and the structure settles. You need to guard against schemes where the seam can end up lower than the edge of the hoop. They are bound to drip.FrauHirsch1 wrote:If I end up making a hoop for the round, I will make it like a casing hung from the seam inside the valence.
Mac
Robert MacPherson
The craftsmen of old had their secrets, and those secrets died with them. We are not the better for that, and neither are they.
http://www.lightlink.com/armory/
http://www.billyandcharlie.com
https://www.facebook.com/BillyAndCharlie
The craftsmen of old had their secrets, and those secrets died with them. We are not the better for that, and neither are they.
http://www.lightlink.com/armory/
http://www.billyandcharlie.com
https://www.facebook.com/BillyAndCharlie
Re: Rectangular tent...a work in progress.
William of Stonebridge wrote:
Mac, thanks for sharing your progress. I never fail to learn something from your posts.
Thank you, William! It is my greatest hope that folks will find my posts useful.
Mac
Robert MacPherson
The craftsmen of old had their secrets, and those secrets died with them. We are not the better for that, and neither are they.
http://www.lightlink.com/armory/
http://www.billyandcharlie.com
https://www.facebook.com/BillyAndCharlie
The craftsmen of old had their secrets, and those secrets died with them. We are not the better for that, and neither are they.
http://www.lightlink.com/armory/
http://www.billyandcharlie.com
https://www.facebook.com/BillyAndCharlie
-
Charlotte J

- Girl Genius
- Posts: 15840
- Joined: Tue Sep 30, 2003 1:01 am
- Location: I <3 Colorado
- Contact:
Re: Rectangular tent...a work in progress.
We take 6 ropes at a time, and hand crochet them into a chain. It's essentially a series of slip knots, if that makes any sense.Now, anyone have a good way of keeping ropes with hooks from tangling up while in storage and transport?
Do you not know that in the service... one must always choose the lesser of two weevils?
-
FrauHirsch1
- Archive Member
- Posts: 1422
- Joined: Tue Mar 22, 2011 4:49 pm
Re: Rectangular tent...a work in progress.
It is not clear why to me. The grains seem to be running the same direction. Could be just this batch of canvas? Not sure, but because of this, I have noticed other tents with the same issue.Mac wrote:FrauHirsch1 wrote:Also, our inner and outer valences are what I think have shrunk over the years.
Do you think that this is the result of a different orientation of the fabric?
My husband wants to make a hub and spoke so he has some storage racks, so it may be moot, but I will definitely keep that in mind. Thanks!Mac wrote:Take care to imagine how the seam between the valence and the canopy will end up once the tension is on and the structure settles. You need to guard against schemes where the seam can end up lower than the edge of the hoop. They are bound to drip.FrauHirsch1 wrote:If I end up making a hoop for the round, I will make it like a casing hung from the seam inside the valence.
Mac
-J
Re: Rectangular tent...a work in progress.
I took the canopy apart last night and made some changes.
As we may recall, there was a problem with the gables sagging.
I made new gables, using the same templates, but curving the bias grain edge inward a bit. The results were dramatic.....Too dramatic, really. I got rid of the sagging, but I clearly took the correction too far.
The striking thing is how much "correction" I got with very little curve. These are the templates I used for both the old and the new gables. The outside edge is the cutting line, the pencil line is the seam line. (My standard seam allowances for these miniatures is 1/4"). The straight lines are the ones I used on the original gables; the curved lines are approximately how much I removed before sewing the new gables.
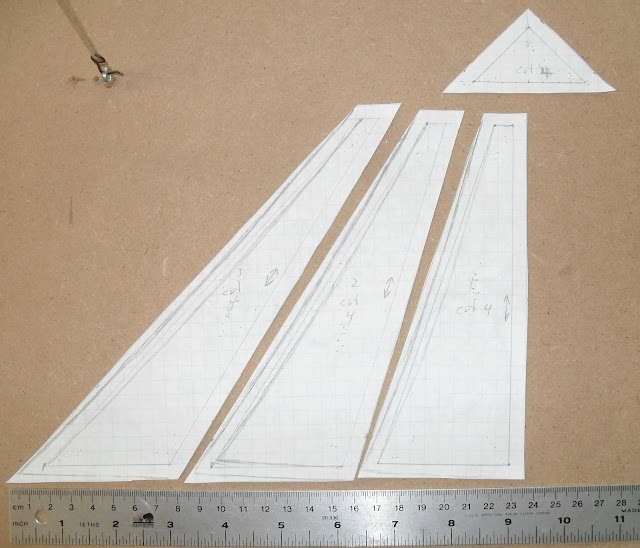
The amount I removed for the new gables is about 1/8". That is a scale 3/4".
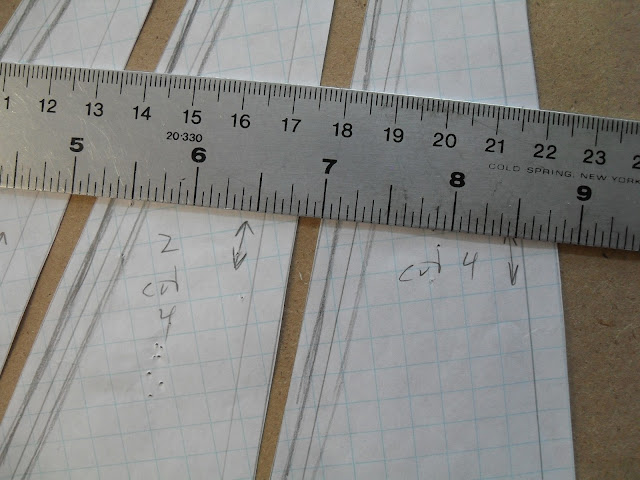
The lessons here are two. First is that we can use this technique to pull out the slack in the panels. The second is that it only takes a little bit to make a big difference. The cumulative effect of this small correction over six (6) seams is too much. I am going to have to make a guess about how much to curve the seams on the full sized tent. It will certainly be less than 3/4"! Perhaps 3/8" will do the trick.
I also made changes to the long-wall pockets and to the valence.
The long-wall pockets are now divided into three. I am guessing that I probably do not really need access to the place where the stiffeners are scarfed together at mid span, so I have enclosed that. I have left openings in the places where I think I would like to add the cross braces if they are necessary.
The valence is now mounted a bit higher. This seems to help the way it looks, but it complicates the assemble. It is also made of two layers of fabric this time. It still does not lay smoothly, but it will probably do better at full scale. I consider inserting battens in between the two layers. This will certainly make it lie smoothly, but I have some reservations about doing it. It seems unnecessarily complex, and the materials I think to use (Masonite or thin birch plywood) do not have any medieval equivalents.
Mac
As we may recall, there was a problem with the gables sagging.
I made new gables, using the same templates, but curving the bias grain edge inward a bit. The results were dramatic.....Too dramatic, really. I got rid of the sagging, but I clearly took the correction too far.
The striking thing is how much "correction" I got with very little curve. These are the templates I used for both the old and the new gables. The outside edge is the cutting line, the pencil line is the seam line. (My standard seam allowances for these miniatures is 1/4"). The straight lines are the ones I used on the original gables; the curved lines are approximately how much I removed before sewing the new gables.
The amount I removed for the new gables is about 1/8". That is a scale 3/4".
The lessons here are two. First is that we can use this technique to pull out the slack in the panels. The second is that it only takes a little bit to make a big difference. The cumulative effect of this small correction over six (6) seams is too much. I am going to have to make a guess about how much to curve the seams on the full sized tent. It will certainly be less than 3/4"! Perhaps 3/8" will do the trick.
I also made changes to the long-wall pockets and to the valence.
The long-wall pockets are now divided into three. I am guessing that I probably do not really need access to the place where the stiffeners are scarfed together at mid span, so I have enclosed that. I have left openings in the places where I think I would like to add the cross braces if they are necessary.
The valence is now mounted a bit higher. This seems to help the way it looks, but it complicates the assemble. It is also made of two layers of fabric this time. It still does not lay smoothly, but it will probably do better at full scale. I consider inserting battens in between the two layers. This will certainly make it lie smoothly, but I have some reservations about doing it. It seems unnecessarily complex, and the materials I think to use (Masonite or thin birch plywood) do not have any medieval equivalents.
Mac
Robert MacPherson
The craftsmen of old had their secrets, and those secrets died with them. We are not the better for that, and neither are they.
http://www.lightlink.com/armory/
http://www.billyandcharlie.com
https://www.facebook.com/BillyAndCharlie
The craftsmen of old had their secrets, and those secrets died with them. We are not the better for that, and neither are they.
http://www.lightlink.com/armory/
http://www.billyandcharlie.com
https://www.facebook.com/BillyAndCharlie
Re: Rectangular tent...a work in progress.
There is a lot to be said for the "attic space" that a spoke tent provides. Our old tent has lightweight spokes to keep the hoop round. (heavier, and pre-curved hoop pieces would make this unnecessary) We use the spokes as a place to store everything from damp clothes to a roll of paper towels.FrauHirsch1 wrote:
My husband wants to make a hub and spoke so he has some storage racks, so it may be moot, but I will definitely keep that in mind. Thanks!
-J
Mac
Robert MacPherson
The craftsmen of old had their secrets, and those secrets died with them. We are not the better for that, and neither are they.
http://www.lightlink.com/armory/
http://www.billyandcharlie.com
https://www.facebook.com/BillyAndCharlie
The craftsmen of old had their secrets, and those secrets died with them. We are not the better for that, and neither are they.
http://www.lightlink.com/armory/
http://www.billyandcharlie.com
https://www.facebook.com/BillyAndCharlie