Rectangular tent...a work in progress.

An area for discussing methods for achieving or approximating a more authentic re-creation, for armour, soft kit, equipment, ...

Moderator: Glen K

Galleron
Archive Member
Posts: 490
Joined: Mon Aug 28, 2006 11:54 am
Contact:

Re: Rectangular tent...a work in progress.

Post by Galleron »

Aussie Yeoman wrote:Thanks for the pics Mac. I didn't mean to pester or nag...I was just curious.

I was surprised to see how many rectangular tents there are. Even in images I had seen before, my eye had been drawn to the round pavillions before.

Dave
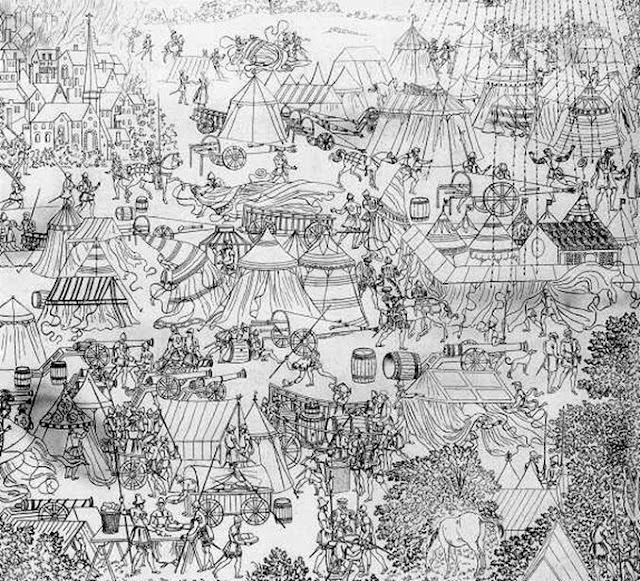
I think most of us have a tendency to unconciously filter out the rectangular tents because they don't match our internal archetypes of what medieval tents look like.

"These aren't the tents you're looking for."
"These aren't the tents we're looking for."

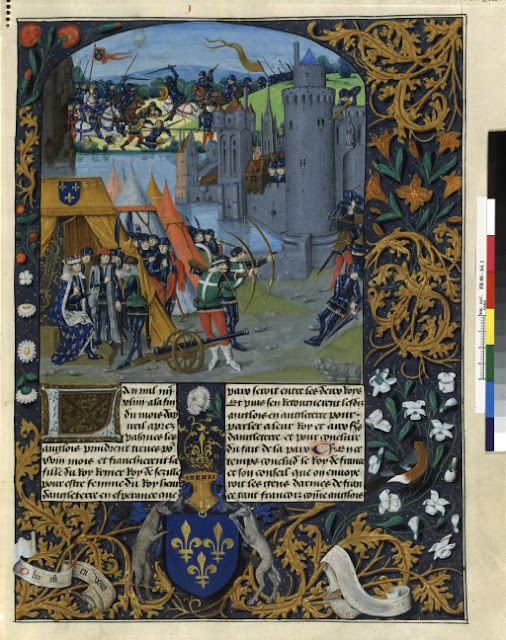
But in a fairly large sample, the rectangular tent is the second most common form, ahead of the oval.

http://willscommonplacebook.blogspot.co ... -1415.html

Yes, once you look for them, they're everywhere.
Galleron

http://willscommonplacebook.blogspot.com: My Blog
http://www.cafepress.com/Commonplacegood: My CafePress store for medieval recreation and the Middle Ages
Mac
Archive Member
Posts: 9953
Joined: Thu Jan 04, 2001 2:01 am
Location: Jeffersonville, PA

Re: Rectangular tent...a work in progress.

Post by Mac »

I put a couple of cross braces in today, and the results are good.

Here are the scale 2/2s.....

Image

....with scale 5/16" pins in the ends.
Image

Here is one, in place. For convenience, I just put a hole right through the sleeve and stiffener. On the sull scale, I will leave an opening in the sleeve. I also expect to tie the ends of the braces in place, so they don't drop out when the wind shakes the tent.

Image

A view from, the floor, looking up at the two braces.
Image


With the valence turned up, you can see the the braces do a good job of keeping the long-wall stiffeners straight.
Image

I ordered up my canvas yesterday. Perhaps I can begin construction of the full scale tent early next week.

Mac
Robert MacPherson

The craftsmen of old had their secrets, and those secrets died with them. We are not the better for that, and neither are they.

http://www.lightlink.com/armory/
http://www.billyandcharlie.com
https://www.facebook.com/BillyAndCharlie
User avatar
whitew01f
New Member
Posts: 48
Joined: Thu Jul 24, 2008 11:16 pm
Location: Alaska (Oertha)
Contact:

Re: Rectangular tent...a work in progress.

Post by whitew01f »

Somone's going to like having a place to hang garb up, if those braces can handle a little extra weight. Oh shut, now I gave you a logical explanation as to why you have to make garb for the Joe. :oops:

Anyway, I also appreciate the model. My Sketchup model of my pavilion is not quite getting the job done, so I may need to resort to a physical model.
What wood are you using and how are you cutting it?
Mac
Archive Member
Posts: 9953
Joined: Thu Jan 04, 2001 2:01 am
Location: Jeffersonville, PA

Re: Rectangular tent...a work in progress.

Post by Mac »

whitew01f wrote:Somone's going to like having a place to hang garb up, if those braces can handle a little extra weight. Oh shut, now I gave you a logical explanation as to why you have to make garb for the Joe. :oops:

w01f,

In the vanishingly unlikely circumstances that I do make any medieval GI Joe clothes, it would have to happen after Pennsic. (and I would be sure to post pics of them)

whitew01f wrote:Anyway, I also appreciate the model. My Sketchup model of my pavilion is not quite getting the job done, so I may need to resort to a physical model.
I'm a big fan of these tent models. I think you learn a lot by making them. Computer modeling gets better all the time, but I just don't trust it like I trust a physical model. Perhaps I am just a Luddite. OK, I'm probably just a Luddite.

whitew01f wrote:What wood are you using and how are you cutting it?
I'm using bass wood from the local hobby store. (Micheal's has it too) A couple of the standard thicknesses are good approximations of dimensional lumber: 1/8 is close to a scale 3/4 ("one by") and 1/4" is the scale equivalent of 1 1/2" ("two by"). I am using a band saw with a rip fence to get the other dimension. I try to get within 5 thousandths of the scaled dimension, so it takes a bit of fussing to get the fence just right. I am using a fresh fine toothed blade, and I have put a piece of Masonite over the saw table to restrict the throat plate.

Mac
Robert MacPherson

The craftsmen of old had their secrets, and those secrets died with them. We are not the better for that, and neither are they.

http://www.lightlink.com/armory/
http://www.billyandcharlie.com
https://www.facebook.com/BillyAndCharlie
User avatar
Charlotte J
Girl Genius
Posts: 15840
Joined: Tue Sep 30, 2003 1:01 am
Location: I <3 Colorado
Contact:

Re: Rectangular tent...a work in progress.

Post by Charlotte J »

Once we get around to ours, we will start with a sketchup model for dimensions and proportion, and then move on to a physical model for engineering.
Do you not know that in the service... one must always choose the lesser of two weevils?
User avatar
Johann ColdIron
Archive Member
Posts: 7421
Joined: Mon Mar 03, 2003 2:01 am
Location: Raleigh, NC

Re: Rectangular tent...a work in progress.

Post by Johann ColdIron »

Mac wrote:
whitew01f wrote:Somone's going to like having a place to hang garb up, if those braces can handle a little extra weight. Oh shut, now I gave you a logical explanation as to why you have to make garb for the Joe. :oops:
As long as the braces dont want to roll when weigh is applied. They may want to turn so that the long dimension is horizontal. I made a tent closet pole that ended up doing just that and deflecting badly when too many pieces of garb were applied. Dual end pins would prevent that.
Mac wrote:
I'm a big fan of these tent models. I think you learn a lot by making them. Computer modeling gets better all the time, but I just don't trust it like I trust a physical model. Perhaps I am just a Luddite. OK, I'm probably just a Luddite.
It would have to be a really good CAD program to deal with bias stretching of canvas. Not as much of an issue with the verticle ends but probably still a factor.

I really wish we had done a scale model when we sewed our first tent. It would have answered a lot of questions BEFORE we tried to set it up. Maybe on the next one. Very cool Mac!
John Cope/ Sir Johann ColdIron, Master- Order of the Laurel

I'm not dead yet!
Mac
Archive Member
Posts: 9953
Joined: Thu Jan 04, 2001 2:01 am
Location: Jeffersonville, PA

Re: Rectangular tent...a work in progress.

Post by Mac »

Johann ColdIron wrote:
As long as the braces dont want to roll when weigh is applied. They may want to turn so that the long dimension is horizontal. I made a tent closet pole that ended up doing just that and deflecting badly when too many pieces of garb were applied. Dual end pins would prevent that.
The braces are "2x2" (ie. 1 1/2" square) so they should not try to roll. If I find that they bend to much in the full scale, I would go to 2x4, and then I would need to find some way to keep them from rolling.


Johann ColdIron wrote:Very cool Mac!
Thank you, Johann!
Robert MacPherson

The craftsmen of old had their secrets, and those secrets died with them. We are not the better for that, and neither are they.

http://www.lightlink.com/armory/
http://www.billyandcharlie.com
https://www.facebook.com/BillyAndCharlie
Mac
Archive Member
Posts: 9953
Joined: Thu Jan 04, 2001 2:01 am
Location: Jeffersonville, PA

Re: Rectangular tent...a work in progress.

Post by Mac »

My canvas just arrived, so now I have to get serious. It looks like the first thing I have to do is make a table big enough to lay out the pieces. The bolt is a nominal 60" wide, so a single 4x8' sheet of ply will not do. I will go and sketch something up.

Mac
Robert MacPherson

The craftsmen of old had their secrets, and those secrets died with them. We are not the better for that, and neither are they.

http://www.lightlink.com/armory/
http://www.billyandcharlie.com
https://www.facebook.com/BillyAndCharlie
Mac
Archive Member
Posts: 9953
Joined: Thu Jan 04, 2001 2:01 am
Location: Jeffersonville, PA

Re: Rectangular tent...a work in progress.

Post by Mac »

This is what I imagine the cutting table to look like. The roll of canvas is about 11" by about 60" and weighs around 110lbs. It will be supported by a pipe, or a broom handle sitting in notches cut in the end stanchions. The top is to be made of two pieces of 3/8" ply. A 2x4 supports the joint between the 4x8 and the 1x8 pieces. Another 2x4 goes under the middle of the 4foot piece. The frame, legs and braces are 2x4". Everything is held together with drywall screws.

Image

Does anyone see any problems that I missed?

Mac
Robert MacPherson

The craftsmen of old had their secrets, and those secrets died with them. We are not the better for that, and neither are they.

http://www.lightlink.com/armory/
http://www.billyandcharlie.com
https://www.facebook.com/BillyAndCharlie
User avatar
Sean Powell
Archive Member
Posts: 9908
Joined: Sat Jul 13, 2002 1:01 am
Location: Holden MA

Re: Rectangular tent...a work in progress.

Post by Sean Powell »

Very profesional and sturdy looking, just what I would do if I wanted a permanant table for a tent business.

For a 1-off I would make the fabric stand self supporting and the table a trestle on 2 saw-horses. I would probably make the table 6' wide instead of 5' so I have space for rullers, scisors, chalk etc. I might even double-up on the number of sawhorses and throw down another sheet of playwood (or unscrew the table and reassemble the 2 original sheets) for an in-feed and outfeed table.

Another idea: cheap interior doors make great light-weight smooth table-tops and are ~7' long and ~3' wide. A pair of those is wide enough for a cutting table and convert to in-feed and outfeed tables easily, but you can't use them for other plywood projects in the future.

Luck!
Sean
Tracy Justus
Archive Member
Posts: 478
Joined: Fri Oct 24, 2003 1:01 am
Location: Burlington. NC

Re: Rectangular tent...a work in progress.

Post by Tracy Justus »

You are designing your cutting table to be exactly the width of your cloth. I suggest you add a few inches to each side and either screw yardsticks (or maybe a metal tape measure) along the both long edges, or draw on a measure. If the measure on both sides are lined up correctly you'll be able to pull your canvas out, make sure it is parallel to the edges of the table, and accurately mark the cloth without having to wave a tape measure around. Does this make sense? I'm not sure I'm expressing myself well.

I also suggest a couple of drawer handles mounted so that you can stick your scissors in them for storage but still have them handy when you need to cut.

My (purchased) cutting table is 34 1/2" high which I find a convenient height. Do you plan to add locking wheels to the your cutting table?

Tracy
User avatar
Johann ColdIron
Archive Member
Posts: 7421
Joined: Mon Mar 03, 2003 2:01 am
Location: Raleigh, NC

Re: Rectangular tent...a work in progress.

Post by Johann ColdIron »

Mac wrote: The braces are "2x2" (ie. 1 1/2" square) so they should not try to roll. If I find that they bend to much in the full scale, I would go to 2x4, and then I would need to find some way to keep them from rolling.

Ack! How did I miss that? My brain said 1x2. Not sure why. Carry on... :oops:

The table looks good. Will 4 screws attaching the canvas roll yokes hold up to the stress of cranking and pulling the canvas? I too would suggest maing a separate canvas roll support dolly. Preferably with locking casters under it. Roll it over to the table, lock it down and pull off what you need then relocate the roll elsewhere so you can work around the whole table. Not sure how much space you have to work with though.

We did something like that for a consevation effort on some large painted canvas murals here at the museum. Think 9' tall 12' wide biblical scenes as powerpoint for turn of the century Baptist tent revivals. All on wooden spools so you could advance the images as the story was told. Cool but labor intensive poject.
John Cope/ Sir Johann ColdIron, Master- Order of the Laurel

I'm not dead yet!
Aussie Yeoman
Archive Member
Posts: 919
Joined: Tue Apr 11, 2006 10:16 pm
Location: Canberra, Australia

Re: Rectangular tent...a work in progress.

Post by Aussie Yeoman »

If not the idea of a separate canvas holder, then at least I would try to put the barrel of the roll of canvas situated over the legs. This would make the table less inclined to want to tip over when someone comes along to watch what you're doing and invariably leans with one elbow on the canvas roll.

Or maybe something like the attached. But that may not work either as the cloth may want to slide off the end of the table.

Dave
Attachments
alternative cutting bench.jpg
(29.06 KiB) Not downloaded yet
Grigorii
Archive Member
Posts: 53
Joined: Mon Jun 22, 2009 9:00 pm
Location: Mobile, Al. / Osprey, Meridies

Re: Rectangular tent...a work in progress.

Post by Grigorii »

Make your table out of a single piece of plywood turned perpendicular to the way you have it now on sawhorses and hang your clothe roll from the cieling rafters. You can also run 2 pieces of cord or rope to the nearest wall to stabilize the clothe when you pull on it. This will get you a 4 foot long table that is 8 feet wide offering a place to put tools while working and save on some construction time. It will also break down for storage or other use quickly.
Gregg

(From another time and place.) Learn from other peoples mistakes, you do not have time to make them all yourself.
Mac
Archive Member
Posts: 9953
Joined: Thu Jan 04, 2001 2:01 am
Location: Jeffersonville, PA

Re: Rectangular tent...a work in progress.

Post by Mac »

Thank you, all for the comments!

Tracy et Sean,
It seems like my biggest error was to make the width be the same as the fabric. I will definitely make the table wider; probably six feet.

Sean,
A large work table might not be a bad thing to have for other projects, and I do have the space for it. So, I might retain the permanent legs, rather than go to saw horses.

I am torn about having the fabric support as a separate fixture. On one hand I can see that it would be a more flexible system. On the other, it would be one more thing to build. I think I might keep the fabric support more or less as I have drawn it and build a separate one later. Once I have built a separate one, I can just cut the long 2/4s off at the end of the table.

Dave,
I have thought it through, and I don't think that there will be a balance problem, even with a hundred pound roll of fabric. The center of gravity will be far enough forward of the back legs to keep it from "popping wheelies". ...if not, I will be sure to get pics.

Greg,
Hanging the fabric from the rafters is a clever idea. Unfortunately (?) I have sheet-rocked my ceiling and my rafters are no longer available for that.
As far as the length of the table goes; I don't think I can really use something shorter than seven feet. The proposed wall panels are six feet high. My next project (there are preliminary sketches) is likely to involve longer canopy panels than the ones for this tent, so I think I will retain the eight foot length.

Johan,

I think that you are right about the stanchions being a bit "under-screwed". I may well bump the stanchions up to 2x6 to make room for a couple more screws, and a wider spacing of them.

I may start the table construction later this weekend.

Mac
Last edited by Mac on Sat Jun 02, 2012 11:20 am, edited 2 times in total.
Robert MacPherson

The craftsmen of old had their secrets, and those secrets died with them. We are not the better for that, and neither are they.

http://www.lightlink.com/armory/
http://www.billyandcharlie.com
https://www.facebook.com/BillyAndCharlie
User avatar
Charlotte J
Girl Genius
Posts: 15840
Joined: Tue Sep 30, 2003 1:01 am
Location: I <3 Colorado
Contact:

Re: Rectangular tent...a work in progress.

Post by Charlotte J »

Have you thought ahead to a sewing table that supports the amount of canvas you'll be moving through, to place next to your industrial?
Do you not know that in the service... one must always choose the lesser of two weevils?
Mac
Archive Member
Posts: 9953
Joined: Thu Jan 04, 2001 2:01 am
Location: Jeffersonville, PA

Re: Rectangular tent...a work in progress.

Post by Mac »

Charlotte J wrote:Have you thought ahead to a sewing table that supports the amount of canvas you'll be moving through, to place next to your industrial?
I am still thinking about that one. It seems like I will need an "in-feed" and an "out-feed" table, but I have no idea how large, or what shape they have to be. What do you recommend?

Mac
Robert MacPherson

The craftsmen of old had their secrets, and those secrets died with them. We are not the better for that, and neither are they.

http://www.lightlink.com/armory/
http://www.billyandcharlie.com
https://www.facebook.com/BillyAndCharlie
Baron Alcyoneus
Archive Member
Posts: 39578
Joined: Tue Sep 23, 2008 7:00 pm

Re: Rectangular tent...a work in progress.

Post by Baron Alcyoneus »

whitew01f wrote:Somone's going to like having a place to hang garb up, if those braces can handle a little extra weight. Oh shut, now I gave you a logical explanation as to why you have to make garb for the Joe.

Interior curtains.
Tracy Justus
Archive Member
Posts: 478
Joined: Fri Oct 24, 2003 1:01 am
Location: Burlington. NC

Re: Rectangular tent...a work in progress.

Post by Tracy Justus »

I mended a 12'x15' fly today and wished the table of my industrial was about 2' wider to the left and 3' deeper, which would give me a little over 4' of table to the left and 4' in back of my machine's needle. If I were to sew another pavilion I'd rig something temporary up. Your gable-end style appeals to me greatly. Our two rectangle tents are hip roofed and the interior roof poles are damned awkward to maneuver around.

T.

I don't know if anyone else has noticed this but Mac's canvas is 56" wide, which means he is throwing in extra seams to mimic the effect of historical loom widths.
User avatar
Sean Powell
Archive Member
Posts: 9908
Joined: Sat Jul 13, 2002 1:01 am
Location: Holden MA

Re: Rectangular tent...a work in progress.

Post by Sean Powell »

Tracy Justus wrote: I don't know if anyone else has noticed this but Mac's canvas is 56" wide, which means he is throwing in extra seams to mimic the effect of historical loom widths.
I noticed as working with 5' rolls of fabric makes for a more challenging table. but I didn't see any benefit to working in 28" width brachios when I think sunforger comes in (I think) 32" widths. I think my modern tent panels are 2'8" wide finished which isn't that far off from 2'4".

Is there something I'm missing other then aestetics that would justify not working with a selvedge edge which I presume would have been the period construction method.

Sean
Mac
Archive Member
Posts: 9953
Joined: Thu Jan 04, 2001 2:01 am
Location: Jeffersonville, PA

Re: Rectangular tent...a work in progress.

Post by Mac »

Baron Alcyoneus wrote:
whitew01f wrote:Somone's going to like having a place to hang garb up, if those braces can handle a little extra weight. Oh shut, now I gave you a logical explanation as to why you have to make garb for the Joe.

Interior curtains.
Indeed. As I pointed out earlier.

Mac
Mac wrote:

Here is an image I found yesterday in which I believe I see just such a brace being used to support a curtain which presumable divides off a storage space.

Image


Mac
Robert MacPherson

The craftsmen of old had their secrets, and those secrets died with them. We are not the better for that, and neither are they.

http://www.lightlink.com/armory/
http://www.billyandcharlie.com
https://www.facebook.com/BillyAndCharlie
Mac
Archive Member
Posts: 9953
Joined: Thu Jan 04, 2001 2:01 am
Location: Jeffersonville, PA

Re: Rectangular tent...a work in progress.

Post by Mac »

Tracy Justus wrote:I mended a 12'x15' fly today and wished the table of my industrial was about 2' wider to the left and 3' deeper, which would give me a little over 4' of table to the left and 4' in back of my machine's needle.
Duly noted. If you had your 'druthers, would you have more table behind your left arm as well?
Tracy Justus wrote:If I were to sew another pavilion I'd rig something temporary up. Your gable-end style appeals to me greatly. Our two rectangle tents are hip roofed and the interior roof poles are damned awkward to maneuver around.
Looking at the historical images, it looks like there are several different possible configurations of the masts and other supports in rectangular tents. Some, like the collapsed tents in Henry VIII's camp at Marqueson, look like they had something supporting the ridge beam which rested on the frame of the eaves. These might have then stood on four corner poles.
Image


Tracy Justus wrote:I don't know if anyone else has noticed this but Mac's canvas is 56" wide, which means he is throwing in extra seams to mimic the effect of historical loom widths.
My basic panel is going to be 1/3 of the fabric width. I hope that it will come out to be close to 18 inches, but it it will probably be more like 17 1/2".
Mac
Robert MacPherson

The craftsmen of old had their secrets, and those secrets died with them. We are not the better for that, and neither are they.

http://www.lightlink.com/armory/
http://www.billyandcharlie.com
https://www.facebook.com/BillyAndCharlie
User avatar
Chris Gilman
Archive Member
Posts: 2467
Joined: Fri Oct 18, 2002 1:01 am
Location: Sylmar CA.
Contact:

Re: Rectangular tent...a work in progress.

Post by Chris Gilman »

Mac, I assume you are going to fold and stitch a "seam", forming a central panel in the middle of your material?
User avatar
Sean Powell
Archive Member
Posts: 9908
Joined: Sat Jul 13, 2002 1:01 am
Location: Holden MA

Re: Rectangular tent...a work in progress.

Post by Sean Powell »

Chris Gilman wrote:Mac, I assume you are going to fold and stitch a "seam", forming a central panel in the middle of your material?
I wish I had thought of that. I assumed cutting the fabric, flipping selvedge edge to raw-edge and then stitching together. That's a pain if you slice the fabric in half and if you slice in 3rds there is no edge to work with on the middle panel. Stitching in a dummy seam would give all of the look with a fraction of the effort and be stronger as well.

Sean
Mac
Archive Member
Posts: 9953
Joined: Thu Jan 04, 2001 2:01 am
Location: Jeffersonville, PA

Re: Rectangular tent...a work in progress.

Post by Mac »

Sean Powell wrote: Is there something I'm missing other then aestetics that would justify not working with a selvedge edge which I presume would have been the period construction method.

Sean
Sean,

Two things drive me to make narrower panels.

One is an effort to replicate the aesthetics of the medieval tent. The widely spaced seams used on most modern "medieval" tents just don't have the same visual impact. This is brought home even more forcefully when folks put arcading on the seams and results tent to look thin and sparse.

The second is structural. Seams bear tension better than the fabric by its self because they are four layers rather than one. A tent with more seams can be put under more tension, and the panels are less likely to sag, and luff in the wind.


Mac
Robert MacPherson

The craftsmen of old had their secrets, and those secrets died with them. We are not the better for that, and neither are they.

http://www.lightlink.com/armory/
http://www.billyandcharlie.com
https://www.facebook.com/BillyAndCharlie
Mac
Archive Member
Posts: 9953
Joined: Thu Jan 04, 2001 2:01 am
Location: Jeffersonville, PA

Re: Rectangular tent...a work in progress.

Post by Mac »

Sean Powell wrote:
Chris Gilman wrote:Mac, I assume you are going to fold and stitch a "seam", forming a central panel in the middle of your material?
I wish I had thought of that. I assumed cutting the fabric, flipping selvedge edge to raw-edge and then stitching together. That's a pain if you slice the fabric in half and if you slice in 3rds there is no edge to work with on the middle panel. Stitching in a dummy seam would give all of the look with a fraction of the effort and be stronger as well.

Sean
Chris et Sean,

I had been presuming to cut the fabric in thirds and seam it back together. On the other hand, using fake seams is a legitimate medieval tailoring trick (there are examples of it in the Greenland garments). There is much to be said for it.....I will consider this carefully.

Mac
Robert MacPherson

The craftsmen of old had their secrets, and those secrets died with them. We are not the better for that, and neither are they.

http://www.lightlink.com/armory/
http://www.billyandcharlie.com
https://www.facebook.com/BillyAndCharlie
Galleron
Archive Member
Posts: 490
Joined: Mon Aug 28, 2006 11:54 am
Contact:

Re: Rectangular tent...a work in progress.

Post by Galleron »

Mac wrote:
Sean Powell wrote:
Chris Gilman wrote:Mac, I assume you are going to fold and stitch a "seam", forming a central panel in the middle of your material?
I wish I had thought of that. I assumed cutting the fabric, flipping selvedge edge to raw-edge and then stitching together. That's a pain if you slice the fabric in half and if you slice in 3rds there is no edge to work with on the middle panel. Stitching in a dummy seam would give all of the look with a fraction of the effort and be stronger as well.

Sean
Chris et Sean,

I had been presuming to cut the fabric in thirds and seam it back together. On the other hand, using fake seams is a legitimate medieval tailoring trick (there are examples of it in the Greenland garments). There is much to be said for it.....I will consider this carefully.

Mac
Also the Basel pavilion.
Galleron

http://willscommonplacebook.blogspot.com: My Blog
http://www.cafepress.com/Commonplacegood: My CafePress store for medieval recreation and the Middle Ages
User avatar
Sean Powell
Archive Member
Posts: 9908
Joined: Sat Jul 13, 2002 1:01 am
Location: Holden MA

Re: Rectangular tent...a work in progress.

Post by Sean Powell »

Galleron wrote:
Mac wrote: I had been presuming to cut the fabric in thirds and seam it back together. On the other hand, using fake seams is a legitimate medieval tailoring trick (there are examples of it in the Greenland garments). There is much to be said for it.....I will consider this carefully.

Mac
Also the Basel pavilion.
You have documentation of false seams on the Basel tent?
Galleron
Archive Member
Posts: 490
Joined: Mon Aug 28, 2006 11:54 am
Contact:

Re: Rectangular tent...a work in progress.

Post by Galleron »

Sean Powell wrote:
Galleron wrote:
Mac wrote: I had been presuming to cut the fabric in thirds and seam it back together. On the other hand, using fake seams is a legitimate medieval tailoring trick (there are examples of it in the Greenland garments). There is much to be said for it.....I will consider this carefully.

Mac
Also the Basel pavilion.
You have documentation of false seams on the Basel tent?
http://www.greydragon.org/pavilions/basel.html
The colored lines are stitched on. On the roof, the blue canvas is stitched over every seam. On the wall pieces, because the seams are farther apart, there is an extra color line attached midway between the seams

http://www.greydragon.org/images/tentpics/tent40.jpg
Galleron

http://willscommonplacebook.blogspot.com: My Blog
http://www.cafepress.com/Commonplacegood: My CafePress store for medieval recreation and the Middle Ages
Jan van Nyenrode
Archive Member
Posts: 781
Joined: Sat May 17, 2003 1:01 am
Location: Polderslot, Drachenwald, Netherlands

Re: Rectangular tent...a work in progress.

Post by Jan van Nyenrode »

Hi Mac,

Do you happen to have a drawing of how you knotted the crow feet's? The knot is still alluding me.

Thank you in advance for your time and effort.

Cheers,

Jan
Tracy Justus
Archive Member
Posts: 478
Joined: Fri Oct 24, 2003 1:01 am
Location: Burlington. NC

Re: Rectangular tent...a work in progress.

Post by Tracy Justus »

Re: table- since I am left handed I don't want a table extending in front of the edge of the sewing machine's stand. If you are working with a narrower width you'll wind up accordion folding it and resting the panel to be attached on your lap while the main body of the canvas rests on the table.

An advantage of narrower panels is that you are not trying to feed a 56" wide panel of canvas under the arm of the machine. Wider widths have to be rolled or folded up and multiple layers of Sunforger get bulky and hard to handle. On the other hand making a false seam would be pretty easy and save a lot of hassle.

Mac, I don't think you posted your yardage estimate for this pavilion. Could you share it?

T.
User avatar
Sean Powell
Archive Member
Posts: 9908
Joined: Sat Jul 13, 2002 1:01 am
Location: Holden MA

Re: Rectangular tent...a work in progress.

Post by Sean Powell »

Galleron wrote: http://www.greydragon.org/pavilions/basel.html
The colored lines are stitched on. On the roof, the blue canvas is stitched over every seam. On the wall pieces, because the seams are farther apart, there is an extra color line attached midway between the seams

http://www.greydragon.org/images/tentpics/tent40.jpg
Gotcha. There is a cosmetic strip appliqued where a seam could be but it is not a folded dummy seam that would provide structural support or intended to fool a tent builder. It also wouldn't be necessary to cut the fabric in 3rds and reassemble. The tent construction could be mimicked properly just by applying strips of an alternate color fabric.

Mac: Any thoughts about alternate color strips on your tent or you just going for visible seam lines?

Sean
Mac
Archive Member
Posts: 9953
Joined: Thu Jan 04, 2001 2:01 am
Location: Jeffersonville, PA

Re: Rectangular tent...a work in progress.

Post by Mac »

Tracy Justus wrote: Mac, I don't think you posted your yardage estimate for this pavilion. Could you share it?

T.
Tracy,

I did a proposed cutting diagram and guesstimate a couple of weeks ago, and came up with 33 yards. that presumed vertical seams on the gables, and we see that the radiating gores will take up a couple of extra yards. So, perhaps 35 yards is an optimistic guess, or 40 yards for realists.

Mac
Robert MacPherson

The craftsmen of old had their secrets, and those secrets died with them. We are not the better for that, and neither are they.

http://www.lightlink.com/armory/
http://www.billyandcharlie.com
https://www.facebook.com/BillyAndCharlie
Mac
Archive Member
Posts: 9953
Joined: Thu Jan 04, 2001 2:01 am
Location: Jeffersonville, PA

Re: Rectangular tent...a work in progress.

Post by Mac »

Sean Powell wrote: Mac: Any thoughts about alternate color strips on your tent or you just going for visible seam lines?

Sean
Sean,

I am planing to use the seam locations as a basis for painted arcading.

Mac
Robert MacPherson

The craftsmen of old had their secrets, and those secrets died with them. We are not the better for that, and neither are they.

http://www.lightlink.com/armory/
http://www.billyandcharlie.com
https://www.facebook.com/BillyAndCharlie
User avatar
Gregoire de Lyon
Archive Member
Posts: 1839
Joined: Fri Jun 11, 2004 9:13 am
Location: Barony of Cynnabar

Re: Rectangular tent...a work in progress.

Post by Gregoire de Lyon »

A little late to the game, but I've made a large cutting table for our home that uses a layer of homosote over a sheet of plywood, all covered in vinyl pleather.

The layer of homosote it very nice for pinning paper and fabric too while patterning and cutting. The pleather gives a nice finished surface that is cleanable and doesn't snag or damage finer fabrics.

Might not be neccessary for this project, but overall something to consider.
Gregoire de Lyon

----
"I am going to go out to the shop to taste some leathers. I'll report back later." -- Mac
Post Reply