Page 1 of 8
Rectangular tent...a work in progress.
Posted: Wed May 23, 2012 11:22 am
by Mac
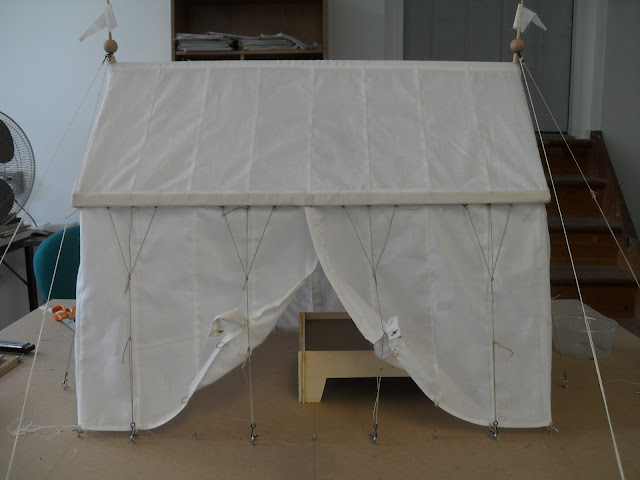
Here is what my model looks like, so far.
Like my other models,
http://billyandcharlie.com/tents/ it is 1/6th scale, or 2 inches to the foot. It is the scale of the old style GI Joe action figures. I find this a convenient scale to work in. The results are not so small as to be tedious, nor so large as to be ponderous. Muslin serves as the canvas, and any sewing machine will do. The seam allowances and hems are not to scale, and indeed, many of the seams are left unfinished.
This tent is going to be 12' by 7' at the "shoulder". The shoulder will be 6' above the ground, which is a convenient height for fastening the stiffeners and hanging the walls. The stiffeners will be 1x4 or perhaps 1x6 clear pine. The valence wraps around the frame, and is secured by lacing points.
The "masts" will be 9 1/2 feet, plus the finials. There will be a ridge beam between them. I currently have a scale 1x6 in place, but it looks heavier than necessary. I will try a 2x4, and see how that looks. The full scale ridge will have a joint like the side stiffeners, but I have not yet done that in the model
The walls will attach to the canopy by toggles. The sides will slope out one foot at the base, but the ends will be vertical.
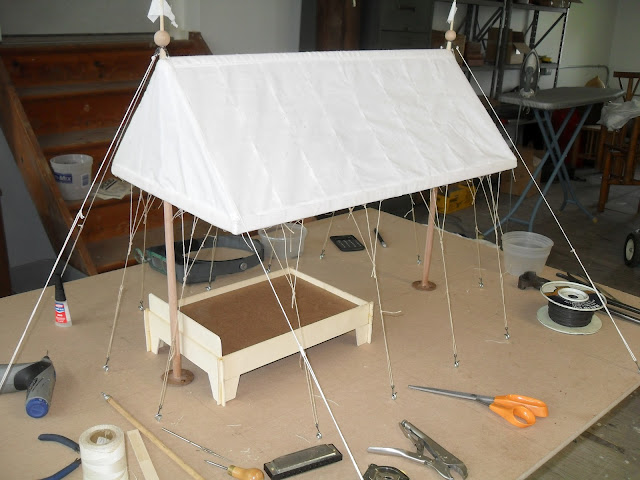
The lacing points of the model are left long for convenience.
The bed is a scale model of the one I already use. The full scale version is 4' by 6' and takes a futon.
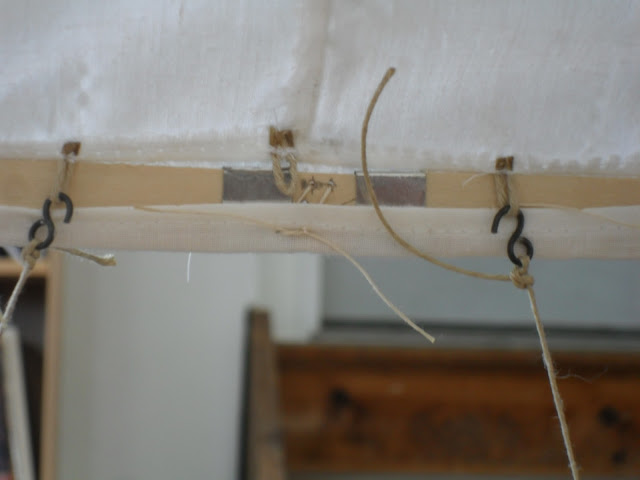
The long lengths will be joined at mid span by a scarf and ferrules, as can be seen in the detail.
Mac
Re: Rectangular tent...a work in progress.
Posted: Wed May 23, 2012 1:32 pm
by Sean Powell
SEXY!
I assume there is a 12' ridge pole that is spliced from two 6.5' pieces leaving 12" or so of overlap? Transporting a 12' ridge is a pain but if this is primarily a Pennsic tent you could buy a 12' board in Butler and hand-drill the necessary holes at the ends.
If your bed is set up with standard queen sheets you may be a bit tight. From memory an american queen is 6'6" tall and 5'0" wide. If you are 7' wide plus slant you only have 12" on either side of the bed and the slant doesn't add much shoulder space when trying not to brush dew-coated wet canvas in the morning. Depending on fabric width you might consider 12'x8' or 12'x8'6" even though 8'6" means splicing the short ends like the long ones.
Sean
Re: Rectangular tent...a work in progress.
Posted: Wed May 23, 2012 8:02 pm
by Charlotte J
Nice. Jeff and I have shifted our focus to rectangular tents, so if we ever get it done there will be something different in camp. Looking forward to seeing how this goes. Ours will necessarily be larger, to house a family of 4.
Re: Rectangular tent...a work in progress.
Posted: Wed May 23, 2012 8:26 pm
by Jacob
Neat! Where will the toggles for the walls be located? On my round, I was more worried about any sagging/stretching that could allow for water to pool. I attached the side ropes to pull out over the frame, and the walls attached below and to the outside of the sleeves to also keep everything in tension.
I had a valance to cover the gap with the ties. You'd have to arrange it a little differently with the tall wooden frame. Possibly you could tie the walls directly to the frame.
Be sure that the canvas will not rub between the poles and the frame in the wind.
Jacob
Re: Rectangular tent...a work in progress.
Posted: Thu May 24, 2012 8:59 am
by Mac
Sean Powell wrote:SEXY!
Thank you, Sean!
Sean Powell wrote:I assume there is a 12' ridge pole that is spliced from two 6.5' pieces leaving 12" or so of overlap? Transporting a 12' ridge is a pain.....
The model has a one piece ridge...at least for the moment. I expect to make the real one in two pieces.
Sean Powell wrote: If you are 7' wide plus slant you only have 12" on either side of the bed and the slant doesn't add much shoulder space when trying not to brush dew-coated wet canvas in the morning
.
You are right. There is not much shoulder room when standing next to the bed, but I think it is going to be OK. I really need to buy a GI Joe for scale, but I am afraid that I will start making clothes for it....
Sean Powell wrote: Depending on fabric width you might consider 12'x8' or 12'x8'6" even though 8'6" means splicing the short ends like the long ones.
I am reluctant to make it any wider at the eaves. I am trying achieve the proportions of the ones in the pics, and if I make it wider, I will have to make the canopy taller and raise the wall height as well. This would not be consistent with keeping the stiffeners and toggles at a convenient working height.
Mac
Re: Rectangular tent...a work in progress.
Posted: Thu May 24, 2012 9:15 am
by Mac
Jacob wrote:Neat!
Thank you, Jacob!
Jacob wrote:Where will the toggles for the walls be located?
The toggles will be attached to the tops of the walls, and the loops will be sewn to juncture of the canopy and valence.
Jacob wrote:On my round, I was more worried about any sagging/stretching that could allow for water to pool. I attached the side ropes to pull out over the frame, and the walls attached below and to the outside of the sleeves to also keep everything in tension.
This is ever on my mind as well.
Jacob wrote: Possibly you could tie the walls directly to the frame.
I have considered that, but none of the systems I could imagine seemed simple enough. I figure that these things would have distilled down over time to be as simple and fool resistant as possible. Left to our own devises, we frequently make things too complicated; and when we finally see "the back side" of the real artifact, it turns out to be quite simple.
I also worry about putting the stiffener pieces in tension across their grain, lest they "brast asunder".
Jacob wrote:Be sure that the canvas will not rub between the poles and the frame in the wind.
This is a good point. I will keep an eye on it.
Mac
Re: Rectangular tent...a work in progress.
Posted: Thu May 24, 2012 9:31 am
by Mac
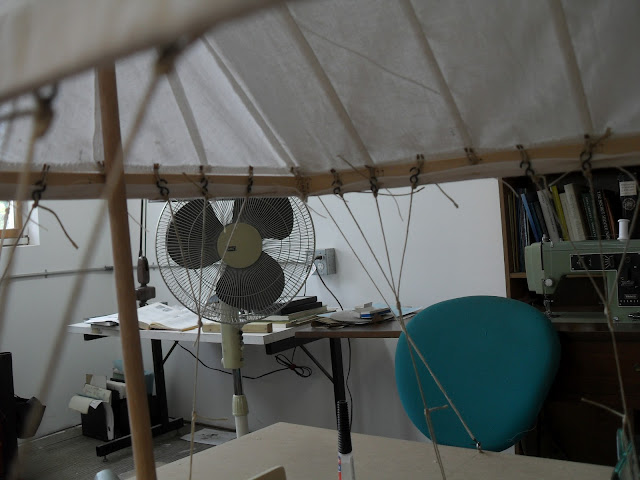
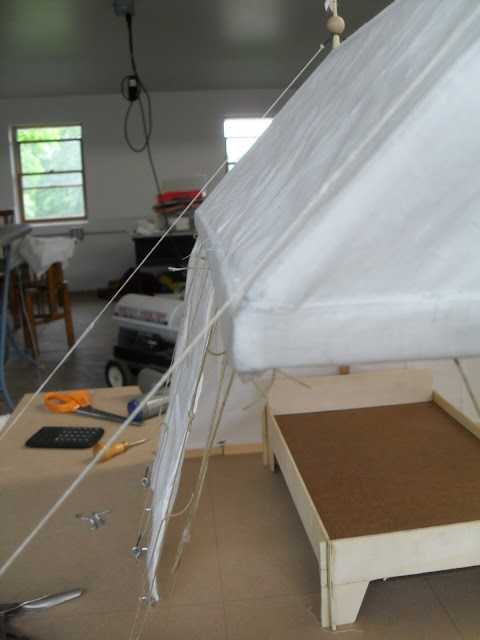
II made up the walls yesterday, but only got one hung before I ran out of patience around 11:00. The second one has its loops but I still have to install the hooks that are filling in for toggles. I believe I could made toggles at this scale, but I might go mad trying to fasten them.


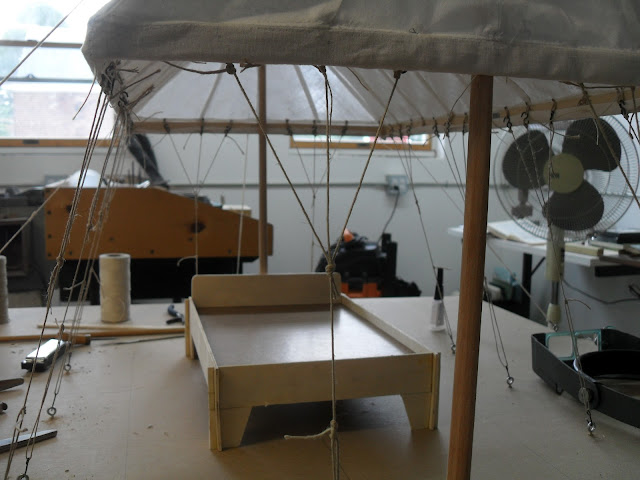
This shows the clearance around the bed. It's a bit tight at the top, but I think it will be OK In any case, it is better than our old tent.
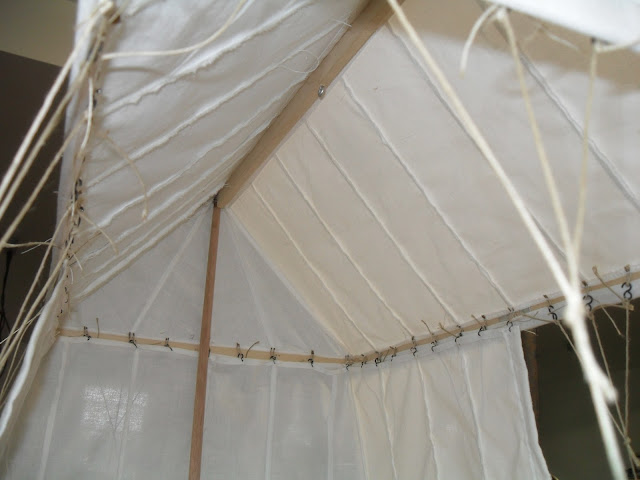
Here's a shot of the ridge beam. It is a simulated 2x6. I am thinking of scaling back to a 2x4 to see how that works. My first thought was to use a 1x6. I am sure it would be stiff enough if it could be relied upon to remain upright, but that's a pretty bid if.
This shows a possible problem that I have been expecting. The long-side stiffeners want to deflect. This will only get worse at full scale. I may have to install a cross piece or two.
Mac
Re: Rectangular tent...a work in progress.
Posted: Thu May 24, 2012 9:38 am
by Mac
Charlotte J wrote:Nice. Jeff and I have shifted our focus to rectangular tents, so if we ever get it done there will be something different in camp. Looking forward to seeing how this goes. Ours will necessarily be larger, to house a family of 4.
Charlotte,
A possible problem with making a "Family-O-Four" version is maintaining truth in the stiffeners. (see my last pic, above). If you keep to about 8' wide as the narrow dimension, (I think) you will only need additional bracing across the long dimension. As long as you accept the idea of cross braces, I think it could be "stretched" considerably. Indeed, longer would look better.
Mac
Re: Rectangular tent...a work in progress.
Posted: Thu May 24, 2012 9:45 am
by Charlotte J
I think that Jeff was considering cross braces anyway. They'll also help us hang curtains to divide it into sleeping rooms. He's also convinced me to go for higher shoulders, and not detaching the walls. Most of the images show the walls spread wide to open, or an arched doorway, but still attached at the top. We plan on raising the walls more than dropping them, if that makes any sense. That'll help us have a larger tent, but maintain that roof proportion.
Not this year though. Considered it, but too many other projects. You should see the chicken coop he's overengineering...
Re: Rectangular tent...a work in progress.
Posted: Thu May 24, 2012 12:40 pm
by Mac
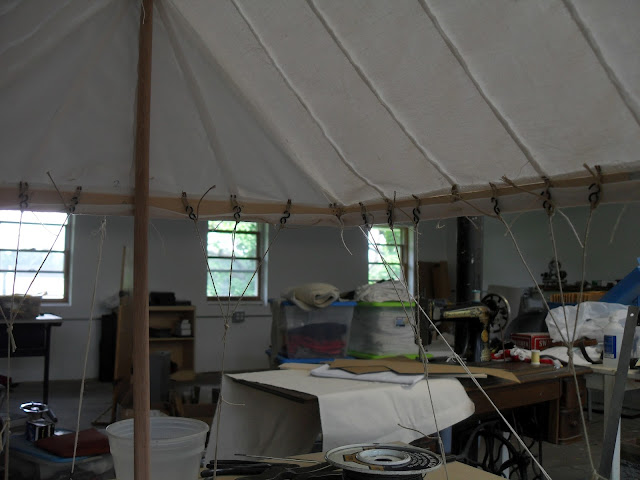
Here is what it looks like with the second wall in place.
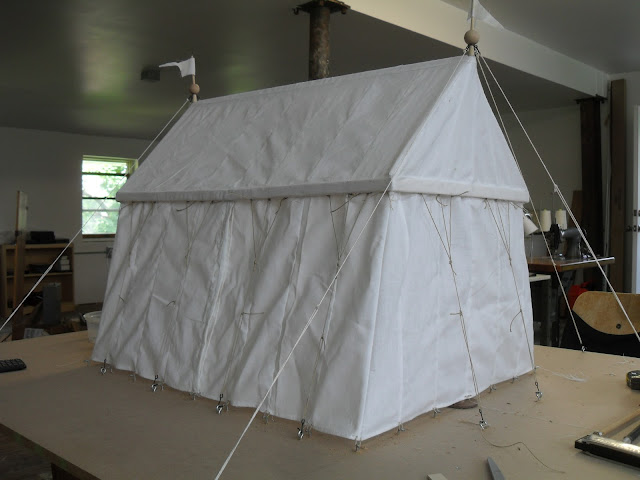
The next two pictures show how much difference perspective can make. The first is taken from slightly higher than the eaves. It seems sort of "roof heavy".
This one was taken from below the eaves and a bit closer. It shows more wall and less roof. Note also, how much the gable ends appear to splay, even though they are, in reality vertical.
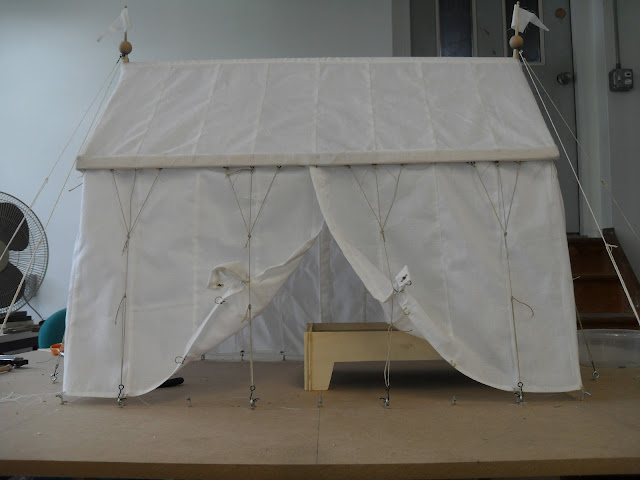
What I am getting at here is the question of how to interpret the proportions of a tent in a medieval illustration. The vantage point of the observer may appear to be high, but the artist's rendering may derive its proportions from a more familiar, and lower, point of view.
Mac
Re: Rectangular tent...a work in progress.
Posted: Thu May 24, 2012 2:50 pm
by Aussie Yeoman
Looking very schmick Mac.
How quickly are your wanting to get on to the 1:1 scale version?
And forgive my ignorance, but 'when' is this tent from?
Dave
Re: Rectangular tent...a work in progress.
Posted: Thu May 24, 2012 9:18 pm
by Jonathon Janusz
Mac wrote:I really need to buy a GI Joe for scale, but I am afraid that I will start making clothes for it....
16th century, gilded and engraved, full garniture including exchange pieces, with complete soft kit (and all that includes the kit for his horse). . .
. . . I dare you.

Seriously, I do very much enjoy seeing your scale models. Other than the skill in craftsmanship, this level of attention to detail, time, and effort really shows how your work gets to YOUR level - artisans at said level being able to be counted on one, maybe two hands, in my very humble opinion.
Cheers!
. . . and if by some chance a GI Joe were to somehow magically find its way to your shop door, would it be looked on as a blessing or a curse. . .?

Re: Rectangular tent...a work in progress.
Posted: Fri May 25, 2012 7:23 am
by Snaebjorn inn Danski Hakonarson
I have ro say that reading this thread is definitely enlightening. I think i'm gonna steal your scale model idea for a few projects of my own. Looking forward to seeing how this turns out in the end.
Re: Rectangular tent...a work in progress.
Posted: Fri May 25, 2012 8:23 am
by Sean Powell
Is there any risk of the anchor points which are interior (I was about to say medial but it's a tent not a person) to the side rails causing pockets or depressions which will catch water?
Sean
Re: Rectangular tent...a work in progress.
Posted: Fri May 25, 2012 8:56 am
by Mac
Aussie Yeoman wrote:
How quickly are your wanting to get on to the 1:1 scale version?
I plan to begin as soon as I am sure everything is in order. I will probably order up the canvas early next week.
Aussie Yeoman wrote:And forgive my ignorance, but 'when' is this tent from?
I am not working form one illustration, but rather trying for the "gestalt" of the rectangular tent. I will post some of the pics I am working from a pit later today.
Mac
Re: Rectangular tent...a work in progress.
Posted: Fri May 25, 2012 9:08 am
by Mac
Jonathon Janusz wrote:Mac wrote:I really need to buy a GI Joe for scale, but I am afraid that I will start making clothes for it....
16th century, gilded and engraved, full garniture including exchange pieces, with complete soft kit (and all that includes the kit for his horse). . .
. . . I dare you.
Jonathan,
I don't think I will fall for that...even if you "double dog dare me". I might be tempted to make something simpler, though. I made some Gothic pieces for doll house scale (1/2" to the foot) about 30 years ago. There's not much room for grinding an polishing in metal that thin.
Jonathon Janusz wrote:Seriously, I do very much enjoy seeing your scale models. Other than the skill in craftsmanship, this level of attention to detail, time, and effort really shows how your work gets to YOUR level - artisans at said level being able to be counted on one, maybe two hands, in my very humble opinion.
Thank you! You are very kind. I think we can come up with bigger numbers than that though.
Jonathon Janusz wrote:. . . and if by some chance a GI Joe were to somehow magically find its way to your shop door, would it be looked on as a blessing or a curse. . .?
I have started looking into the question of getting a Joe..... I would want one like I had as a kid in the 60s. These newfangled ones are all hypertrophied, and have chests like sacks of melons.
Mac
Re: Rectangular tent...a work in progress.
Posted: Fri May 25, 2012 9:10 am
by Mac
Snaebjorn wrote:I have ro say that reading this thread is definitely enlightening. I think i'm gonna steal your scale model idea for a few projects of my own. Looking forward to seeing how this turns out in the end.
Thank you, Bjorn. Take the idea and run with it; I think it is a very useful and powerful one.
Mac
Re: Rectangular tent...a work in progress.
Posted: Fri May 25, 2012 9:17 am
by Mac
Sean Powell wrote:Is there any risk of the anchor points which are interior (I was about to say medial but it's a tent not a person) to the side rails causing pockets or depressions which will catch water?
Sean
Sean,
I always look forward to your observations with a sort of giddy dread because you see the potential for problems and do not hesitate to point them out. Thank you!
Yes, I think that there is a real possibility of trouble at those points. One of the reasons I made this model was to try to investigate the extent of that puckering. In the model the effect is not as pronounced as I had feared, but the tendency is there, none the less. Leaving the model under tension for a few days should tell me more. In any case, if the seams do leak there, the water should end up on the outside of the walls.....I think.
Mac
Re: Rectangular tent...a work in progress.
Posted: Fri May 25, 2012 10:24 am
by Sean Powell
Mac wrote:
Sean,
I always look forward to your observations with a sort of giddy dread because you see the potential for problems and do not hesitate to point them out. Thank you!
Yes, I think that there is a real possibility of trouble at those points. One of the reasons I made this model was to try to investigate the extent of that puckering. In the model the effect is not as pronounced as I had feared, but the tendency is there, none the less. Leaving the model under tension for a few days should tell me more. In any case, if the seams do leak there, the water should end up on the outside of the walls.....I think.
Mac
Sorry. The ability to identify failure modes and the lack of social skills that make me prone to saying "I told you so" are both common traits in engineers.

A good test would be to wet your model so the fibers can stretch, swell and move and then see how it dries slowly. You can check for puddle spots with sand or salt (suggar would attract ants) but the salt will wash-up as well as vaccume up.
I think if you hooked the ropes outside the wood frame you would likely cause the frame to bend in even more requiring more cross-bracing so that is not a likely solution either.
You might consider a test where the frame passes through a rope loop that the frame passes through which would cause the line of force to pass through the wood rather then in front or behind. Alternately you might consider hanging the frame by hooks or toggles from the roof (didn't Galleron have a referance to replacement 'points' used on one of king Renes tents?) and then attaching the ropes to the bottom of the frame so tension was applied in series. Not certain what that would do but it would definetly distribute rope tension forces and remove puckering that catches water.
Just thinking out loud.
Oh, I ownd a 12x16 tent from panther with the sliding metal splice on the full 16' ridge. I think it was a 2x4 with rounded top. It held up just fine but showed a little sag. Definetly strong enough and would probably sag less as a single piece. I wouldn't go with 1x4 or 1x6 unless you had an imaginative plausibly authentic solution for attaching it to the masts. I used 1/2" steel rod through 5/8" holes at the top of my masts and the ridge was reinforced with metal (a few deck splice plates and screws. That left 7/8 or so of wood. I wouldn't go lighter then a 3/8 steel pin in a 1/2" hole and that would only leave 1/8 of wood per side in a 1x4. Even reinforced I suspect breakage.
Luck!
Sean
Re: Rectangular tent...a work in progress.
Posted: Fri May 25, 2012 10:28 am
by Tracy Justus
Mac, do you have any sort of fastening on the wood frame at the corners to keep it at 90 degrees, or is it kept there just by the canvas of the valence?
Tracy
Re: Rectangular tent...a work in progress.
Posted: Fri May 25, 2012 10:37 am
by Charlotte J
Mac wrote:What I am getting at here is the question of how to interpret the proportions of a tent in a medieval illustration. The vantage point of the observer may appear to be high, but the artist's rendering may derive its proportions from a more familiar, and lower, point of view.
Mac
So what you're saying is that the roof is probably bigger proportionally to the whole tent than what we tend to see in the illustrations?
If you enlarged it, would you just make it longer, or wider as well? We'd been talking about making it wider, too, and doing that would flatten out the roof were the roof itself kept the same height. That would necessitate making the roof portion itself higher, which would make it larger proportionally to the rest of the tent. I like the proportions you have, but making it bigger would make the roof taller, so to keep proportions similar to that, making the walls higher would also be necessary.
Mostly, Jeff's always wanted a tent tall enough to ride a horse in and out of.

Re: Rectangular tent...a work in progress.
Posted: Fri May 25, 2012 10:43 am
by Sean Powell
Charlotte J wrote:Mostly, Jeff's always wanted a tent tall enough to ride a horse in and out of.
Medieval sized horse or modern sized horse?
Duck under the eaves and ride out or siting upright, resplendent in full garniture with crest?
It makes a difference in the design.
Sean
Re: Rectangular tent...a work in progress.
Posted: Fri May 25, 2012 11:13 am
by Mac
[
Sean Powell wrote:
Sorry. The ability to identify failure modes and the lack of social skills that make me prone to saying "I told you so" are both common traits in engineers.
No.. no .. It's all good! The first makes you a good engineer, and the second makes you a hit a parties.
Sean Powell wrote:A good test would be to wet your model so the fibers can stretch, swell and move and then see how it dries slowly. You can check for puddle spots with sand or salt (suggar would attract ants) but the salt will wash-up as well as vaccume up.
I'm a bit reluctant to get the model wet with the humidity levels what they are today, but I think this may well be a good test when it is a bit dryer. If nothing else, it will accelerate the "settling in" process.
Sean Powell wrote:I think if you hooked the ropes outside the wood frame you would likely cause the frame to bend in even more requiring more cross-bracing so that is not a likely solution either.
I don't think I follow you here. Do you mean attaching them to tabs on the outside of the canopy at the "shoulder"? They do appear to originate there in some pics, and I might fall back to it, but I was hoping to do the "ropes from under the valance" thing.
Sean Powell wrote:You might consider a test where the frame passes through a rope loop that the frame passes through which would cause the line of force to pass through the wood rather then in front or behind.
A diagram would help me here.
Sean Powell wrote:Alternately you might consider hanging the frame by hooks or toggles from the roof (didn't Galleron have a referance to replacement 'points' used on one of king Renes tents?)
(I think it was Henry VIII) I am using points to secure the stiffeners for that very reason, but I am not really satisfied with wrapping the valence around the bottom edge to do it. I originally had the stiffeners hanging from points attached at inside of the "shoulder" but I did not like having to thread them through the wood. Perhaps I need to re-think that.
Sean Powell wrote:.....and then attaching the ropes to the bottom of the frame so tension was applied in series. Not certain what that would do but it would definetly distribute rope tension forces and remove puckering that catches water.
I considered attaching the guys (and the walls for that matter) directly to the stiffeners, but I rejected it for a couple of reasons. One is that I wanted to keep things simple. Two, is that I wanted to be able to attach the guys *before* I attached the stiffeners, as a means of stabilizing the canopy during set up and strike. Three, is that I am a bit suspicious of loading the stiffeners in tension across their grain, lest they split.
Sean Powell wrote:Oh, I ownd a 12x16 tent from panther with the sliding metal splice on the full 16' ridge. I think it was a 2x4 with rounded top. It held up just fine but showed a little sag. Definetly strong enough and would probably sag less as a single piece. I wouldn't go with 1x4 or 1x6 unless you had an imaginative plausibly authentic solution for attaching it to the masts. I used 1/2" steel rod through 5/8" holes at the top of my masts and the ridge was reinforced with metal (a few deck splice plates and screws. That left 7/8 or so of wood. I wouldn't go lighter then a 3/8 steel pin in a 1/2" hole and that would only leave 1/8 of wood per side in a 1x4. Even reinforced I suspect breakage.
I was thinking of a metallic eye at each end of the ridge. I am very concerned with balancing strength against the ability to tolerate angular misalignment during set up and strike. A metal eye would allow me to use a ridge that was taller than it was wide. But perhaps I am over thinking this.... Will's blog links to a description of some 18th. C. ridge poles,
http://willscommonplacebook.blogspot.com/ and they are round or "D" shaped, with ferrules on the ends. Washington's marquee had a 13foot oak 4x4. His tent was bigger than mine, and thus the ridge had to support more weight of canvas, but the ridge length is similar.
Mac
Re: Rectangular tent...a work in progress.
Posted: Fri May 25, 2012 11:30 am
by Mac
Tracy Justus wrote:Mac, do you have any sort of fastening on the wood frame at the corners to keep it at 90 degrees, or is it kept there just by the canvas of the valence?
Tracy
Tracy,
I am more worried about the stiffeners twisting around their long axes than I am about keeping the "plan" square. I want the frame to tolerate a certain amount of misalignment without damage. I can bring it to square with the placement of the walls and ropes.
I have a sort of loose fitting finger joint of three on the ends of the stiffeners....like a dovetail with out the "dove" part. That was not working well, in part because I inadvertently put the single finger on the long pieces, and the two fingers on the short. The result was that the long pieces wanted to twist about their axes. I went back and laced the joints together, and that was a big improvement.
Between putting the right part of the joint on the correct frame members, and lacing the corners, so they can not come apart, I think I have that part under control. The lacing, by the way, is readily accessible by pulling the valence up off the corner. This should make set up and strike go smoothly. I'll try to get a pic of this later.
Mac
Re: Rectangular tent...a work in progress.
Posted: Fri May 25, 2012 11:33 am
by Tom B.
Mac wrote:
Sean Powell wrote:You might consider a test where the frame passes through a rope loop that the frame passes through which would cause the line of force to pass through the wood rather then in front or behind.
A diagram would help me here.
Mac
I think he means this.
1. Enlarge the loops on the roof (the ones that the guy hooks fasten to).
2. Pass the stiffeners through these enlarged loops.
3. Now the hooks would attach below the stiffeners.
The force would be transmitted from the guys to the roof partially through the loop part to the inside of the stiffener and partially through the part on the outside.
Re: Rectangular tent...a work in progress.
Posted: Fri May 25, 2012 11:35 am
by Tom B.
Mac wrote:
Mac
Lots of things on the table there but the harmonica seems out of place.

Tom
Re: Rectangular tent...a work in progress.
Posted: Fri May 25, 2012 11:44 am
by Mac
Charlotte J wrote:Mac wrote:What I am getting at here is the question of how to interpret the proportions of a tent in a medieval illustration. The vantage point of the observer may appear to be high, but the artist's rendering may derive its proportions from a more familiar, and lower, point of view.
Mac
Charlotte J wrote:So what you're saying is that the roof is probably bigger proportionally to the whole tent than what we tend to see in the illustrations?
Yes. But it's hard to know by how much.
Charlotte J wrote:If you enlarged it, would you just make it longer, or wider as well? We'd been talking about making it wider, too, and doing that would flatten out the roof were the roof itself kept the same height. That would necessitate making the roof portion itself higher, which would make it larger proportionally to the rest of the tent.
Exactly! ...and pretty soon you need to stand on something to get at the frame and wall attachment. Our old tent has that stuff at about 7 feet above the ground, and it makes for an unpleasant experience to set up and strike. You end up spending a lot of time with your arms up. Marianne says it makes her mindful of the Crucifixion, and she keeps expecting the Romans to break her legs.
Charlotte J wrote:I like the proportions you have, but making it bigger would make the roof taller, so to keep proportions similar to that, making the walls higher would also be necessary.
Yes. but see caveat above.
Charlotte J wrote:Mostly, Jeff's always wanted a tent tall enough to ride a horse in and out of.
Ya' know that just leads to horse shit in the tent, don't ya'?
Mac
Re: Rectangular tent...a work in progress.
Posted: Fri May 25, 2012 1:35 pm
by Galleron
Mac wrote:[
Sean Powell wrote:
Sorry. The ability to identify failure modes and the lack of social skills that make me prone to saying "I told you so" are both common traits in engineers.
No.. no .. It's all good! The first makes you a good engineer, and the second makes you a hit a parties.
Sean Powell wrote:A good test would be to wet your model so the fibers can stretch, swell and move and then see how it dries slowly. You can check for puddle spots with sand or salt (suggar would attract ants) but the salt will wash-up as well as vaccume up.
I'm a bit reluctant to get the model wet with the humidity levels what they are today, but I think this may well be a good test when it is a bit dryer. If nothing else, it will accelerate the "settling in" process.
Sean Powell wrote:I think if you hooked the ropes outside the wood frame you would likely cause the frame to bend in even more requiring more cross-bracing so that is not a likely solution either.
I don't think I follow you here. Do you mean attaching them to tabs on the outside of the canopy at the "shoulder"? They do appear to originate there in some pics, and I might fall back to it, but I was hoping to do the "ropes from under the valance" thing.
Sean Powell wrote:You might consider a test where the frame passes through a rope loop that the frame passes through which would cause the line of force to pass through the wood rather then in front or behind.
A diagram would help me here.
Sean Powell wrote:Alternately you might consider hanging the frame by hooks or toggles from the roof (didn't Galleron have a referance to replacement 'points' used on one of king Renes tents?)
(I think it was Henry VIII) I am using points to secure the stiffeners for that very reason, but I am not really satisfied with wrapping the valence around the bottom edge to do it. I originally had the stiffeners hanging from points attached at inside of the "shoulder" but I did not like having to thread them through the wood. Perhaps I need to re-think that.
Mac
It was:
http://willscommonplacebook.blogspot.co ... -1511.html
Re: Rectangular tent...a work in progress.
Posted: Fri May 25, 2012 2:08 pm
by Mac
Enrico di Venezia wrote:Mac wrote:
Sean Powell wrote:You might consider a test where the frame passes through a rope loop that the frame passes through which would cause the line of force to pass through the wood rather then in front or behind.
A diagram would help me here.
Mac
I think he means this.
1. Enlarge the loops on the roof (the ones that the guy hooks fasten to).
2. Pass the stiffeners through these enlarged loops.
3. Now the hooks would attach below the stiffeners.
The force would be transmitted from the guys to the roof partially through the loop part to the inside of the stiffener and partially through the part on the outside.
Thank you for the explanation, Tom. I've just talked to Sean on the phone, and that is indeed the crux of his idea.
It has a lot of merit, so I'm back to the sketch book. Perhaps I'll have something new to show later this weekend.
Mac
Re: Rectangular tent...a work in progress.
Posted: Fri May 25, 2012 2:12 pm
by Mac
Enrico di Venezia wrote:Mac wrote:
Mac
Lots of things on the table there but the harmonica seems out of place.
Tom
It's not out of place at all. That's my "shop harp"....it's a crappy Honer "blues band". I keep my fleet of "Lee Oskars" in the house.
Mac
Re: Rectangular tent...a work in progress.
Posted: Fri May 25, 2012 2:25 pm
by Sean Powell
Enrico di Venezia wrote:
I think he means this.
1. Enlarge the loops on the roof (the ones that the guy hooks fasten to).
2. Pass the stiffeners through these enlarged loops.
3. Now the hooks would attach below the stiffeners.
The force would be transmitted from the guys to the roof partially through the loop part to the inside of the stiffener and partially through the part on the outside.
Pretty much what I was thinking although after I finished I had the second thought of a 'pigtail' with a loop at one end and a toggle at the other. Slip the pigtail through the existing guy-loop, around the stiffner and tuck it's toggle into it's own tail loop. The hook the guys to the bottom of the pigtail. These could be the 'points as decribed in another book or could be tied rather then toggle and loop.
I though the removeable pigtails might make things simpler but the more I think about it the more complicated they seemed. Far easer to have a sleeve for a frame and the guys attach to the bottom of the sleeve.
I'll have to draw pictures tonight as I'm busy at work.
Sean
Re: Rectangular tent...a work in progress.
Posted: Fri May 25, 2012 3:31 pm
by Tom B.
Mac wrote:Enrico wrote:
I think he means this.
1. Enlarge the loops on the roof (the ones that the guy hooks fasten to).
2. Pass the stiffeners through these enlarged loops.
3. Now the hooks would attach below the stiffeners.
The force would be transmitted from the guys to the roof partially through the loop part to the inside of the stiffener and partially through the part on the outside.
Thank you for the explanation, Tom. I've just talked to Sean on the phone, and that is indeed the crux of his idea.
It has a lot of merit, so I'm back to the sketch book. Perhaps I'll have something new to show later this weekend.
Mac
Sometimes it takes an Engineer to understand an Engineer.

I often find myself in the role of translator.
Tom
Re: Rectangular tent...a work in progress.
Posted: Fri May 25, 2012 6:35 pm
by Galleron
Mac wrote:Enrico di Venezia wrote:Mac wrote:
Mac
Lots of things on the table there but the harmonica seems out of place.
Tom
It's not out of place at all. That's my "shop harp"....it's a crappy Honer "blues band". I keep my fleet of "Lee Oskars" in the house.
Mac
I'm getting a "Land of the Giants" flashback here, in which the plucky crew escape the peril of the week by clever use of a two foot harmonica.
Re: Rectangular tent...a work in progress.
Posted: Fri May 25, 2012 6:45 pm
by Jonathon Janusz
Mac wrote:I don't think I will fall for that...even if you "double dog dare me". . .
No need to pursue beyond this little thread, my friend! Simply reading that you have actually spent a bit of time considering the logistics was enough to make me laugh. Thanks!
Mac wrote:I have started looking into the question of getting a Joe..... I would want one like I had as a kid in the 60s. These newfangled ones are all hypertrophied, and have chests like sacks of melons.
Okay. . . specifically which Joe did you have/do you want? I'm also assuming you are looking for a "shop Joe" (read: decent shape but doesn't have to be perfect), or are you looking for something near mint in box (read: collectible condition)? My family is in the antiques business, with a focus for a few years many years ago on toys. With the particulars of what you are after, in my travels if this Joe happens to cross my path, I'll give him a plane ticket your way.
Cheers!
Re: Rectangular tent...a work in progress.
Posted: Fri May 25, 2012 10:01 pm
by Mac
Jonathon,
Look for a PM.
Mac