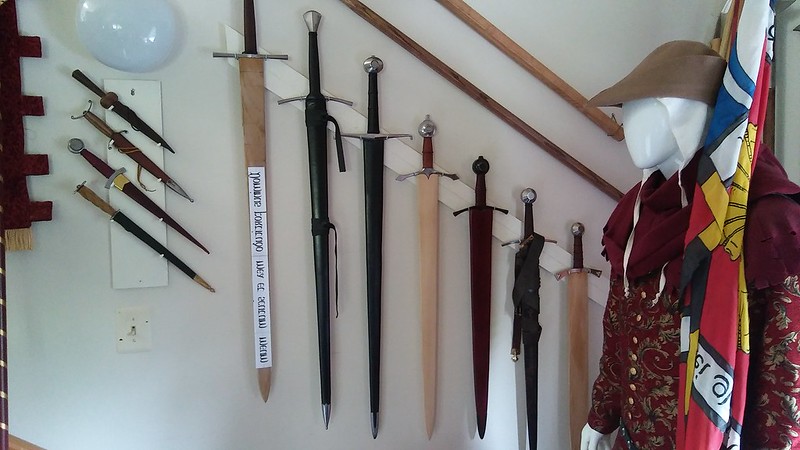
For medieval events I will make a scabbard for my A&A Spada di Zogho. A scabbard is quick, cheap, and does not require many tools or expensive materials, and I don't know anyone who make scabbards with the typical late-14th-century suspension.
Some of Datini's pairs of swords for fencing in the 1360s had cheap black scabbards.
What do we have for sources? We have earlier surviving scabbards (I do not have time to make a list). We have more than 300 of the leather covers from York, Scheswig, and Leiden. We have guild rules from Paris and Angers and descriptions of the process by Randle Holme 1688 and in Diderot 1765.
The consistent things:
- Scabbards should have a wooden core (preferably beechwood/hêtre/fagus sylvatica) covered with thin leather (usually vegetable-tanned calf)
- This core was fitted around the blade and possibly made from green wood
- This leather cover had a seam up the back and has pairs of holes from a diamond-section awl on either side of the seam. The thread does not survive.
- Some scabbards have a lining of linen or cloth or fur, but usually before 1000 or after 1600
- It was possible to remove the old cover without mangling it too badly, because garbage at York, Leiden, and Schleswig included scabbard leathers with no trace of the wood.
- Scabbard covers do not have the lavish decorations found on knife sheaths without the core. Most of the covers from Leiden and Schleswig had no visible decoration, and the 20% or so with decoration are not 'busy.'
All of the guild rules specify calfskin over beechwood (hêtre, fagus sylvatica): by the 16th century there was sometimes a layer of linen between the wood and the leather. Tod Todeschini guesses that this was because fashionable swords got long and thin in that period.
In the 18th century, they were using what may have been veneers ie. split green wood. Today people either use a "dugout" construction or steam the wood.
Buying the leather, the glue, and finding someone to cut the wood has taken weeks.
I now have: - some 1.5-2 mm black calfskin from Salzburg (one of the archaeological reports says that the surviving covers are 1-2 mm thick)
- some 40 x 5 x 1000 mm boards of European beech from the local orange home-improvement warehouse
- a lead on a local carpenter's workshop which will cut those boards down to about 2 mm thick (I don't have a table saw, money to buy one or room to put one)
- a lead on a coppersmith who can make a throat and chape with a hidden attachment to the hip belt
- some hot hide glue/Warmleime (I need to make up a small amount and try it out on scraps of various materials)
- a cheap brush, an awl, linen thread, beeswax, a project notebook, and various pots and jars for heating the glue
My tentative plan is to rig up a 'tent' with some old sheets around a pot of boiling water and the slats of wood and see if that softens them enough to bend around the blade. I might wrap the blade in thin linen to allow for the wood changing shape. If this fails I will try the dugout construction, these beech boards are about 2 Euros apiece.
1360s Scabbard Project
Moderator: Glen K
1360s Scabbard Project
DIS MANIBUS GUILLELMI GENTIS MCLEANUM FAMILIARITER GALLERON DICTI
VIR OMNIBUS ARTIBUS PERITUS
Check out Age of Datini: European Material Culture 1360-1410
VIR OMNIBUS ARTIBUS PERITUS
Check out Age of Datini: European Material Culture 1360-1410
-
John Vernier
- Archive Member
- Posts: 232
- Joined: Mon Mar 14, 2011 5:57 pm
- Location: south central Indiana
Re: 1360s Scabbard Project
Thin woods can often be bent after soaking in hot water rather than steam. That is the method often used for Shaker oval boxes. I mention it because it may be less trouble for you to rig up a long skinny container to pour hot water into, rather than a steam box, depending on your workspace.
Re: 1360s Scabbard Project
Hi John, humn, that seems like it could be a great solution for people with more space (say a bathtub or a house with some big, long storage boxes). I can't think of any suitable container which is at least 90 cm long and costs under 20 Euros.
I have the kind of kitchen you'd expect in a studio apartment, and a carpentry makerspace which does not have anything for steaming (a small steam box, the kind you use for craft projects not boatbuilding, seems like a great Saturday project for woodworkers but what do I know ... they had never heard of Hautleime/Knochenleime/Warmleime either).
I forgot two important materials: oil or tallow to treat the swordblade before wrapping it in damp wood and leather and leaving it overnight, and bandages or clamps to hold the wood in place while it sets/while you see if the dugout is shaped right. Mac has had more success with 3 in 1 oil than tallow.
DIS MANIBUS GUILLELMI GENTIS MCLEANUM FAMILIARITER GALLERON DICTI
VIR OMNIBUS ARTIBUS PERITUS
Check out Age of Datini: European Material Culture 1360-1410
VIR OMNIBUS ARTIBUS PERITUS
Check out Age of Datini: European Material Culture 1360-1410
-
Johann ColdIron

- Archive Member
- Posts: 7421
- Joined: Mon Mar 03, 2003 2:01 am
- Location: Raleigh, NC
Re: 1360s Scabbard Project
I have used Vaseline successfully on short swords and dagger blades. Though I like the idea of using period available materials. Only concern I would have is that Tallow may go rancid eventually.Sean M wrote:
I forgot two important materials: oil or tallow to treat the swordblade before wrapping it in damp wood and leather and leaving it overnight, and bandages or clamps to hold the wood in place while it sets/while you see if the dugout is shaped right. Mac has had more success with 3 in 1 oil than tallow.
John Cope/ Sir Johann ColdIron, Master- Order of the Laurel
I'm not dead yet!
I'm not dead yet!
-
Jeff J
- Archive Member
- Posts: 9181
- Joined: Tue Aug 22, 2000 1:01 am
- Location: Adrift Just Off the Islets of Langerhans: Latitude N 39° 2' 55.3, Longitude W 104° 48' 50.4
Re: 1360s Scabbard Project
The one scabbard I have made with bent slats, I made a wooden blade blank. If taking the grease route, I'd add something over the greased blade. Like wax paper or a plastic wrap.
Last edited by Jeff J on Wed Apr 11, 2018 8:45 am, edited 1 time in total.
BONANZA!!!
-
John Vernier
- Archive Member
- Posts: 232
- Joined: Mon Mar 14, 2011 5:57 pm
- Location: south central Indiana
Re: 1360s Scabbard Project
I think a length of PVC tube with a cap to close the bottom, filled from a tea kettle or two. I think the people who do shaker boxes don't have the water at a vigorous boil. A gentle poaching seems to do the trick.Sean M wrote:I can't think of any suitable container which is at least 90 cm long and costs under 20 Euros.
-
Harry Marinakis

- Archive Member
- Posts: 796
- Joined: Sat Aug 18, 2012 7:09 pm
- Location: Kingdom of Æthelmearc
Re: 1360s Scabbard Project
Sean,
Your research is outstanding.
The "dugout" method of making a scabbard is not that difficult, and Beech is very nice to carve using sharp chisels and gouges. Here is how I do it:
Lay the sword on the Beech boards and trace the sword onto both boards. Carve out a cavity for the sword on both boards. if you are using a liner, then the cavity has to been deep enough for the sword and liner.
- Attachments
-
- IMGP6244.jpg (78.07 KiB) Viewed 4142 times
-
- IMGP6246.jpg (76.9 KiB) Viewed 4142 times
-
- IMGP5853.jpg (75.35 KiB) Viewed 4142 times
Otto Böse
(Otto the Wicked)
(Otto the Wicked)
-
Harry Marinakis
- Archive Member
- Posts: 796
- Joined: Sat Aug 18, 2012 7:09 pm
- Location: Kingdom of Æthelmearc
Re: 1360s Scabbard Project
If you are using a liner, cut two strips, one for each half of the cavity. I used a thick fullered wool. You can use a hide with short hair, like cow or goat, but that adds a lot of bulk to the thickness of the finished scabbard.
When you have smoothed out the cavity, place the liner into the cavity, tape the boards together, and check the fit of the sword. Make the liner long so that you can hold it when you try to insert the sword. Clamps change the fit, so tape the boards together, don't use clamps for the test fitting.
When you have smoothed out the cavity, place the liner into the cavity, tape the boards together, and check the fit of the sword. Make the liner long so that you can hold it when you try to insert the sword. Clamps change the fit, so tape the boards together, don't use clamps for the test fitting.
- Attachments
-
- IMGP7522 - Copy.jpg (86.91 KiB) Viewed 4141 times
-
- IMGP7530.jpg (68.02 KiB) Viewed 4142 times
Last edited by Harry Marinakis on Mon Apr 09, 2018 12:18 pm, edited 2 times in total.
Otto Böse
(Otto the Wicked)
(Otto the Wicked)
-
Harry Marinakis
- Archive Member
- Posts: 796
- Joined: Sat Aug 18, 2012 7:09 pm
- Location: Kingdom of Æthelmearc
Re: 1360s Scabbard Project
When the fit is correct, remove the lining and glue the boards together with spots of hide glue. I call this a "board pack."
Hide glue is reversible, so you can take apart the board pack later.
Now draw your sanding guides on the board pack. Trace an oval at the the throat and trace the outline of the sword on the outside of the board pack. You want the scabbard walls to be only 1/8-inch thick, but give yourself a 1/4 inch when tracing the sanding guides. Use these lines to start sanding the board pack down to a scabbard. Make sure that you mark the very tip of the board pack, where the tip of the sword rests, and leave this mark intact until the very end. This way you always know where the point of the sword should be located during the sanding process. It is very easy to sand the point of the wood core off center unless you have a reference.
When you sand away the sanding guides that you drew, draw them again. You know where the tip of the sword should be, so draw a center line down the board pack, lay the sword on the center line, and retrace the sword to create another sanding guide. This is very important to keep repeating when the walls start getting thin, because you can easily sand too much and break through into the internal cavity.
You want the walls of the scabbard to be 1/8 inches thick maximum. When you are getting close to finishing, you can tap on the wood with your knuckle to see how thick or thin the wood is getting.
- Attachments
-
- IMGP1354.jpg (78.64 KiB) Viewed 4140 times
-
- IMGP6355.jpg (80.01 KiB) Viewed 4140 times
-
- IMGP1413.jpg (67.63 KiB) Viewed 4140 times
Last edited by Harry Marinakis on Mon Apr 09, 2018 12:21 pm, edited 7 times in total.
Otto Böse
(Otto the Wicked)
(Otto the Wicked)
-
Harry Marinakis
- Archive Member
- Posts: 796
- Joined: Sat Aug 18, 2012 7:09 pm
- Location: Kingdom of Æthelmearc
Re: 1360s Scabbard Project
If you are using a chape, then you must check the fit of the chape with appropriate leather spacers while you are sanding the point of the scabbard
- Attachments
-
- IMGP7574.jpg (76.91 KiB) Viewed 4140 times
Last edited by Harry Marinakis on Mon Apr 09, 2018 12:28 pm, edited 1 time in total.
Otto Böse
(Otto the Wicked)
(Otto the Wicked)
-
Harry Marinakis
- Archive Member
- Posts: 796
- Joined: Sat Aug 18, 2012 7:09 pm
- Location: Kingdom of Æthelmearc
Re: 1360s Scabbard Project
Now use a heat gun to soften the hide glue, and take the scabbard apart. Lay the strips of lining material into the cavity, tape the scabbard plates back together and check the fit of the sword.
If the sword is too tight or too loose, then correct any problems.
When the fit is perfect, glue the lining into place (I use contact cement), glue the scabbard plates together (I use permanent wood glue), and cut off the excess lining that sticks out of the mouth.
It is a good idea to seal the wood core with waterproof spar urethane, inside and out, to prevent the wood from absorbing moisture and swelling. This can adversely affect the fit of the sword. You can seal the inside right before you permanently glue the lining into place.
- Attachments
-
- IMGP7041.jpg (74.28 KiB) Viewed 4140 times
-
- IMGP7604.jpg (75.59 KiB) Viewed 4140 times
Last edited by Harry Marinakis on Mon Apr 09, 2018 12:31 pm, edited 1 time in total.
Otto Böse
(Otto the Wicked)
(Otto the Wicked)
-
Harry Marinakis
- Archive Member
- Posts: 796
- Joined: Sat Aug 18, 2012 7:09 pm
- Location: Kingdom of Æthelmearc
Re: 1360s Scabbard Project
Once you have a wood core that fits the sword properly, the rest is easy. Cut your leather cover to fit the wood core, and cut all of the belts and straps. Put everything together to make sure it all fits properly (called the "dry build").
- Attachments
-
- IMGP1409.jpg (84.38 KiB) Viewed 4140 times
Last edited by Harry Marinakis on Mon Apr 09, 2018 12:27 pm, edited 4 times in total.
Otto Böse
(Otto the Wicked)
(Otto the Wicked)
-
Harry Marinakis
- Archive Member
- Posts: 796
- Joined: Sat Aug 18, 2012 7:09 pm
- Location: Kingdom of Æthelmearc
Re: 1360s Scabbard Project
When you dye the pieces, be sure to put temporary straps into place to prevent shrinking of the strap slits
- Attachments
-
- IMGP1479.jpg (79.36 KiB) Viewed 4140 times
Otto Böse
(Otto the Wicked)
(Otto the Wicked)
Re: 1360s Scabbard Project
Vaseline sounds like a great solution!Johann ColdIron wrote:I have used Vaseline successfully on short swords and dagger blades. Though I like the idea of using period available materials. Only concern I would have is that Tallow may go rancid eventually.Sean M wrote:
I forgot two important materials: oil or tallow to treat the swordblade before wrapping it in damp wood and leather and leaving it overnight, and bandages or clamps to hold the wood in place while it sets/while you see if the dugout is shaped right. Mac has had more success with 3 in 1 oil than tallow.
If they used green wood instead of soaking or steaming or carving, they may not have had such a problem with the blades rusting. Unfortunately, nobody seems to have looked closely at surviving scabbard timbers and decided how they were shaped. On the other hand, since we can't order thin boards of the best wood by the hundred from the best forest, we have to do the best with the wood and tools we have.
I think that some of the scabbard covers from Leiden were dagger-sized. So not all dagger sheaths were leather alone.
Fitting the scabbard around the blade worked for the fourbisseurs of Paris in 1765, so it is good enough for me.
DIS MANIBUS GUILLELMI GENTIS MCLEANUM FAMILIARITER GALLERON DICTI
VIR OMNIBUS ARTIBUS PERITUS
Check out Age of Datini: European Material Culture 1360-1410
VIR OMNIBUS ARTIBUS PERITUS
Check out Age of Datini: European Material Culture 1360-1410
Re: 1360s Scabbard Project
That is clever! I like these practical threads, because different solutions will work for people's tools and workspaces.John Vernier wrote:I think a length of PVC tube with a cap to close the bottom, filled from a tea kettle or two. I think the people who do shaker boxes don't have the water at a vigorous boil. A gentle poaching seems to do the trick.Sean M wrote:I can't think of any suitable container which is at least 90 cm long and costs under 20 Euros.
Someone in Cowichan uses sheets of polyethelene as a steam box https://coppercanyoncanoe.com/steam-ben ... stic-bags/
DIS MANIBUS GUILLELMI GENTIS MCLEANUM FAMILIARITER GALLERON DICTI
VIR OMNIBUS ARTIBUS PERITUS
Check out Age of Datini: European Material Culture 1360-1410
VIR OMNIBUS ARTIBUS PERITUS
Check out Age of Datini: European Material Culture 1360-1410
Re: 1360s Scabbard Project
Hi Harry,Harry Marinakis wrote:Sean,
Your research is outstanding.
I hope I get a chance to translate the French sources sometime! The most important bit is that they keep saying calfskin over beechwood, then in 1565 they start to talk about a layer of linen in between.
Lining scabbards with fur or wool seems practical, I don't know why it seemed to go in and out of fashion.
I may write more later after I have visited the woodworking shop. If they can't cut the boards thinner, I may just try the dugout method. At the hilt I will hardly have to take any wood away from the outside at all.
Sean
DIS MANIBUS GUILLELMI GENTIS MCLEANUM FAMILIARITER GALLERON DICTI
VIR OMNIBUS ARTIBUS PERITUS
Check out Age of Datini: European Material Culture 1360-1410
VIR OMNIBUS ARTIBUS PERITUS
Check out Age of Datini: European Material Culture 1360-1410
Re: 1360s Scabbard Project
It might be worth dropping in a link to the thread on Carol van Driel-Murray's new article which turned into musings about suspensions viewtopic.php?f=4&t=187300
For some reason, there is lots of "late 14th century style" armour and clothing around, but very few scabbards with the most common kind of suspension between 1360 and 1410. Maybe it is because the different kinds of armoured combat folks don't usually wear swords, I don't know.
For some reason, there is lots of "late 14th century style" armour and clothing around, but very few scabbards with the most common kind of suspension between 1360 and 1410. Maybe it is because the different kinds of armoured combat folks don't usually wear swords, I don't know.
DIS MANIBUS GUILLELMI GENTIS MCLEANUM FAMILIARITER GALLERON DICTI
VIR OMNIBUS ARTIBUS PERITUS
Check out Age of Datini: European Material Culture 1360-1410
VIR OMNIBUS ARTIBUS PERITUS
Check out Age of Datini: European Material Culture 1360-1410
Re: 1360s Scabbard Project
For whatever it's worth, i have done a few scabbards, i generally rip the board lengthwise, i do the chiselwork on what had been the exterior of the wood. When i glue it up the wood will have a tendancy to work against warping
Sweat in the tiltyard, or bleed on the field.
-
Harry Marinakis
- Archive Member
- Posts: 796
- Joined: Sat Aug 18, 2012 7:09 pm
- Location: Kingdom of Æthelmearc
Re: 1360s Scabbard Project
Be warned, if you sew the leather cover too tight then it will change the fit of the sword (usually loosens the fit). I think what happens is that the wood core is oval, and if the leather cover is tight then it pulls the oval a little towards a circle shape. This is enough to lift the top and bottom of the oval off the sword, and thus the sword becomes loose in the scabbard.
This means if you pull the leather really tight, the fit of the sword will loosen. If you sew wet leather tight, then when the leather dries and shrinks the fit of the sword will loosen.
This means if you pull the leather really tight, the fit of the sword will loosen. If you sew wet leather tight, then when the leather dries and shrinks the fit of the sword will loosen.
Otto Böse
(Otto the Wicked)
(Otto the Wicked)
Re: 1360s Scabbard Project
It might be that both glue and wet leather are overkill and either provides enough firmness by itself. I could check the reports, but I don't know of source for moistening the leather before stretching it over the slats and sewing it. It would be great for someone who has handled several early scabbards to write up what they know.
I will visit the carpenter's shop this week ... it is just hard to make time to set up a visit.
I will visit the carpenter's shop this week ... it is just hard to make time to set up a visit.
DIS MANIBUS GUILLELMI GENTIS MCLEANUM FAMILIARITER GALLERON DICTI
VIR OMNIBUS ARTIBUS PERITUS
Check out Age of Datini: European Material Culture 1360-1410
VIR OMNIBUS ARTIBUS PERITUS
Check out Age of Datini: European Material Culture 1360-1410
-
Kel Rekuta
- Archive Member
- Posts: 1588
- Joined: Thu Apr 29, 2004 11:01 am
- Location: Toronto Canada
Re: 1360s Scabbard Project
Sean M wrote:It might be that both glue and wet leather are overkill and either provides enough firmness by itself. I could check the reports, but I don't know of source for moistening the leather before stretching it over the slats and sewing it. It would be great for someone who has handled several early scabbards to write up what they know.
I will visit the carpenter's shop this week ... it is just hard to make time to set up a visit.
Wet leather and hide glue make a tight covering on a solid core item like a sword grip. As Harry mentioned earlier, this is a bad thing for a scabbard as the tension distorts the item.
Thanks for mentioning the references to beech for scabbard cores. I've always used poplar successfully so never thought much about it. Since beech is my preferred furniture wood, I'll have to run some veneer and try it out!
FWIW, my process is to create thick veneer, seal the inside faces with linseed oil finish then trim it to the blade shape. Fine canvas or linen strips bind the faces together. Diluted carpenter's glue is my preference for adhesive unless a period product is required. (pretty rarely in my experience)
Once the adhesive hits the outside faces of the wood, they swell a bit into mild curve and conform to the blade. As the scabbard body dries it becomes springy enough to grip the blade lightly. I have completely given up on the "dugout" concept.
Suspensions, though... what a difficult topic. I'm glad you are looking into this, you are a much better sleuth than I.
-
Harry Marinakis
- Archive Member
- Posts: 796
- Joined: Sat Aug 18, 2012 7:09 pm
- Location: Kingdom of Æthelmearc
Re: 1360s Scabbard Project
Check out Peter Johnsson's threads on Bladesmith Forum, he has a tutorial on making period laminated scabbards
You'll have to search all of posts, because the scabbard tutorial is a part of an unrelated sword thread
In the meanwhile, I'll see if I can find it for you
You'll have to search all of posts, because the scabbard tutorial is a part of an unrelated sword thread
In the meanwhile, I'll see if I can find it for you
Otto Böse
(Otto the Wicked)
(Otto the Wicked)
-
Harry Marinakis
- Archive Member
- Posts: 796
- Joined: Sat Aug 18, 2012 7:09 pm
- Location: Kingdom of Æthelmearc
-
Keegan Ingrassia

- Archive Member
- Posts: 6422
- Joined: Thu Jul 16, 2009 4:07 pm
- Location: College Station, Texas (Shadowlands)
Re: 1360s Scabbard Project
Nice find, Harry! Thanks for sharing.
"There is a tremendous amount of information in a picture, but getting at it is not a purely passive process. You have to work at it, but the more you work at it the easier it becomes." - Mac
-
Jehan de Pelham

- Archive Member
- Posts: 11405
- Joined: Thu Jul 24, 2003 1:01 am
- Location: Outremer
- Contact:
Re: 1360s Scabbard Project
Raimond made one of these for my A&A Henry V and man it completed that sword like nothing doing. Good work!
He who does not give what he has will not get what he wants.
Re: 1360s Scabbard Project
On the weekend I found a shop which used power tools to make the beechwood boards thin, and roughed out a quick-and-dirty leather scabbard for a wooden rondel dagger. This let me practice saddle stitch and wet forming (I dipped my hand in water, stroked it across the inside of the leather, and repeated until the water was soaking in to the flesh side, then left the scabbard on the leather overnight).

Bob Charrette showed me a rondel dagger scabbard at the end of Knives and Scabbards which cups the lower rondel. He says that since he made one of those, his dagger has never fallen out of the scabbard during wrestling and shoving.
These daggers have a ball tip. I wrapped the tip of the dagger from just above the ball to the middle of the blade in linen to make sure that the leather did not squeeze the top too tightly, then wrapped the wood in aluminum foil to keep water and wood apart. The foil tends to get caught in the stitch.
I notice that when I pierce the holes with the awl, the leather on the back tends to lift away from the wood, so the seam is tighter in the front than the back. Do experienced leatherworkers have a solution?
I should also have been more generous with the thread length .... I forgot that with saddle stitch (two needles passing in opposite direction through each hole) only leaves half the length on each side, so a thread longer than 24" is not awkward.
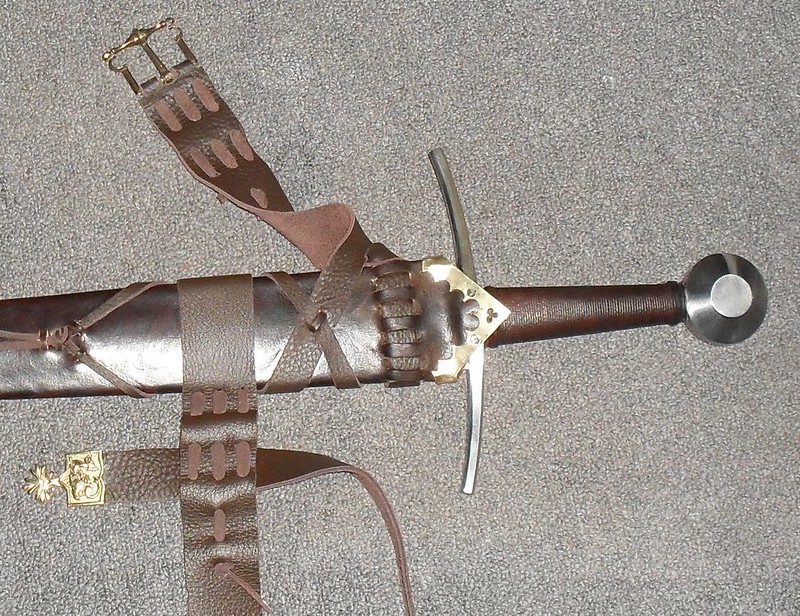
The cut was inspired by my memory of the scabbards, and especially the rondel dagger scabbard, in the MoL book. The chape is fraction-of-a-mm sheet brass, with the edge cut in a motif from illumination borders using those blunt-tipped scissors from the school supply aisle, and some trefoils pierced in it with a hammer and nail. I glued it in place with hide glue.
This is quick and dirty, using the tools and materials and books to hand, not a reproduction!
Bob Charrette showed me a rondel dagger scabbard at the end of Knives and Scabbards which cups the lower rondel. He says that since he made one of those, his dagger has never fallen out of the scabbard during wrestling and shoving.
These daggers have a ball tip. I wrapped the tip of the dagger from just above the ball to the middle of the blade in linen to make sure that the leather did not squeeze the top too tightly, then wrapped the wood in aluminum foil to keep water and wood apart. The foil tends to get caught in the stitch.
I notice that when I pierce the holes with the awl, the leather on the back tends to lift away from the wood, so the seam is tighter in the front than the back. Do experienced leatherworkers have a solution?
I should also have been more generous with the thread length .... I forgot that with saddle stitch (two needles passing in opposite direction through each hole) only leaves half the length on each side, so a thread longer than 24" is not awkward.
The cut was inspired by my memory of the scabbards, and especially the rondel dagger scabbard, in the MoL book. The chape is fraction-of-a-mm sheet brass, with the edge cut in a motif from illumination borders using those blunt-tipped scissors from the school supply aisle, and some trefoils pierced in it with a hammer and nail. I glued it in place with hide glue.
This is quick and dirty, using the tools and materials and books to hand, not a reproduction!
DIS MANIBUS GUILLELMI GENTIS MCLEANUM FAMILIARITER GALLERON DICTI
VIR OMNIBUS ARTIBUS PERITUS
Check out Age of Datini: European Material Culture 1360-1410
VIR OMNIBUS ARTIBUS PERITUS
Check out Age of Datini: European Material Culture 1360-1410
-
Cian of Storvik

- Archive Member
- Posts: 4234
- Joined: Fri Jul 29, 2005 1:34 pm
- Location: Storvik, Kingdom of Atlantia
- Contact:
Re: 1360s Scabbard Project
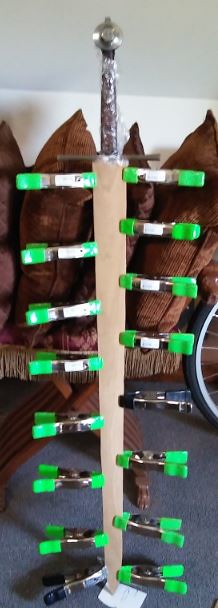
I make all of my own scabbards and use the "bent slat" method. Some wood suppliers will ship dimensional lumber in thicknesses you request. I get all of mine from DandD hardwoods. For me, I find 1/8" wood is too thick and 1/16" is too thin, and so I purchase 3/32" slats of yellow tulip poplar (readily available here in the US. It is tighter grain and carves and sands well and maintains it's shape better than aspen or pine).
As you can see, I have some scabbards that need coverings and lots of hardware and belts to complete.
I made a steamer box out of thick-walled PVC and a garment steamer and had issues that I was weary of after reading wood-working sites. Problem #1) Steaming actually dries out the wood. Even though the hot water vapor relaxes the cells to enable bending, it greatly reduces the working time you have to get it clamped in place. This allows the wood to set much faster, allowing you to remove the clamps and sword quicker than if you saturate the wood with water. #2) You can burn yourself on the super-hot steam. Remember you have a VERY limited time to work with steamed wood. You can't let it cool off to start working with it, like you can wet wood. BTDT #3) In cabinet making, wood workers tend to over-exaggerate the bends because when the wood relaxes, it tends to return (about 15-20%) back to the original shape. When clamping to the blade (100% of the bend you are hoping for) it tends to relax and then make the resultant wooden core VERY tight in my experience. It was an expensive experiment, but I got a clothing steamer I now use a lot more than breaking out the iron to remove wrinkles in my clothes.
I tried steaming two sets of slats for different swords and was unhappy with both and went back to the hot water method. I also live in an apartment and don't have a lot of space. So I use a tub. Fill the tub with about 1-2" of hot water as hot as I can get it, (let the water run until it's VERY hot, THEN plug the drain). Then I put the slats in with a weight (gallon jug or bucket of water) on top to prevent the wood floating to the top. After about 30 mins to an hour, I pull them out and clamp them on the blade.
(Note that prior to the water-logging the wood, I have roughed out the slats to the shape of the blade). I spray the blades with anti-corrosion grease, and then wrap the whole sword liberally in saran wrap. Saran wrap will prevent a lot of the water from getting to the blade or stain the grips or hardware.
Set the whole sword/slats/clamps assembly near an air-vent. It doesn't need to be hot to dry the blanks. You need air to move around it. I leave the whole thing clamped for about 2 or 3 days.
You can PM me if you have any questions.
-Cian
The democracy will cease to exist when you take away from those who are willing to work and give to those who would not. - Anonymous
When wrongs are pressed because it is believed they will be borne, resistance becomes morality. -Thomas Jefferson
When wrongs are pressed because it is believed they will be borne, resistance becomes morality. -Thomas Jefferson
Re: 1360s Scabbard Project
My scabbard slats are sitting on the blade wrapped in bandages. I steamed them using a tea kettle, a length of PVP pipe with a cap on one end and a slit cap on the other, and various rags and gloves. It seemed like it did not reach evenly ... parts of the wood were wet from condensation but others still felt stiff not floppy. The hole in the bottom was just big enough to insert and remove the slats while still leaving a 'lip' all around to keep them from falling out.
The gloves which I used were thick but too breathable for steam. I think that heavy leather gloves might do better.
I think I may try the soak-in-hot-water approach, first I have to do some chores.
The gloves which I used were thick but too breathable for steam. I think that heavy leather gloves might do better.
I think I may try the soak-in-hot-water approach, first I have to do some chores.
DIS MANIBUS GUILLELMI GENTIS MCLEANUM FAMILIARITER GALLERON DICTI
VIR OMNIBUS ARTIBUS PERITUS
Check out Age of Datini: European Material Culture 1360-1410
VIR OMNIBUS ARTIBUS PERITUS
Check out Age of Datini: European Material Culture 1360-1410
Re: 1360s Scabbard Project
I coated the blade in vaseline and then in Backpapier/waxed paper, filled a 7 cm radius PVC tube with a mix of two parts boiling water and one part hot water, dropped the slats into it and let them soak for about 50 minutes with a glass jar on top to weight them. I then removed them, placed them on the blade and wrapped them densely with hemp cord.
I don't feel like the they are 'bowing' enough. One problem is that this is a blunt sword with a rectangular cross-section ... a lenticular or diamond section would be better at guiding the slats into shape. To counter that, I might allow more than 5-6 mm at the sides of the blade, making a 'wide scabbard' instead of a 'blocky scabbard.' If you have clamps like Cian used, they could be another good choice.
Pro tip: Tape the cap on the lower end down with some duct tape in case the seal weakens under heat or the weight of the water when you try to dump it.
gaukler used steamed oak, and I think that oak steams very well (don't shipwrights do that?) I don't know what soaking or steaming beech is like.
DIS MANIBUS GUILLELMI GENTIS MCLEANUM FAMILIARITER GALLERON DICTI
VIR OMNIBUS ARTIBUS PERITUS
Check out Age of Datini: European Material Culture 1360-1410
VIR OMNIBUS ARTIBUS PERITUS
Check out Age of Datini: European Material Culture 1360-1410
Re: 1360s Scabbard Project
I am still waiting for a new awl to arrive, but today I unbound the slats and painted ordinary linseed oil on the inner surfaces. I will also take some files and knives and sandpaper and round the corners where they will be touching the leather.
I suspect that for a real woodworker with a drawknife and some kind of clamp, rounding the corners would be about 10 minutes' work.
Edit: I should also turn the end from 'square-ish' to 'pointed-ish'
I suspect that for a real woodworker with a drawknife and some kind of clamp, rounding the corners would be about 10 minutes' work.
Edit: I should also turn the end from 'square-ish' to 'pointed-ish'
DIS MANIBUS GUILLELMI GENTIS MCLEANUM FAMILIARITER GALLERON DICTI
VIR OMNIBUS ARTIBUS PERITUS
Check out Age of Datini: European Material Culture 1360-1410
VIR OMNIBUS ARTIBUS PERITUS
Check out Age of Datini: European Material Culture 1360-1410
Re: 1360s Scabbard Project

This picture shows the gap between the slats after bending. I will see what effect that has on the final scabbard, worst comes to worst I have another pair of slats which are less narrow.

Here are the slats after rounding the tip and sanding the edges which will touch the leather. This wood is very pleasant to work! It drinks up the oil and carves easily.
DIS MANIBUS GUILLELMI GENTIS MCLEANUM FAMILIARITER GALLERON DICTI
VIR OMNIBUS ARTIBUS PERITUS
Check out Age of Datini: European Material Culture 1360-1410
VIR OMNIBUS ARTIBUS PERITUS
Check out Age of Datini: European Material Culture 1360-1410
Re: 1360s Scabbard Project
I had not realized that the sword you were making the scabbard for was a blunt. The advise I had been offering presumed something with edges. 
I think that there are two possible paths to take with a blunt....
--The first would be to add fillers between the two slats. These would have to be about the width of the "edge", and may well taper in width toward the point. You may still be able to go this route with what you have.
--The other would be to have the slats wide enough that they could be brought together smoothly past the blunt edges of the sword. This would produce the effect of a much wider blade, but it might not look bad.
Mac
Robert MacPherson
The craftsmen of old had their secrets, and those secrets died with them. We are not the better for that, and neither are they.
http://www.lightlink.com/armory/
http://www.billyandcharlie.com
https://www.facebook.com/BillyAndCharlie
The craftsmen of old had their secrets, and those secrets died with them. We are not the better for that, and neither are they.
http://www.lightlink.com/armory/
http://www.billyandcharlie.com
https://www.facebook.com/BillyAndCharlie
Re: 1360s Scabbard Project
Hi Mac,Mac wrote:I had not realized that the sword you were making the scabbard for was a blunt. The advise I had been offering presumed something with edges.
I think that there are two possible paths to take with a blunt....
--The first would be to add fillers between the two slats. These would have to be about the width of the "edge", and may well taper in width toward the point. You may still be able to go this route with what you have.
--The other would be to have the slats wide enough that they could be brought together smoothly past the blunt edges of the sword. This would produce the effect of a much wider blade, but it might not look bad.
Mac
yes, that is a bit of clash of cultures. To my crowd in Canada and the USA, blunts are tools with a specific purpose, and often fitted with a rolled tip, nail head, or bird blunt for safety. In Europe people seem to see them as 'ersatz sharps' and fit them with scabbards and belts. So I am playing 'when in Rome.'
The problem is that I did not save the offcuts from the shop which cut one set of lathes to shape and thinned them down. So I don't have material for 'fillers' and I have already invested too much time and brain-space in this project. These boards are only 40 mm wide and the blade is 28 mm wide at the cross.
I could try cutting some long, narrow strips from the 5 mm thick beech, then sanding them down to be thick at the cross and thin at the point, but that would be fiddly work that requires concentration.
I could also make up a first scabbard using the slats, the linen bandages, and the leather I have and treat it as a learning experience. I think I have said, but I have 0 more brain-space to commit between two months ago and the middle of August when I hand in my thesis.
DIS MANIBUS GUILLELMI GENTIS MCLEANUM FAMILIARITER GALLERON DICTI
VIR OMNIBUS ARTIBUS PERITUS
Check out Age of Datini: European Material Culture 1360-1410
VIR OMNIBUS ARTIBUS PERITUS
Check out Age of Datini: European Material Culture 1360-1410
-
Juhani Nissilä
- New Member
- Posts: 21
- Joined: Fri Jun 15, 2018 6:37 am
- Location: Oulu, Finland
Re: 1360s Scabbard Project
A quick question for all the scabbard builders here:
what is your preferred method for attaching a metal chape to your scabbards?
I rarely see anything that even hints to some rigid connection (rivet, stitching, etc..) in reconstructions, so I presume that most people just clue them on?
what is your preferred method for attaching a metal chape to your scabbards?
I rarely see anything that even hints to some rigid connection (rivet, stitching, etc..) in reconstructions, so I presume that most people just clue them on?
Re: 1360s Scabbard Project
I had a scabbard for an old sabre from India, wood covered with very thin leather or maybe rayskin, and the chape and locket were attached with tiny little tacks, like pins without heads. With the minute size, the lack of heads and the placement you could scarcely see that they were there at all. There was no glue; after removing the tacks the chape and locket came off easily.
Of course that says nothing about how it was done in the 14th century.
Of course that says nothing about how it was done in the 14th century.