I noticed that too, they appear too uniform in size and shape to be rags, etc. The polisher in the back has two more of them next to his bowl that also looks like they might be sitting on some cloth. Do you think they might be whetstones for polishing areas the wheel can't get to?Mac wrote: In the blow up, we can see some mysterious objects sitting there between the wheels. I'm sure they're not potato chips.... The ones in the second station seem to have a lot or depth.... Bits of cotton, tow, or rags to wipe the work? Whatever they are, a guy needs more than one of them, so that rules out flint nodules to "deaden" the cut. (that's a thing that you do on glue-n-grit wheels)
Mac
Traditional Armor Finishing Processes
Moderator: Glen K
-
Jason Grimes

- Archive Member
- Posts: 2387
- Joined: Wed Jul 25, 2001 1:01 am
- Location: Fairbanks, AK, USA
- Contact:
Re: Traditional Armor Finishing Processes
Jason
Re: Traditional Armor Finishing Processes
They might be stones, like the sort of thing that Sean M was talking about.Jason Grimes wrote:
I noticed that too, they appear too uniform in size and shape to be rags, etc. The polisher in the back has two more of them next to his bowl that also looks like they might be sitting on some cloth. Do you think they might be whetstones for polishing areas the wheel can't get to?
It seems a bit strange, though, to have them at the wheel like that. I'm not sure it makes the best sense from an efficiency standpoint to have the guy at the wheel stop and scrub at a spot by hand.... but who knows.
Mac
Robert MacPherson
The craftsmen of old had their secrets, and those secrets died with them. We are not the better for that, and neither are they.
http://www.lightlink.com/armory/
http://www.billyandcharlie.com
https://www.facebook.com/BillyAndCharlie
The craftsmen of old had their secrets, and those secrets died with them. We are not the better for that, and neither are they.
http://www.lightlink.com/armory/
http://www.billyandcharlie.com
https://www.facebook.com/BillyAndCharlie
-
Kristoffer

- Archive Member
- Posts: 1697
- Joined: Sat Sep 09, 2000 1:01 am
- Location: Ostersund - Sweden
- Contact:
Re: Traditional Armor Finishing Processes
A few things I noticed:
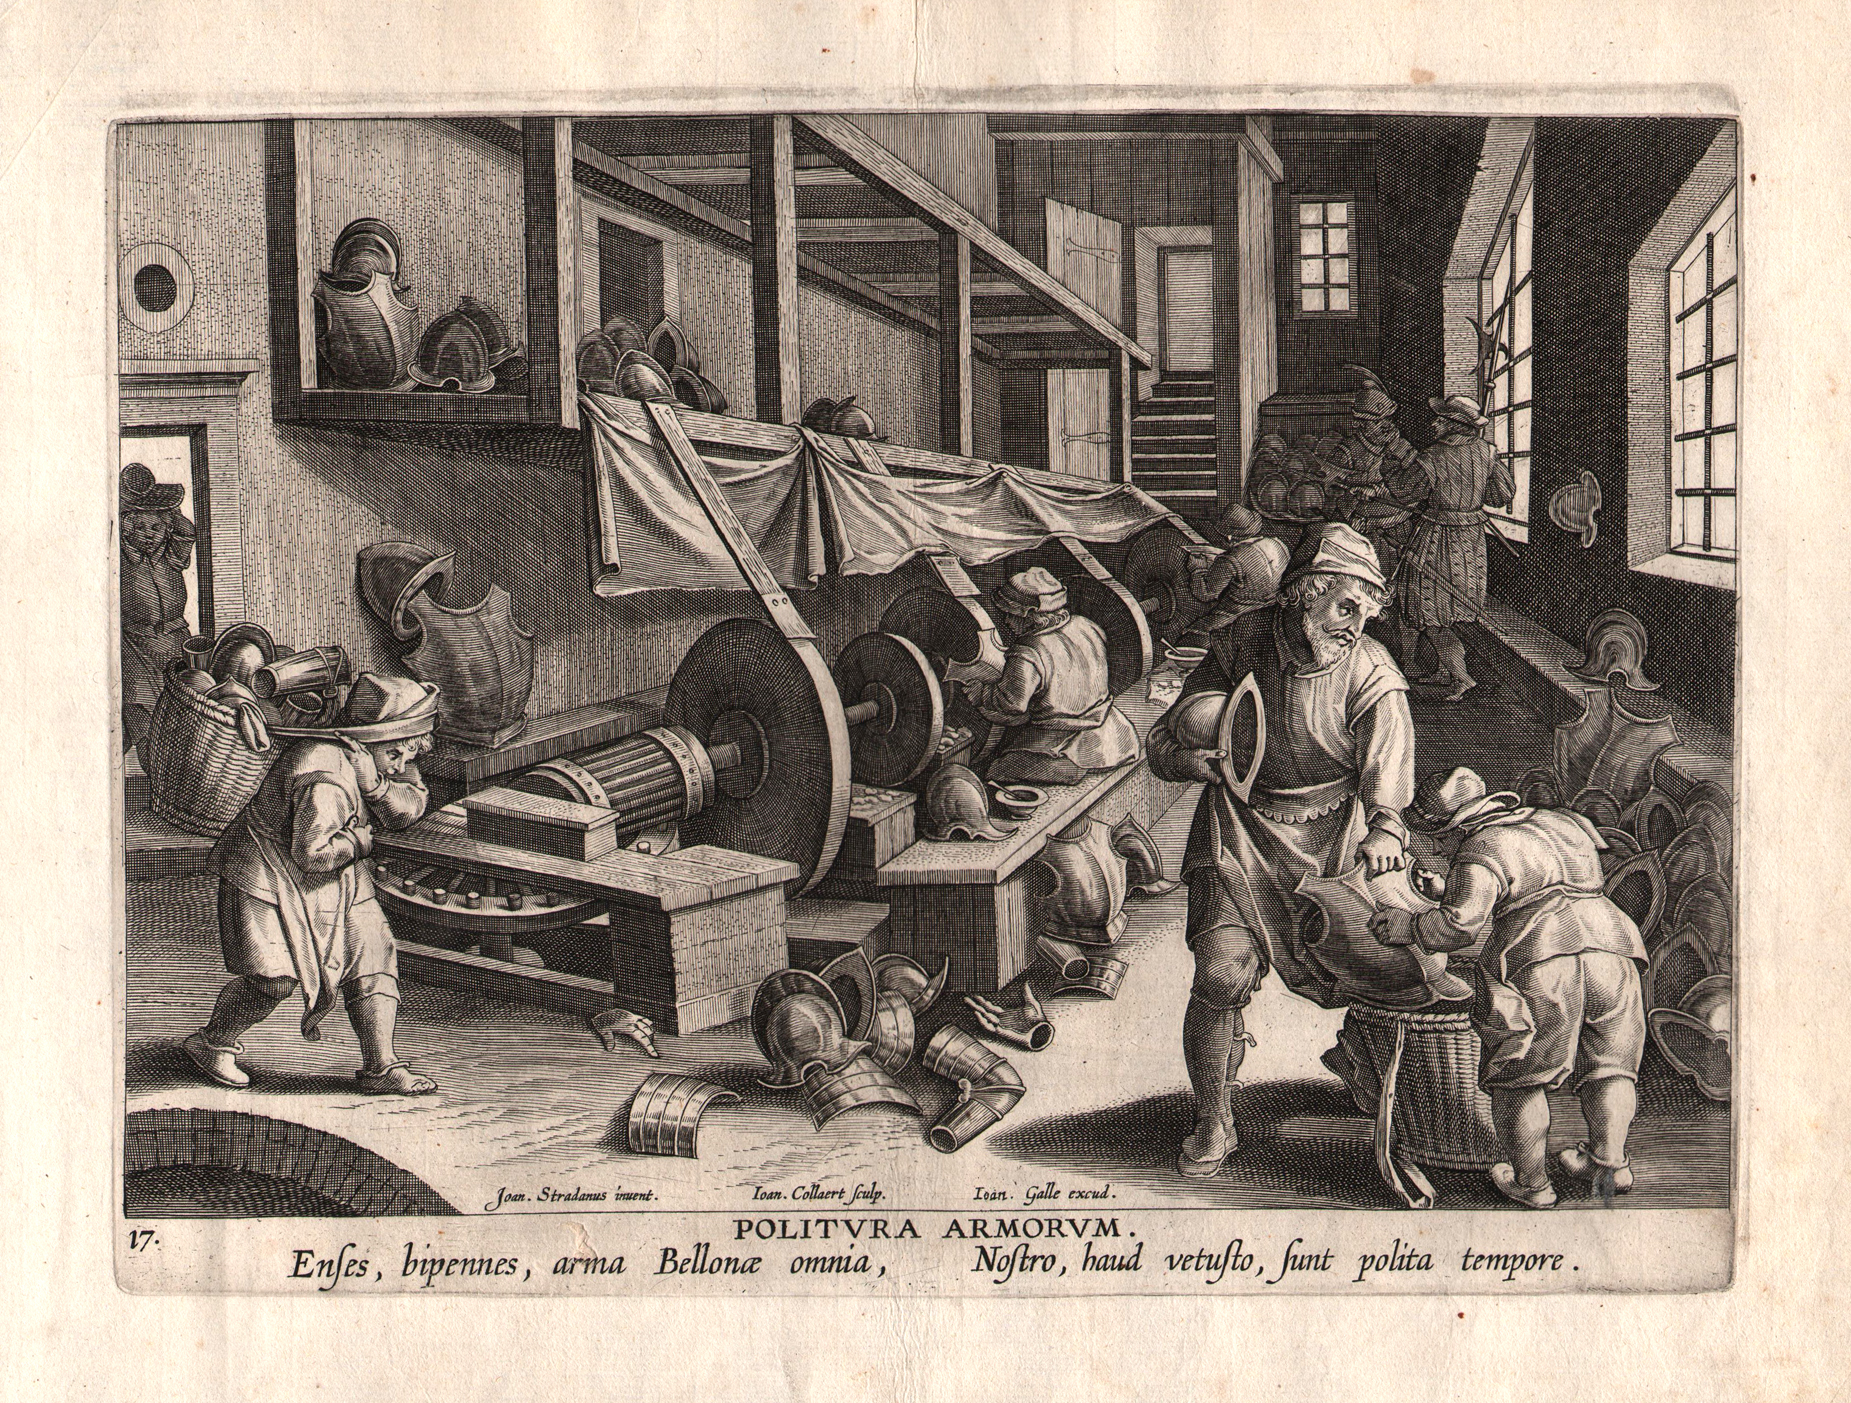
They guy on the far end is sharpening the axe head of some sort. The two gentlemen behind him is discussing their weapons and waiting for the man doing the work to finish.
The wheel closest to us has had what I am guessing is a spatter protective sail hung under the spatter board instead of having it rest on top of it like the other wheels.
The far workers bowl of oatmeal has a big blubber thing next to it with odd shape. It almost looks like its a piece of hide with a thick fat layer, like from a whale or seal, but this is only my imagination playing..
Last edited by Kristoffer on Mon Jan 02, 2017 11:48 am, edited 1 time in total.
Kristoffer Metsälä
Re: Traditional Armor Finishing Processes
I've made a screen shot and cropped out a couple of details.
Here's the guy in the back who's working on an axe of some sort. He has his mysterious objects (not potato chips) spread out on some irregular mat of stuff. As Kristoffer says, it does seem to have more thickness than one would expect of fabric.

The work stations in the foreground keep their mystery objects on the flat surfaces of what are probably the bases of the shaft bearing blocks. Although we can't see the intermediate bearings because of the wheels, such a long shaft almost certainly has them. Kristoffer pointed out that the fabric spatter guard in the first station is under the wooden guard, rather than over it like the others. I don't know if this is a functional difference, or if the artist just thought it adds character to the composition.... which it certainly does.
It may be significant that the wheel of the second work station does not have the wood and leather spatter guard that the larger wheels have. This wheel may be of a different sort than the others in some way other than size.

It is interesting to note that the spatter guards are very like the ones that are still used by "copper wheel" glass engravers. These guys make them out of this brass with a soft leather pad that just barely touches the wheel. It has the dual purpose of keeping the oil and grit from spraying into the craftsman's face and serving as a reservoir to keep the right amount of abrasive on the wheel.

Mac
Here's the guy in the back who's working on an axe of some sort. He has his mysterious objects (not potato chips) spread out on some irregular mat of stuff. As Kristoffer says, it does seem to have more thickness than one would expect of fabric.
The work stations in the foreground keep their mystery objects on the flat surfaces of what are probably the bases of the shaft bearing blocks. Although we can't see the intermediate bearings because of the wheels, such a long shaft almost certainly has them. Kristoffer pointed out that the fabric spatter guard in the first station is under the wooden guard, rather than over it like the others. I don't know if this is a functional difference, or if the artist just thought it adds character to the composition.... which it certainly does.
It may be significant that the wheel of the second work station does not have the wood and leather spatter guard that the larger wheels have. This wheel may be of a different sort than the others in some way other than size.
It is interesting to note that the spatter guards are very like the ones that are still used by "copper wheel" glass engravers. These guys make them out of this brass with a soft leather pad that just barely touches the wheel. It has the dual purpose of keeping the oil and grit from spraying into the craftsman's face and serving as a reservoir to keep the right amount of abrasive on the wheel.
Mac
Robert MacPherson
The craftsmen of old had their secrets, and those secrets died with them. We are not the better for that, and neither are they.
http://www.lightlink.com/armory/
http://www.billyandcharlie.com
https://www.facebook.com/BillyAndCharlie
The craftsmen of old had their secrets, and those secrets died with them. We are not the better for that, and neither are they.
http://www.lightlink.com/armory/
http://www.billyandcharlie.com
https://www.facebook.com/BillyAndCharlie
-
Kristoffer
- Archive Member
- Posts: 1697
- Joined: Sat Sep 09, 2000 1:01 am
- Location: Ostersund - Sweden
- Contact:
Re: Traditional Armor Finishing Processes
Another thing I noticed on your cropped pictures Mac, is that the first wheels spatter guard plate has a different appearance then the others.
It also looks like there is a small mallet on top of the thick thing next to the bowl. If you lookat it, it appears to be a handle on the thing and a head just right of it.
It also looks like there is a small mallet on top of the thick thing next to the bowl. If you lookat it, it appears to be a handle on the thing and a head just right of it.
- IMG_20170102_181630.jpg (57.41 KiB) Viewed 6414 times
Kristoffer Metsälä
Re: Traditional Armor Finishing Processes
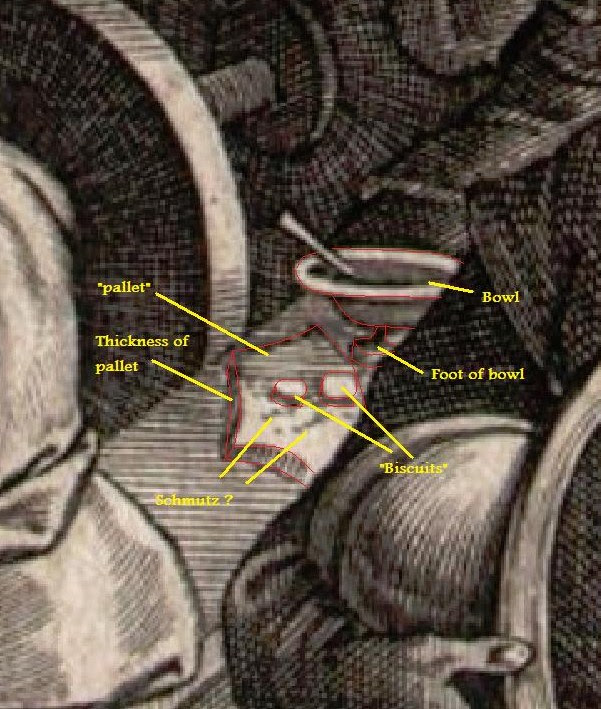
I see an irregularly shaped object that appears to have some thickness. I am going to presume that it is a sort of pallet, and will refer to it thus (at least for now)
Beyond the pallet I see the foot of the bowl
On the far end of the pallet I see the shadow of the bowl
On the pallet, I see two squarish "biscuits". Their front and left edges are shaded to show thickness.
On the unshadowed surface of the pallet I see a couple of dark areas which appear to have no thickness. I presume these to be schmutz.
I can sketch them out in Paint if you would like. I started doing that, but it seemed like it was going to be less trouble to try to explain in writhing.
Mac
Robert MacPherson
The craftsmen of old had their secrets, and those secrets died with them. We are not the better for that, and neither are they.
http://www.lightlink.com/armory/
http://www.billyandcharlie.com
https://www.facebook.com/BillyAndCharlie
The craftsmen of old had their secrets, and those secrets died with them. We are not the better for that, and neither are they.
http://www.lightlink.com/armory/
http://www.billyandcharlie.com
https://www.facebook.com/BillyAndCharlie
-
Kristoffer
- Archive Member
- Posts: 1697
- Joined: Sat Sep 09, 2000 1:01 am
- Location: Ostersund - Sweden
- Contact:
Re: Traditional Armor Finishing Processes
What you see as the foot of the bowl does not match the center of the bowl. After some more zooming and looking I would guess that we see more of the stones next to the bowl. (Not that it really matters. The thicker white vertical line across the board looked like something but the detail is not really good enough to make anything out).
- zoom.png (31.04 KiB) Viewed 6902 times
Kristoffer Metsälä
Re: Traditional Armor Finishing Processes
I think it shows better here. I didn't blow it up quite so much.
The foot of the bowl is not really centered on the body, but it's a small detail in a work of art. I'm pretty sure that the artist intended us to see it as the foot, even if he didn't get the perspective right.
Mac
The foot of the bowl is not really centered on the body, but it's a small detail in a work of art. I'm pretty sure that the artist intended us to see it as the foot, even if he didn't get the perspective right.
Mac
Robert MacPherson
The craftsmen of old had their secrets, and those secrets died with them. We are not the better for that, and neither are they.
http://www.lightlink.com/armory/
http://www.billyandcharlie.com
https://www.facebook.com/BillyAndCharlie
The craftsmen of old had their secrets, and those secrets died with them. We are not the better for that, and neither are they.
http://www.lightlink.com/armory/
http://www.billyandcharlie.com
https://www.facebook.com/BillyAndCharlie
-
Kristoffer
- Archive Member
- Posts: 1697
- Joined: Sat Sep 09, 2000 1:01 am
- Location: Ostersund - Sweden
- Contact:
Re: Traditional Armor Finishing Processes
The other bowl do have a foot so I might have to give. The offset just annoys my brain.
Talking about detail, is this inked art or an etching? How big is the original image, do we know?
Talking about detail, is this inked art or an etching? How big is the original image, do we know?
Kristoffer Metsälä
Re: Traditional Armor Finishing Processes
When I look back at the full size image, the foot looks better than my Paint outline. I'm just OK with it as a foot, really.
I'm pretty sure that the original art is an engraving on metal (probably copper), and that there are several extant prints from it.
Mac
I'm pretty sure that the original art is an engraving on metal (probably copper), and that there are several extant prints from it.
Mac
Robert MacPherson
The craftsmen of old had their secrets, and those secrets died with them. We are not the better for that, and neither are they.
http://www.lightlink.com/armory/
http://www.billyandcharlie.com
https://www.facebook.com/BillyAndCharlie
The craftsmen of old had their secrets, and those secrets died with them. We are not the better for that, and neither are they.
http://www.lightlink.com/armory/
http://www.billyandcharlie.com
https://www.facebook.com/BillyAndCharlie
Re: Traditional Armor Finishing Processes
I searched politura armorum and came up with at least four extant examples of the print in collections. The descriptions all agree that it's an engraving, and one of the German language pages specifies the technique as Kupferstich, so copper is probably right for the plate material. They also give a dimension for the plate (as well as the print), and the plate was 201 x 277 mm. So, the size we see it here http://www.renzocampanini.it/file/opere ... rmorum.jpg (without blowing it up) is only slightly reduced.
Mac
Mac
Robert MacPherson
The craftsmen of old had their secrets, and those secrets died with them. We are not the better for that, and neither are they.
http://www.lightlink.com/armory/
http://www.billyandcharlie.com
https://www.facebook.com/BillyAndCharlie
The craftsmen of old had their secrets, and those secrets died with them. We are not the better for that, and neither are they.
http://www.lightlink.com/armory/
http://www.billyandcharlie.com
https://www.facebook.com/BillyAndCharlie
-
Kristoffer
- Archive Member
- Posts: 1697
- Joined: Sat Sep 09, 2000 1:01 am
- Location: Ostersund - Sweden
- Contact:
Re: Traditional Armor Finishing Processes
Just speculating here.
I would want to believe that there is another smaller wheel between the two furthest away. There are two people grinding, if they have one large, one smaller and one large wheel each and a bunch of potato chips between the wheels, they would perhaps start on one of the big wheels, touchup with stones (or snack on chips), do another coarse on the smaller wheel, more snacks/stones, then finish on the last big wheel. This would make sense of the whole wheel setup.
If the grinding would be done wet, no rags would be needed to clean the piece between passes. However, there is no indication of wet grinding so my guess is that its done dry and you just blow the pieces to remove dust every now and then. That would make it a very dirty job and not one you would survive until an old age I guess.
What is strange is the apparent lack of need for a spatter guard for the small wheel...
Kristoffer Metsälä
Re: Traditional Armor Finishing Processes
I think we can call this a "wet" grinding operation even though the wheel are not in troughs. The bowls probably contain oil, or an oil and grit slurry. I'm sure this is messy, or they wouldn't have the splash guards.
You bring up a good point about "grit hygiene". Whatever processes they used, they had to be sure that all of the coarse grit was removed before going on to a finer one.
Mac
You bring up a good point about "grit hygiene". Whatever processes they used, they had to be sure that all of the coarse grit was removed before going on to a finer one.
Mac
Robert MacPherson
The craftsmen of old had their secrets, and those secrets died with them. We are not the better for that, and neither are they.
http://www.lightlink.com/armory/
http://www.billyandcharlie.com
https://www.facebook.com/BillyAndCharlie
The craftsmen of old had their secrets, and those secrets died with them. We are not the better for that, and neither are they.
http://www.lightlink.com/armory/
http://www.billyandcharlie.com
https://www.facebook.com/BillyAndCharlie
Re: Traditional Armor Finishing Processes
Digressing slightly here.....
It occurred to me that I had a coarser and more open "stone" available to me in the form of an old angle grinder disc. These things are something like 24grit.

Like the earlier tests, the "user interface" leaves a lot to be desired....... but it's only a test. I rotated the tool frequently in my hand to distribute the wear. That way I still might be able to use it as a wheel some day
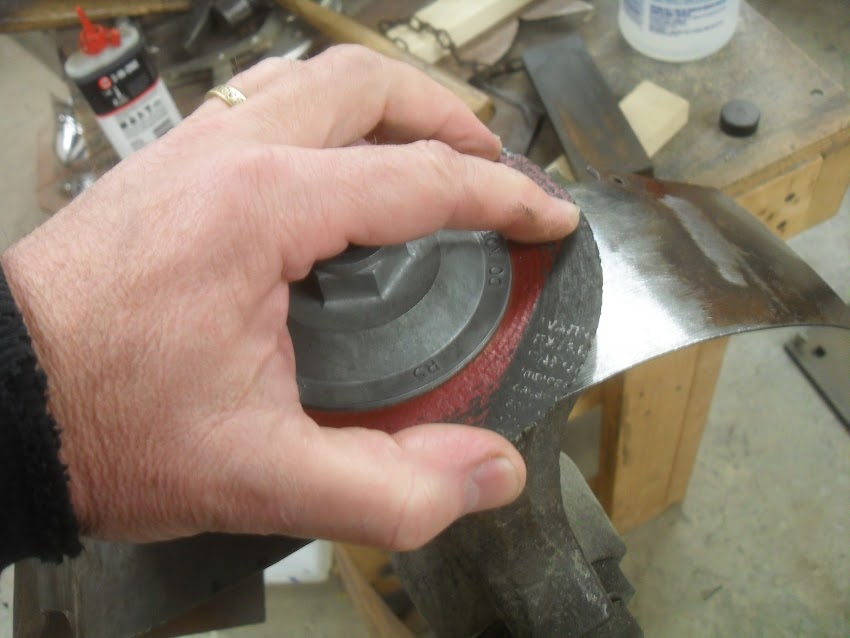
The results were pretty encouraging. I spent a few minutes scrubbing at this plate and managed to remove the hammer marks, and the scratches look really "official". I used water as a lubricant, but I'm not convinced that it was necessary. The wheel showed no sign of wanting to clog.

The coarser grit and more open bond let me remove a lot more metal than with the whetstone. Now, that said, the going was not that easy and I can see where this would get pretty old pretty fast if this is what you did all day. But, with some hands-free method to hold the work and a way to get two hands on the tool, I think it's doable.
So... does anyone here have a good idea how to get a couple of chunks of Naxos emery about a palmo or two across? Failing that, does anyone know how emery from other locations compares with the stuff from Naxos?
Mac
It occurred to me that I had a coarser and more open "stone" available to me in the form of an old angle grinder disc. These things are something like 24grit.
Like the earlier tests, the "user interface" leaves a lot to be desired....... but it's only a test. I rotated the tool frequently in my hand to distribute the wear. That way I still might be able to use it as a wheel some day
The results were pretty encouraging. I spent a few minutes scrubbing at this plate and managed to remove the hammer marks, and the scratches look really "official". I used water as a lubricant, but I'm not convinced that it was necessary. The wheel showed no sign of wanting to clog.
The coarser grit and more open bond let me remove a lot more metal than with the whetstone. Now, that said, the going was not that easy and I can see where this would get pretty old pretty fast if this is what you did all day. But, with some hands-free method to hold the work and a way to get two hands on the tool, I think it's doable.
So... does anyone here have a good idea how to get a couple of chunks of Naxos emery about a palmo or two across? Failing that, does anyone know how emery from other locations compares with the stuff from Naxos?
Mac
Robert MacPherson
The craftsmen of old had their secrets, and those secrets died with them. We are not the better for that, and neither are they.
http://www.lightlink.com/armory/
http://www.billyandcharlie.com
https://www.facebook.com/BillyAndCharlie
The craftsmen of old had their secrets, and those secrets died with them. We are not the better for that, and neither are they.
http://www.lightlink.com/armory/
http://www.billyandcharlie.com
https://www.facebook.com/BillyAndCharlie
-
Kristoffer
- Archive Member
- Posts: 1697
- Joined: Sat Sep 09, 2000 1:01 am
- Location: Ostersund - Sweden
- Contact:
Re: Traditional Armor Finishing Processes
Perhaps a fire brick could work?
Apparently emery is used for sandblasting on occasion. I wonder if they pulverize it abroad or if companies can get the raw mineral. My supplier has two versions of the ground stuff. One contains iron and one does not..
Apparently emery is used for sandblasting on occasion. I wonder if they pulverize it abroad or if companies can get the raw mineral. My supplier has two versions of the ground stuff. One contains iron and one does not..
Kristoffer Metsälä
-
Jason Grimes
- Archive Member
- Posts: 2387
- Joined: Wed Jul 25, 2001 1:01 am
- Location: Fairbanks, AK, USA
- Contact:
Re: Traditional Armor Finishing Processes
I don't know if this will add much but here is a closeup from the Bargello:
Shows a man sharpening razors(?) to use them for torturing. What interested me was again the bowl with oil(?) and the honing stones.
- Bargello.jpg (82.2 KiB) Viewed 6813 times
Jason
Re: Traditional Armor Finishing Processes
That's an interesting image, Jason. I'm not sure I've ever seen a medieval or renaissance depiction of a whetstone in use.
The other oddity is that he seems to have a little square white "plaster" covering some small wound on his leg. Has anyone else here ever seen a 15th C Band-aid?
Are there any other goodies in the rest of the painting. I tried to search it out but came up dry. I figured it was a Martyrdom of St. Bartholomew, but no matter how I spelled it in the search string with Bargello, I got nothing useful.
Mac
Robert MacPherson
The craftsmen of old had their secrets, and those secrets died with them. We are not the better for that, and neither are they.
http://www.lightlink.com/armory/
http://www.billyandcharlie.com
https://www.facebook.com/BillyAndCharlie
The craftsmen of old had their secrets, and those secrets died with them. We are not the better for that, and neither are they.
http://www.lightlink.com/armory/
http://www.billyandcharlie.com
https://www.facebook.com/BillyAndCharlie
-
Kristoffer
- Archive Member
- Posts: 1697
- Joined: Sat Sep 09, 2000 1:01 am
- Location: Ostersund - Sweden
- Contact:
Re: Traditional Armor Finishing Processes
Looks like he cut himself while shaving his legs and put a piece of paper on the cut. 
Kristoffer Metsälä
-
Jason Grimes
- Archive Member
- Posts: 2387
- Joined: Wed Jul 25, 2001 1:01 am
- Location: Fairbanks, AK, USA
- Contact:
Re: Traditional Armor Finishing Processes
Sorry, it's from the "Martyrdom of St. Caterina (Catherine?)".
I agree with Xtracted, looks like he was testing the razors on his legs and they are so sharp that he cut himself. I was thinking it was another bit of commentary to show the amount of misery that Caterina is going through. It's interesting that we do the same thing today, although with a bit of toilet paper. 
https://www.flickr.com/photos/andrea_ca ... 611038449/
- Bargello2.jpg (55.41 KiB) Viewed 6769 times
https://www.flickr.com/photos/andrea_ca ... 611038449/
Jason
-
John Vernier
- Archive Member
- Posts: 232
- Joined: Mon Mar 14, 2011 5:57 pm
- Location: south central Indiana
Re: Traditional Armor Finishing Processes
As the discussion of the Stradanus engraving was getting a bit "grassy knoll" in the close readings, it's good to note that the Worcester Art Museum has acquired a copy of the print to enhance the armor collection absorbed from the Higgins. Here's a notice from Jeffrey Forgeng about the print:
http://wamupdates.worcesterart.org/2015 ... ed-it.html
If a visit to the print room, or a request for closer photography, would improve our understanding, this might be an approachable copy of the print.
http://wamupdates.worcesterart.org/2015 ... ed-it.html
If a visit to the print room, or a request for closer photography, would improve our understanding, this might be an approachable copy of the print.
Re: Traditional Armor Finishing Processes
Since you're here, John... What's your take on these wheels? ... and what do you suppose the "potato chips" are about?
Mac
Mac
Robert MacPherson
The craftsmen of old had their secrets, and those secrets died with them. We are not the better for that, and neither are they.
http://www.lightlink.com/armory/
http://www.billyandcharlie.com
https://www.facebook.com/BillyAndCharlie
The craftsmen of old had their secrets, and those secrets died with them. We are not the better for that, and neither are they.
http://www.lightlink.com/armory/
http://www.billyandcharlie.com
https://www.facebook.com/BillyAndCharlie
-
John Vernier
- Archive Member
- Posts: 232
- Joined: Mon Mar 14, 2011 5:57 pm
- Location: south central Indiana
Re: Traditional Armor Finishing Processes
Mac, I don't have any very original ideas about the wheels. I think that if we take what we know about 19th century grinding technology, about which we seem to have a lot of information (the videos from the Solingen cutlery museum, e.g., are very good, and there is plenty of evidence for large solid stone wheels and smaller wooden set-up wheels) - what we have is a technology which could go back to the middle ages without much evidence of development except for details like motive power and ready access to walrus hide. Is there anything in the early evidence which suggests it must be very different from that? I don't think so. Your evidence for metal substrate grinding is intriguing but aside from Holtzapffel, who obviously delved into every obscure corner of the trades, do we know anything about which trades were using these techniques?
As for the potato chips, I like your suggestion about the flints. You dismissed that idea because only one would be needed, but I don't buy that. I've worked in shops where little oddments stack up in abandoned piles - nubs of buffing compound, old hacksaw blades used for dressing wheels - and it seems totally normal to me that stones would pile up. I think you would want a stone with a fresh edge, which would wear quickly, to dress a wheel, and at some point you need to get a fresh stone or take your pile of pebbles out back and do some flint knapping. Maybe that's the sort of thing you do once a day or once a week, but in the meanwhile you've got a pile of stones.
As for the potato chips, I like your suggestion about the flints. You dismissed that idea because only one would be needed, but I don't buy that. I've worked in shops where little oddments stack up in abandoned piles - nubs of buffing compound, old hacksaw blades used for dressing wheels - and it seems totally normal to me that stones would pile up. I think you would want a stone with a fresh edge, which would wear quickly, to dress a wheel, and at some point you need to get a fresh stone or take your pile of pebbles out back and do some flint knapping. Maybe that's the sort of thing you do once a day or once a week, but in the meanwhile you've got a pile of stones.
-
Jason Grimes
- Archive Member
- Posts: 2387
- Joined: Wed Jul 25, 2001 1:01 am
- Location: Fairbanks, AK, USA
- Contact:
Re: Traditional Armor Finishing Processes
John's comment on piles of stones made me think about something. The pallet thing that I thought was cloth next to the rear polisher, maybe it's a slab of slate or other stone that could be used to grind the grit into finer grades? I'm thinking that it might be similar to how painters grind their pigments. I always assumed that they would use a mortar and pestle, but maybe that's not the tool for these kind of jobs?
Jason
-
johnameyer
- Archive Member
- Posts: 176
- Joined: Sat Nov 07, 2009 1:52 am
- Location: Buffalo, NY
Re: Traditional Armor Finishing Processes
what if the "pallet" is a large stone for dressing the other stones back to flat? Assuming you'd be using the small stones to work odd angles and such theyre going to wear at odd irregular rates so i imagine dressing would be a frequent issue.
Cliff side armoury
https://www.facebook.com/Cliffsidearmoury?ref=hl
https://www.facebook.com/Cliffsidearmoury?ref=hl
Re: Traditional Armor Finishing Processes
Digressing again.....
I made up a test tool earlier today. It will (I hope) serve two purposes. The first is to see whether or not it's possible that the polishing sticks we see in the Hausbuch drawings (and elsewhere) can be made to work with a metallic sole.

The second is to test four likely metals.
Copper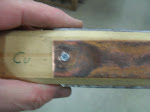 Tin
Tin  Lead
Lead  Tin/Lead pewter
I hope to make some tests this evening, and will report later.
Mac
I made up a test tool earlier today. It will (I hope) serve two purposes. The first is to see whether or not it's possible that the polishing sticks we see in the Hausbuch drawings (and elsewhere) can be made to work with a metallic sole.
The second is to test four likely metals.
Copper
Tin Lead Tin/Lead pewter I hope to make some tests this evening, and will report later.
Mac
Robert MacPherson
The craftsmen of old had their secrets, and those secrets died with them. We are not the better for that, and neither are they.
http://www.lightlink.com/armory/
http://www.billyandcharlie.com
https://www.facebook.com/BillyAndCharlie
The craftsmen of old had their secrets, and those secrets died with them. We are not the better for that, and neither are they.
http://www.lightlink.com/armory/
http://www.billyandcharlie.com
https://www.facebook.com/BillyAndCharlie
Re: Traditional Armor Finishing Processes
I admit it's a bit of a stretch. The only things we have to support the use of laps are the indirect evidence of objects that may have been abraded that way. We have engraved stones, which almost certainly were cut with a lathe using copper or soft iron wheels...John Vernier wrote: Your evidence for metal substrate grinding is intriguing but aside from Holtzapffel, who obviously delved into every obscure corner of the trades, do we know anything about which trades were using these techniques?

....and we have the so called engraved lines on armor, which I suspect were cut with narrow copper wheels.
The other thing we may have is this inventory entry from 1514. From Ffoulkes https://archive.org/stream/cu3192403068 ... 5/mode/2up
The tin might be for the bearings, and it might be for tinning of plates etc., but it might be for making the tires of the polishing wheels. It's a long shot, but there's not much low hanging fruit to be picked.9 July, to fohn Blewbery.
For a millwheel with stondard, 2 beams & brasys [braces]
belonging thereto and two small wheels to drive the
glasys 40s.
For two elm planks for lanterns for the same mill 5s.
13 lbs. of tin at 5d. a lb. 5s. ^d.
Mac
Robert MacPherson
The craftsmen of old had their secrets, and those secrets died with them. We are not the better for that, and neither are they.
http://www.lightlink.com/armory/
http://www.billyandcharlie.com
https://www.facebook.com/BillyAndCharlie
The craftsmen of old had their secrets, and those secrets died with them. We are not the better for that, and neither are they.
http://www.lightlink.com/armory/
http://www.billyandcharlie.com
https://www.facebook.com/BillyAndCharlie
-
Kristoffer
- Archive Member
- Posts: 1697
- Joined: Sat Sep 09, 2000 1:01 am
- Location: Ostersund - Sweden
- Contact:
Re: Traditional Armor Finishing Processes
One thing I thought of earlier regarding metal on the sticks Mac, was that it kinda looks like the metal is mounted with a distance from the stick. This would change the way it works a bit. Putting a nut between the metal blade an the wood where you have the screw would do this.
I believe this would allow you to reach tight spots better and allow the metal to flex both up and down to conforme to different curves in the armour.
I believe this would allow you to reach tight spots better and allow the metal to flex both up and down to conforme to different curves in the armour.
Kristoffer Metsälä
Re: Traditional Armor Finishing Processes
For my test, I used a scrap vambrace. This was prepared by applying a uniform 220gr scratch pattern at 90° to the long axis. I marked out four test fields and labeled them with the four metals represented on my tool. Each metal lap was oiled and dusted with a bit of loose 220gr aluminum oxide. I worked that into a slurry with my finger to get it distributed.
After about 30 seconds of lengthwise scrubbing with each metal, the specimen looked like this.

Here are images of each test patch after cleaning with oil and a paper towel. I also added labels closer to the test patches so they would show up in the pics.


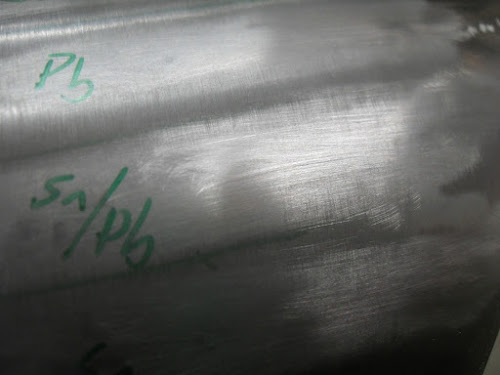

All of the laps performed OK. They were each able to efface the previous scratches. The three soft metals (Lead, Tin, and Tin/Lead pewter) worked quietly and softly, and left rather shallow scratches. The copper had a noisier and grittier action, and left deeper scratches.
In terms of rapid removal of material, the copper is a clear winner, but for one thing; the copper was also the metal which suffered the most abrasion from the process. I will get some pics of the laps up in a bit.
Mac
After about 30 seconds of lengthwise scrubbing with each metal, the specimen looked like this.
Here are images of each test patch after cleaning with oil and a paper towel. I also added labels closer to the test patches so they would show up in the pics.
All of the laps performed OK. They were each able to efface the previous scratches. The three soft metals (Lead, Tin, and Tin/Lead pewter) worked quietly and softly, and left rather shallow scratches. The copper had a noisier and grittier action, and left deeper scratches.
In terms of rapid removal of material, the copper is a clear winner, but for one thing; the copper was also the metal which suffered the most abrasion from the process. I will get some pics of the laps up in a bit.
Mac
Robert MacPherson
The craftsmen of old had their secrets, and those secrets died with them. We are not the better for that, and neither are they.
http://www.lightlink.com/armory/
http://www.billyandcharlie.com
https://www.facebook.com/BillyAndCharlie
The craftsmen of old had their secrets, and those secrets died with them. We are not the better for that, and neither are they.
http://www.lightlink.com/armory/
http://www.billyandcharlie.com
https://www.facebook.com/BillyAndCharlie
Re: Traditional Armor Finishing Processes
Here are pics of the metal laps after the test. They have been cleaned up with oil and a paper towel. It's hard to get good pics of the wear patterns, but in general, they consist of a combination of scratches and a sort of "orange peel" roughening. The copper is predominantly scratches. I presume this is because it is hard enough (even annealed as it is) that the grit does not really embed its self. The softer metals have fewer scratches and more of the general roughness. I believe this means that the grit had more or less embedded its self.


In most respects the three soft metals are more or less equivalent. The lead and the leaded pewter are a bit "silkier" feeling in their action than the tin, but the difference is slight. All things being equal, I would rather not introduce a process into the shop that produces finely divided lead as a byproduct, so I'm glad that neither the lead nor the leaded pewter are manifestly better than the tin.
The copper produces faster results, but it is more rapidly consumed than the other metals... at least at 220 grit.
I have another piece of the same 2x2 stick left over to make another test tool, and will try some lead-free pewter as well as some leather on that. Can anyone suggest any other materials to test? The tool has four faces.
Mac
Robert MacPherson
The craftsmen of old had their secrets, and those secrets died with them. We are not the better for that, and neither are they.
http://www.lightlink.com/armory/
http://www.billyandcharlie.com
https://www.facebook.com/BillyAndCharlie
The craftsmen of old had their secrets, and those secrets died with them. We are not the better for that, and neither are they.
http://www.lightlink.com/armory/
http://www.billyandcharlie.com
https://www.facebook.com/BillyAndCharlie
-
Jason Grimes
- Archive Member
- Posts: 2387
- Joined: Wed Jul 25, 2001 1:01 am
- Location: Fairbanks, AK, USA
- Contact:
Re: Traditional Armor Finishing Processes
Some heavy linen would be interesting, if you have some 5oz or so. Maybe wool as well, just to see if they even work at all.
Jason
-
John Vernier
- Archive Member
- Posts: 232
- Joined: Mon Mar 14, 2011 5:57 pm
- Location: south central Indiana
Re: Traditional Armor Finishing Processes
It might be worth trying abrasive on a bare wooden stick, if only for comparison, although I think a dense hardwood would give better results than pine.
-
Tom B.
- Archive Member
- Posts: 4532
- Joined: Mon Oct 17, 2005 4:15 am
- Location: Nicholasville, KY
- Contact:
Re: Traditional Armor Finishing Processes
Mac wrote: The other oddity is that he seems to have a little square white "plaster" covering some small wound on his leg. Has anyone else here ever seen a 15th C Band-aid?
Mac
Burial of Christ from a passover altar, late 15th / early 16th century, former Baden / CH, today in the museum in Dijon (Burgundy, F)

-
Jason Grimes
- Archive Member
- Posts: 2387
- Joined: Wed Jul 25, 2001 1:01 am
- Location: Fairbanks, AK, USA
- Contact:
Re: Traditional Armor Finishing Processes
Bone?Mac wrote:[
Can anyone suggest any other materials to test? The tool has four faces.
Mac
Jason
-
Keegan Ingrassia

- Archive Member
- Posts: 6422
- Joined: Thu Jul 16, 2009 4:07 pm
- Location: College Station, Texas (Shadowlands)
Re: Traditional Armor Finishing Processes
Oooh, nice idea! In a similar vein, how about horn?Jason Grimes wrote:Bone?Mac wrote:[
Can anyone suggest any other materials to test? The tool has four faces.
Mac
"There is a tremendous amount of information in a picture, but getting at it is not a purely passive process. You have to work at it, but the more you work at it the easier it becomes." - Mac
Re: Traditional Armor Finishing Processes
OK! There's some things to think about.
Bare wood sounds like an easy one to try. What I'd really like is endgrain mahogany. Hotzapffel mentions glassing wheels made that way. It's hard to image it as the surface of one of those polishing sticks, but for all we know that's how the big wheels are made. I'll start with a bit of birch plywood and see if that shows any promise.
I don't think fabric is going to do it in this particular application... and least not without gluing it down. I can try heavy wool felt, though.
Horn and Bone! I had not thought to go that way, but if I recall correctly, the old clock and watch guys used to sometime polish on laps made of ivory. That's not an option, but I half remember reading that some type of plastic makes a good substitute...... In any case, I'll look around and see if I can find a suitable piece of horn.
Mac
Robert MacPherson
The craftsmen of old had their secrets, and those secrets died with them. We are not the better for that, and neither are they.
http://www.lightlink.com/armory/
http://www.billyandcharlie.com
https://www.facebook.com/BillyAndCharlie
The craftsmen of old had their secrets, and those secrets died with them. We are not the better for that, and neither are they.
http://www.lightlink.com/armory/
http://www.billyandcharlie.com
https://www.facebook.com/BillyAndCharlie