Perhaps they were used as wheel rakes to clean off expended compound.Mac wrote:They might be stones, like the sort of thing that Sean M was talking about.Jason Grimes wrote:
I noticed that too, they appear too uniform in size and shape to be rags, etc. The polisher in the back has two more of them next to his bowl that also looks like they might be sitting on some cloth. Do you think they might be whetstones for polishing areas the wheel can't get to?
It seems a bit strange, though, to have them at the wheel like that. I'm not sure it makes the best sense from an efficiency standpoint to have the guy at the wheel stop and scrub at a spot by hand.... but who knows.
Mac
Traditional Armor Finishing Processes
Moderator: Glen K
Re: Traditional Armor Finishing Processes
-
Friethjoph
- Archive Member
- Posts: 135
- Joined: Fri Jan 06, 2017 6:27 am
- Location: Germany
Re: Traditional Armor Finishing Processes
Excuse my rude insertion, but I suggest to test something I know in Germany as "Schachtelhalm", or in latin Equisetum, for use as an abrasive on metal. In English you might find it under horsetail, snake grass or puzzlegrass. I do happen to know that it was used as 'sanding paper equivalent' in woodwork in the middle ages, but I sadly doubt that it can be used bound to a stick. They seem to have used especially Equisetum arvense, field horsetail or common horsetail, which in Germany has one name variant "Scheuerkraut" (~abrasive herb), as it is rich in mineral content. As Aunt Wikipedia told me just now, it was also used in pewter polishing under the name pewterwort.
The 1st rule of research is: Don't make assumptions!
The 2nd rule of research is: Don't make assumptions!
The 3rd rule of research: Don't cling to your theory
The 4th rule of research: Use Ockhams Razor.
The 5th and last rule: don't be a sore looser.
The 2nd rule of research is: Don't make assumptions!
The 3rd rule of research: Don't cling to your theory
The 4th rule of research: Use Ockhams Razor.
The 5th and last rule: don't be a sore looser.
Re: Traditional Armor Finishing Processes
Thanks, Friethjoph! I had not considered Equisetum. It seems like a pretty mild sort of abrasive. I wonder if it's aggressive enough for casual rust removal, though. Have you used it at all? I never have, but I think of it as a sort of "preindustrial glass brush".
Mac
Mac
Robert MacPherson
The craftsmen of old had their secrets, and those secrets died with them. We are not the better for that, and neither are they.
http://www.lightlink.com/armory/
http://www.billyandcharlie.com
https://www.facebook.com/BillyAndCharlie
The craftsmen of old had their secrets, and those secrets died with them. We are not the better for that, and neither are they.
http://www.lightlink.com/armory/
http://www.billyandcharlie.com
https://www.facebook.com/BillyAndCharlie
Re: Traditional Armor Finishing Processes
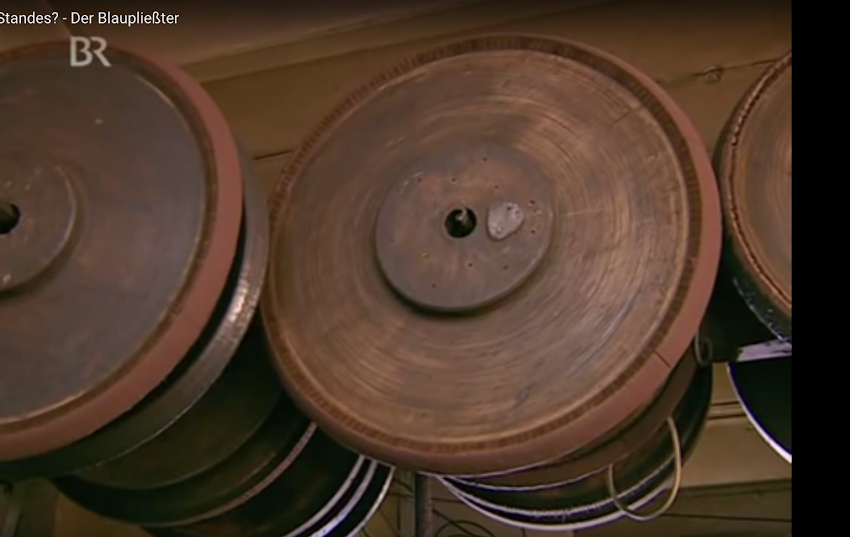
I found this today. https://www.youtube.com/watch?v=TzGpjAyx5xkThe video is primarily about re-tinning of copper vessels, but at the beginning there is some footage of a guy using a late 19th C (?) mobile sharpening cart. It's a glorious thing that any itinerant sharpener would be delighted to own .... but what caught my eye was the wheel. It bears a sort of resemblance to the ones used by the armor polishers. Here's a screen shot from 0:40.

It seems to be wood with some sort of rim. I can't tell if he's using the water drip on it of not, but I don't think so. He also have a "mystery biscuit" sitting next to the little vise. I suppose it's probably a whet stone, but the visual similarity to what we are seeing in the Stradanus print is striking.
Mac
Robert MacPherson
The craftsmen of old had their secrets, and those secrets died with them. We are not the better for that, and neither are they.
http://www.lightlink.com/armory/
http://www.billyandcharlie.com
https://www.facebook.com/BillyAndCharlie
The craftsmen of old had their secrets, and those secrets died with them. We are not the better for that, and neither are they.
http://www.lightlink.com/armory/
http://www.billyandcharlie.com
https://www.facebook.com/BillyAndCharlie
-
Tom B.
- Archive Member
- Posts: 4532
- Joined: Mon Oct 17, 2005 4:15 am
- Location: Nicholasville, KY
- Contact:
Re: Traditional Armor Finishing Processes
Hey Mac that video reminded me that some of the water powered trip hammer videos had footage of grinding.
I have not had a chance to look back through them yet, but here is a YouTube playlist I made a few years ago with 18 videos.
http://www.youtube.com/playlist?list=PL ... BrGtXDagrc
and here is the one from Goll's thesis
https://drive.google.com/file/d/0B7VQpD ... sp=sharing
I have not had a chance to look back through them yet, but here is a YouTube playlist I made a few years ago with 18 videos.
http://www.youtube.com/playlist?list=PL ... BrGtXDagrc
and here is the one from Goll's thesis
https://drive.google.com/file/d/0B7VQpD ... sp=sharing
Last edited by Tom B. on Mon Jan 09, 2017 3:25 pm, edited 1 time in total.
Re: Traditional Armor Finishing Processes
Splendid, Tom! Thanks.
I have started a couple of playlists that I will release later. The one is on tinning, and the other is about forming vessels under a hammer. I found a couple of Italian ones about making stuff in copper that fit in well with what we have on making iron vessels.
Mac
I have started a couple of playlists that I will release later. The one is on tinning, and the other is about forming vessels under a hammer. I found a couple of Italian ones about making stuff in copper that fit in well with what we have on making iron vessels.
Mac
Robert MacPherson
The craftsmen of old had their secrets, and those secrets died with them. We are not the better for that, and neither are they.
http://www.lightlink.com/armory/
http://www.billyandcharlie.com
https://www.facebook.com/BillyAndCharlie
The craftsmen of old had their secrets, and those secrets died with them. We are not the better for that, and neither are they.
http://www.lightlink.com/armory/
http://www.billyandcharlie.com
https://www.facebook.com/BillyAndCharlie
-
Friethjoph
- Archive Member
- Posts: 135
- Joined: Fri Jan 06, 2017 6:27 am
- Location: Germany
Re: Traditional Armor Finishing Processes
Up to now, only on wood, and there the effect was rather small (it's like a very very fine grit), more a fine smooth polishing. As on metal, not yet. But at the moment the supply of Equisetum arvense is a bit problematic due to cold temperatures and it being January. But I try to conduct an experiment with the dried herb once I can get my fingers on it again in the spring.Mac wrote:Thanks, Friethjoph! I had not considered Equisetum. It seems like a pretty mild sort of abrasive. I wonder if it's aggressive enough for casual rust removal, though. Have you used it at all? I never have, but I think of it as a sort of "preindustrial glass brush".
Mac
The 1st rule of research is: Don't make assumptions!
The 2nd rule of research is: Don't make assumptions!
The 3rd rule of research: Don't cling to your theory
The 4th rule of research: Use Ockhams Razor.
The 5th and last rule: don't be a sore looser.
The 2nd rule of research is: Don't make assumptions!
The 3rd rule of research: Don't cling to your theory
The 4th rule of research: Use Ockhams Razor.
The 5th and last rule: don't be a sore looser.
-
Mark D. Chapman
- Archive Member
- Posts: 173
- Joined: Fri Oct 31, 2003 2:01 am
- Location: USA
Re: Traditional Armor Finishing Processes
Years ago I tried this to reworks some heavilly rusted mild steel armour. I used iron oxide powder as the abrasive, oil to hold it on and a leather pad on the wooden stick. My recollection is that this did a good job and cleaned things up to where I could go back to standard polishing compounds for the finish.
Mark
Mark
Mark D. Chapman
Re: Traditional Armor Finishing Processes
Excellent! I look forward to hearing how it works.Friethjoph wrote: Up to now, only on wood, and there the effect was rather small (it's like a very very fine grit), more a fine smooth polishing. As on metal, not yet. But at the moment the supply of Equisetum arvense is a bit problematic due to cold temperatures and it being January. But I try to conduct an experiment with the dried herb once I can get my fingers on it again in the spring.
Mac
Robert MacPherson
The craftsmen of old had their secrets, and those secrets died with them. We are not the better for that, and neither are they.
http://www.lightlink.com/armory/
http://www.billyandcharlie.com
https://www.facebook.com/BillyAndCharlie
The craftsmen of old had their secrets, and those secrets died with them. We are not the better for that, and neither are they.
http://www.lightlink.com/armory/
http://www.billyandcharlie.com
https://www.facebook.com/BillyAndCharlie
Re: Traditional Armor Finishing Processes
I've done this as well, and had better results with water than with oil. The iron oxide I used was from a ceramic supply house, and was not so red as rouge, nor so dark as crocus. I think it must have been more or less equivalent to what the clock and watch guys used to call "red stuff".Mark D. Chapman wrote:Years ago I tried this to reworks some heavilly rusted mild steel armour. I used iron oxide powder as the abrasive, oil to hold it on and a leather pad on the wooden stick. My recollection is that this did a good job and cleaned things up to where I could go back to standard polishing compounds for the finish.
Mark
Mac
Robert MacPherson
The craftsmen of old had their secrets, and those secrets died with them. We are not the better for that, and neither are they.
http://www.lightlink.com/armory/
http://www.billyandcharlie.com
https://www.facebook.com/BillyAndCharlie
The craftsmen of old had their secrets, and those secrets died with them. We are not the better for that, and neither are they.
http://www.lightlink.com/armory/
http://www.billyandcharlie.com
https://www.facebook.com/BillyAndCharlie
-
Scott Martin

- Archive Member
- Posts: 1074
- Joined: Wed May 23, 2012 3:34 pm
- Location: Calgary AB, Canada
- Contact:
Re: Traditional Armor Finishing Processes
Hi MacMac wrote:OK! There's some things to think about.
Bare wood sounds like an easy one to try. What I'd really like is endgrain mahogany. Hotzapffel mentions glassing wheels made that way. It's hard to image it as the surface of one of those polishing sticks, but for all we know that's how the big wheels are made. I'll start with a bit of birch plywood and see if that shows any promise.
I don't think fabric is going to do it in this particular application... and least not without gluing it down. I can try heavy wool felt, though.
Horn and Bone! I had not thought to go that way, but if I recall correctly, the old clock and watch guys used to sometime polish on laps made of ivory. That's not an option, but I half remember reading that some type of plastic makes a good substitute...... In any case, I'll look around and see if I can find a suitable piece of horn.
Mac
Perhaps some UHMW polyethylene? It's probably soft enough that it would embed well, and "smooth" enough that it may work cleanly.
If you were closer I'd offer you some of the mahogany in my garage (as a fairly "soft" hardwood) and perhaps some of the oak and bubinga (Ironwood) as "hard" hardwoods.
Scott
-
Friethjoph
- Archive Member
- Posts: 135
- Joined: Fri Jan 06, 2017 6:27 am
- Location: Germany
Re: Traditional Armor Finishing Processes
Sadly, PE is not really 'period', don't you think? But mahagoni or other hardwoods do sound interesting, but that also holds true for well dried wood from the heart of a tree then.Scott Martin wrote:Hi MacMac wrote:OK! There's some things to think about.
Bare wood sounds like an easy one to try. What I'd really like is endgrain mahogany. Hotzapffel mentions glassing wheels made that way. It's hard to image it as the surface of one of those polishing sticks, but for all we know that's how the big wheels are made. I'll start with a bit of birch plywood and see if that shows any promise.
I don't think fabric is going to do it in this particular application... and least not without gluing it down. I can try heavy wool felt, though.
Horn and Bone! I had not thought to go that way, but if I recall correctly, the old clock and watch guys used to sometime polish on laps made of ivory. That's not an option, but I half remember reading that some type of plastic makes a good substitute...... In any case, I'll look around and see if I can find a suitable piece of horn.
Mac
Perhaps some UHMW polyethylene? It's probably soft enough that it would embed well, and "smooth" enough that it may work cleanly.
If you were closer I'd offer you some of the mahogany in my garage (as a fairly "soft" hardwood) and perhaps some of the oak and bubinga (Ironwood) as "hard" hardwoods.
Scott
The 1st rule of research is: Don't make assumptions!
The 2nd rule of research is: Don't make assumptions!
The 3rd rule of research: Don't cling to your theory
The 4th rule of research: Use Ockhams Razor.
The 5th and last rule: don't be a sore looser.
The 2nd rule of research is: Don't make assumptions!
The 3rd rule of research: Don't cling to your theory
The 4th rule of research: Use Ockhams Razor.
The 5th and last rule: don't be a sore looser.
-
Christian Wiedner

- Archive Member
- Posts: 263
- Joined: Wed Mar 18, 2009 7:33 pm
- Location: Germany
- Contact:
Re: Traditional Armor Finishing Processes
I found another one... sort ofMac wrote:I'm not sure I've ever seen a medieval or renaissance depiction of a whetstone in use.Mac
- Whetstone.jpg (93.67 KiB) Viewed 7123 times
Re: Traditional Armor Finishing Processes
Indeed! I had not really thought about scythe sharpeners, although I think I've seen a few of them. I mostly don't pay much attention to the mowers unless they are peening their blades on one of those little anvils they carry into the field with them.
Mac
Mac
Robert MacPherson
The craftsmen of old had their secrets, and those secrets died with them. We are not the better for that, and neither are they.
http://www.lightlink.com/armory/
http://www.billyandcharlie.com
https://www.facebook.com/BillyAndCharlie
The craftsmen of old had their secrets, and those secrets died with them. We are not the better for that, and neither are they.
http://www.lightlink.com/armory/
http://www.billyandcharlie.com
https://www.facebook.com/BillyAndCharlie
-
Tom B.
- Archive Member
- Posts: 4532
- Joined: Mon Oct 17, 2005 4:15 am
- Location: Nicholasville, KY
- Contact:
Re: Traditional Armor Finishing Processes
You guys have to watch this German knife grinding video!!!
http://www.baufun.de/interessantes/der-blaupliesster
Some screen shots

http://www.baufun.de/interessantes/der-blaupliesster
Some screen shots
Re: Traditional Armor Finishing Processes
B. Rime on the Arms & Armour Forum found a video of removing the wrapper plate from an armet and showing that you can read a watch in the reflection of the best preserved spot. It was the video "A visit to the Armour Gallery" from the Met starting at 12:00 https://www.youtube.com/watch?v=NjKbi7Y ... e&t=11m51s


Who here has academic contacts at the Met? I think we want the original frames (not a degraded-for-youtube digital version) and any still photos and notes which they took at the same time. Can we figure out the catalogue number of that armet? I don't know armour after 1410.
Who here has academic contacts at the Met? I think we want the original frames (not a degraded-for-youtube digital version) and any still photos and notes which they took at the same time. Can we figure out the catalogue number of that armet? I don't know armour after 1410.
Last edited by Sean M on Sat Oct 09, 2021 11:11 am, edited 1 time in total.
DIS MANIBUS GUILLELMI GENTIS MCLEANUM FAMILIARITER GALLERON DICTI
VIR OMNIBUS ARTIBUS PERITUS
Check out Age of Datini: European Material Culture 1360-1410
VIR OMNIBUS ARTIBUS PERITUS
Check out Age of Datini: European Material Culture 1360-1410
-
Thomas Powers
- Archive Member
- Posts: 13112
- Joined: Fri Aug 11, 2000 1:01 am
- Location: Socorro, New Mexico
Re: Traditional Armor Finishing Processes
Blacksmiths produce quite a bit of Iron Oxide of the magnetite variety, known as scale, It does a good job of polishing the face of an anvil in use and will actually polish our fine pitting from condensation rusting. (I have an anvil face I have been polishing out this way---nice and shiny in the sweet spot) For finer use a mortar and pestle might work as well as sifting the results. As I recall Theophilus suggested powdered roman tiles or bricks for polishing
-
Friethjoph
- Archive Member
- Posts: 135
- Joined: Fri Jan 06, 2017 6:27 am
- Location: Germany
Re: Traditional Armor Finishing Processes
Roman brick were 1.5x1 roman feet (1 Roman foot is 275 mm; 1 modern foot is 304.5 mm), at times with square shape, their thickness varies greatly but is usually relative thin. Because of this, roman bricks and tiles are pretty much the same and at times only referred to under the term "ceramic building material".
Sherwood, Nikolic, Humphrey & Oleson quote several (antic) authors, naming two main types of roman brick: unbaked mud brick/sun dried brick (which was no longer used at Vitruvius time) and baked brick. They say he named "good clay" as the source material.
More elaborate is Özlem Aslan Özkaya, page 8:
More in-depth analysis of the material can be found on page 39 following, where experimental roman bricks are evaluated, including grain size and composition.In the production of bricks, natural raw material sources containing quartz, feldspar and clay are used. Of these raw materials, clays provide the plastic quality (gives the shape), feldspars reduce the melting temperature whereas quartz forms the porosity as a filling material. The bricks are produced through the processes of mixing the raw materials with water after being sifted, shaping, drying and baking. When the clays are baked at the temperatures of 450-900 °C based on their type, their crystal structures are collapsed and then turn to amorf structures made up of silicate and aluminate (He et al. 1995). At higher temperatures, some stable minerals such as mullite and kristobalite are formed (Lee et al. 1999).
Several pages are dedicated to the chemical compounds in different bricks, the following pages (pages 45 to 53, 58 to 60) contain images with grain sizes in the bricks next to the chemical composition. The grains are in the 10 µm to 200 µm scale, most seeming to be in the 20 to 75 µm range.Color, composition and mechanical properties of bricks depend on the raw materials, kiln environment, operators, temperature and firing process and nature of the temper (quartz, carbonates, shards, grounded fired clays) (Cardiano et al. 2004).
In this section experimental results of main physical, mineralogical, chemical and microstructural properties of Roman bricks are discussed in relation to these characteristics.
The 1st rule of research is: Don't make assumptions!
The 2nd rule of research is: Don't make assumptions!
The 3rd rule of research: Don't cling to your theory
The 4th rule of research: Use Ockhams Razor.
The 5th and last rule: don't be a sore looser.
The 2nd rule of research is: Don't make assumptions!
The 3rd rule of research: Don't cling to your theory
The 4th rule of research: Use Ockhams Razor.
The 5th and last rule: don't be a sore looser.
Re: Traditional Armor Finishing Processes
Mappae Clavicula (oldest extant version is a Latin manuscript from around 800 AD) tr. Smith and Hawthorne wrote: 145. Emery plates
Make a plate of lead. Take live emery, grind it well, and sprinkle the whole plate, rubbing glass down onto it at the same time, until the emery powder is embedded into the plate. After this work whatever is necessary, using water.
...
146-D. On [polishing] glass
Glass, however, should be rubbed into shape on sandstone; then to smoothness with fine sandstone powder on lead. Then [while it is held] on a small pointed stick of wood, the work is completed by rubbing it on an antique sherd as on a whetstone, with water; finally it receives its brilliant polish on Cimolian earth, and this [too while it is held] on a small pointed stick of wood.
146-E. How emery stone is prepared for polishing gems
The emery stone is broken into a very fine powder, using a hammer on a hard anvil. And there should be a lead plate, which is fixed onto a wooden bench; and the powder of the [emery] stone is sprinkled on the plate and every kind of gem stone may be brought to shape on it. They are rubbed, with water, until they take on the shape that the engraver wishes to give them. Then the same powder is taken and washed; and the part that is the finest is put on another lead sheet, and any kind of gem stone is rubbed on it until it is perfectly smooth.
146-F. How unpolished gems ought to be held for polishing
A piece of wood is taken, as thick as the little finger, as long as the width of a palm; and on its tip is placed hot pitch, mixed with ground-up tile- this mixture should have two parts of tile powder and a third one of pitch. After the mixture is heated [and placed on the stick], the gem stone that is to be polished should be applied so that it sticks to it.
From Cyril Stanley Smith and John G. Hawthorne, "Mappae Clavicula: A Little Key to the World of Medieval Techniques," Transactions of the American Philosophical Society, Vol. 64, No. 4 (1974), pp. 1-128. Their manuscript comes from around the 12th century.
It looks like the Mendel brothers had taken to fastening the armour to the workbench and the plate with the emery powder to the stick.
DIS MANIBUS GUILLELMI GENTIS MCLEANUM FAMILIARITER GALLERON DICTI
VIR OMNIBUS ARTIBUS PERITUS
Check out Age of Datini: European Material Culture 1360-1410
VIR OMNIBUS ARTIBUS PERITUS
Check out Age of Datini: European Material Culture 1360-1410
Re: Traditional Armor Finishing Processes
Splendid, Sean!
This seems to indicate that the lead lap was well enough known by time of plate armor. I had not done any of this recent series of experiments with water as a lubricant, but I imagine it will cut more aggressively and leave a brighter finish than oil. I'll give it a try when I get a chance.
Mac
This seems to indicate that the lead lap was well enough known by time of plate armor. I had not done any of this recent series of experiments with water as a lubricant, but I imagine it will cut more aggressively and leave a brighter finish than oil. I'll give it a try when I get a chance.
Mac
Robert MacPherson
The craftsmen of old had their secrets, and those secrets died with them. We are not the better for that, and neither are they.
http://www.lightlink.com/armory/
http://www.billyandcharlie.com
https://www.facebook.com/BillyAndCharlie
The craftsmen of old had their secrets, and those secrets died with them. We are not the better for that, and neither are they.
http://www.lightlink.com/armory/
http://www.billyandcharlie.com
https://www.facebook.com/BillyAndCharlie
Re: Traditional Armor Finishing Processes
Now... if we could understand exactly how they were fastening the work to the bench, we could get both hands on the stick/file and really go to town. I don't think a scaled up version of the way the Mappae Clavicula author tells us to use pitch to attach a stone to a dap stick will work, but who knows... it might.Sean M wrote: It looks like the Mendel brothers had taken to fastening the armour to the workbench and the plate with the emery powder to the stick.
Mac
Robert MacPherson
The craftsmen of old had their secrets, and those secrets died with them. We are not the better for that, and neither are they.
http://www.lightlink.com/armory/
http://www.billyandcharlie.com
https://www.facebook.com/BillyAndCharlie
The craftsmen of old had their secrets, and those secrets died with them. We are not the better for that, and neither are they.
http://www.lightlink.com/armory/
http://www.billyandcharlie.com
https://www.facebook.com/BillyAndCharlie
Re: Traditional Armor Finishing Processes
You are welcome Mac! The editors warn that the people who wrote down the recipes had not necessarily tried them all, and once they were written down they kept being copied whether or not anyone was using that technique any more, but it at least confirms that some polishers used metal laps with powdered stone and water before the 14th century. I am sure that some tried different metals, or different lubricants, or different powders.
DIS MANIBUS GUILLELMI GENTIS MCLEANUM FAMILIARITER GALLERON DICTI
VIR OMNIBUS ARTIBUS PERITUS
Check out Age of Datini: European Material Culture 1360-1410
VIR OMNIBUS ARTIBUS PERITUS
Check out Age of Datini: European Material Culture 1360-1410
-
Tom B.
- Archive Member
- Posts: 4532
- Joined: Mon Oct 17, 2005 4:15 am
- Location: Nicholasville, KY
- Contact:
Re: Traditional Armor Finishing Processes
So looking back at the Die Hausbücher images of the guys using the polishing sticks Mac posted on page 1.Mac wrote:Now... if we could understand exactly how they were fastening the work to the bench, we could get both hands on the stick/file and really go to town. I don't think a scaled up version of the way the Mappae Clavicula author tells us to use pitch to attach a stone to a dap stick will work, but who knows... it might.Sean M wrote: It looks like the Mendel brothers had taken to fastening the armour to the workbench and the plate with the emery powder to the stick.
Mac
The armour to be polished always seems to be resting/attached to a piece of wood and this support piece is usually held to the bench by "bench dogs"
Do you think the polishing is done in only one direction a push away from the the worker, like most of the other trades using bench & bench dogs?


It also looks like some of the armour polishers' benches are sloped, with the worker on the high end pushing down hill.
This may account for the angle on some of the bench dogs, they are not perpendicular to the bench surface.

Still the big question is how the armour is attached to the support piece.
For some pieces do you think that with the right shaped support piece there may not be a need for attachment?
I can see that for some shapes the downward pressure from the polishing stick would keep them in place but this would not work for many if not most pieces.
What do you guys think about there being lots of what appears to be fully assembled pieces in these images?
Modernly we usually polish each piece of an assembly separately.
Am I trying to read too much into this? Is this just the artist simplifying things?
For example look at the fully assembled armour pieces on the wall in the image below

Re: Traditional Armor Finishing Processes
It certainly resembles a sort of planing process. I've always been torn about whether I think the bench really is shorter in front or whether that's just about early 15th C perspective.
Here is another one of a guy polishing a spaulder, but this time it's clearly made up of several lames. His bench is set up with holes for dogs in more than one location, and the armor seems to be attached to a board. We can see how the board is secured to the bench, but we don't know is how the armor is secured to the board. I suppose it might be nailed down through any of the holes that armor normally has. It might even be "glued" on with pitch like the way one "daps" a gemstone. Our artist has not really thrown us a bone here.

The part where he is working on an assembly suggests that he is re-polishing, rather than polishing ab initio, since he can not get at the underlaps this way.
In the image below, the polisher is also using dogs to restrain the armor, but in this case they are applied directly to the work. The other difference we see here is that the bench is clearly parallel to the ground. This may be taken as evidence that the the Hausbuch benches are parallel, or it may be that different shops had different practices. It may be significant that this polisher sits on his bench, and the Hausbuch guys stand behind theirs.

Mac
Here is another one of a guy polishing a spaulder, but this time it's clearly made up of several lames. His bench is set up with holes for dogs in more than one location, and the armor seems to be attached to a board. We can see how the board is secured to the bench, but we don't know is how the armor is secured to the board. I suppose it might be nailed down through any of the holes that armor normally has. It might even be "glued" on with pitch like the way one "daps" a gemstone. Our artist has not really thrown us a bone here.
The part where he is working on an assembly suggests that he is re-polishing, rather than polishing ab initio, since he can not get at the underlaps this way.
In the image below, the polisher is also using dogs to restrain the armor, but in this case they are applied directly to the work. The other difference we see here is that the bench is clearly parallel to the ground. This may be taken as evidence that the the Hausbuch benches are parallel, or it may be that different shops had different practices. It may be significant that this polisher sits on his bench, and the Hausbuch guys stand behind theirs.
Mac
Robert MacPherson
The craftsmen of old had their secrets, and those secrets died with them. We are not the better for that, and neither are they.
http://www.lightlink.com/armory/
http://www.billyandcharlie.com
https://www.facebook.com/BillyAndCharlie
The craftsmen of old had their secrets, and those secrets died with them. We are not the better for that, and neither are they.
http://www.lightlink.com/armory/
http://www.billyandcharlie.com
https://www.facebook.com/BillyAndCharlie
-
Tom B.
- Archive Member
- Posts: 4532
- Joined: Mon Oct 17, 2005 4:15 am
- Location: Nicholasville, KY
- Contact:
Re: Traditional Armor Finishing Processes
I did consider the that the sloped benches might just badly done attempts at perspective.
Some of the images look more like bad perspective and some less so.
I also just noticed that this guy has what looks to be a painted cervelliere on his table.
Some of the images look more like bad perspective and some less so.
I also just noticed that this guy has what looks to be a painted cervelliere on his table.
Re: Traditional Armor Finishing Processes
I'd be more willing to write it off as a perspective error if I didn't think it might be ergonomically better for a workman who is standing. I mean to try it out some day, but that presumes we can figure out how to secure the work. Perhaps there is no good reason that the one experiment must wait for another, though. Maybe I can rig up a test without worrying about how they really secured the work.
The helmet is interesting. It probably is painted, but I had always assumed that it was an early example of "black and white"; and that the black squares were slightly recessed. I don't know why I assumed that, since paint is a pretty obvious idea and we can be more confident of it at this date.
Mac
Robert MacPherson
The craftsmen of old had their secrets, and those secrets died with them. We are not the better for that, and neither are they.
http://www.lightlink.com/armory/
http://www.billyandcharlie.com
https://www.facebook.com/BillyAndCharlie
The craftsmen of old had their secrets, and those secrets died with them. We are not the better for that, and neither are they.
http://www.lightlink.com/armory/
http://www.billyandcharlie.com
https://www.facebook.com/BillyAndCharlie
-
Jason Grimes

- Archive Member
- Posts: 2387
- Joined: Wed Jul 25, 2001 1:01 am
- Location: Fairbanks, AK, USA
- Contact:
Re: Traditional Armor Finishing Processes
I always assumed that it was one of those scale helmets that you often see in artwork at this time. Maybe the different colors represent different materials? All the armour looks very Kastenbrusty.
Jason
-
Jason Grimes
- Archive Member
- Posts: 2387
- Joined: Wed Jul 25, 2001 1:01 am
- Location: Fairbanks, AK, USA
- Contact:
Re: Traditional Armor Finishing Processes
On the workbenches, I don't think we are seeing a bad perspective as in other parts of the same images you can see good perspective. It looks to me that they were making a conscious choice of making the legs in different sizes. On the other images of the wood workers, etc. you can see that the bench legs are close to the same size, for both short legs and long legs.
Jason
Re: Traditional Armor Finishing Processes
I too think that completed armour parts are secured to the bench using existing holes and or straps and leathers tabs, the polisher can use a iron wire or other strings to tie the plates in place. I just don't think that parts like spaulders or arms are secured to a table like those depicted, because in this way it would be hard to polish the sides near the table. Maybe they had wooden stakes to hold some pieces to better reach all the surfaces, or simply thinner boards that do not obstacle the work.
Re: Traditional Armor Finishing Processes
I'm worried about how to do the sides without running into the bench as well. Perhaps the polisher has a fleet of specialized boards to which different sorts of work are secured. I imagine one sort of board for the middles of spaulders and another for the sides. Yet others might accommodate different sorts of helmets etc., and all of them would be fastened to the bench with dogs.
Mac
Mac
Robert MacPherson
The craftsmen of old had their secrets, and those secrets died with them. We are not the better for that, and neither are they.
http://www.lightlink.com/armory/
http://www.billyandcharlie.com
https://www.facebook.com/BillyAndCharlie
The craftsmen of old had their secrets, and those secrets died with them. We are not the better for that, and neither are they.
http://www.lightlink.com/armory/
http://www.billyandcharlie.com
https://www.facebook.com/BillyAndCharlie
Re: Traditional Armor Finishing Processes
I agree, we must remember that that was a serial job, not a "one of a kind" production, so probably they had dedicated setups for different parts.
-
Jason Grimes
- Archive Member
- Posts: 2387
- Joined: Wed Jul 25, 2001 1:01 am
- Location: Fairbanks, AK, USA
- Contact:
Re: Traditional Armor Finishing Processes
Interesting idea, very much like the knife grinder having a specific board to hold each of the different blanks when he is grinding them? The drawing of the polisher who is polishing the frog-mouthed helmet is using a much larger, more square shaped board to hold it. You could probably get away with having general shapes that would work across many different plate types. I was also thinking that you could use a strap that you hold down with your foot to keep the parts from moving?
Jason
-
John Vernier
- Archive Member
- Posts: 232
- Joined: Mon Mar 14, 2011 5:57 pm
- Location: south central Indiana
Re: Traditional Armor Finishing Processes
I used traditional Japanese pitch for holding small repousee work when I was studying metalsmithing. The formulation reminds me of that in the Mappae Clavicula text, pine resin mixed with brick dust and carbon black to stiffen it, and a vegetable oil to make it less brittle. I sourced some equivalent materials readily available through US artists' and chemical suppliers so we could make a large batch for the classroom. Lump resin from a printmakers' supply house, inexpensive red earth pigment in place of the brick dust, lampblack to darken the color, and any cheap vegetable oil. It worked pretty well, however both the traditional pitch and our updated version were quite messy. It takes a fair amount of heat to stick a piece of metalwork to the pitch block, and careful heat management is called for (we were using Prest-O-Lite torches, which made this easy). Inevitably a lot of residue would remain on the back of a piece which had been un-stuck. It is easy enough to remove with lacquer thinner, but I think it would be extremely awkward to manage without the modern solvents (you can burn it off), and the prospect of getting pitch stuck on articulating leathers or cloth linings makes this sound like a very unappealing method for holding assembled armor elements the way that the Mendel Hausbuch polishers seem to be doing. It would also be a very slow way to work. So I'm doubting that pitch was used in this way, I'm sure they would have devised something more efficient, like the support boards being discussed.
-
Jason Grimes
- Archive Member
- Posts: 2387
- Joined: Wed Jul 25, 2001 1:01 am
- Location: Fairbanks, AK, USA
- Contact:
Re: Traditional Armor Finishing Processes
For lames you might be able to have a wooden board with a couple of holes drilled that matched the holes in the lame. You could then use little wooden pegs to hold the lame to the board. The pegs wouldn't interfere with the polishing and would just be ground the same as the metal. Once the polish is finished you could pop the lame off and remove the pegs (or maybe just leave them in?). The holes could be drilled as needed, after several jobs you would have a large range of hole positions and wouldn't need to drill as many new ones.
Jason